Colm & Neimi Infernal Guide and Recommended Team (Bound Hero Battle)
★ Latest Banners: Tiki: Everlasting Voice | Springtime Sisters
☆ New: Mythic Tiki (Adult) | Spring Thórr, Spring Dorothea, Spring Sothe, Spring Eirika
★ Free Units: Spring Bernadetta
☆ State of the Meta (February 2026)

This is a guide to clearing the Infernal and Lunatic maps for Colm and Neimi in Fire Emblem Heroes (FEH). To see strategy for defeating Colm and Neimi, enemy information, as well as the best units and party to use, read on!
Table of Contents
Colm and Neimi Strategy Overview
| Enemy Units |
|
|---|---|
| Recommended Level | Lv.40 |
| Difficulty | Infernal Lunatic Hard |
| Conditions | Condition 1: All 4 units must survive. Condition 2: You cannot use Light's Blessing |
| Dates Active | 04/27/2023 to 05/04/2023 |
Initial Unit Placement
| Infernal | Lunatic |
|---|---|
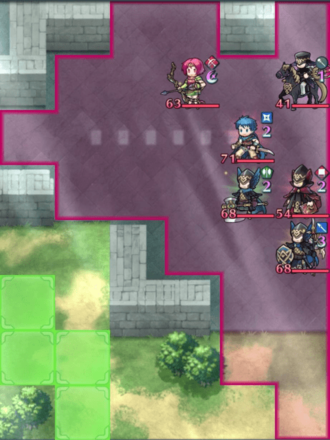 |
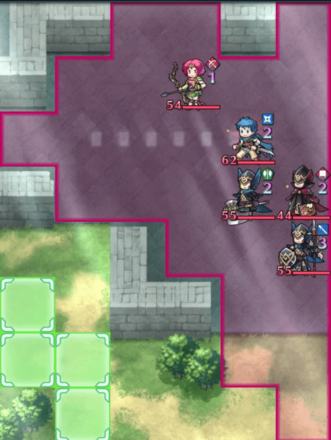 |
Infernal Enemy Information
| A
|
HP 63 |
Atk 57 |
Spd 49 |
Def 23 |
Res 38 |
||||||
|---|---|---|---|---|---|---|---|---|---|---|---|
|
|
|
||||||||||
B
 Troubadour Troubadour
|
HP 41 |
Atk 52 |
Spd 23 |
Def 17 |
Res 50 |
||||||
|
|
|
||||||||||
| C
|
HP 71 |
Atk 53 |
Spd 45 |
Def 27 |
Res 35 |
||||||
|
|
|
||||||||||
D
 Axe Fighter Axe Fighter
|
HP 68 |
Atk 50 |
Spd 40 |
Def 36 |
Res 24 |
||||||
|
|
|
||||||||||
E
 Red Mage Red Mage
|
HP 54 |
Atk 50 |
Spd 38 |
Def 22 |
Res 33 |
||||||
|
|
|
||||||||||
F
 Lance Fighter Lance Fighter
|
HP 68 |
Atk 50 |
Spd 37 |
Def 40 |
Res 24 |
||||||
|
|
|
||||||||||
Lunatic Enemy Information
| A
|
HP 54 |
Atk 53 |
Spd 45 |
Def 21 |
Res 35 |
||||||
|---|---|---|---|---|---|---|---|---|---|---|---|
|
|
|
||||||||||
| B
|
HP 62 |
Atk 49 |
Spd 41 |
Def 24 |
Res 32 |
||||||
|
|
|
||||||||||
C
 Axe Fighter Axe Fighter
|
HP 55 |
Atk 47 |
Spd 34 |
Def 33 |
Res 22 |
||||||
|
|
|
||||||||||
D
 Red Mage Red Mage
|
HP 44 |
Atk 46 |
Spd 35 |
Def 20 |
Res 30 |
||||||
|
|
|
||||||||||
E
 Lance Fighter Lance Fighter
|
HP 55 |
Atk 47 |
Spd 34 |
Def 33 |
Res 22 |
||||||
|
|
|
||||||||||
Colm and Neimi Strategy
Use an offensive Player Phase strategy!
Any offensive strategy can help you clear this map, especially with the the lack of reinforcements and enemy refresher units on the enemy side. It also helps that all units are next to each other, allowing you to use more complex strategies to get the win.
You can use a simple hit-and-run strategy to force enemies to approach you while running back to safety with the help of any Canto skills or refresher units. You can easily pull this off at the top area, just before stepping on the gray tiles. From here, you can freely reach the Axe Fighter with any ranged unit of your choice. Once damaged or defeated, you can easily run back to safety with either Canto or with the help of a refresher ally. Make sure your unit has Reposition if you're planning to use the latter so as to save them from harm's way.
Once closer to your team, you can start focusing on picking them off one by one while leaving the less threatening ones for the next turn, should there be any.
Additionally, all enemies present in both maps do not bear any movement assist skills that can warp them to areas they normally can't reach. This allows you to use any straightforward approach when initiating, baiting, and retreating.
Alternatively, use a tanking strategy!
The enemies here can be defeated with a tanking strategy easily, as long as proper support is present.
Placing a tank unit on the top choke point near the two walls will cause the enemies to approach and attack into your tank unit one at a time. The choke point will prevent them from approaching the rest of your units while your tank unit picks them off one at a time.
Best Units for Colm and Neimi
Player Phase units
| Unit Name | |
|---|---|
|
|
Sword Armored Regal Sunshade's brave effect can quickly eliminate enemies. Raging Storm can grant one additional action after combat. Inheriting Galeforce can grant a third action per turn. |
|
|
Green Tome Cavalry Ninjutsu Scrolls' brave effect can quickly defeat enemies. Duo Skill grants herself an additional action. |
|
|
Colorless Dagger Flying Tailwind Shuriken's brave effect can quickly defeat enemies. Duo Skill grants herself an additional action. |
|
|
Blue Bow Flying Flamefrost Bow's brave effect can quickly defeat enemies. Duo Skill grants herself an additional action. |
|
|
Lance Cavalry A Fate Changed! can Reposition an ally, copy their bonuses, and grant another action to himself. S/D Near Trace 3 grants Canto allowing him to retreat post-combat. |
|
|
Lance Cavalry Moonlight Bangle grants Canto for mobility. Binding Reginleif allows her to defeat her foes in one round. |
|
|
Sword Cavalry Lyngheiðr grants Canto for mobility. Seiðr Shell is pre-charged and can defeat an enemy quickly. |
Tank Units
| Unit Name | |
|---|---|
|
|
Sword Armored Regal Sunshade's brave effect can quickly eliminate enemies. Using a defensive build allows her to tank multiple enemies in this map. |
|
|
Lance Armored Guaranteed follow-up attack Weapon refine makes him a very powerful tank. |
|
|
Blue Breath Armored A magical version of Brave Hector. D/R Near Save 3 protects nearby allies against melee attacks. Wily Fighter 3 negates bonuses on her foes. |
|
|
Axe Armored Can retaliate against effects that prevent her counterattacks. A/R Far Save 3 protects nearby allies against ranged attacks. |
|
|
Red Breath Armored Can retaliate at any distance with Distant Ferocity. Woeful Upheaval deals chip damage, has a Far Save effect, and gives damage reduction. |
|
|
Colorless Beast Armored Can make a guaranteed follow-up attack Nullifies buffs from ranged units. |
|
|
Blue Breath Infantry A budget option that can fulfill the Blue tank role to bait on turn one. |
Support Units
| Unit Name | |
|---|---|
|
|
Staff Flying Grants damage reduction and can shut down "At start of turn" effects of foes in cardinal directions. |
|
|
Staff Flying Grants damage reduction and healing. |
|
|
Lance Infantry Grants bonus stats and Special acceleration to nearby allies during combat. |
|
|
Sword Infantry Grants bonus stats to his Ally Support during combat. |
|
|
Staff Flying Grants Atk+6 and Special acceleration to nearby allies during combat. |
Recommended Dancer Units
| Unit Name | |
|---|---|
|
|
Green Tome Flying Gentle Dream provides stat and mobility bonuses. Duo Skill grants an ally an additional action. |
|
|
Blue Tome Flying Gentle Dream provides stat and mobility bonuses. |
|
|
Blue Tome Flying Prayer Wheel and Gray Waves II combine to grant an ally stat and mobility bonuses. |
|
|
Green Tome Cavalry Dancing Flames and Gray Waves combine to grant an ally stat and mobility bonuses. S/R Far Trace 3 allows repositioning after an attack or a refresh. |
List of All Dancers | Heroes with Refresher Skills
User Submitted Units / Parties for Colm and Neimi
We are looking for user submitted clears!
Let us know about your party and how you cleared the maps in the comments below, via a picture of your team and their skills.
If you have uploaded the walkthrough video on Twitter etc., please enter the URL as well!
FEH Related Guides
Other Bound Hero Battle Walkthroughs
Bound Hero Battles Walkthroughs and Schedule
List of Bound Hero Battles
Comment
Author
Colm & Neimi Infernal Guide and Recommended Team (Bound Hero Battle)
improvement survey
03/2026
improving Game8's site?

Your answers will help us to improve our website.
Note: Please be sure not to enter any kind of personal information into your response.

We hope you continue to make use of Game8.
Premium Articles
Rankings
- We could not find the message board you were looking for.
Gaming News
Popular Games

Genshin Impact Walkthrough & Guides Wiki

Honkai: Star Rail Walkthrough & Guides Wiki

Umamusume: Pretty Derby Walkthrough & Guides Wiki

Pokemon Pokopia Walkthrough & Guides Wiki

Resident Evil Requiem (RE9) Walkthrough & Guides Wiki

Monster Hunter Wilds Walkthrough & Guides Wiki

Wuthering Waves Walkthrough & Guides Wiki

Arknights: Endfield Walkthrough & Guides Wiki

Pokemon FireRed and LeafGreen (FRLG) Walkthrough & Guides Wiki

Pokemon TCG Pocket (PTCGP) Strategies & Guides Wiki
Recommended Games

Diablo 4: Vessel of Hatred Walkthrough & Guides Wiki

Fire Emblem Heroes (FEH) Walkthrough & Guides Wiki

Yu-Gi-Oh! Master Duel Walkthrough & Guides Wiki

Super Smash Bros. Ultimate Walkthrough & Guides Wiki

Pokemon Brilliant Diamond and Shining Pearl (BDSP) Walkthrough & Guides Wiki

Elden Ring Shadow of the Erdtree Walkthrough & Guides Wiki

Monster Hunter World Walkthrough & Guides Wiki

The Legend of Zelda: Tears of the Kingdom Walkthrough & Guides Wiki

Persona 3 Reload Walkthrough & Guides Wiki

Cyberpunk 2077: Ultimate Edition Walkthrough & Guides Wiki
All rights reserved
© 2025 Nintendo / INTELLIGENT SYSTEMS
The copyrights of videos of games used in our content and other intellectual property rights belong to the provider of the game.
The contents we provide on this site were created personally by members of the Game8 editorial department.
We refuse the right to reuse or repost content taken without our permission such as data or images to other sites.



![Everwind Review [Early Access] | The Shaky First Step to A Very Long Journey](https://img.game8.co/4440226/ab079b1153298a042633dd1ef51e878e.png/thumb)

![Monster Hunter Stories 3 Review [First Impressions] | Simply Rejuvenating](https://img.game8.co/4438641/2a31b7702bd70e78ec8efd24661dacda.jpeg/thumb)


