Ryoma and Sakura Infernal Guide and Recommended Team (Bound Hero Battle)
★ Latest Banners: Tiki: Everlasting Voice | Springtime Sisters
☆ New: Mythic Tiki (Adult) | Spring Thórr, Spring Dorothea, Spring Sothe, Spring Eirika
★ Free Units: Spring Bernadetta
☆ State of the Meta (February 2026)

This is a guide to clearing the Infernal and Lunatic maps for Ryoma and Sakura in Fire Emblem Heroes (FEH). To see strategy for defeating Ryoma and Sakura, enemy information, as well as the best units and party to use, read on!
Table of Contents
Ryoma and Sakura Strategy Overview
| Featured Unit |
|
|---|---|
| Recommended Level | Lv.40 |
| Difficulty | Infernal Lunatic Hard |
| Conditions | Condition 1: All 4 units must survive. Condition 2: You cannot use Light's Blessing |
| Dates Active | 04/22/2020-04/29/2020 |
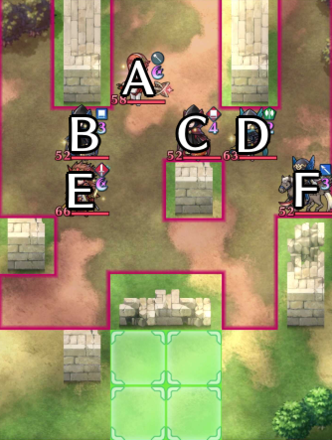
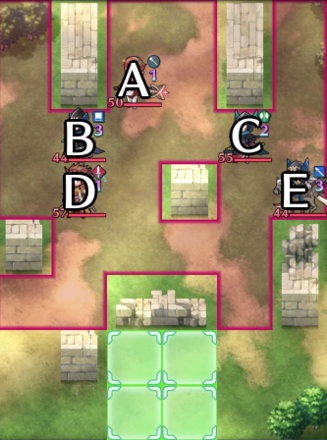
Initial Unit Placement
| Initial Infernal Unit Placements | Initial Infernal Unit Placements |
|---|---|
 |
 |
Infernal Enemy Information
| A
|
HP 58 |
Atk 42 |
Spd 33 |
Def 27 |
Res 33 |
||||||
|---|---|---|---|---|---|---|---|---|---|---|---|
|
|
|
||||||||||
B
 Blue Mage Blue Mage
|
HP 52 |
Atk 47 |
Spd 38 |
Def 22 |
Res 33 |
||||||
|
|
|
||||||||||
C
 Red Mage Red Mage
|
HP 52 |
Atk 50 |
Spd 38 |
Def 22 |
Res 33 |
||||||
|
|
|
||||||||||
D
 Axe Fighter Axe Fighter
|
HP 63 |
Atk 49 |
Spd 37 |
Def 36 |
Res 24 |
||||||
|
|
|
||||||||||
| E
|
HP 66 |
Atk 53 |
Spd 38 |
Def 30 |
Res 23 |
||||||
|
|
|
||||||||||
F
 Lance Flier Lance Flier
|
HP 52 |
Atk 46 |
Spd 38 |
Def 26 |
Res 39 |
||||||
|
|
|
||||||||||
Lunatic Enemy Information
| A
|
HP 50 |
Atk 39 |
Spd 30 |
Def 24 |
Res 30 |
||||||
|---|---|---|---|---|---|---|---|---|---|---|---|
|
|
|
||||||||||
B
 Blue Mage Blue Mage
|
HP 44 |
Atk 44 |
Spd 35 |
Def 20 |
Res 30 |
||||||
|
|
|
||||||||||
C
 Axe Fighter Axe Fighter
|
HP 55 |
Atk 46 |
Spd 34 |
Def 33 |
Res 22 |
||||||
|
|
|
||||||||||
| D
|
HP 57 |
Atk 50 |
Spd 35 |
Def 27 |
Res 21 |
||||||
|
|
|
||||||||||
E
 Lance Flier Lance Flier
|
HP 44 |
Atk 43 |
Spd 35 |
Def 23 |
Res 36 |
||||||
|
|
|
||||||||||
Ryoma and Sakura Strategy
Ryoma and Sakura have their Specials ready!
Both Ryoma and Sakura have their Specials up at the start of the map on the Infernal version.
Be careful when letting Ryoma attack as your units can take a lot of damage.
Sakura, meanwhile, will grant her allies Atk/Res+6 for 1 turn, which can be a bit tricky if you're using magic units.
You can have Ryoma face a very tanky blue unit or defeat him during the player phase with a blue mage.
Hit and run or Tanking tactics are recommended
There are two ways to handle this map.
You can use units like Reginn or other units who have【Canto】in their kit to do hit and run tactics.
Go in, defeat an enemy unit and then retreat to safety to funnel the enemy forces to you.
Another option is to use tanky units.
You can park a tanky blue unit in the area near Ryoma to try to take out 3 units at once (Ryoma and both tome users).
You an then use a green tanky unit to handle the Axe Fighter and Lance flier.
Best Units for Ryoma and Sakura
Tanky Units That Can Counterattack Regardless of Distance
| Unit Name | |
|---|---|
|
|
Lance Armored Guaranteed follow-up attack Weapon refine makes him immune to armor-effective weapons. |
|
|
Axe Armored High mobility for an armored unit. High stats all around. |
|
|
Colorless Armored Beast Can move and attack several times per turn. Can heal herself after combat. |
|
|
Colorless Armored Breath Armored unit that can move 2 spaces. Her Special can be charged easily. |
|
|
Colorless Armored Beast Can make a guaranteed follow-up attack Nullifies buffs from ranged units. |
High Power Units
| Unit Name | |
|---|---|
|
|
Red Beast Flier Can make a guaranteed follow-up attack Can move 3 spaces when he transforms. |
|
|
Sword Flier Can attack twice with her weapon and counterattack regardless of range. |
|
|
Blue Cavalry Tome Can attack twice with his weapon. Easy to obtain unit. |
|
|
Red Cavalry Tome Has an AoE Special that deals adaptive damage. Has Hardy Bearing in her weapon. |
|
|
Green Infantry Tome Very high firepower that can double because of her high spd. |
|
|
Green Infantry Tome Blade weapon with high firepower. Easy to obtain unit. |
|
|
Colorless Cavalry Bow Special allows him to gain another action. |
|
|
Colorless Dagger Flier Weapon allows her to attack twice Duo skill allows her to take another action. |
Recommended Dancer Units
| Unit Name | |
|---|---|
|
|
Sword Flier Grants buffs to ally that she dances. |
|
|
Blue Tome Flier Her skills grants powerful buffs. Her kit provides good mobility. |
|
|
Blue Tome Flier Extreme strong refresher skill Grants flying and infantry allies +1 movement space when she uses her Sing skill. |
|
|
Green Beast Flier Can move 3 spaces when he transforms. Easy to obtain unit. |
List of All Dancers | Heroes with Refresher Skills
Ryoma and Sakura Infernal Strategy Example
With Three Houses
|
|
|
|
|
This is for the limited Hero battle that restricts you into using only units from Fire Emblem: Three Houses.
User Submitted Units / Parties for Ryoma and Sakura
We are looking for user submitted clears!
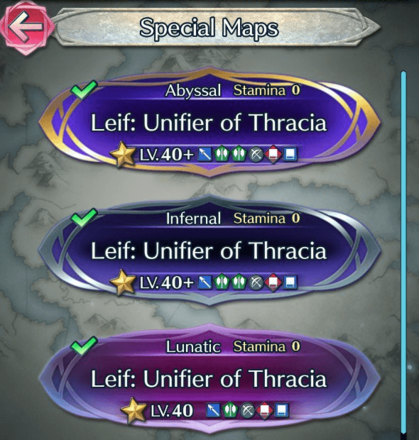
Let us know about your party and how you cleared the maps in the comments below, via a picture of your team and their skills.
If you have uploaded the walkthrough video on Twitter etc., please enter the URL as well!
FEH Related Guides
Other Bound Hero Battle Walkthroughs
Bound Hero Battles Walkthroughs and Schedule
List of Bound Hero Battles
Comment
Author
Ryoma and Sakura Infernal Guide and Recommended Team (Bound Hero Battle)
improvement survey
03/2026
improving Game8's site?

Your answers will help us to improve our website.
Note: Please be sure not to enter any kind of personal information into your response.

We hope you continue to make use of Game8.
Premium Articles
Rankings
- We could not find the message board you were looking for.
Gaming News
Popular Games

Genshin Impact Walkthrough & Guides Wiki

Honkai: Star Rail Walkthrough & Guides Wiki

Umamusume: Pretty Derby Walkthrough & Guides Wiki

Pokemon Pokopia Walkthrough & Guides Wiki

Resident Evil Requiem (RE9) Walkthrough & Guides Wiki

Monster Hunter Wilds Walkthrough & Guides Wiki

Wuthering Waves Walkthrough & Guides Wiki

Arknights: Endfield Walkthrough & Guides Wiki

Pokemon FireRed and LeafGreen (FRLG) Walkthrough & Guides Wiki

Pokemon TCG Pocket (PTCGP) Strategies & Guides Wiki
Recommended Games

Diablo 4: Vessel of Hatred Walkthrough & Guides Wiki

Cyberpunk 2077: Ultimate Edition Walkthrough & Guides Wiki

Fire Emblem Heroes (FEH) Walkthrough & Guides Wiki

Yu-Gi-Oh! Master Duel Walkthrough & Guides Wiki

Super Smash Bros. Ultimate Walkthrough & Guides Wiki

Pokemon Brilliant Diamond and Shining Pearl (BDSP) Walkthrough & Guides Wiki

Elden Ring Shadow of the Erdtree Walkthrough & Guides Wiki

Monster Hunter World Walkthrough & Guides Wiki

The Legend of Zelda: Tears of the Kingdom Walkthrough & Guides Wiki

Persona 3 Reload Walkthrough & Guides Wiki
All rights reserved
© 2025 Nintendo / INTELLIGENT SYSTEMS
The copyrights of videos of games used in our content and other intellectual property rights belong to the provider of the game.
The contents we provide on this site were created personally by members of the Game8 editorial department.
We refuse the right to reuse or repost content taken without our permission such as data or images to other sites.



![Everwind Review [Early Access] | The Shaky First Step to A Very Long Journey](https://img.game8.co/4440226/ab079b1153298a042633dd1ef51e878e.png/thumb)

![Monster Hunter Stories 3 Review [First Impressions] | Simply Rejuvenating](https://img.game8.co/4438641/2a31b7702bd70e78ec8efd24661dacda.jpeg/thumb)


