Lyon and Eirika Infernal Guide and Recommended Team (Bound Hero Battle)
★ Latest Banners: Harmonized CYL Hector & Celica
☆ New: Harmonized Brave Hector, Harmonized Brave Celica, Chosen Fjorm
★ Free Units: Griss
☆ State of the Meta (February 2026)
This is a guide to clearing the Infernal and Lunatic maps for Lyon and Eirika in Fire Emblem Heroes (FEH). To see strategy for defeating Lyon and Eirika, enemy information, as well as the best units and party to use, read on!
Table of Contents
Lyon and Eirika Strategy Overview
| Featured Units |
|
|---|---|
| Recommended Level | Lv.40 |
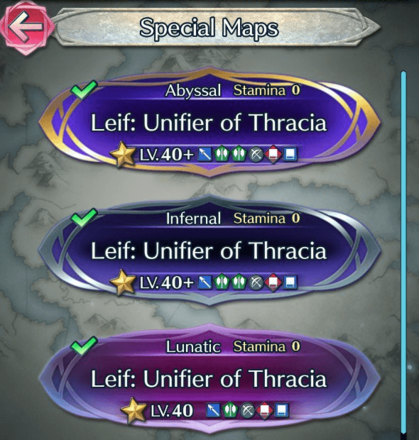
| Difficulty | Infernal Lunatic Hard |
| Conditions | Condition 1: All 4 units must survive. Condition 2: You cannot use Light's Blessing |
| Dates Active | 12/19/2020-12/27/2020 |
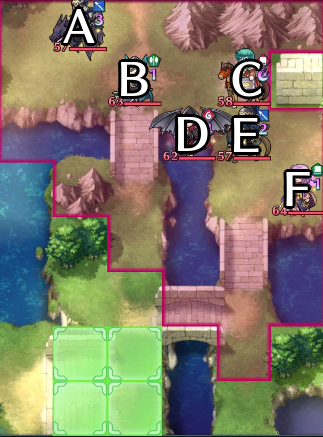
Initial Unit Placement
| Infernal | Lunatic |
|---|---|
 |
 |
Infernal Enemy Information
A
 Lance Dragon Lance Dragon
|
HP 57 |
Atk 55 |
Spd 30 |
Def 39 |
Res 23 |
||||||
|---|---|---|---|---|---|---|---|---|---|---|---|
|
|
|
||||||||||
B
 Axe Fighter Axe Fighter
|
HP 63 |
Atk 50 |
Spd 37 |
Def 36 |
Res 24 |
||||||
|
|
|
||||||||||
| C
|
HP 58 |
Atk 48 |
Spd 38 |
Def 22 |
Res 27 |
||||||
|
|
|
||||||||||
D
 Red Fáfnir Red Fáfnir
|
HP 62 |
Atk 51 |
Spd 40 |
Def 37 |
Res 32 |
||||||
|
|
|||||||||||
E
 Lance Cavalier Lance Cavalier
|
HP 57 |
Atk 51 |
Spd 27 |
Def 31 |
Res 33 |
||||||
|
|
|
||||||||||
| F
|
HP 64 |
Atk 61 |
Spd 17 |
Def 35 |
Res 38 |
||||||
|
|
|
||||||||||
Lunatic Enemy Information
| A
Lance Dragon
|
HP 49 |
Atk 51 |
Spd 27 |
Def 36 |
Res 21 |
||||||
|---|---|---|---|---|---|---|---|---|---|---|---|
|
|
|
||||||||||
| B
Axe Fighter
|
HP 55 |
Atk 47 |
Spd 34 |
Def 33 |
Res 22 |
||||||
|
|
|
||||||||||
| C
|
HP 50 |
Atk 45 |
Spd 35 |
Def 20 |
Res 25 |
||||||
|
|
|
||||||||||
| D
Lance Cavalier
|
HP 49 |
Atk 48 |
Spd 24 |
Def 28 |
Res 30 |
||||||
|
|
|
||||||||||
| E
|
HP 56 |
Atk 57 |
Spd 16 |
Def 32 |
Res 35 |
||||||
|
|
|
||||||||||
Lyon and Eirika Strategy
Enemy units will not move until a unit is within range
The enemy units in this map will not move until one of your own units is within their danger zone or attacks them.
However, due to the close proximity of enemies with different colors of the weapon triangle covered, baiting them is quite difficult.
Hit and Run tactics or ranged attacks are recommended
Baiting with tanky units on this map may result in a defeat because Eirika, the Lance Cavalier, and Lyon will be able to reach them during when you try to move your unit into any of the nearby spaces.
Therefore, using units with Canto like Reginn or any units with Trace skills like Summer Ashe is recommended as they can attack and then move back to safety.
You can also try baiting either the Red Fáfnir or the Axe Fighter by attacking them with a ranged unit and then having a dancer move them to safety.
Watch out for Eirika and Lyon's Specials!
Eirika has her Special up in the Infernal map, while Lyon has his at Special cooldown 1.
This means that when either of them attack, your units will be taking a lot of damage.
Try as much as possible to defeat both of them in the player phase using melee units.
Best Units for Lyon and Eirika
Units That Can Reposition Themselves
| Unit Name | |
|---|---|
|
|
Sword Cavalry High firepower. Can move again after attacking. Easy to obtain unit. |
|
|
Lance Cavalry Grants himself massive buffs. Can move again after attacking. |
|
|
Lance Infantry Can move an extra space during odd-numbered turns. Can move again after attacking and prevents enemy units from counterattacking. |
|
|
Staff Cavalry Can prevent enemy units from counterattacking. Can move again after attacking. |
Units With Brave Weapons
| Unit Name | |
|---|---|
|
|
Colorless Bow Cavalry Weapon allows him to attack twice. Special allows him to take an additional action. |
|
|
Colorless Dagger Flier Weapon allows her to attack twice. Duo Skill grants her another action. |
|
|
Colorless Infantry Bow Weapon allows him to attack twice Effective against flying units. |
|
|
Colorless Infantry Bow Weapon allows him to attack twice Effective against flying units. |
Tanky Units That Can Counterattack Regardless of Distance
| Unit Name | |
|---|---|
|
|
Sword Infantry His Special heals him. Easy to obtain unit. |
|
|
Red Infantry Breath Her Special heals her. Her Special can be charged easily due to her kit and heals her. |
|
|
Lance Infantry Her Special reduces damage from ranged units. Easy to obtain unit. |
|
|
Blue Infantry Tome His Special can be charged easily. His weapon prevents follow-up attacks from enemy units. |
|
|
Axe Armored Strong stats and skills all around. |
|
|
Green Armored Breath Her Special can be charged easily due to her kit and heals her. |
|
|
Colorless Armored Breath Armored unit that can move 2 spaces. Her Special can be charged easily. |
|
|
Colorless Armored Beast Can make a guaranteed follow-up attack Nullifies buffs from ranged units. |
High Power Units
| Unit Name | |
|---|---|
|
|
Sword Cavalry Can move after attacking or using an assist skill. Powerful exclusive Special. |
|
|
Sword Flier Can attack twice with her weapon and counterattack regardless of range. |
|
|
Blue Cavalry Tome Can attack twice with his weapon. Easy to obtain unit. |
|
|
Blue Infantry Tome Her Special is easy to charge and can hit multiple units. |
|
|
Green Infantry Tome Very high firepower that can double because of her high spd. |
|
|
Green Infantry Tome Blade weapon with high firepower. Easy to obtain unit. |
|
|
Colorless Beast Flier Guaranteed follow-up attack with his weapon. Can move 3 spaces when he transforms. |
Recommended Dancer Units
| Unit Name | |
|---|---|
|
|
Sword Flier Grants buffs to ally that she dances. |
|
|
Blue Tome Flier Her skills grants powerful buffs. Her kit provides good mobility. |
|
|
Blue Tome Flier Extreme strong refresher skill Grants flying and infantry allies +1 movement space when she uses her Sing skill. |
|
|
Green Beast Flier Can move 3 spaces when he transforms. Easy to obtain unit. |
List of All Dancers | Heroes with Refresher Skills
Lyon and Eirika Infernal Strategy Example
With Alfonse and Sharena
|
|
|
|
|
This is for the quest where you need to defeat Lyon with Alfonse and Eirika with Sharena.
Let Reginn clear the other units on the map with help from Peony!
With Fliers
|
|
|
|
|
This is for the quest where you need to clear this map with an all-flying team.
Use Eir to put some initial damage on the Axe Fighter to bait the rest of the enemy team into moving.
Then, use Cordelia's high firepower to clear out several enemy units with Fiora assisting!
Infernal Clear
|
|
|
|
|
This is for clearing the Infernal difficulty of this map.
Utilizing Lex's brave weapon and Reginn's high firepower allows this team to clear with relative ease.
We left the Eirika and the Red Fáfnir for last and baited them into separating for the finish!
User Submitted Units / Parties for Lyon and Eirika
We are looking for user submitted clears!
Let us know about your party and how you cleared the maps in the comments below, via a picture of your team and their skills.
If you have uploaded the walkthrough video on Twitter etc., please enter the URL as well!
FEH Related Guides
Other Bound Hero Battle Walkthroughs
Bound Hero Battles Walkthroughs and Schedule
List of Bound Hero Battles
Comment
Author

Lyon and Eirika Infernal Guide and Recommended Team (Bound Hero Battle)
Premium Articles
Rankings
- We could not find the message board you were looking for.
Gaming News
![Neverness to Everness (NTE) Review [Beta Co-Ex Test] | Rolling the Dice on Something Special](https://img.game8.co/4414628/dd3192c8f1f074ea788451a11eb862a7.jpeg/show)


Popular Games

Genshin Impact Walkthrough & Guides Wiki
Honkai: Star Rail Walkthrough & Guides Wiki
Arknights: Endfield Walkthrough & Guides Wiki
Umamusume: Pretty Derby Walkthrough & Guides Wiki
Wuthering Waves Walkthrough & Guides Wiki
Pokemon TCG Pocket (PTCGP) Strategies & Guides Wiki
Abyss Walkthrough & Guides Wiki
Zenless Zone Zero Walkthrough & Guides Wiki
Digimon Story: Time Stranger Walkthrough & Guides Wiki
Clair Obscur: Expedition 33 Walkthrough & Guides Wiki


Recommended Games
Fire Emblem Heroes (FEH) Walkthrough & Guides Wiki
Pokemon Brilliant Diamond and Shining Pearl (BDSP) Walkthrough & Guides Wiki
Diablo 4: Vessel of Hatred Walkthrough & Guides Wiki
Super Smash Bros. Ultimate Walkthrough & Guides Wiki
Yu-Gi-Oh! Master Duel Walkthrough & Guides Wiki
Elden Ring Shadow of the Erdtree Walkthrough & Guides Wiki
Monster Hunter World Walkthrough & Guides Wiki
The Legend of Zelda: Tears of the Kingdom Walkthrough & Guides Wiki
Persona 3 Reload Walkthrough & Guides Wiki
Cyberpunk 2077: Ultimate Edition Walkthrough & Guides Wiki


All rights reserved
© 2025 Nintendo / INTELLIGENT SYSTEMS
The copyrights of videos of games used in our content and other intellectual property rights belong to the provider of the game.
The contents we provide on this site were created personally by members of the Game8 editorial department.
We refuse the right to reuse or repost content taken without our permission such as data or images to other sites.