Legendary Hero Battle - Marth Abyssal Guide and Recommended Team
★ Latest Banners: Harmonized CYL Hector & Celica
☆ New: Harmonized Brave Hector, Harmonized Brave Celica, Chosen Fjorm
★ Free Units: Griss
☆ State of the Meta (February 2026)

This is a guide to clearing the Infernal and Abyssal maps for Legendary Marth in Fire Emblem Heroes (FEH). To see strategy for defeating Legendary Marth, enemy information, as well as the best units and party to use, read on!
| Boss Unit for This Legendary Hero Battle |
|---|
|
[9.0/10] |
Table of Contents
Legendary Marth Strategy Overview
| Featured Hero |
|
|---|---|
| First Clear Reward | Abyssal: Gold Seashell Hairpin
Infernal:
Lunatic:
Hard:
Normal:
|
| Recommended Level | Lv.40 |
| Difficulty | Abyssal Infernal Lunatic Hard |
| Conditions | Condition 1: All units must survive Condition 2: Cannot use Light's Blessing |
| Dates Active | 08/28/2018-09/04/2018 |
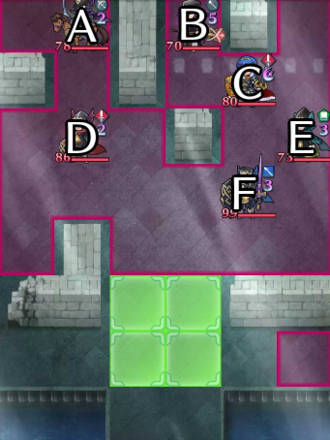
Unit Placement
| Abyssal | Infernal |
|---|---|
|
 |
Abyssal Enemy Information
A
 Bow Cavalier Bow Cavalier
|
HP 78 |
Atk 56 |
Spd 29 |
Def 29 |
Res 28 |
||||||
|---|---|---|---|---|---|---|---|---|---|---|---|
|
|
|
||||||||||
B
 Cleric Cleric
|
HP 70 |
Atk 44 |
Spd 33 |
Def 28 |
Res 42 |
||||||
|
|
|
||||||||||
| C
|
HP 80 |
Atk 61 |
Spd 50 |
Def 42 |
Res 30 |
||||||
|
|
|
||||||||||
D
 Sword Fighter Sword Fighter
|
HP 86 |
Atk 55 |
Spd 37 |
Def 35 |
Res 27 |
||||||
|
|
|
||||||||||
E
 Green Mage Green Mage
|
HP 73 |
Atk 51 |
Spd 38 |
Def 24 |
Res 33 |
||||||
|
|
|
||||||||||
F
 Lance Knight Lance Knight
|
HP 99 |
Atk 62 |
Spd 19 |
Def 48 |
Res 23 |
||||||
|
|
|
||||||||||
Abyssal Reinforcements
Turn 2 Reinforcements
Turn 1  Lance Fighter Lance Fighter | HP 84 | Atk 51 | Spd 37 | Def 35 | Res 27 | ||||||
|---|---|---|---|---|---|---|---|---|---|---|---|
| | | ||||||||||
Turn 1  Bow Fighter Bow Fighter | HP 82 | Atk 50 | Spd 34 | Def 34 | Res 22 | ||||||
| | | ||||||||||
Turn 1  Sword Dragon Sword Dragon | HP 82 | Atk 57 | Spd 32 | Def 48 | Res 23 | ||||||
| | | ||||||||||
Turn 3 Reinforcements
Turn 2  Bow Fighter Bow Fighter | HP 82 | Atk 50 | Spd 36 | Def 34 | Res 19 | ||||||
|---|---|---|---|---|---|---|---|---|---|---|---|
| | | ||||||||||
Turn 2  Lance Cavalier Lance Cavalier | HP 82 | Atk 57 | Spd 29 | Def 34 | Res 35 | ||||||
| | | ||||||||||
Turn 2  Green Mage Green Mage | HP 73 | Atk 52 | Spd 41 | Def 27 | Res 36 | ||||||
| | | ||||||||||
Turn 4 Reinforcements
Turn 3  Red Cavalier Red Cavalier | HP 71 | Atk 57 | Spd 30 | Def 20 | Res 41 | ||||||
|---|---|---|---|---|---|---|---|---|---|---|---|
| | | ||||||||||
Turn 3  Lance Fighter Lance Fighter | HP 81 | Atk 48 | Spd 35 | Def 38 | Res 30 | ||||||
| | | ||||||||||
Turn 3  Red Manakete Red Manakete | HP 87 | Atk 54 | Spd 35 | Def 34 | Res 33 | ||||||
| | | ||||||||||
Infernal Enemy Information
A
 Bow Cavalier Bow Cavalier
|
HP 57 |
Atk 52 |
Spd 26 |
Def 27 |
Res 25 |
||||||
|---|---|---|---|---|---|---|---|---|---|---|---|
|
|
|
||||||||||
B
 Cleric Cleric
|
HP 46 |
Atk 42 |
Spd 31 |
Def 25 |
Res 38 |
||||||
|
|
|
||||||||||
| C
|
HP 64 |
Atk 53 |
Spd 42 |
Def 35 |
Res 23 |
||||||
|
|
|
||||||||||
D
 Sword Fighter Sword Fighter
|
HP 66 |
Atk 52 |
Spd 34 |
Def 33 |
Res 24 |
||||||
|
|
|
||||||||||
E
 Green Mage Green Mage
|
HP 52 |
Atk 45 |
Spd 35 |
Def 22 |
Res 31 |
||||||
|
|
|
||||||||||
F
 Lance Knight Lance Knight
|
HP 81 |
Atk 58 |
Spd 17 |
Def 44 |
Res 21 |
||||||
|
|
|
||||||||||
Infernal Reinforcements
Turn 2 Reinforcements
Turn 1  Lance Fighter Lance Fighter | HP 64 | Atk 48 | Spd 34 | Def 33 | Res 24 | ||||||
|---|---|---|---|---|---|---|---|---|---|---|---|
| | | ||||||||||
Turn 1  Bow Fighter Bow Fighter | HP 61 | Atk 47 | Spd 32 | Def 32 | Res 20 | ||||||
| | | ||||||||||
Turn 1  Sword Dragon Sword Dragon | HP 62 | Atk 53 | Spd 30 | Def 44 | Res 21 | ||||||
| | | ||||||||||
Turn 3 Reinforcements
Turn 2  Bow Fighter Bow Fighter | HP 61 | Atk 47 | Spd 34 | Def 32 | Res 17 | ||||||
|---|---|---|---|---|---|---|---|---|---|---|---|
| | | ||||||||||
Turn 2  Lance Cavalier Lance Cavalier | HP 62 | Atk 53 | Spd 27 | Def 32 | Res 33 | ||||||
| | | ||||||||||
Turn 2  Green Mage Green Mage | HP 52 | Atk 49 | Spd 38 | Def 25 | Res 34 | ||||||
| | | ||||||||||
Turn 4 Reinforcements
Turn 3  Red Cavalier Red Cavalier | HP 47 | Atk 53 | Spd 28 | Def 18 | Res 37 | ||||||
|---|---|---|---|---|---|---|---|---|---|---|---|
| | | ||||||||||
Turn 3  Lance Fighter Lance Fighter | HP 61 | Atk 45 | Spd 32 | Def 36 | Res 27 | ||||||
| | | ||||||||||
Legendary Marth Strategy
Reinforcements Will Appear
Reinforcements will appear on this map, so using units of different attributes will greatly help so they can defeat them when they appear.
Be Careful of the Cleric's Panic Ploy!
In Abyssal, the Cleric has Panic Ploy 3 as a Sacred Seal, which converts bonuses into penalties.
This could prove annoying when trying to clear this map, so you can either defeat the Cleric as soon as possible or use a skill like Harsh Command+.
Use High Power Units
Enemy units are harder to defeat on Abyssal, so using high power units like Reinhardt and Brave Lyn will help in clearing.
However, do note that Legendary Eirika has Deflect Magic 3 as a Sacred Seal and will reduce damage from magic attacks. If you're using tome units, take this into account.
You can use Triangle Adept 3 to give your units more firepower against specific unit attributes.
Recommended Units for Legendary Marth
Units With Brave Weapons
|
|
|
|
|
High Power Mage Units
|
|
|
|
|
Raventome Units
|
|
|
|
|
Staff Units That Can Both Attack and Heal
|
|
|
|
|
Recommended Dancer Units
|
|
|
|
|
|
|
|
Legendary Marth Abyssal Strategy Example
|
|
|
|
|
This battle is a tricky one, with reinforcements coming from both sides of the map.
Dimitri acts as the main tank for the party, with Reinhardt and Eirika taking out those that come from behind, and Peony giving much needed buffs.
The merges of the units here shouldn't matter too much, though if you find you are lacking damage, you can consider giving your units Ally and/or Summoner Support.
User Submitted Parties for Legendary Marth
We are looking for user submitted clears!
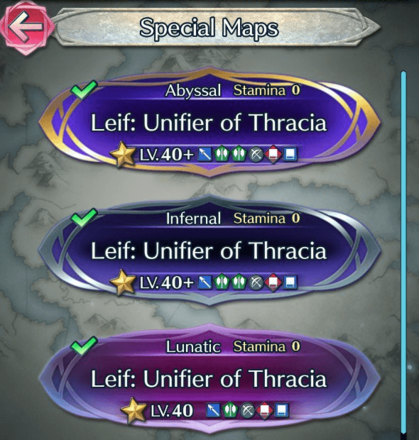
Let us know about your party and how you cleared the maps in the comments below, via a picture of your team and their skills.
If you have uploaded the walkthrough video on Twitter etc., please enter the URL as well!
FEH Related Guides
Legendary Hero Battle Walkthroughs
Legendary Hero Battle Walkthroughs and Schedule
List of Legendary Hero Battles
Comment
Author
Legendary Hero Battle - Marth Abyssal Guide and Recommended Team
Premium Articles
Rankings
- We could not find the message board you were looking for.
Gaming News
Popular Games

Genshin Impact Walkthrough & Guides Wiki

Honkai: Star Rail Walkthrough & Guides Wiki

Arknights: Endfield Walkthrough & Guides Wiki

Umamusume: Pretty Derby Walkthrough & Guides Wiki

Wuthering Waves Walkthrough & Guides Wiki

Pokemon TCG Pocket (PTCGP) Strategies & Guides Wiki

Abyss Walkthrough & Guides Wiki

Zenless Zone Zero Walkthrough & Guides Wiki

Digimon Story: Time Stranger Walkthrough & Guides Wiki

Clair Obscur: Expedition 33 Walkthrough & Guides Wiki
Recommended Games

Fire Emblem Heroes (FEH) Walkthrough & Guides Wiki

Pokemon Brilliant Diamond and Shining Pearl (BDSP) Walkthrough & Guides Wiki

Diablo 4: Vessel of Hatred Walkthrough & Guides Wiki

Super Smash Bros. Ultimate Walkthrough & Guides Wiki

Yu-Gi-Oh! Master Duel Walkthrough & Guides Wiki

Elden Ring Shadow of the Erdtree Walkthrough & Guides Wiki

Monster Hunter World Walkthrough & Guides Wiki

The Legend of Zelda: Tears of the Kingdom Walkthrough & Guides Wiki

Persona 3 Reload Walkthrough & Guides Wiki

Cyberpunk 2077: Ultimate Edition Walkthrough & Guides Wiki
All rights reserved
© 2025 Nintendo / INTELLIGENT SYSTEMS
The copyrights of videos of games used in our content and other intellectual property rights belong to the provider of the game.
The contents we provide on this site were created personally by members of the Game8 editorial department.
We refuse the right to reuse or repost content taken without our permission such as data or images to other sites.
 Diamant: Fortified King
 Black Knight: Mortal Legend
 Sakura: In Full Bloom
 Legendary Ayra and Mythic Athos
 Shez: Dual Sword Master
 Corrin: Child of Dawn
 Alear: Engaging Fire
 Camilla: Alluring Darkness
 Elincia: Undaunted Queen
 Alear: Awoken Divinity
 Guinivere: Queen of Bern
 Hinoka: Thundering Wings
 Yuri: Underground Lord
 Robin: Exalt's Other Half
 Shez: Sharpest Blades
 Ninian: Ice-Dragon Oracle
 Deirdre: Fated Saint
 Xander: Gallant King
 Myrrh: Guardian Dragon
 Nanna: Beloved Princess
 Caeda: Beloved Queen
 Byleth: The Fódlan Light
 Fae: Childlike Dragon
 Micaiah: Radiant Queen
 Byleth: the Fódlan Star
 Sigurd: Fated Holy Knight
 Claude: King of Unification
 Lilina: Firelight Leader
 Dimitri: Savior King
 Corrin: Child of Dusk
 Seliph: Scion of Light
 Edelgard: Flame Emperor
 Chrom: Crowned Exalt
 Celica: Queen of Valentia
 Leif: Unifier of Thracia
 Julia: Crusader of Light
 Eliwood: Blazing Knight
 Alm: Saint-King
 Roy: Blazing Lion
 Azura: Vallite Songstress
 Hríd: Icy Blade
 Eirika: Graceful Resolve
 Tiki: Legendary Dragon
 Lucina: Glorious Archer
 Hector: Marquess of Ostia
 Ryoma: Supreme Samurai
 Lyn: Lady of the Wind
 Robin: Fell Vessel


![Neverness to Everness (NTE) Review [Beta Co-Ex Test] | Rolling the Dice on Something Special](https://img.game8.co/4414628/dd3192c8f1f074ea788451a11eb862a7.jpeg/show)


