The Tormented Helm Walkthrough
☆Get to know Alain and the other characters
★Choices | Gammel | Mandrin
☆Farm Divine Shards for Ochlys!
★Classes | How to Promote and How to Change Class
☆Let us know who you'll marry in our Romance guide!
This is a walkthrough and guide for The Tormented Helm in Unicorn Overlord. See a walkthrough guide for The Tormented Helm, its location and rewards, the stage's objectives, recommended units and formations, item locations, and battle strategies!
| All Tatiana Guides | ||
|---|---|---|
| How to Recruit Tatiana | Should the Experiments Continue or End? | The Tormented Helm Walkthrough |
List of Contents
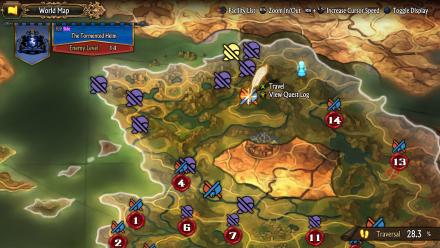
The Tormented Helm Location and Rewards
Location
| Map Location | Overworld Location |
|---|---|
 |
 |
| Region: Cornia Location: Above Fort Epine Morceaux |
|
Rewards
| Rewards |
|---|
|
・Black-Iron Axe x1 ・Healing Tonic (M) x1 ・House Chouvre x1 |
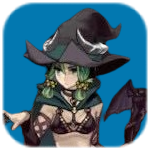
The Tormented Helm Recruitable Characters
| Recruitable Characters | ||
|---|---|---|
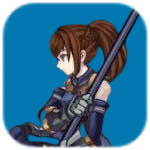
 Tatiana Tatiana
|
||
The Tormented Helm marks the first stage where Tatianna will be recruitable after you defeat her in battle.
List of All Recruitable Characters
The Tormented Helm Recommended Units
| Recommended Unit Leaders | ||||
|---|---|---|---|---|
 Ochlys
 |
 Rolf
Rolf |
 Auch
Auch |
 Sharon
 |
 Adel
Adel |
Before doing this quest, make sure that you have expanded your units from 4 to 5 and 5 of your party's unit slots from 3 to 4. Additionally, hiring a Gryphon Knight mercenary is recommended for this battle. You can expand your units, and hire Mercenaries by spending Honor in Forts you own.
The Tormented Helm lets you use up to 6 units but using five will be enough for this stage. We recommend the Unit Leaders listed above. Click on the leader's name to see our recommended Unit Formation for that leader in this stage.
Ochlys's Unit
| Ochlys's Unit | ||
|---|---|---|
 Chloe Chloe (Soldier) |
Ochlys (Feathersword) |
Any Hired Gryphon Knight Mercenary |
| - |
 Hodrick Hodrick (Hoplite) |
- |
Having all of the back row members advantageous towards Cavalries, this is a force to be reckoned with for the Knights in this stage.
Hodrick can hold down the fort effectively, with his Heavy Cover skill. At the end of the battle, healing is expected from Chloe's First Aid and the Gryphon Knight's Wing Rest can heal herself.
Recruiting Ochlys
Ochlys can be recruited in the overworld after finishing the The Winged Knight side quest. After doing so, she will appear in the overworld with her shop, talk to her, and start An Angel's Request side quest, complete this quest and she will join you afterward.
Having Ochlys is useful since you will be dealing with Cavalries in this stage. It is recommended that you first recruit her before starting this quest.
Rolf's Unit
| Rolf's Unit | ||
|---|---|---|
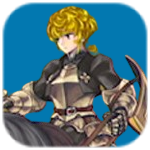 Monica Monica (Radiant Knight) |
 Berenice Berenice (Sellsword) |
Rolf (Hunter) |
| - |
 Travis Travis (Thief) |
- |
Rolf's Unit is your ultimate go-to for Wizard enemies. Travis is basically untouchable as he will always be using his Evade passive and therefore, take no damage.
Monica is resistant to Magick and can provide healing for their entire row at the back with her Row Heal, Berenice makes sure that the numbers of the enemy unit go down as much as possible with her Killing Chain and Following Slash moves. Rolf, with his Dual Shot, makes sure that he hits two enemies regardless if they are in front or at the back. Furthermore, having Rolf as the leader of this unit will make use of his Ranged Assist leader effect.
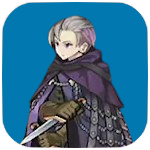
Auch's Unit
| Auch's Unit | ||
|---|---|---|
|
Auch (Wizard) |
 Melisandre Melisandre (Swordfighter) |
 Yahna Yahna (Witch) |
| - |
 Josef Josef (Paladin) |
- |
Auch's Unit utilizes the power of Magick and Physickal attacks. It is a balanced unit that can also hold itself down on its own. This unit is your best bet for Hunter units.
Before Melisandre attacks with her powerful sword, Yahna will make sure that the attack will deal even more damage with her Magick Conferral skill. Auch and Yahna can afflict enemies with Burn or Freeze, which are really helpful. All the while having Josef deal multiple damage with Pursuit and heal party members with Heal. Moreover, having Auch as the party leader will make his leader effect, Magickal Assist usable in this stage.
Recruiting Auch
Auch is a recruitable character and will join the Liberation after successfully finishing the The Self-Effacing Sorcerer side quest should you choose to spare him.
Recruiting Auch before starting this quest is recommended as he will be effective in this battle.
The Self-Effacing Sorcerer Walkthrough
Sharon's Unit
| Sharon's Unit | ||
|---|---|---|
 Nina Nina (Warrior) |
Sharon (Cleric) |
 Mordon Mordon (Warrior) |
| - |
 Bruno Bruno (Gladiator) |
- |
Sharon's unit is a powerful one, mostly composed of allies who boast high ATK and crippling damage.
Putting Sharon in the middle of the back row might sound dangerous due to a Knight's Wild Rush skill but this is actually effective since Sharon has the highest Evasion rate among all of the members here. Also, she can heal multiple times. Assigning Sharon to be the leader of this unit will make use of her Healing Assist leader effect, which is very useful in this quest.
Recruiting Sharon
Sharon is a recruitable character accessible by finishing the The Winged Knight sidequest.
After defeating Mandrin, you will have the option to recruit Sharon or not. It is advisable to recruit her as she will be a great healer for the party.
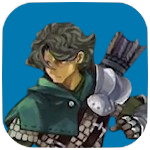
Adel's Unit
| Adel's Unit | ||
|---|---|---|
|
Adel (Knight) |
 Selvie Selvie (Shaman) |
 Clive Clive (Knight) |
| - |
 Alain Alain (Lord) |
- |
Adel's Unit is a team that focuses on debuffing the enemies while attacking multiple times.
Selvie will be responsible for enemy debuffs with her Passive Curse ensuring that the enemy unit will lose -1 PP during the beginning of the battle while Adel and Clive deal multiple Assaulting Lance attacks at them. Alain will be responsible for guarding this unit with his high HP and his Noble Guard ability. In addition, having either Adel or Clive as the unit's leader can make travel faster and get to places quickly such as treasures, forts, and artilleries.
Recruiting Adel
Adel is a recruitable character and will join the Liberation after successfully finishing the Province of Famine side quest.
Having Adel in this quest is good but not recommended as his unit will not be part of the core team in this stage. You can replace him with any hired Knight mercenary.
The Self-Effacing Sorcerer Walkthrough
The Tormented Helm Walkthrough
| # | Step by Step Guide |
|---|---|
| 1 |
 Deploy and Wait Deploy Ochlys, Rolf, Adel, and Auch. Have Adel's unit clear out the Watchtower first before advancing to avoid Ranged Assists from the enemy and Ochlys' team is susceptible to arrow damage. You can have Auch's unit tail them for extra damage using his Magickal Assist leader effect since there will be an enemy unit hidden in the forest. Using Adel will disable the enemy to use their Arrow Rain on your units as his mobility has the upper hand from their Valor increase. Have the others wait until the Watchtower has been cleared out. On the way to the tower, look for a glint on the ground and collect a Revival Orb (S). |
| 2 |
 Deploy Sharon and Move Forward After finishing off the enemies on the way to the tower, you will have enough Valor Points to deploy your last unit. Deploy Sharon's Unit and continue moving forward. Enemies will be approaching you, use your units carefully. Have Ochlys take on the Knights, Rolf battle the Wizards, and Auch for the Hunters. Utilize the leader effects of Sharon, Auch, and Rolf when necessary. Meanwhile, Have Adel collect the treasure on the left side of the road to get War Funds 5000G. |
| 3 |
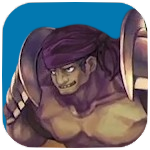
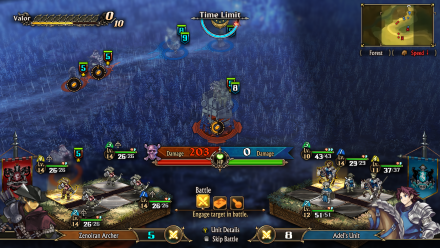
 Head to Fort Epine Morceaux There is a Knight unit here, you must attack it before it gathers enough Valor Points and use Wild Rush against you as this will be fatal and not to mention, your units are close together. Continue with the switching strategy when defeating enemies on the way, but use Ochlys to battle with Ghislain. Make sure that Auch, Rolf, and Sharon's Units remain inside the radius of Ochlys' attack so you can utilize their leader effects. Use all of the assist leader effects available to defeat Ghislain and take control of the fort. Once Ghislain is defeated, you will receive an Angel Hunter's Buckler. |
| 4 |
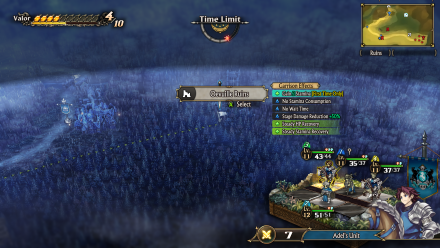 Move Forward Strategically The second part of the battle will begin now and this time you will have to beat Tatianna. Rolf's team will be essential in defeating the wandering enemy units since they are all Wizards. Garrison at Fort Epine Morceaux and continue moving forward. As you approach the enemy command post, there will be a Ballista nearby, set Ochlys' destination to here. Meanwhile, have Adel's Unit garrison in Oevuille Ruins up north and collect War Funds 6000G. |
| 5 |
Protect Rolf's Unit An enemy unit will take over the ballista temporarily, that is until you defeat them. The Ballista will fire at your area, hitting whoever is in the first lane. Have Ochlys' unit take the damage until she overthrows the enemy unit here. Feel free to use items or even the Heal Valor Skill for HP recovery. |
| 6 |
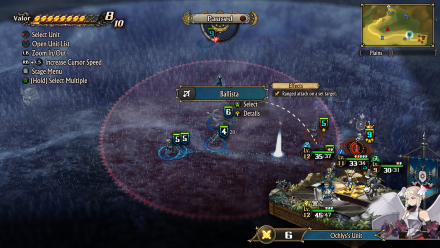 Defeat the Wandering Enemies Still closely together, set your final destination to Tatiana's location, and defeat the enemy units while they also get hit by the Ballista for maximum damage. Tatianna will deploy reinforcements but you can continue with the strategy and have Rolf's team defeat them while the Ballista also targets them. In the meantime, have Adel collect the treasure next to the Ballista and get Empowering Draught. |
| 7 |
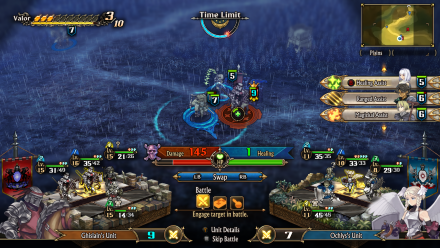
 Defeat Tatianna Surprisingly, Rolf's Unit is not the most effective in battling Tatianna, Auch's team is. Have Auch battle Tatianna and use Ranged Assist from Rolf for maximum damage. You can also utilize Sharon's Healing Assist if you think this will not be done in one battle. |
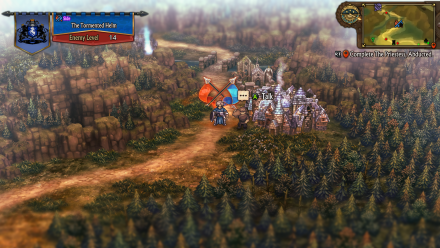
The Tormented Helm Stage Info
| The Tormented Helm Stage Map | ||
|---|---|---|
 |
||
| Enemy Level | 14 | |
| Victory Condition | ・Defeat Ghislain | |
| Defeat Condition |
・The Liberation's command post is captured ・The time limit expires |
|
Unicorn Overlord Related Guides
All Main Quest Stages
All Side Quest Stages
All Overworld Quests
| Overworld Quests | |
|---|---|
| An Angel's Request | Palevia's Escaped Chickens |
| Carved of Cornia Stone | Cemeteries of Cornia |
| Carved of Drakenhold Stone | Cemeteries of Drakenhold |
| Drakenhold's Escaped Chickens | - |
All Liberation Quests
Comment
Author
The Tormented Helm Walkthrough
Rankings
- We could not find the message board you were looking for.
Gaming News

![Death Stranding 2: On The Beach Review [PC] | A Port That Delivers](https://img.game8.co/4447392/15310a0c9aa1b6843bb713b2ea216930.jpeg/show)

![Death Stranding 2: On The Beach Review [PC] | A Port That Delivers](https://img.game8.co/4447392/15310a0c9aa1b6843bb713b2ea216930.jpeg/thumb)

Popular Games

Genshin Impact Walkthrough & Guides Wiki
Umamusume: Pretty Derby Walkthrough & Guides Wiki
Crimson Desert Walkthrough & Guides Wiki
Monster Hunter Stories 3: Twisted Reflection Walkthrough & Guides Wiki
Honkai: Star Rail Walkthrough & Guides Wiki
Pokemon Pokopia Walkthrough & Guides Wiki
The Seven Deadly Sins: Origin Walkthrough & Guides Wiki
Wuthering Waves Walkthrough & Guides Wiki
Zenless Zone Zero Walkthrough & Guides Wiki
Arknights: Endfield Walkthrough & Guides Wiki


Recommended Games
Fire Emblem Heroes (FEH) Walkthrough & Guides Wiki
Diablo 4: Vessel of Hatred Walkthrough & Guides Wiki
Cyberpunk 2077: Ultimate Edition Walkthrough & Guides Wiki
Yu-Gi-Oh! Master Duel Walkthrough & Guides Wiki
Super Smash Bros. Ultimate Walkthrough & Guides Wiki
Pokemon Brilliant Diamond and Shining Pearl (BDSP) Walkthrough & Guides Wiki
Elden Ring Shadow of the Erdtree Walkthrough & Guides Wiki
Monster Hunter World Walkthrough & Guides Wiki
The Legend of Zelda: Tears of the Kingdom Walkthrough & Guides Wiki
Persona 3 Reload Walkthrough & Guides Wiki


All rights reserved
©ATLUS. ©SEGA. All rights reserved. SEGA is registered in the U.S. Patent and Trademark Office. ATLUS and the ATLUS logo are registered trademarks or trademarks of ATLUS Co., Ltd. SEGA, the SEGA logo and UNICORN OVERLORD are registered trademarks or trademarks of SEGA CORPORATION.
The copyrights of videos of games used in our content and other intellectual property rights belong to the provider of the game.
The contents we provide on this site were created personally by members of the Game8 editorial department.
We refuse the right to reuse or repost content taken without our permission such as data or images to other sites.