This survey will take about 1 minute.
Your answers will help us to improve our website.
Unicorn Overlord
Province of Famine Walkthrough
☆Get to know Alain and the other characters
★Choices | Gammel | Mandrin
☆Farm Divine Shards for Ochlys!
★Classes | How to Promote and How to Change Class
☆Let us know who you'll marry in our Romance guide!
This is a walkthrough and guide for Province of Famine in Unicorn Overlord. See a walkthrough guide for Province of Famine, its location and rewards, the stage's objectives, recommended units and formations, item locations, and battle strategies!
| Related Articles | |
|---|---|
| Adel | Province of Famine |
List of Contents
Province of Famine Location and Rewards
Location
| Map Location | Overworld Location |
|---|---|
 |
 |
| Region: Cornia Location: Near the Bridge below Facon Town |
|
Rewards
| Rewards |
|---|
|
・Recruit's Shortspear x1 ・Quenching Amulet x1 ・Ashen Blue Knights x1 |
Province of Famine Recruitable Characters
| Recruitable Characters | ||
|---|---|---|
 Adel Adel
|
||
Province of Famine marks the first stage where Adel can be playable. Adel will join forces immediately during the beginning of the quest.
List of All Recruitable Characters
Province of Famine Recommended Units
| Recommended Unit Leaders | ||||
|---|---|---|---|---|
 Auch
Auch |
 Rolf
Rolf |
 Clive
Clive |
 Josef
Josef |
|
Before doing this quest, make sure that you are able to hire a Hunter Mercenary as they are the most effective in this battle. You can hire mercenaries by accessing any Forts that you own, each fort will have different mercenaries for hire.
In Province of Famine, deploying a total of 4 units is enough to finish the quest succesfully. You will be joined by Adel and Fran's Team as well as some Cavalry teams in this quest. We recommend the Unit Leaders listed above. Click on the leader's name to see our recommended Unit Formation for that leader in this stage.
Auch's Unit
| Auch's Unit | ||
|---|---|---|
 Yahna Yahna (Witch) |
- |
Auch (Wizard) |
| - |
 Alain Alain (Lord) |
- |
Auch's unit will mostly be responsible for Magickal Assists throughout the stage, so having them near any Cavalry's radius is ideal.
You can also have Auch's unit defeat wandering Hunter units as this team is strong against them.
Recruiting Auch
Auch is a recruitable character and will join the Liberation after successfully finishing the The Self-Effacing Sorcerer side quest should you choose to spare him.
Recruiting Auch before starting this quest is recommended as there will be Hunters in this battle.
The Self-Effacing Sorcerer Walkthrough
Rolf's Unit
| Rolf's Unit | ||
|---|---|---|
|
Rolf (Hunter) |
- | Any Hunter Mercenary |
| - |
 Hodrick Hodrick (Hoplite) |
- |
Rolf's unit is the Anti-Gryphon Knights team. The team will also be utilized for Ranged Assists so make sure that this team and Auch's are closely following the Cavalry units.
Hunters are typically weak to any attacks so having Hodrick being the defender in the frontline is optimal.
Josef's Unit
| Josef's Unit | ||
|---|---|---|
|
Josef (Paladin) |
- |
 Chloe Chloe (Soldier) |
| - |
 Mordon Mordon (Warrior) |
- |
Josef's unit, along with Clive, Adel, and Fran's will be leading the core team due to their quick mobility.
Josef's Unit has pure offense and is very strong against enemy Cavalries. It is best to have this unit be a palette switch for any Cavalry units nearby to conserve stamina.
Clive's Unit
| Clive's Unit | ||
|---|---|---|
 Sharon Sharon (Cleric) |
- |
Clive (Knight) |
| - |
 Lex Lex (Fighter) |
- |
This team is a balanced unit able to battle Cavalries and Housecarls with Sharon's Heal on stand by. The best strategy for this team is to be tailed by both Auch's and Rolf's team for maximum damage.
Having Clive as the team leader will enable conversations between the enemy and him. Early on in this stage, you can recruit a team of Cavalry Knights by choosing to talk to a nearby Cavalry enemy unit.
Province of Famine Walkthrough
| # | Step by Step Guide |
|---|---|
| 1 |
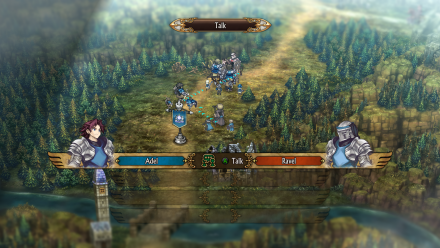 Deploy and Talk First things first is to deploy Rolf, Clive, and Auch's units. You can reserve Josef's unit for now, he will be able to catch up quickly later. Adel and Fran will aid the party in this stage and will be controllable. Once the three units are deployed, have Adel or Clive's unit talk to the nearby Cavalry unit to gain their forces. This will provide you with four additional Cavalry units. |
| 2 |
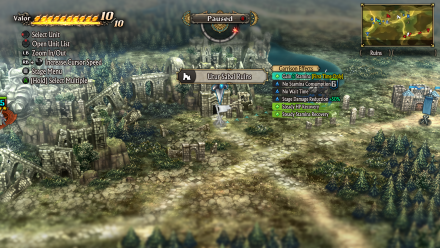
 Garrison in Nearby Areas Set your next destination to the nearby garrisonable areas. By the time you arrive here, your recently acquired Cavalry units will have defeated the enemy units garrisoned in Facon Town. Garrison in Facon Town and an NPC will provide you with a Holy Herb, have another unit garrison in the Poutiselle Ruins and receive a Dew of Protection. |
| 3 |
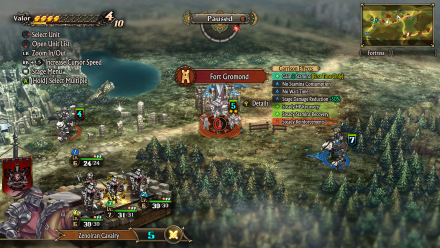 Garrison in Fort Gromond On the other side of the map, have Fran's Unit defeat nearby enemy units. Fran's unit is actually the best unit to use in this stage so keep this in mind. Once everything is clear, garrison her to Fort Gormond to gain Valor Points. There is a treasure on the ground near the fort, let this be her next destination to pick up a Farsight Crystal |
| 4 |
 Deploy Josef's Unit and Follow the Core Team Once enough Valor Points have been acquired, you can now deploy Josef's Unit and have him follow the core team near the effigy. At the same time, you can have Fran's team garrison in Utur Sabal Ruins to get a Dew of Warding. |
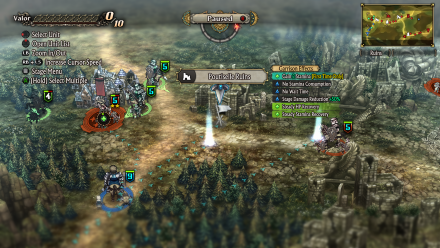
| 5 |
 Defeat Enemies on the Way Back to the core team, you will be facing a lot of enemies from here on out. Make sure that all of your units are within each other's radius to fully utilize Rolf's Ranged Assist and Auch's Magickal Assist leader effects. You can use Josef's team, if he had been able to follow you, or Adel's team to battle. Using these two will make you utilize both assists at the same time. |
| 6 |
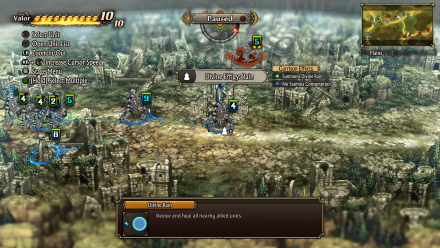 Check Out the Effigy In their path, the core team will encounter a Water Effigy that will heal all nearby units, you can have a nearby unit to pray in here. In the meantime, have Josef's unit garrison in Deucrin Ruins to get War Funds 5000G. There will be a treasure beside it, have Josef get here next to collect Healing Font(S). |
| 7 |
Regroup With Fran Fran cannot advance from here on out because there are Hunter enemy units down south, regrouping will be her best chance at survival. Once regrouped, have Fran collect the treasure in the forest to get Camping Set (S) |
| 8 |
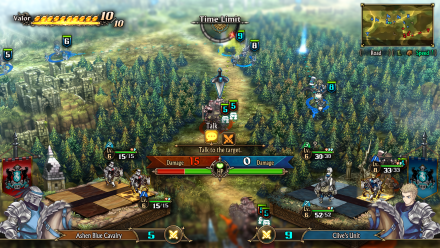 Talk to the Enemy You can have Clive or Adel talk to the reinforcements from the enemy unit but either way, the enemy will choose not to ally with you so prepare for battle. Have any allied units with assisting leader effects ready as well. In the meantime, have Fran defeat the enemy unit guarding the Divine Effigy: Thunder and avoid Hunter enemy units. |
| 9 |
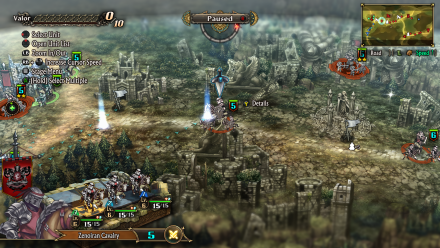
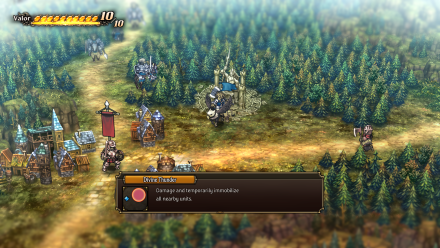 Charge Through Nordplage Town Get all your units set on Nordplage Town and Have Fran pray in the effigy to summon Divine Thunder upon the town. After this, let her continue on picking out the enemy units one by one and regroup with her later. Once garrisoned in Nordplage Town, an NPC will provide you with a Defensive Draught |
| 10 |
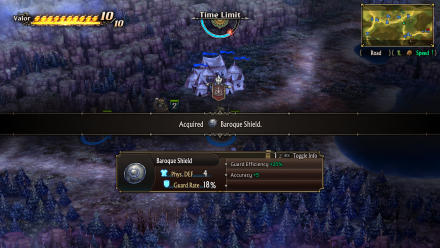 Defeat Gaston After Nordplage Town, the final destination will be the enemy Command Post. The path will most likely have been cleared by Fran's unit by now, making Gaston open for attacks. Since Fran's unit is the nearest and the most effective in fighting Gaston, utilize her and defeat Gaston. If upon unsuccesful victory in one battle, feel free to use any Valor Skills to your advantage. You will acquire Baroque Shield upon successful victory. |
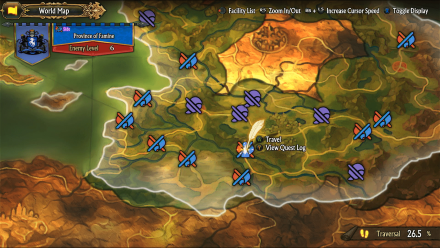
Province of Famine Stage Info
| Province of Famine Stage Map | ||
|---|---|---|
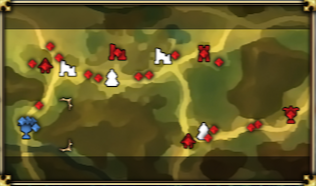 |
||
| Enemy Level | 6 | |
| Victory Condition | ・Defeat Gaston | |
| Defeat Condition |
・The Liberation's command post is captured ・The time limit expires |
|
Unicorn Overlord Related Guides
All Main Quest Stages
All Side Quest Stages
All Overworld Quests
| Overworld Quests | |
|---|---|
| An Angel's Request | Palevia's Escaped Chickens |
| Carved of Cornia Stone | Cemeteries of Cornia |
| Carved of Drakenhold Stone | Cemeteries of Drakenhold |
| Drakenhold's Escaped Chickens | - |
All Liberation Quests
Comment
Author

Province of Famine Walkthrough
Please participate in our site
improvement survey
03/2026
improvement survey
03/2026
Would you assist in
improving Game8's site?
improving Game8's site?

×
We are listening to our users' valuable opinions and discussing how to act on them.
The information collected through this survey will be used for the purpose of improving our services. In addition, the information will only be disclosed a part of a statistic in a format that will not allow identification of personal information.
Begin Survey
Not Now
×
Please rate each item regarding Game8.co's Advertisements.
Amount of Ads
Very Dissatisfied
Somewhat Dissatisfied
Fine
Somewhat Satisfied
Highly Satisfied
Placement of Ads
Timing of Ad Display
Ad Loading Speed
Safeness of Ads
Content of Ads
×
Please rate each item regarding Game8.co's Quality of Articles.
Amount of information
Very Dissatisfied
Somewhat Dissatisfied
Fine
Somewhat Satisfied
Highly Satisfied
Frequency of updates
Speed of new information
Accuracy of articles
Understandibility of articles
Readability of sentences
×
Please rate each item regarding Game8.co's Usability of the Site.
Ease of finding information
Very Dissatisfied
Somewhat Dissatisfied
Fine
Somewhat Satisfied
Highly Satisfied
Loading Speed
Use of Color
Font Size
Visibility of Images
Easy to Understand Layout
×
Please rate each item regarding Game8.co's Message Boards, Comments.
Ease of Writing
Very Dissatisfied
Somewhat Dissatisfied
Fine
Somewhat Satisfied
Highly Satisfied
Readability
Ease in Finding Information
Comment Quality
Comment Quantity
Admin Response
×
Please rate each item regarding Game8.co's Site's new design.
Please rate our site's new design
Very Dissatisfied
Somewhat Dissatisfied
Fine
Somewhat Satisfied
Highly Satisfied
Do you think that the website's design change makes the site easier to use?
Has the new design made it easier for you to find information on the site?
Has the new design improved the overall visual appeal of the site?
How would you rate your overall satisfaction with the new design of the site?
×
How likely are you to recommend Game8 to someone you know?
Very Unlikely
0
1
2
3
4
5
6
7
8
9
10
Very Likely
If you have other opinions regarding potential improvement to the website, please share them with us. We would appreciate your honest opinion.
Note: This is a free response section, so you can proceed without entering anything.
Note: Please be sure not to enter any kind of personal information into your response.
Note: Please be sure not to enter any kind of personal information into your response.
×
Thank You
×
Thank you for participating in our survey! Your answers will help us to improve the quality of our website and services.
We hope you continue to make use of Game8.
We hope you continue to make use of Game8.
Close
Rankings
- We could not find the message board you were looking for.
Gaming News


![Monster Hunter Stories 3 Review [First Impressions] | Simply Rejuvenating](https://img.game8.co/4438641/2a31b7702bd70e78ec8efd24661dacda.jpeg/thumb)
Popular Games

Genshin Impact Walkthrough & Guides Wiki
Honkai: Star Rail Walkthrough & Guides Wiki
Umamusume: Pretty Derby Walkthrough & Guides Wiki
Pokemon Pokopia Walkthrough & Guides Wiki
Resident Evil Requiem (RE9) Walkthrough & Guides Wiki
Monster Hunter Wilds Walkthrough & Guides Wiki
Wuthering Waves Walkthrough & Guides Wiki
Arknights: Endfield Walkthrough & Guides Wiki
Pokemon FireRed and LeafGreen (FRLG) Walkthrough & Guides Wiki
Pokemon TCG Pocket (PTCGP) Strategies & Guides Wiki


Recommended Games
Diablo 4: Vessel of Hatred Walkthrough & Guides Wiki
Cyberpunk 2077: Ultimate Edition Walkthrough & Guides Wiki
Fire Emblem Heroes (FEH) Walkthrough & Guides Wiki
Yu-Gi-Oh! Master Duel Walkthrough & Guides Wiki
Super Smash Bros. Ultimate Walkthrough & Guides Wiki
Pokemon Brilliant Diamond and Shining Pearl (BDSP) Walkthrough & Guides Wiki
Elden Ring Shadow of the Erdtree Walkthrough & Guides Wiki
Monster Hunter World Walkthrough & Guides Wiki
The Legend of Zelda: Tears of the Kingdom Walkthrough & Guides Wiki
Persona 3 Reload Walkthrough & Guides Wiki


All rights reserved
©ATLUS. ©SEGA. All rights reserved. SEGA is registered in the U.S. Patent and Trademark Office. ATLUS and the ATLUS logo are registered trademarks or trademarks of ATLUS Co., Ltd. SEGA, the SEGA logo and UNICORN OVERLORD are registered trademarks or trademarks of SEGA CORPORATION.
The copyrights of videos of games used in our content and other intellectual property rights belong to the provider of the game.
The contents we provide on this site were created personally by members of the Game8 editorial department.
We refuse the right to reuse or repost content taken without our permission such as data or images to other sites.