Beyond the Swirling Sands Walkthrough
☆Get to know Alain and the other characters
★Choices | Gammel | Mandrin
☆Farm Divine Shards for Ochlys!
★Classes | How to Promote and How to Change Class
☆Let us know who you'll marry in our Romance guide!
This is a walkthrough and guide for Beyond the Swirling Sands in Unicorn Overlord. See a walkthrough guide for Beyond the Swirling Sands, its location and rewards, the stage's objectives, recommended units and formations, item locations, and battle strategies!
| Related Articles | |
|---|---|
| Magellan | Beyond the Swirling Sands |
List of Contents
Beyond the Swirling Sands Location and Rewards
Location
| Map Location | Overworld Location |
|---|---|
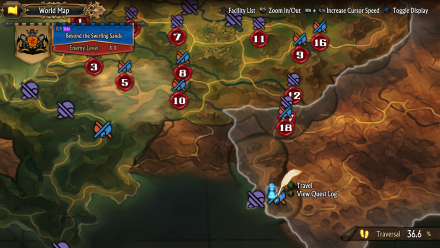 |
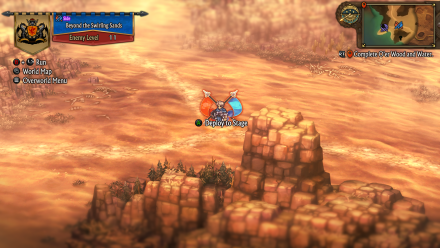 |
| Region: Drakenhold Location: East of Weszait Town |
|
Rewards
| Rewards |
|---|
|
・Black-Iron Spear x1 ・ Free Meal Ticket x1 ・ Sand Scorpion Thieves x1 |
Beyond the Swirling Sands Recruitable Characters
| Recruitable Characters | ||
|---|---|---|
 Magellan Magellan
|
||
Beyond the Swirling Sands marks the first stage where Magellan will join the Liberation upon victory.
List of All Recruitable Characters
Beyond the Swirling Sands Recommended Units
| Recommended Unit Leaders | ||||
|---|---|---|---|---|
 Fran
Fran |
 Ochlys
 |
Gryphon Knight Mercenary | ||
Before doing this quest, it is recommended that you have expanded 3 of your party's unit slots from 3 to 4. Additionally, hiring a Gryphon Knight mercenary is recommended for this battle. You can expand your units and hire Mercenaries by spending Honor in Forts you own.
In Beyond the Swirling Sands, you will only be deploying 3 teams as you will be helped by 3 additional friendly units in this stage. Each team will have a Flying type ally as their leader for faster travel. We recommend the Unit Leaders listed above. Click on the leader's name to see our recommended Unit Formation for that leader in this stage.
Fran's Unit
| Fran's Unit | ||
|---|---|---|
 Chloe Chloe (Soldier) |
Fran (Gryphon Knight) |
 Auch Auch (Wizard) |
| - |
 Hodrick Hodrick (Hoplite) |
- |
Fran's Unit will be dealing with Wyvern Knights in this stage as the team is carefully selected to be strong against them. Wyvern Knight enemies are located north, above your command post.
Having Chloe and Auch here will be bad for Wyvern Knights as Chloe's Javelin is very powerful against these types of enemies, matching this with Auch's Fireball which also deals Burn at the same time. Fran can eliminate rows of enemies with her High Swing and Hodrick will have no difficulty in defending everyone at the back with his Heavy Cover.
Ochlys' Unit
| Ochlys's Unit | ||
|---|---|---|
 Berenice Berenice (Sellsword) |
 Sharon Sharon (Cleric) |
 Aramis Aramis (Swordfighter) |
| - |
Ochlys (Feathersword) |
- |
Ochlys' unit is built to defeat a lot of the enemy units in this stage as it focuses on dealing heavy damage while having to strike multiple times.
Ochlys is great as a defender for this team due to her high Evasion Rate and high DEF as well. Aramis will be making sure that every deadly strike of his hits the enemies, making them low on HP. This synergizes well with Berenice's Killing Chain, if Berenice defeats an enemy with her Killing Chain she can attack once more.
Recruiting Ochlys
Ochlys can be recruited in the overworld after finishing the The Winged Knight side quest. After doing so, she will appear in the overworld with her shop, talk to her, and start An Angel's Request side quest, complete this quest and she will join you afterward.
Having Ochlys is useful since you will be dealing with the desert in this stage. It is recommended that you first recruit her before starting this quest.
Gryphon Knight Mercenary's Unit
| Gryphon Knight Mercenary's Unit | ||
|---|---|---|
 Leah Leah (Swordfighter) |
Any Hired Gryphon Knight Mercenary |
 Melisandre Melisandre (Swordfighter) |
| - |
 Travis Travis (Thief) |
- |
This unit is tailored to fend off Thieves. There are a lot of thieves units in this stage that will continuously use Plunder on you but will have a hard time running away.
With the Gryphon Knight mercenary leading the team, traveling in the desert will not affect the team's mobility. Both Leah and Melisandre will deal the damages and both will strike with guaranteed hits to enemies since this is their specialty.
Travis will not have any problems dealing with the enemy as he can Evade any attacks easily.
Beyond the Swirling Sands Walkthrough
| # | Step by Step Guide |
|---|---|
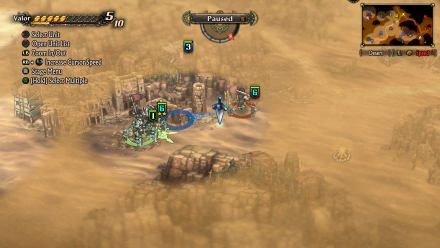
| 1 |
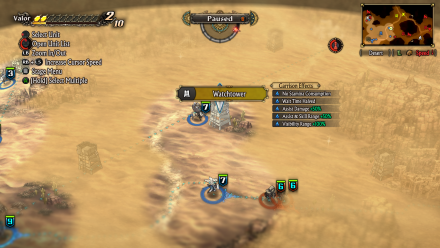 Head for the Watchtower Deploy all Units. At the beginning of the battle, your view will be barred by sandstorms thus rendering you unable to see enemy units on the map. The best thing to do here is to head for the Watchtowers. Have your Mercenary's unit go to the nearest watchtower ahead. After successfully doing so, the sandstorm will clear out. |
| 2 |
Continue On Your Way After a successful garrison in the watch tower, have your Mercenary's unit head to the second watchtower and be on standby. Send Fran's Unit to garrison in Banham Ruins on the northern part of where your command post is, and send Ochlys' Unit to the watchtower on the east side. This path is full of thieves, but Ochlys' team can handle them pretty easily. Be prepared as the sandstorm will be coming regularly so just have a nearby unit garrison into a nearby Watchtower. |
| 3 |
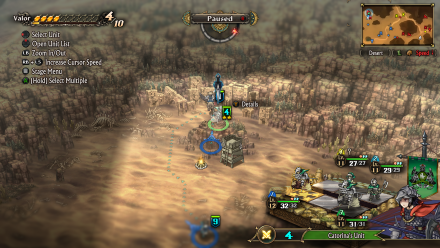 Welcome Catorina's Unit Once you've reached Banham Ruins, you will be fighting Catorina's unit and they will surrender eventually. You will also collect War Funds 7000G. After this, Catorina's Unit will be the ones responsible for talking to Camilla's Unit up north. Protect them with Fran's unit. Meanwhile, after clearing out the watchtower beside Kanseinn Ruins, have Ochlys' unit collect the treasure beside the tower and get a Concealing Cloak. You can go to the Kanseinn Ruins afterward. On the middle part of the map, continue having the Mercenary's unit on standby until they rendezvous with Catorina's Unit. There will be a treasure on the ground near the mountain with dinosaur bones, have Fran collect it on the way and get a Beckoning Chime. |
| 4 |
 Welcome Bernd's Unit After Ochlys' team successfully defeats Bernd's Unit on Kanseinn Ruins, they will eventually join you afterward and will fight by your side. You will also collect a Dew of Vitality after claiming the ruins. After this, set Ochlys' next location the Bousin Ruins, and claim War Funds 7000G. |
| 5 |
Welcome Camilla's Unit After Catorina's team starts a conversation with Camilla's, they will immediately change sides and join you on defeating Magellan. She will stay at the command post but will continuously send friendly units to aid you. After this, claim the treasure beside Velkwiller Garrison and get a Hot Cross Buns. |
| 6 |
 Defeat Magellan Now that you have everyone on your side. It is time to defeat Magellan once and for all. Use Ochlys' Unit to defeat Magellan and receive a Pursuant's Bracelet. |
Beyond the Swirling Sands Stage Info
| Beyond the Swirling Sands Stage Map | ||
|---|---|---|
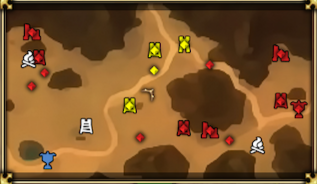 |
||
| Enemy Level | 11 | |
| Victory Condition | ・Defeat Magellan | |
| Defeat Condition |
・The Liberation's command post is captured ・The time limit expires |
|
Unicorn Overlord Related Guides

All Main Quest Stages
All Side Quest Stages
All Overworld Quests
| Overworld Quests | |
|---|---|
| An Angel's Request | Palevia's Escaped Chickens |
| Carved of Cornia Stone | Cemeteries of Cornia |
| Carved of Drakenhold Stone | Cemeteries of Drakenhold |
| Drakenhold's Escaped Chickens | - |
All Liberation Quests
Comment
Author

Beyond the Swirling Sands Walkthrough
Rankings
- We could not find the message board you were looking for.
Gaming News

![Death Stranding 2: On The Beach Review [PC] | A Port That Delivers](https://img.game8.co/4447392/15310a0c9aa1b6843bb713b2ea216930.jpeg/show)

![Death Stranding 2: On The Beach Review [PC] | A Port That Delivers](https://img.game8.co/4447392/15310a0c9aa1b6843bb713b2ea216930.jpeg/thumb)

Popular Games

Genshin Impact Walkthrough & Guides Wiki
Umamusume: Pretty Derby Walkthrough & Guides Wiki
Crimson Desert Walkthrough & Guides Wiki
Monster Hunter Stories 3: Twisted Reflection Walkthrough & Guides Wiki
Honkai: Star Rail Walkthrough & Guides Wiki
Pokemon Pokopia Walkthrough & Guides Wiki
The Seven Deadly Sins: Origin Walkthrough & Guides Wiki
Wuthering Waves Walkthrough & Guides Wiki
Zenless Zone Zero Walkthrough & Guides Wiki
Arknights: Endfield Walkthrough & Guides Wiki


Recommended Games
Fire Emblem Heroes (FEH) Walkthrough & Guides Wiki
Diablo 4: Vessel of Hatred Walkthrough & Guides Wiki
Cyberpunk 2077: Ultimate Edition Walkthrough & Guides Wiki
Yu-Gi-Oh! Master Duel Walkthrough & Guides Wiki
Super Smash Bros. Ultimate Walkthrough & Guides Wiki
Pokemon Brilliant Diamond and Shining Pearl (BDSP) Walkthrough & Guides Wiki
Elden Ring Shadow of the Erdtree Walkthrough & Guides Wiki
Monster Hunter World Walkthrough & Guides Wiki
The Legend of Zelda: Tears of the Kingdom Walkthrough & Guides Wiki
Persona 3 Reload Walkthrough & Guides Wiki


All rights reserved
©ATLUS. ©SEGA. All rights reserved. SEGA is registered in the U.S. Patent and Trademark Office. ATLUS and the ATLUS logo are registered trademarks or trademarks of ATLUS Co., Ltd. SEGA, the SEGA logo and UNICORN OVERLORD are registered trademarks or trademarks of SEGA CORPORATION.
The copyrights of videos of games used in our content and other intellectual property rights belong to the provider of the game.
The contents we provide on this site were created personally by members of the Game8 editorial department.
We refuse the right to reuse or repost content taken without our permission such as data or images to other sites.