The Champion of Order Walkthrough
☆Get to know Alain and the other characters
★Choices | Gammel | Mandrin
☆Farm Divine Shards for Ochlys!
★Classes | How to Promote and How to Change Class
☆Let us know who you'll marry in our Romance guide!
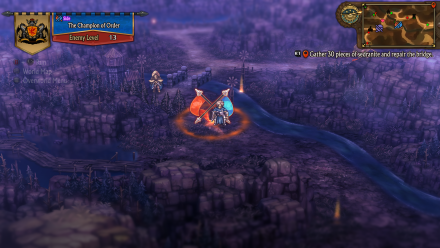
This is a walkthrough and guide for The Champion of Order in Unicorn Overlord. See a walkthrough guide for The Champion of Order, its location and rewards, the stage's objectives, recommended units and formations, item locations, and battle strategies!
| Related Articles | |
|---|---|
| Hilda | The Champion of Order |
List of Contents
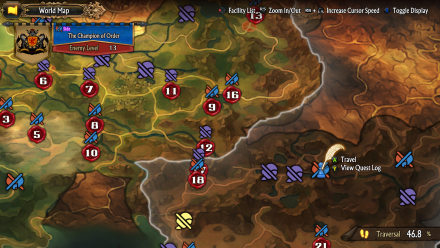
The Champion of Order Location and Rewards
Location
| Map Location | Overworld Location |
|---|---|
 |
 |
| Region: Drakenhold Location: East of Walled City of Adopti |
|
Rewards
| Rewards |
|---|
|
・Carnat Spear x1 ・Magick Mine x1 ・Salamander Kinghts x1 |
The Champion of Order Recruitable Characters
| Recruitable Characters | ||
|---|---|---|
 Hilda Hilda
|
||
The Champion of Order marks the first stage where Hilda can be recruited, provided that you have talked to her with Primm during the stage battle.
List of All Recruitable Characters
The Champion of Order Recommended Units
| Recommended Unit Leaders | ||||
|---|---|---|---|---|
 Clive
Clive |
 Liza
Liza |
 Josef
Josef |
 Fran
Fran |
|
Before doing this quest, it is recommended that you have expanded 4 of your party's unit slots from 3 to 4. You can expand your units and hire Mercenaries by spending Honor in Forts you own.
In The Champion of Order, using 4 units will be enough to successfully finish the quest. We recommend the Unit Leaders listed above. Click on the leader's name to see our recommended Unit Formation for that leader in this stage.
Clive's Unit
| Clive's Unit | ||
|---|---|---|
 Aramis Aramis (Swordfighter) |
Clive (Knight) |
 Melisandre Melisandre (Swordfighter) |
| - |
 Virginia Virginia (Crusader) |
- |
Clive's Unit is a unit without a healer but boasts pure truestrikes and maximum damage. There will be many Thief units in this stage and this team will prove useful in dealing with them easily and efficiently without taking much damage.
Having Clive as the leader will take advantage of his mobility and take over as many command posts as quickly as possible.
Liza's Unit
| Liza's Unit | ||
|---|---|---|
|
Liza (Arbalist) |
 Tatiana Tatiana (Cleric) |
 Magellan Magellan (Sellsword) |
| - |
 Alain Alain (Lord) |
- |
Liza's Unit will serve as Clive's backup in this stage, the team will also deal with approaching flying enemy units while Clive takes over command posts.
With Liza's Ranged Assist leader effect, having her garrisoned in a Watchtower will make sure that the damage to enemy units will be larger than battling them normally since Watchtowers provide +50% more damage.
Recruiting Liza
Liza is a recruitable character and will join the Liberation after successfully finishing the Black Knight of the Dunes main quest
Having Liza in this unit is highly encouraged as not only does she deal damage to flying units and offer Ranged Assist, but she can also heal allies using her Medical Aid. Additionally, her Valor Skill, Smoke Bolt will prove useful in this stage.
Josef's Unit
| Josef's Unit | ||
|---|---|---|
 Mordon Mordon (Warrior) |
 Primm Primm (Cleric) |
 Nina Nina (Warrior) |
| - |
Josef (Paladin) |
- |
Josef's Unit will take the path to the left and go to Hilda's command post the fastest.
With Primm in this unit, you will be able to have a conversation with her sister, Hilda. Josef will use his fast mobility to the team's advantage and get to Hilda as fast as they can. Having Mordon and Nina in this unit will also help you destroy Barricades on the way.
Fran's Unit
| Fran's Unit | ||
|---|---|---|
 Berenice Berenice (Sellsword) |
Fran (Gryphon Knight) |
 Kitra Kitra (Warrior) |
| - |
 Berengaria Berengaria (Dark Marquess) |
- |
Fran's unit will be going to the south path where the Catapult is located.
This team will have no worries about the enemy units on their path since Berenice and Berengaria are here for multiple damage and lethal blows. Kitra also ignores DEF when attacking, rendering any enemy vulnerable to her attacks. Having Fran in this unit will make traveling the woods not a problem since she ignores terrain while traversing the landscape.
Recruiting Fran
Fran is a recruitable character and will join the Liberation after successfully finishing the The Priestess, Abducted main quest.
Having Fran in this unit will make traversing easier, especially in terrains where normal Cavalry units will have low mobility.
The Priestess, Abducted Walkthrough
The Champion of Order Walkthrough
| # | Step by Step Guide |
|---|---|
| 1 |
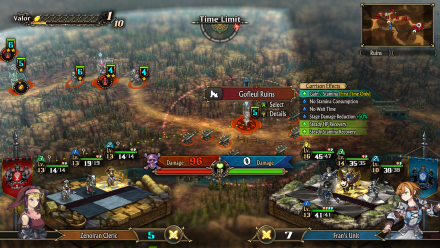
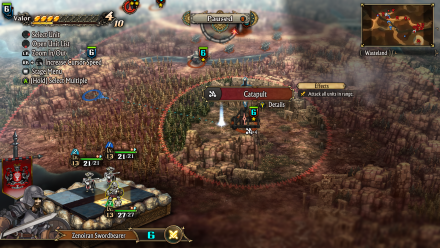 Go to the Catapult Deploy all units. There will be three paths from your command post, each with incoming enemies of different classes. First things first is to have Fran use the path below, defeat the enemy units, and circle around to see the Catapult in the woods on the way to Gofleul Ruins. Fran will not be hit by the catapult as it takes time to launch and Fran's mobility is faster. Before mounting the catapult you will come across a treasure on the ground, collect it and you will receive a Beckoning Bell. Once mounted, use it to destroy any nearby enemy units and the Barricades near the ruins. |
| 2 |
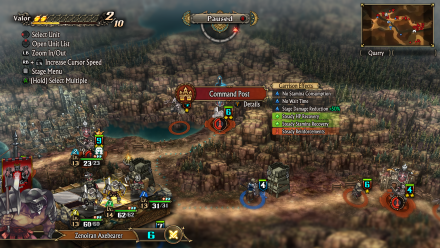
Talk to Hilda Using Josef's unit, go to the left path and use the shortcut to get to Hilda easily. Once you get to the barricades, use Nina or Mordon's Heavy Swing Valor Skill to destroy them easily and reach Hilda faster. There will be a treasure on the ground once the barricade gets destroyed, pick it up and acquire a Wind Faerie's Charm. After talking to Hilda, Josef's unit can stay on standby as his unit will not be effective in battling her. Meanwhile with Fran, after having the Barricades destroyed, you can switch the target of the catapult to the enemy unit stationed at Gofleul Ruins. |
| 3 |
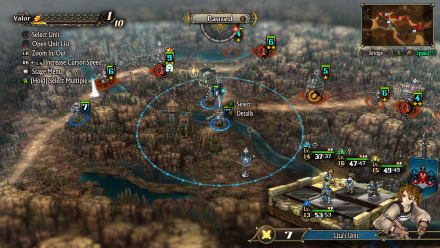 Get to the Bridge Have Clive and Liza's Unit get to the bridge and wait for approaching enemy units. While waiting, use Liza's Smoke Bolt Valor Skill to neutralize Ranged Assists from enemies in the watchtower. If you do not have enough Valor Points to do so, now is the perfect time to use a Hallowed Corne Ash to gain 2 Valor Points, use as much as necessary. |
| 4 |
 Take Over the Command Post After successfully taking control of the situation, you can have Clive and Liza's Units clear out the Watchtowers and head for the enemy command post up north. Use Liza's Ranged Assist to your advantage. Should you run out of stamina, feel free to use Smoked Nuts or use the Campfire nearby to fill up your stamina. |
| 5 |
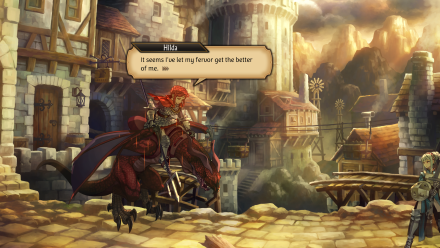 Take Over Hilda's Command Post After taking the nearby command post as your own, have Clive go to Hilda's command post and defeat her. You can have Liza's unit garrison in the nearby Watchtower so her Ranged Assist will have +50% damage. After successfully defeating Hilda, you will acquire a Silver Trident, and an NPC will provide you with a Farsight Crystal. |
| 6 |
 Go to Gofleul Ruins Once everything has been destroyed, you can leave the Catapult and head towards Gofleul Ruins. On the way, there will be a treasure on the ground near the bridge, pick this up and collect a Giant's Canopy. Once garrisoned in the ruins, you will receive a Dew of Keenness. |
| 7 |
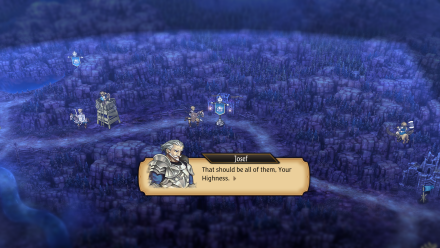 Rendezvous at the Last Command Post Once all has been done and one enemy command post remains, have all units meet at the last command post in the middle and take control of it. You can have Liza use the Watchtower nearby for a more powerful Ranged Assist. The quest is done after taking over this command post. |
The Champion of Order Stage Info
| The Champion of Order Stage Map | ||
|---|---|---|
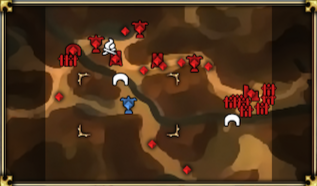 |
||
| Enemy Level | 13 | |
| Victory Condition | ・Capture All Enemy Command Post | |
| Defeat Condition |
・The Liberation's command post is captured ・The time limit expires |
|
Unicorn Overlord Related Guides

All Main Quest Stages
All Side Quest Stages
All Overworld Quests
| Overworld Quests | |
|---|---|
| An Angel's Request | Palevia's Escaped Chickens |
| Carved of Cornia Stone | Cemeteries of Cornia |
| Carved of Drakenhold Stone | Cemeteries of Drakenhold |
| Drakenhold's Escaped Chickens | - |
All Liberation Quests
Comment
Author

The Champion of Order Walkthrough
Rankings
- We could not find the message board you were looking for.
Gaming News

![Death Stranding 2: On The Beach Review [PC] | A Port That Delivers](https://img.game8.co/4447392/15310a0c9aa1b6843bb713b2ea216930.jpeg/show)

![Death Stranding 2: On The Beach Review [PC] | A Port That Delivers](https://img.game8.co/4447392/15310a0c9aa1b6843bb713b2ea216930.jpeg/thumb)

Popular Games

Genshin Impact Walkthrough & Guides Wiki
Umamusume: Pretty Derby Walkthrough & Guides Wiki
Crimson Desert Walkthrough & Guides Wiki
Monster Hunter Stories 3: Twisted Reflection Walkthrough & Guides Wiki
Honkai: Star Rail Walkthrough & Guides Wiki
Pokemon Pokopia Walkthrough & Guides Wiki
The Seven Deadly Sins: Origin Walkthrough & Guides Wiki
Wuthering Waves Walkthrough & Guides Wiki
Zenless Zone Zero Walkthrough & Guides Wiki
Arknights: Endfield Walkthrough & Guides Wiki


Recommended Games
Fire Emblem Heroes (FEH) Walkthrough & Guides Wiki
Diablo 4: Vessel of Hatred Walkthrough & Guides Wiki
Cyberpunk 2077: Ultimate Edition Walkthrough & Guides Wiki
Yu-Gi-Oh! Master Duel Walkthrough & Guides Wiki
Super Smash Bros. Ultimate Walkthrough & Guides Wiki
Pokemon Brilliant Diamond and Shining Pearl (BDSP) Walkthrough & Guides Wiki
Elden Ring Shadow of the Erdtree Walkthrough & Guides Wiki
Monster Hunter World Walkthrough & Guides Wiki
The Legend of Zelda: Tears of the Kingdom Walkthrough & Guides Wiki
Persona 3 Reload Walkthrough & Guides Wiki


All rights reserved
©ATLUS. ©SEGA. All rights reserved. SEGA is registered in the U.S. Patent and Trademark Office. ATLUS and the ATLUS logo are registered trademarks or trademarks of ATLUS Co., Ltd. SEGA, the SEGA logo and UNICORN OVERLORD are registered trademarks or trademarks of SEGA CORPORATION.
The copyrights of videos of games used in our content and other intellectual property rights belong to the provider of the game.
The contents we provide on this site were created personally by members of the Game8 editorial department.
We refuse the right to reuse or repost content taken without our permission such as data or images to other sites.