Bowman of the Setting Sun Walkthrough
☆Get to know Alain and the other characters
★Choices | Gammel | Mandrin
☆Farm Divine Shards for Ochlys!
★Classes | How to Promote and How to Change Class
☆Let us know who you'll marry in our Romance guide!
This is a walkthrough and guide for Bowman of the Setting Sun in Unicorn Overlord. See a walkthrough guide for Bowman of the Setting Sun, its location and rewards, the stage's objectives, recommended units and formations, item locations, and battle strategies!
| Related Articles | |
|---|---|
| Galadimir | Bowman of the Setting Sun |
List of Contents
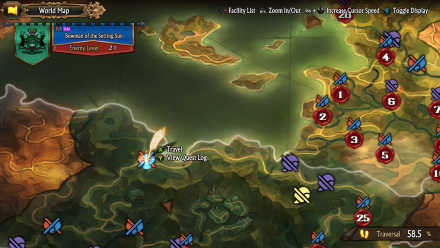
Bowman of the Setting Sun Location and Rewards
Location
| Map Location | Overworld Location |
|---|---|
 |
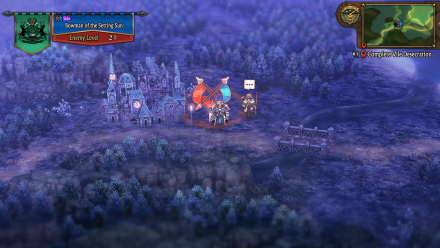 |
| Region: Elheim Location: Beside Voitarafi Town |
|
Rewards
| Rewards |
|---|
|
・Greatwood Bow x1 ・Star Iron x1 ・Faerie Knights x1 |
Bowman of the Setting Sun Recruitable Characters
| Recruitable Characters | ||
|---|---|---|
 Galadmir Galadmir
|
||
Bowman of the Setting Sun marks the first stage where Galadimir automatically joins the Liberation upon successful victory.
List of All Recruitable Characters
Bowman of the Setting Sun Recommended Units
| Recommended Unit Leaders | ||||
|---|---|---|---|---|
 Alain
Alain |
 Hilda
Hilda |
 Josef
Josef |
||
Before doing this quest, make sure that you have expanded your slots from 3 to 4. Additionally, your Renown should be at rank B by now, and promoting your party members is a must since the enemies are much stronger and are at an advanced class as well. You can expand your units, hire Mercenaries, and promote your allies by spending Honor in Forts you own.
In Bowman of the Setting Sun, using 3 units will be enough to finish this as Galadimir will be offering both healing and Ranged Assists in this stage. We recommend the Unit Leaders listed above. Click on the leader's name to see our recommended Unit Formation for that leader in this stage.
Alain's Unit
| Alain's Unit | ||
|---|---|---|
 Mandrin Mandrin (Sniper) |
 Scarlett Scarlett (Priestess) |
 Rolf Rolf (Hunter) |
| - |
Alain (Lord) |
- |
Alain's Unit will deal with the Gryphon Masters and Elven Fencers.
Mandrin and Rolf both possess the ability to ensure truestrikes with their Eagle Eye passives making the Fencers' Sylphic Barrier nullified. Scarlett excels in both magick and healing and will be very useful, along with Rolf and Mandrin, in dealing with Gryphon Masters. Alain will hold down this fort as he has the highest DEF among them and can shield allies with his Noble Guard
Promoting Alain
It is recommended that you promote Alain from Lord to High Lord before starting this quest, as he will gain access to a mount and will have faster mobility. Allowing him to keep up with Josef's movement speed so they will stand closely together.
Alternatively, if you haven't promoted Alain yet, you can use a Light Feather for faster mobility.
How to Promote to Advanced Classes
Hilda's Unit
| Hilda's Unit | ||
|---|---|---|
 Fran Fran (Gryphon Knight) |
Hilda (Wyvern Knight) |
 Chloe Chloe (Soldier) |
| - |
 Ochlys Ochlys (Feathersword) |
- |
Hilda's unit will be responsible for treasure collecting and taking down Cavalry or Gryphon Master units.
Having all the flying allies in this group will lead them to victory when fighting Cavalry units. Chloe elevates this team by having attacks suited for both Flying and Cavalry units, making this team able to battle Gryphon Masters as well.
Recruiting Hilda
Hilda is a recruitable character and will join the Liberation after having Primm talk to her and finishing the battle in The Champion of Order side quest.
Having Hilda in this unit will make traversing easier, especially in terrains where normal Cavalry units will have low mobility.
The Champion of Order Walkthrough
Josef's Unit
| Josef's Unit | ||
|---|---|---|
 Magellan Magellan (Sellsword) |
 Berenice Berenice (Sellsword) |
 Jeremy Jeremy (Sellsword) |
| - |
Josef (Paladin) |
- |
Having composed of all the best damagers in the team, Josef's team can take on almost all units in this stage, except Hoplites, which may take another round of battle to finish due to their shields, and Elven Fencers, due to their extremely high Evasion.
Josef's team is best suited to battle the Infantries in this stage.
Promoting Sellswords
Before starting this quest, you can promote at least one of your Sellswords to Landsknechts so you will gain access to their anti Hoplite skill, the Bastard's Cross.
Once the ability is learned, this unit will also be able to defeat any shielded enemy that comes its way.
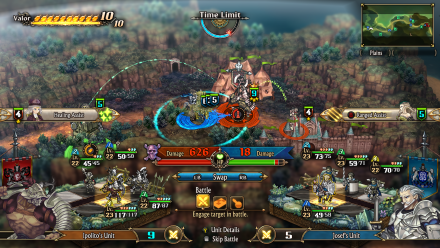
Bowman of the Setting Sun Walkthrough
| # | Step by Step Guide |
|---|---|
| 1 |
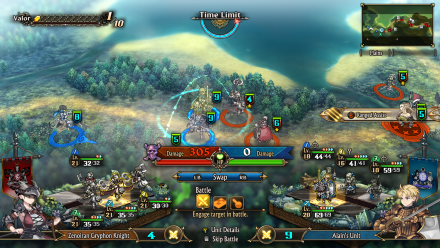 Deploy and Disperse Deploy Alain, Hilda, and Josef's units and make your way towards the bridge. Alain will target the Gryphon Masters while Josef deals with the Infantry units. Hilda on the other hand, will be in charge of getting treasure on the edge of the woods near the bridge, you will collect a Defensive Draught once picking it up, take note that you can use a Light Feather to increase Hilda's mobility so she can keep up with Josef and Alain. Once garrisoned at the bridge, two additional enemy units will approach you, Josef and Alain will have no problem defeating these enemies. Also, Galadimir will be stationed at the Watchtowers all throughout and aid you in your battles. |
| 2 |
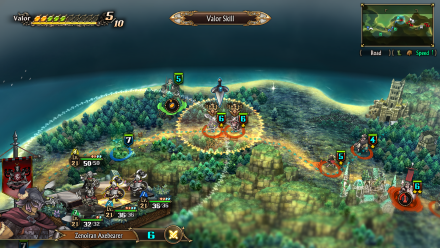 Go to Jokisvun Ruins After clearing out the path, your next destination will be at Jokisvun Ruins. Defeat enemies on the way and use the same strategy as before, Josef on Infantries and Alain on Gryphon Masters and Fencers. Hilda will still be on the path to collecting a treasure on the way to the ruins, but first have her deal with the Dark Knight unit that leads the charge on the way to you. After this, Galadimir will have been spotted by the enemy units. you can have Hilda use her Dragoon Dive Valor Skill to the enemies approaching Galadimir and then let Josef and Alain finish the fight as you collect the treasure up north near the shore to get a Hallowed Corne Ash. Once garrisoned in Jokisvun Ruins, you will receive a Dew of Acuity. |
| 3 |
 Defeat Ipolito Now that the path is clear, the final goal is to head to the enemy command post and defeat Ipolito. Before this, garrison in Merietra Town to collect a Magick Bomb from an NPC. Then, have Hilda collect the treasure just below the town and get a Mantlet Kit. Finally, head on to Ipolito's post, defeating enemy units on the way. You can use either Josef or Alain to defeat Ipolito, whoever has more damage and stamina to battle. After defeating Ipolito, you will receive a Giant's Greataxe. |
Bowman of the Setting Sun Stage Info
| Bowman of the Setting Sun Stage Map | ||
|---|---|---|
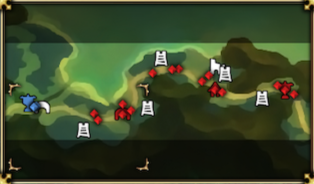 |
||
| Enemy Level | 21 | |
| Victory Condition | ・Defeat Ipolito | |
| Defeat Condition |
・The Liberation's command post is captured ・The time limit expires |
|
Unicorn Overlord Related Guides

All Main Quest Stages
All Side Quest Stages
All Overworld Quests
| Overworld Quests | |
|---|---|
| An Angel's Request | Palevia's Escaped Chickens |
| Carved of Cornia Stone | Cemeteries of Cornia |
| Carved of Drakenhold Stone | Cemeteries of Drakenhold |
| Drakenhold's Escaped Chickens | - |
All Liberation Quests
Comment
Author

Bowman of the Setting Sun Walkthrough
Rankings
- We could not find the message board you were looking for.
Gaming News


![Monster Hunter Stories 3 Review [First Impressions] | Simply Rejuvenating](https://img.game8.co/4438641/2a31b7702bd70e78ec8efd24661dacda.jpeg/thumb)
Popular Games

Genshin Impact Walkthrough & Guides Wiki
Honkai: Star Rail Walkthrough & Guides Wiki
Umamusume: Pretty Derby Walkthrough & Guides Wiki
Pokemon Pokopia Walkthrough & Guides Wiki
Resident Evil Requiem (RE9) Walkthrough & Guides Wiki
Monster Hunter Wilds Walkthrough & Guides Wiki
Wuthering Waves Walkthrough & Guides Wiki
Arknights: Endfield Walkthrough & Guides Wiki
Pokemon FireRed and LeafGreen (FRLG) Walkthrough & Guides Wiki
Pokemon TCG Pocket (PTCGP) Strategies & Guides Wiki


Recommended Games
Diablo 4: Vessel of Hatred Walkthrough & Guides Wiki
Cyberpunk 2077: Ultimate Edition Walkthrough & Guides Wiki
Fire Emblem Heroes (FEH) Walkthrough & Guides Wiki
Yu-Gi-Oh! Master Duel Walkthrough & Guides Wiki
Super Smash Bros. Ultimate Walkthrough & Guides Wiki
Pokemon Brilliant Diamond and Shining Pearl (BDSP) Walkthrough & Guides Wiki
Elden Ring Shadow of the Erdtree Walkthrough & Guides Wiki
Monster Hunter World Walkthrough & Guides Wiki
The Legend of Zelda: Tears of the Kingdom Walkthrough & Guides Wiki
Persona 3 Reload Walkthrough & Guides Wiki


All rights reserved
©ATLUS. ©SEGA. All rights reserved. SEGA is registered in the U.S. Patent and Trademark Office. ATLUS and the ATLUS logo are registered trademarks or trademarks of ATLUS Co., Ltd. SEGA, the SEGA logo and UNICORN OVERLORD are registered trademarks or trademarks of SEGA CORPORATION.
The copyrights of videos of games used in our content and other intellectual property rights belong to the provider of the game.
The contents we provide on this site were created personally by members of the Game8 editorial department.
We refuse the right to reuse or repost content taken without our permission such as data or images to other sites.