The Battle for Portolle Walkthrough
☆Get to know Alain and the other characters
★Choices | Gammel | Mandrin
☆Farm Divine Shards for Ochlys!
★Classes | How to Promote and How to Change Class
☆Let us know who you'll marry in our Romance guide!
The Battle for Portolle is one of four late-game liberation quests that can be completed early to gain EXP fast in Unicorn Overlord. See how to cheese The Battle for Portolle so you can gain EXP quickly.
| EXP Farming Guides | |
|---|---|
| The Battle for Plum Paferme | The Battle for Sorm |
| The Battle for Soiree Calme | The Battle for Portolle |
List of Contents
The Battle for Portolle Recommended Unit Setup
Units and Equipment
| Low-Level Leveling Unit | |||
|---|---|---|---|
| Back |  Gryphon Knight Gryphon Knight |
 Cleric Cleric |
 Sellsword Sellsword |
| Front |  Alain Alain |
||
This unit composition and guide is optimized for a low-level clear in Story Difficulty to level up this specific unit fast.
Higher level characters with better gear in higher difficulties may still use this strategy as a guide though results may vary.
Gryphon Knight
| Character/Class | Equipment | Tactics |
|---|---|---|
| Gryphon Knight (Required) |
|
|
A Gryphon Knight will be used to use the unit leader to swiftly reach the boss with the Hastened Call Valor Skill without fighting any other hostile units.
The Gryphon Knight will be our main AoE DPS in the unit with High Swing as its primary Active Skill.
Any Gryphon Knight can be used with this strategy; however, one with Phys. ATK, Crit. Rate, or Initiative Growths is recommended. Fort Mainteneaut, Fort Paradis, Fort Plaine, and the Walled City of Eucuit are all locations where you can hire Gryphon Knight Mercenaries.
Fran is a unique Gryphon Knight you recruit after completing The Priestess, Abducted Main Quest.
Sellsword
| Character/Class | Equipment | Tactics |
|---|---|---|
| Sellsword (Required) |
|
|
Sellswords are the best class to use versus against enemies that far out-level you. Their Valor Skill, Summon Warriors, summons an allied Sellsword unit that scales with the stage level, not the user. In Story difficulty, this unit usually hits the boss for 90% of their health, and that's when your unit comes in for the final hit.
Note that you will have to deal the final blow to the boss, or you won't gain the EXP for the kill. The Sellsword unit may occasionally kill the boss in one battle, and If they do and you need the EXP, you would have to restart the stage.
Our Sellsword will be the secondary DPS to kill off any remaining enemies with Pursuit or Killing Chain.
Any Sellsword can be used with this strategy; however, one with Phys. ATK, Crit. Rate, or Accuracy Growths is recommended. You can hire Sellsword Mercenaries in Fort Colmarre and the Walled City of Eucuit.
Berenice is a unique Sellsword you can recruit in The Mercenary's Trial Side Quest.
Cleric
| Character/Class | Equipment | Tactics |
|---|---|---|
| Cleric (Recommended) |
|
|
The Cleric is primarily used for the Lyrical Wand. It can provide another Active Point to our Gryphon Knight for another High Swing, effectively doubling its damage output. The Lyrical Wand can be purchased in the Walled City of Barbatimo, unlocked after completing The Battle for Barbatimo.
The Tailwind Passive Buff is also important as it almost guarantees the unit will outspeed the high-level enemies and will deal damage before the enemy can. The Cleric is also heavily recommended due to their Refresh Passive Skill, which can dispel any debuff the Back Row can suffer, such as Freeze and Initiative Down.
Another character and class may replace them if they can provide the Tailwind buff at the start of combat and deal a fair amount of damage to replace the additional AP lost from Lyrical Wand.
Any Cleric can be used with this strategy. However, one with Initiative Growths is recommended. Fort Chandelis, Fort Epine Morceaux, and the Walled Cities of Barbatimo and Eucuit are locations where you can hire Cleric Mercenaries.
Sharon and Tatiana are unique Clerics you can recruit early in The Winged Knight and The Tormented Helm Side Quests respectively.
Alain
| Character/Class | Equipment | Tactics |
|---|---|---|
| Alain (Recommended) |
|
|
Alain is arguably the most versatile character and can fit in most unit compositions. As this is a low-level cheese clear for leveling, it's recommended that he equip the Rookie Egg for bonus EXP.
Alain's primary role in the unit is to protect the Cleric from hits or debuffs so they can cast Refresh and Active Heal. Viperfang's Poison Slash damages armored classes, which our unit can struggle to damage to being Phys. Atk heavy.
If you plan on leveling other characters, you can still replace Alain with another character. You can replace him with an offensive/defensive hybrid character, an AP provider with White Cat-Ear Hood, or another offensive support while the Sellsword replaces the front-row role.
Consumable Items
| Item | Item Usage and Details |
|---|---|
x1 Required |
Allied units will not incur assist attacks. Last for one battle.
・ Prevents our unit from instantly dying from enemy assists at the start of the battle. ・ One for each battle stage is required. |
x1 Required |
All enemy units in range move toward the user for 10 seconds. Does not affect enemies in towns, forts, or bases.
・ Will be used to lure a group of enemy units away from our undefended Command Post. |
x1 Required |
Targeted enemy unit moves toward the user for 10 seconds. Does not affect enemies in towns, forts, or bases.
・ Will be used to lure an enemy unit away from our undefended Command Post. |
x2 Required |
Sacred ash that prevents defeat. Can be used to recover 2 Valor Points.
・ Two will be used to cast both Valorous and Royal Orders. |
x1 Recommended |
Doubles the EXP and gold gained by the user's unit for 20 seconds.
・ Can be used to replace Hallowed Corne Ashes and Valor Order to get a 100% EXP boost. ・ Does not stack with the effects of Valor Order. |
x1 Recommended |
Increases damage dealt by the user's unit by 30%. Lasts for one battle.
・ Increases our damage output to deal the final blow to the enemy general and end the stage. ・ Optional, depending on your team's damage output. |
x1 Recommended |
Decreases damage taken by the user's unit by 30%. Lasts for one battle.
・ Decreases the damage taken to survive enemy casters with Quick Cast, which always moves first and deals AoE Magick damage |
This stage is pretty straightforward, and if done right, we would only need to use one Wind Faerie's Charm to prevent Magick Assists from killing our unit.
Note that a unit can only have three buffs at a time. It's best to have Royal Order, Wind Faerie Charm, and Defensive/Empowering Draught. Sometimes, you may use another Hallowed Corne Ash instead of Valorous Order for a damage boost, damage reduction, and First Strike, allowing our team to move first regardless of Initiative.
The Battle for Portolle Walkthrough
The Battle for Portolle Low-Level Guide
| # | Step by Step Objectives |
|---|---|
| 1 |
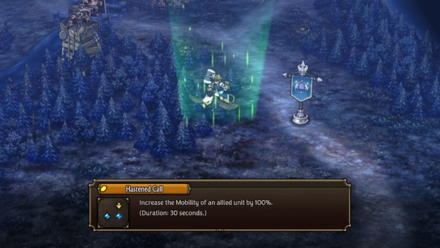 Deploy the Unit Deploy the unit to the east and use Hastened Call. |
| 2 |
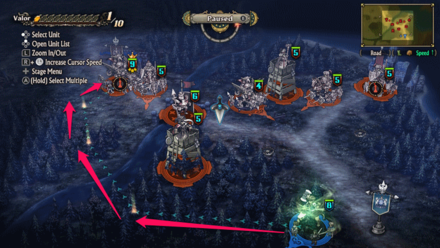 Travel West Towards the Boss Travel west and avoid any battle against the enemy Cavalry. |
| 3 |
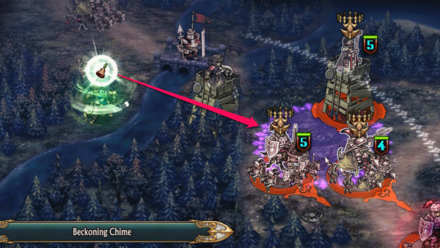 Use a Beckoning Chime on Three Units When the Cavalry furthest to your Command Post gets close to the Cleric Watchtower and the other Cavalry Unit, use a Beckoning Chime on them to prevent them from capturing your Command Post. |
| 4 |
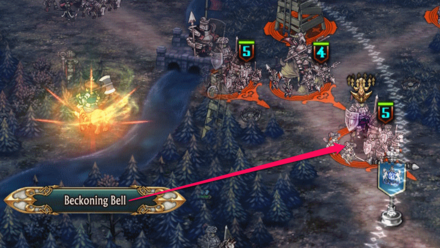 Use a Beckoning Bell on the Furthest Unit Use a Beckoning Bell to the unit closest to your Command Post to prevent them from capturing it. |
| 5 |
 Eliminate the Cleric Unit Hidden in the Trees While moving toward the boss, you'll encounter a Cleric Unit that you can easily dispose of. |
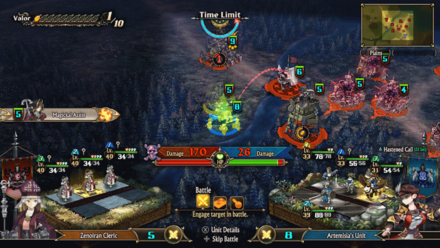
| 6 |
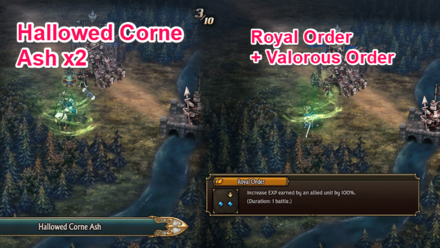 Use Two Ashes then Royal and Valorous Order Use two Hallowed Corne Ashes to have enough Valor Points for Royal and Valorous Orders. Valorous Order is required to gain First Strike and out-speed the enemy Sorceress with Quick Cast. |
| 7 |
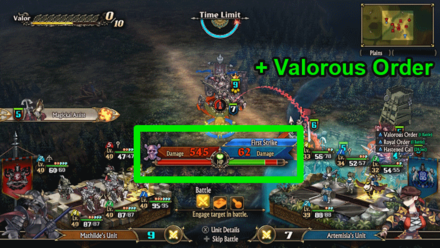 Deal the Finishing Blow With the Valorous Order buff, your Gryphon Knight can easily sweep the enemy Cavalry, and then the rest of your unit kills the Back Row. |
To clear The Battle for Portolle, use the Gryphon Knight as the leader to have unobstructed movement, and with the Hastened Call Valor Skill, move northwest and go straight to the boss.
Before flying through the river, use a Beckoning Chime and a Beckoning Bell on the attacking units, as well as the Cleric unit in the Watchtower to prevent it from capturing the Command Post and providing Healing Assist on the boss. You will have enough time to set-up for the boss kill before the Beckoning Chime and Bell effects expires.
Once you get to the boss, use enough Hallowed Corne Ashes to be able to use both Valorous and Royal Orders. Valarous Order will be used to gain First Strike and outspeed the enemy Sorceress in the boss' unit which has Quick Cast and Ice Coffin.
With maybe a little more assistance from item buffs, deal the final hit to the boss to finish the stage.
EXP Results

The Lv. 15 Unit from The Battle for Plum Paferme Guide received a couple more levels after the 4th and last stage with Alain now reaching Lv. 42. Before even completing The Priestess, Abducted.
Unicorn Overlord Related Guides
All Main Quest Stages
All Side Quest Stages
All Overworld Quests
| Overworld Quests | |
|---|---|
| An Angel's Request | Palevia's Escaped Chickens |
| Carved of Cornia Stone | Cemeteries of Cornia |
| Carved of Drakenhold Stone | Cemeteries of Drakenhold |
| Drakenhold's Escaped Chickens | - |
All Liberation Quests
Comment
Author

The Battle for Portolle Walkthrough
Rankings
- We could not find the message board you were looking for.
Gaming News

![Star Savior Review [First Impressions] | Engaging, Entertaining, and Expensive](https://img.game8.co/4447603/8f500e9bf666bdb8adb1af478e9dfdbd.png/show)

![Death Stranding 2: On The Beach Review [PC] | A Port That Delivers](https://img.game8.co/4447392/15310a0c9aa1b6843bb713b2ea216930.jpeg/thumb)

Popular Games

Genshin Impact Walkthrough & Guides Wiki
Umamusume: Pretty Derby Walkthrough & Guides Wiki
Crimson Desert Walkthrough & Guides Wiki
Monster Hunter Stories 3: Twisted Reflection Walkthrough & Guides Wiki
Honkai: Star Rail Walkthrough & Guides Wiki
Pokemon Pokopia Walkthrough & Guides Wiki
The Seven Deadly Sins: Origin Walkthrough & Guides Wiki
Wuthering Waves Walkthrough & Guides Wiki
Zenless Zone Zero Walkthrough & Guides Wiki
Arknights: Endfield Walkthrough & Guides Wiki


Recommended Games
Fire Emblem Heroes (FEH) Walkthrough & Guides Wiki
Diablo 4: Vessel of Hatred Walkthrough & Guides Wiki
Cyberpunk 2077: Ultimate Edition Walkthrough & Guides Wiki
Yu-Gi-Oh! Master Duel Walkthrough & Guides Wiki
Super Smash Bros. Ultimate Walkthrough & Guides Wiki
Pokemon Brilliant Diamond and Shining Pearl (BDSP) Walkthrough & Guides Wiki
Elden Ring Shadow of the Erdtree Walkthrough & Guides Wiki
Monster Hunter World Walkthrough & Guides Wiki
The Legend of Zelda: Tears of the Kingdom Walkthrough & Guides Wiki
Persona 3 Reload Walkthrough & Guides Wiki


All rights reserved
©ATLUS. ©SEGA. All rights reserved. SEGA is registered in the U.S. Patent and Trademark Office. ATLUS and the ATLUS logo are registered trademarks or trademarks of ATLUS Co., Ltd. SEGA, the SEGA logo and UNICORN OVERLORD are registered trademarks or trademarks of SEGA CORPORATION.
The copyrights of videos of games used in our content and other intellectual property rights belong to the provider of the game.
The contents we provide on this site were created personally by members of the Game8 editorial department.
We refuse the right to reuse or repost content taken without our permission such as data or images to other sites.