O'er Wood and Water Walkthrough
☆Get to know Alain and the other characters
★Choices | Gammel | Mandrin
☆Farm Divine Shards for Ochlys!
★Classes | How to Promote and How to Change Class
☆Let us know who you'll marry in our Romance guide!
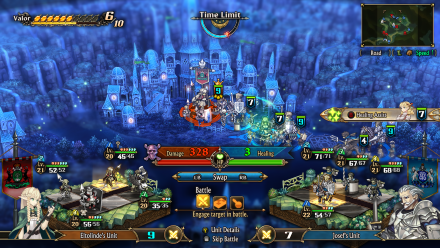
This is a walkthrough and guide for O'er Wood and Water in Unicorn Overlord. See a walkthrough guide for O'er Wood and Water, its location and rewards, the stage's objectives, recommended units and formations, item locations, and battle strategies!
| Related Articles | |
|---|---|
| Eltolinde | O'er Wood and Water |
List of Contents
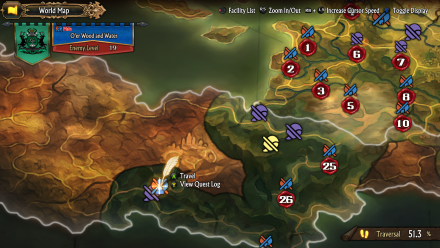
O'er Wood and Water Location and Rewards
Location
| Map Location | Overworld Location |
|---|---|
 |
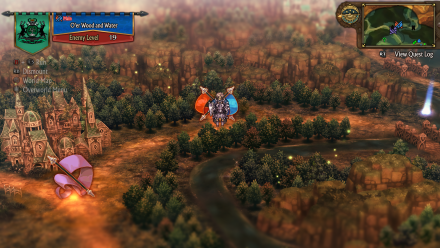 |
| Region: Elheim Location: To the right of Quentari Town |
|
Rewards
| Rewards |
|---|
|
・Clearsight Amulet x1 ・Healing Font(S)x1 ・Elheim x1 |
O'er Wood and Water Recruitable Characters
| Recruitable Characters | ||
|---|---|---|
 Eltolinde Eltolinde
|
||
O'er Wood and Water marks the first stage where Eltolinde automatically joins the Liberation upon successful victory.
List of All Recruitable Characters
O'er Wood and Water Recommended Units
| Recommended Unit Leaders | ||
|---|---|---|
 Renault
 |
 Hilda
Hilda |
 Josef
Josef |
 Alain
Alain |
 Scarlett
 |
 Gloucester
 |
Before doing this quest, make sure that you have expanded your units to 6 and 6 of your party's unit slots from 3 to 4. Additionally, if your Renown is at rank B, you can begin promoting any party member you want to. You can expand your units, hire Mercenaries, and promote your allies by spending Honor in Forts you own.
In O'er Wood and Water, utilizing 6 units is recommended. We recommend the Unit Leaders listed above. Click on the leader's name to see our recommended Unit Formation for that leader in this stage.
Renault's Unit
| Renault's Unit | ||
|---|---|---|
 Auch Auch (Wizard) |
 Ithilion Ithilion (Elven Fencer) |
 Yahna Yahna (Witch) |
| - |
Renault (Great Knight) |
- |
This stage has a lot of Armored units and thus the need for Magick users arises.
Auch, Yahna, and Ithilion will be very useful in defeating Hoplites as they may have shields, but you have magick. Renault can do very well in keeping the front lines in check as he has high DEF and he also has Quick Guard for that extra layer of protection.
Recruiting Renault
Renault is a recruitable character and will automatically join the Liberation after certain conditions are met.
First, you must have the quest The Priestess, Abducted already finished. After this, you must finish four Liberation Quests, any Liberation Quest will do. Doing these steps will guarantee that Renault will join the Liberation's forces.
The Priestess, Abducted Walkthrough
Hilda's Unit
| Hilda's Unit | ||
|---|---|---|
 Fran Fran (Gryphon Knight) |
Hilda (Wyvern Knight) |
 Bruno Bruno (Gladiator) |
| - |
 Ochlys Ochlys (Feathersword) |
- |
Hilda's unit will be dealing with the Knights in this stage. Gathering all your flying allies in one team is a good way to go.
Fran, Hilda, and Ochlys are a Knight's worst nightmare when grouped together. Bruno is an additional force to be reckoned with with his Wide Smash that can damage rows of enemies with one attack. Hilda's Dragoon Dive Valor Skill is also useful for thinning out enemy units without necessarily fighting them. Ochlys can deal with enemies just fine as the defender in the front row as she has extremely high Evasion and every time an enemy attacks her, she activates her Accelerate passive.
Recruiting Hilda
Hilda is a recruitable character and will join the Liberation after having Primm talk to her and finishing the battle in The Champion of Order side quest.
Having Hilda in this unit will make traversing easier, especially in terrains where normal Cavalry units will have low mobility.
The Champion of Order Walkthrough
Josef's Unit
| Josef's Unit | ||
|---|---|---|
 Magellan Magellan (Sellsword) |
 Berenice Berenice (Sellsword) |
 Jeremy Jeremy (Sellsword) |
| - |
Josef (Paladin) |
- |
This unit is designed to be indestructible against Infantry units such as the Housecarls, which are extremely harmful when they get promoted to the Viking class.
All Sellswords are lined up at the back protected by Josef, who will also be responsible for healing them. Killing Chain and Following Slash will be the content of every battle as they will just keep on attacking until the enemy count is zero. Unless you promote your Sellswords to Landsknecht and they learn Bastard's Cross you have to stay away from Hoplites. If you have promoted them, however, you can deal with every enemy in this stage.
Alain's Unit
| Alain's Unit | ||
|---|---|---|
 Mordon Mordon (Warrior) |
 Aubin Aubin (Housecarl) |
 Nina Nina (Warrior) |
| - |
Alain (Lord) |
- |
Alain's unit is your second main against Hoplites and armored units as you have DEF ignoring attackers in the back.
Mordon and Nina carry massive strikes that are sure to destroy even the armor and shields of enemies. Aubin on the other hand, can lower enemy guard using his Rolling Axe.
Scarlett's Unit
| Scarlett's Unit | ||
|---|---|---|
 Mandrin Mandrin (Sniper) |
Scarlett (Priestess) |
 Liza Liza (Arbalist) |
| - |
 Hodrick Hodrick (Hoplite) |
- |
Scarlett's unit is your support unit that will be tailing your core team. They don't have to fight unless some pesky Gryphon Knight enemy unit decides to ambush you.
Scarlett's team is only effective against Gryphon Knights and will not be fighting as much as the core team. Every member of this team is essential though, as Scarlett's primary role is to heal the teams with her Healing Assist, Liza will be using her Smoke Bolt Valor Skill to disarm Magickal Assists from enemy units in Watchtowers, Mandrin will use his Arrow Rain II Valor Skill in helping thin the numbers of enemy units, and Hodrick will be responsible for taking and absorbing all damage in case this team gets ambushed.
Gloucester's Unit
| Gloucester's Unit | ||
|---|---|---|
|
Gloucester (Dark Knight) |
 Selvie Selvie (Shaman) |
 Kitra Kitra (Warrior) |
| - |
 Virginia Virginia (Crusader) |
- |
Gloucester's team will be deployed later. This team's only goal is to defend the command post as there will be a reinforcement later on coming from the bridge beside your base.
There is only one reinforcement that will come, and this is a shielded enemy unit. It is good that we have another Warrior left to deploy, and Kitra will make sure that the Hoplites will be crippled. Virginia has the Iron Crusher skill that will prove useful in this battle as well, Gloucester deals massive damage alone, and can also inflict Poison with his Venom Axe. All the while Selvie doing what she does best, debuffing the enemy units before they attack and making sure that your unit is at its best.
Recruiting Gloucester
Gloucester is a recruitable character and will join the Liberation after successfully finishing the Black Knight of the Dunes main quest, together with Liza.
Gloucester is a Dark Knight that deals massive damage. He can also inflict Poison to enemy units with his Venom Axe.
O'er Wood and Water Walkthrough
| # | Step by Step Guide |
|---|---|
| 1 |
 Deploy Units Deploy Alain, Josef, Hilda, and Renault's units. Wait for the approaching enemy unit to go near your base before you battle with them to avoid enemy assistance from the nearby Watchtower. If you think that you are out of the radius of the tower, battle the Sorcerer unit that's heading towards you. Meanwhile, have Hilda's unit bypass the enemy unit on the bridge and go towards the Watchtower to clear it out first, then have Renault or Alain's unit battle the Armored Infantry unit guarding the bridge. |
| 2 |
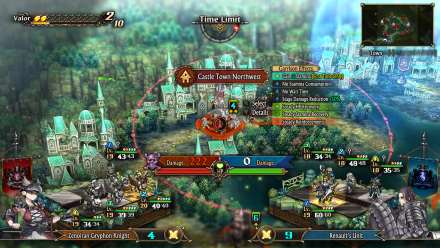 Part Ways With Renault Now that the enemy is gone, all units must disperse and head to their own destination. Renault's unit will continue onwards in this bridge up until Castle Town Northwest as his team can singlehandedly defeat every enemy in this path which is mostly composed of Hoplites and Gryphon Knights. On the way, you will collect a treasure on the ground, grab it to acquire a Hallowed Corne Ash. Meanwhile, the rest of the unit will head east and continue their fight from there. Use a Light Feather on Hilda so she can follow the Cavalry units' speed. She will also lead the way as the enemy units here are Knights. |
| 3 |
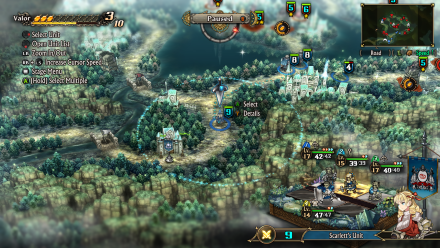 Deploy Scarlett If you have collected enough Valor Points, you can deploy Scarlett and make her rendezvous with the team that's heading east. Once here, disable all the Watchtowers using Liza's Smoke Bolt so that Hilda's team will be safe from Magickal Assists. Feel free to use a Light Feather on Scarlett so she moves faster. |
| 4 |
 Raise the Bridges Once Renault has successfully garrisoned in Castle Town Northwest, the bridge nearby will be raised. Have him continue onwards and defeat the enemy units here. Meanwhile, while waiting for Scarlett to rendezvous, have Hilda collect the treasure on the water surface to collect a Barricade Kit, after this, have her destroy the Watchtower beside Castle Town Center. Josef and Scarlett's unit will be on standby at the other end of the unactivated bridge and wait for Renault's team to garrison in Castle Town Center. Alain's Unit will continue their path to the east, collecting a Healing Tonic (M) on the ground near the Watchtower, and finally, taking over Castle Town Southeast to activate the bridge there. |
| 5 |
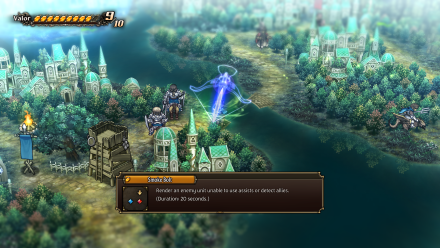 Meet on the Final Bridge Once all but one bridge has been activated, a reinforcement will appear below. Your command post is unguarded. Deploy Gloucester's unit and have him deal with the enemy. Meanwhile, have Josef and Scarlett pass the bridge and meet with Hilda and Renault. Alain will be dealing with the enemies solo for now as he moves forward on his path, you may also have Hilda's unit join him and use her powerful Valor Skill, Dragoon Dive on enemies to help thin the herd a bit. Also on the other side, you can help Alain by using Valor Skills. You can utilize Mandrin's Arrow Rain II, or Auch's Blaze. Additionally, have Scarlett positioned at the edge of the unactivated bridge and use Liza's Smoke Bolt on the nearby Sorcerer unit to avoid Magickal Assists. |
| 6 |
 Take a Rest Once Alain takes over Castle Town Northeast, the bridge will be activated and the Castle barrier will be down. Have everybody meet up first and use the Encampment below to regain HP and Stamina before the final fight. |
| 7 |
 Defeat Eltolinde After camping, you can go and have the whole team pursue Eltolinde. Defeat the enemy units on the way to Eltolinde, feel free to switch between your units to see which is more effective to use. Finally, Josef's team will be the one to defeat Eltolinde so go ahead and battle Eltolinde using his team. Once Eltolinde is defeated, you will obtain a Charm of Sun & Moon. |
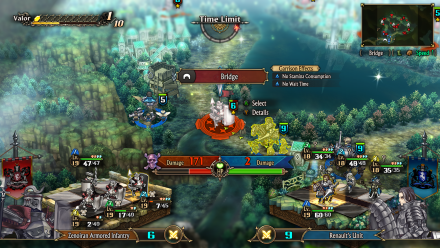
O'er Wood and Water Stage Info
| O'er Wood and Water Stage Map | ||
|---|---|---|
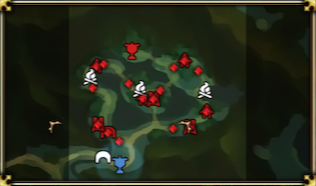 |
||
| Enemy Level | 19 | |
| Victory Condition | ・Defeat Eltolinde | |
| Defeat Condition |
・The Liberation's command post is captured ・The time limit expires |
|
Unicorn Overlord Related Guides
All Main Quest Stages
All Side Quest Stages
All Overworld Quests
| Overworld Quests | |
|---|---|
| An Angel's Request | Palevia's Escaped Chickens |
| Carved of Cornia Stone | Cemeteries of Cornia |
| Carved of Drakenhold Stone | Cemeteries of Drakenhold |
| Drakenhold's Escaped Chickens | - |
All Liberation Quests
Comment
Author

O'er Wood and Water Walkthrough
Rankings
- We could not find the message board you were looking for.
Gaming News

![Death Stranding 2: On The Beach Review [PC] | A Port That Delivers](https://img.game8.co/4447392/15310a0c9aa1b6843bb713b2ea216930.jpeg/show)

![Death Stranding 2: On The Beach Review [PC] | A Port That Delivers](https://img.game8.co/4447392/15310a0c9aa1b6843bb713b2ea216930.jpeg/thumb)

Popular Games

Genshin Impact Walkthrough & Guides Wiki
Umamusume: Pretty Derby Walkthrough & Guides Wiki
Crimson Desert Walkthrough & Guides Wiki
Monster Hunter Stories 3: Twisted Reflection Walkthrough & Guides Wiki
Honkai: Star Rail Walkthrough & Guides Wiki
Pokemon Pokopia Walkthrough & Guides Wiki
The Seven Deadly Sins: Origin Walkthrough & Guides Wiki
Wuthering Waves Walkthrough & Guides Wiki
Zenless Zone Zero Walkthrough & Guides Wiki
Arknights: Endfield Walkthrough & Guides Wiki


Recommended Games
Fire Emblem Heroes (FEH) Walkthrough & Guides Wiki
Diablo 4: Vessel of Hatred Walkthrough & Guides Wiki
Cyberpunk 2077: Ultimate Edition Walkthrough & Guides Wiki
Yu-Gi-Oh! Master Duel Walkthrough & Guides Wiki
Super Smash Bros. Ultimate Walkthrough & Guides Wiki
Pokemon Brilliant Diamond and Shining Pearl (BDSP) Walkthrough & Guides Wiki
Elden Ring Shadow of the Erdtree Walkthrough & Guides Wiki
Monster Hunter World Walkthrough & Guides Wiki
The Legend of Zelda: Tears of the Kingdom Walkthrough & Guides Wiki
Persona 3 Reload Walkthrough & Guides Wiki


All rights reserved
©ATLUS. ©SEGA. All rights reserved. SEGA is registered in the U.S. Patent and Trademark Office. ATLUS and the ATLUS logo are registered trademarks or trademarks of ATLUS Co., Ltd. SEGA, the SEGA logo and UNICORN OVERLORD are registered trademarks or trademarks of SEGA CORPORATION.
The copyrights of videos of games used in our content and other intellectual property rights belong to the provider of the game.
The contents we provide on this site were created personally by members of the Game8 editorial department.
We refuse the right to reuse or repost content taken without our permission such as data or images to other sites.