A Shifting Tide Walkthrough
☆Get to know Alain and the other characters
★Choices | Gammel | Mandrin
☆Farm Divine Shards for Ochlys!
★Classes | How to Promote and How to Change Class
☆Let us know who you'll marry in our Romance guide!
This is a walkthrough and guide for A Shifting Tide in Unicorn Overlord. See a walkthrough guide for A Shifting Tide, its location and rewards, the stage's objectives, recommended units and formations, item locations, and battle strategies!
| Related Articles | |
|---|---|
| Mandrin | Gammel |
| Celeste | A Shifting Tide |
List of Contents
A Shifting Tide Location and Rewards
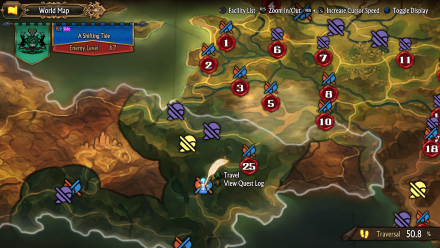
Location
| Map Location | Overworld Location |
|---|---|
 |
 |
| Region: Elheim Location: In front of Yaniss Town |
|
Rewards
| Rewards |
|---|
|
・Greatwood Spear x1 ・Hot Cross Buns x1 ・Black Talon Thieves x1 |
A Shifting Tide Recruitable Characters
| Recruitable Characters | ||
|---|---|---|
 Mandrin Mandrin
|
 Gammel Gammel
|
 Celeste Celeste
|
A Shifting Tide marks the first stage where Celeste, Mandrin, and Gammel will join you upon successful victory. Note that Mandrin and Gammel will only join if you chose not to execute them on The Winged Knight and A Solitary Resistance respectively.
List of All Recruitable Characters
A Shifting Tide Recommended Units
| Recommended Unit Leaders | ||||
|---|---|---|---|---|
 Josef
Josef |
 Auch
Auch |
 Liza
Liza |
 Scarlett
 |
|
Before doing this quest, make sure that you have expanded your units to at least 4 and 4 of your party's unit slots from 3 to 4. Additionally, if your Renown is at rank B, you can begin promoting any party member you want to. You can expand your units, hire Mercenaries, and promote your allies by spending Honor in Forts you own.
In A Shifting Tide, using 4 units will suffice since you will also be joined by Celeste's unit in this stage. We recommend the Unit Leaders listed above. Click on the leader's name to see our recommended Unit Formation for that leader in this stage.
Josef's Unit
| Josef's Unit | ||
|---|---|---|
 Magellan Magellan (Sellsword) |
 Berenice Berenice (Sellsword) |
 Jeremy Jeremy (Sellsword) |
| - |
Josef (Paladin) |
- |
Josef's Unit will be your go-to unit for all enemy units, except thieves.
Josef's unit is built to have the highest damage among all. The Sellswords will make sure that multiple attacks will land with their Following Slash and Killing Chain, while Josef does the same with his Pursuit ability, all the while being able to Heal party members. Assign Josef as the leader for his mobility, which is useful when collecting treasures.
Auch's Unit
| Auch's Unit | ||
|---|---|---|
|
Auch (Wizard) |
 Mordon Mordon (Warrior) |
 Yahna Yahna (Witch) |
| - |
 Virginia Virginia (Crusader) |
- |
Auch's unit is the Anti-Hoplite unit. With Magick users at the back, Hoplites are sure to die in the hands of Yahna and Auch, pair that with Mordon's DEF ignoring attacks and you have the best team against shielded enemies.
Virginia will be in charge of guarding since she has high DEF and can counterattack enemies with her Maiden's Hammer. Have Auch be the leader of this unit so his Magickal Assist leader effect will be useful.
Recruiting Auch
Auch is a recruitable character and will join the Liberation after successfully finishing the The Self-Effacing Sorcerer side quest should you choose to spare him.
Recruiting Auch before starting this quest is recommended as he will be effective in this battle.
The Self-Effacing Sorcerer Walkthrough
Liza's Unit
| Liza's Unit | ||
|---|---|---|
|
Liza (Arbalist) |
 Hilda Hilda (Wyvern Knight) |
 Rolf Rolf (Hunter) |
| - |
 Alain Alain (Lord) |
- |
Liza's Unit is best suited to target Thief enemies. Both Liza and Rolf can carry truestrikes and Hilda does massive damage to any enemy with her Diving Thrust especially Cavalries.
Alain will have no problem guarding them in the front as he has extremely high DEF and his Noble Guard is always a lifesaver. Have Liza lead this team for her Ranged Assist leader effect.
Recruiting Liza
Liza is a recruitable character and will join the Liberation after successfully finishing the Black Knight of the Dunes main quest
Having Liza in this unit is highly encouraged as not only does she deal damage to flying units and offer Ranged Assist, but she can also heal allies using her Medical Aid. Additionally, her Valor Skill, Smoke Bolt will prove useful in this stage.
Scarlett's Unit
| Scarlett's Unit | ||
|---|---|---|
 Aramis Aramis (Swordfighter) |
Scarlett (Priestess) |
 Melisandre Melisandre (Swordfighter) |
| - |
 Bruno Bruno (Gladiator) |
- |
Scarlett's team is a balanced unit that's very effective against any combination of enemies, specifically with Cesar's Unit.
This team allows for maximum damage, both magickal and physickal, and maximum healing, with Scarlett's Curing Call and Bruno's Bulk Up. This unit can defeat almost any enemy in this stage without much difficulty. Have Scarlett lead this team so her Healing Assist leader effect can be of use.
A Shifting Tide Walkthrough
| # | Step by Step Guide |
|---|---|
| 1 |
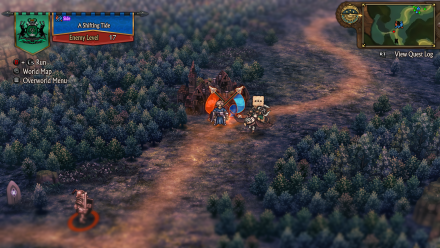
 Deploy and Move You will automatically be joined by Celeste's Unit in the beginning. Deploy all four units and proceed forward, except for Josef's unit, which will be getting the treasure near the bridge to the left. Pick up the treasure and acquire a Hallowed Corne Ash. There will be incoming enemy units on the way, feel free to switch your battle parties depending on the enemy unit you will face. Beware of the Magick Mine nearby as it will explode once a unit touches it. Also, thieves will be coming your way and Plunder gold from you. What you can do is use a Hallowed Corne Ash to increase your Valor Points and then use Yahna's Gravity Valor Skill so the thieves wouldn't be able to run away, or if you have Gammel in Celeste's team, use his Plunder II to get back your lost gold. |
| 2 |
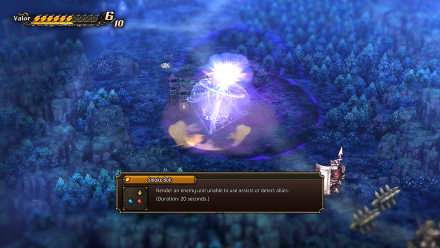 Utilize Your Valor Skills After clearing out the path of enemies, have at least one unit garrison in Fort Joperse to collect a lot of Valor Points. then you can move forward. On the way to Penilakssun Garrison, there will be Barricades and two Watchtowers with enemies on them. Now is a good time to consume your Valor Points and use Liza's Smoke Bolt to disarm enemy assists from the Watchtowers and use Mordon's Heavy Swing Valor Skill to destroy the barricades, plus damage the enemy unit in front of it. After doing everything, clear out the Watchtowers to prevent future Ranged Assists from the enemy. Once the Watchtowers are cleared out, have Liza's Unit garrison in one of them. |
| 3 |
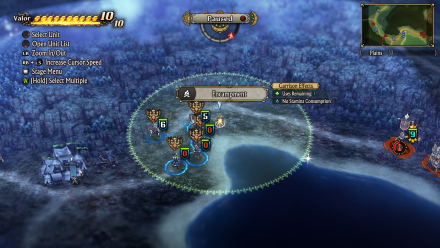 Use the Encampment On the way to the second Fort, there is a treasure near the Watchtower, get it to collect a Beckoning Bell. Now, you may proceed to garrison into Penilakssun Garrison to collect Valor Points, take Liza's unit off the Watchtower after defeating the enemy unit here, and have her follow the core team. By this time, your ally units may or may not have enough stamina points to continue. You must use the Campfire nearby to restore both HP and Stamina before going to the enemy command post. If your allied unit that has no stamina is far from the Campsite, use Smoked Nuts and have them go there. Wait until everybody has gathered near the radius before using it. |
| 4 |
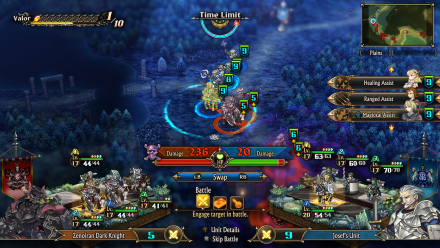
 Defeat Cesar After regaining Health and Stamina, proceed to move forward and head to Cesar's command post. Also, while on the way, have Josef's unit pick up the treasure near the lake to collect a Magick Mine. It is advised that before you fight with Cesar, you should debilitate the Hunter enemy unit garrisoned in the Watchtower nearby first, using Liza's Smoke Bolt to disable their Ranged Assist. Go ahead and do so, then have Scarlett's team battle Cesar, ignoring the remaining enemy unit in the tower. Use Auch's Magickal Assist and Liza's Ranged Assist as you see fit. After defeating Cesar, you will receive a Golden Egg. |
A Shifting Tide Stage Info
| A Shifting Tide Stage Map | ||
|---|---|---|
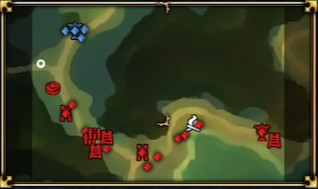 |
||
| Enemy Level | 17 | |
| Victory Condition | ・Defeat Cesar | |
| Defeat Condition |
・The Liberation's command post is captured ・The time limit expires |
|
Unicorn Overlord Related Guides

All Main Quest Stages
All Side Quest Stages
All Overworld Quests
| Overworld Quests | |
|---|---|
| An Angel's Request | Palevia's Escaped Chickens |
| Carved of Cornia Stone | Cemeteries of Cornia |
| Carved of Drakenhold Stone | Cemeteries of Drakenhold |
| Drakenhold's Escaped Chickens | - |
All Liberation Quests
Comment
Author

A Shifting Tide Walkthrough
Rankings
- We could not find the message board you were looking for.
Gaming News

![Star Savior Review [First Impressions] | Engaging, Entertaining, and Expensive](https://img.game8.co/4447603/8f500e9bf666bdb8adb1af478e9dfdbd.png/show)

![Death Stranding 2: On The Beach Review [PC] | A Port That Delivers](https://img.game8.co/4447392/15310a0c9aa1b6843bb713b2ea216930.jpeg/thumb)

Popular Games

Genshin Impact Walkthrough & Guides Wiki
Umamusume: Pretty Derby Walkthrough & Guides Wiki
Crimson Desert Walkthrough & Guides Wiki
Monster Hunter Stories 3: Twisted Reflection Walkthrough & Guides Wiki
Honkai: Star Rail Walkthrough & Guides Wiki
Pokemon Pokopia Walkthrough & Guides Wiki
The Seven Deadly Sins: Origin Walkthrough & Guides Wiki
Wuthering Waves Walkthrough & Guides Wiki
Zenless Zone Zero Walkthrough & Guides Wiki
Arknights: Endfield Walkthrough & Guides Wiki


Recommended Games
Fire Emblem Heroes (FEH) Walkthrough & Guides Wiki
Diablo 4: Vessel of Hatred Walkthrough & Guides Wiki
Cyberpunk 2077: Ultimate Edition Walkthrough & Guides Wiki
Yu-Gi-Oh! Master Duel Walkthrough & Guides Wiki
Super Smash Bros. Ultimate Walkthrough & Guides Wiki
Pokemon Brilliant Diamond and Shining Pearl (BDSP) Walkthrough & Guides Wiki
Elden Ring Shadow of the Erdtree Walkthrough & Guides Wiki
Monster Hunter World Walkthrough & Guides Wiki
The Legend of Zelda: Tears of the Kingdom Walkthrough & Guides Wiki
Persona 3 Reload Walkthrough & Guides Wiki


All rights reserved
©ATLUS. ©SEGA. All rights reserved. SEGA is registered in the U.S. Patent and Trademark Office. ATLUS and the ATLUS logo are registered trademarks or trademarks of ATLUS Co., Ltd. SEGA, the SEGA logo and UNICORN OVERLORD are registered trademarks or trademarks of SEGA CORPORATION.
The copyrights of videos of games used in our content and other intellectual property rights belong to the provider of the game.
The contents we provide on this site were created personally by members of the Game8 editorial department.
We refuse the right to reuse or repost content taken without our permission such as data or images to other sites.