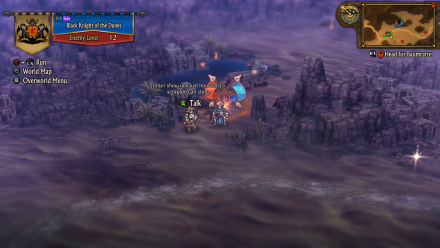
Black Knight of the Dunes Walkthrough
☆Get to know Alain and the other characters
★Choices | Gammel | Mandrin
☆Farm Divine Shards for Ochlys!
★Classes | How to Promote and How to Change Class
☆Let us know who you'll marry in our Romance guide!
This is a walkthrough and guide for Black Knight of the Dunes in Unicorn Overlord. See a walkthrough guide for Black Knight of the Dunes, its location and rewards, the stage's objectives, recommended units and formations, item locations, and battle strategies!
| Related Articles | |
|---|---|
| Gloucester Liza |
Black Knight of the Dunes |
List of Contents
Black Knight of the Dunes Location and Rewards
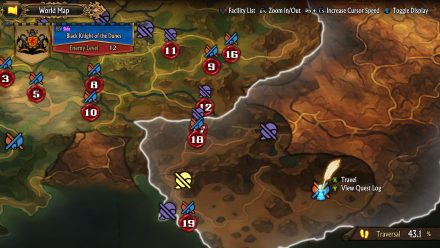
Location
| Map Location | Overworld Location |
|---|---|
 |
 |
| Region: Drakenhold Location: Northeast of Bandit's Keep |
|
Rewards
| Rewards |
|---|
|
・Carnat Axe x1 ・Beckoning Bell x1 ・Golden Ram Knights x1 |
Black Knight of the Dunes Recruitable Characters
| Recruitable Characters | ||
|---|---|---|
 Gloucester Gloucester
|
 Liza Liza
|
|
Black Knight of the Dunes marks the first stage where Gloucester and Liza automatically join the Liberation upon successful victory.
List of All Recruitable Characters
Black Knight of the Dunes Recommended Units
| Recommended Unit Leaders | ||
|---|---|---|
 Fran
Fran |
 Ochlys
 |
Gryphon Knight Mercenary |
 Auch
Auch |
 Scarlett
 |
 Yahna
Yahna |
Before doing this quest, make sure that you have expanded your units from 5 to 6 and at least 3 of your party's unit slots from 3 to 4. Additionally, hiring a Gryphon Knight mercenary is recommended for this battle. You can expand your units and hire Mercenaries by spending Honor in Forts you own.
In Black Knight of the Dunes, you will be using 6 units in total. 3 of them will be the core team and 3 will only be on guard at your command posts. You will also be joined by Liza's unit as the stage begins. We recommend the Unit Leaders listed above. Click on the leader's name to see our recommended Unit Formation for that leader in this stage.
Fran's Unit
| Fran's Unit | ||
|---|---|---|
 Magellan Magellan (Sellsword) |
Fran (Gryphon Knight) |
 Berenice Berenice (Sellsword) |
| - |
 Berengaria Berengaria (Dark Marquess) |
- |
Fran's Unit is the ultimate unit among all and can stand on its own even without a healer. Fran will be the leader of this unit for faster traversal in the sands.
The Sellswords, Magellan and Berenice will make sure that they attack multiple times and debilitate enemy numbers fast with their Killing Chain skill, while Berengeria ensures that an entire row will be destroyed using her Death Spin attack and she also has Eye of the Warrior Princess that ensures enemy attacks are at their lowest once the battle starts.
Recruiting Fran
Fran is a recruitable character and will join the Liberation after successfully finishing the The Priestess, Abducted main quest.
Having Fran in this unit will make traversing easier, especially in terrains where normal Cavalry units will have low mobility.
The Priestess, Abducted Walkthrough
Ochlys' Unit
| Ochlys' Unit | ||
|---|---|---|
 Melisandre Melisandre (Swordfighter) |
 Tatiana Tatiana (Cleric) |
 Aramis Aramis (Swordfighter) |
| - |
Ochlys (Feathersword) |
- |
Ochlys' unit is designed to hit all enemies without the chance of them dodging anything. Have Ochlys as the leader for easy mobility.
Use her team on any Thieves unit and they will be gone in one battle. While Melisandre, Aramis, and Ochlys deal powerful hits to the enemies, Tatiana ensures that their HP will not be diminished.
Recruiting Ochlys
Ochlys can be recruited in the overworld after finishing the The Winged Knight side quest. After doing so, she will appear in the overworld with her shop, talk to her, and start An Angel's Request side quest, complete this quest and she will join you afterward.
Having Ochlys is useful since you will be dealing with traveling in the desert in this stage. It is recommended that you first recruit her before starting this quest.
Gryphon Knight Mercenary's Unit
| Gryphon Knight Mercenary's Unit | ||
|---|---|---|
 Chloe Chloe (Soldier) |
Any Gryphon Knight Mercenary |
 Rolf Rolf (Hunter) |
| - |
 Bruno Bruno (Gladiator) |
- |
This mercenary's unit is your best bet against Wyvern Knights.
With Rolf and Chloe being both powerful against flying enemies, they are sure to wreak havoc on flying units. Bruno can hit entire rows of enemies with his Wide Smash and can heal himself with Bulk Up. Have this team deal with the pesky Wyvern Knight enemy units and let them be gone.
Auch's Unit
| Auch's Unit | ||
|---|---|---|
|
Auch (Wizard) |
- |
 Nina Nina (Warrior) |
| - |
 Alain Alain (Lord) |
- |
Have this team on standby whenever you obtain a command post or deploy them at your command post in the beginning.
This team has Alain as their defender and so will be highly protected due to his Noble Guard. Auch and Nina are both the strongest in their suit on both Magickal and Physickal damage.
Recruiting Auch
Auch is a recruitable character and will join the Liberation after successfully finishing the The Self-Effacing Sorcerer side quest should you choose to spare him.
Recruiting Auch before starting this quest is recommended as he will be effective in fighting flying enemies.
The Self-Effacing Sorcerer Walkthrough
Scarlett's Unit
| Scarlett's Unit | ||
|---|---|---|
|
Scarlett (Priestess) |
- |
 Mordon Mordon (Warrior) |
| - |
 Josef Josef (Paladin) |
- |
Have this team on standby whenever you obtain a command post or deploy them at your command post in the beginning.
It's a good thing that you have a third Magick user after rescuing Scarlett, she will be effective against incoming Wyvern Knight enemy units while Mordon and Josef deal with the armored units, should they decide to approach your command post.
Yahna's Unit
| Yahna's Unit | ||
|---|---|---|
|
Yahna (Witch) |
- |
 Kitra Kitra (Warrior) |
| - |
 Travis Travis (Thief) |
- |
Have this team on standby whenever you obtain a command post or deploy them at your command post in the beginning.
Your magick user in this unit will be Yahna and your primary fighter will be Kitra. Travis does not deal much damage but can Evade incoming attacks, he can also deal poison damage with his Toxic Throw. This team does not lack strength though since Yahna can use her Magick Conferral skill on any ally and make their attacks more crippling.
Recruiting Yahna
Yahna is a recruitable character and will join the Liberation after successfully finishing the The Ravaged Swamp main quest.
Recruiting Yahna before starting this quest is recommended as she will be effective in this battle.
Black Knight of the Dunes Walkthrough
| # | Step by Step Guide |
|---|---|
| 1 |
 Deploy and Separate Deploy all units. You will be joined by Liza's team in this stage. Make Fran garrison in the command post up north, the enemies here will be defeated easily by Fran's unit. Garrison here and collect a Dew of Skill. Have Ochlys go to the Muttiwaran Ruins below and get a Dew of Keenness. At the same time, command your mercenary's unit to head to Jonnich Ruins nearby and collect War Funds 7000G, and make Liza tail this team for Ranged Assist. |
| 2 |
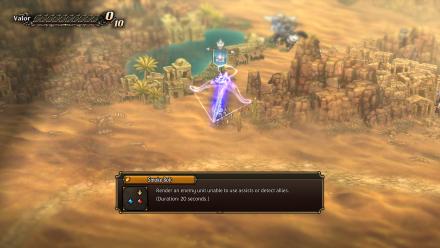 Use Smoke Bolt As you get near the watchtower on the way to Muttiwaran Ruins, you will have a short story event where Liza informs you that she can use her Smoke Bolt to stop enemy units from giving assists. Use this on the enemies on the Watchtower so they cannot provide Ranged Assist to their allies. Since Ochlys will pass this tower on the way to the ruins, have her deal with these enemies first and if Liza is nearby, you can utilize her Ranged Assist. |
| 3 |
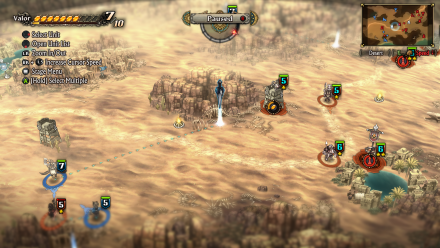 Collect Treasures Nearby Have each team collect the treasures near their garrisoned places. Collect the treasure on the other side of the rocky terrain beside Fran's command post to get a Light Tailfeather, after this have her regroup with the core team. Get the treasure just beside the Muttiwaran Ruins and you will collect War Funds 5000 G. Lastly, have your mercenary knight go to the treasure beside the Encampment and acquire a Camping Set (M). Since Ochlys' unit is the nearest to her collected treasure, after her task is done, you can make her follow your mercenary's unit. |
| 4 |
Protect Your Command Posts Having Acquired two command posts by now, guarding them is very essential. If your opponent takes over all of your command posts, this will result in your defeat. Feel free to deploy a unit for each command post you own and have them on standby. The enemies that will mostly approach and take over your base are Wyvern Knights. |
| 5 |
 Take Over the Remaining Command Posts Now that all is set, you can finally take over the two remaining command posts. Have Ochlys' team take over the command post nearby below the second Watchtower where an NPC will provide you with a Giant's Canopy, her unit will be tailed by Liza for Ranged Assist. Remember that once you take over a command post, you should deploy a unit to guard it. Meanwhile, have your mercenary's unit defeat any wandering enemies nearby. Fran's team will be the one to finish this as she takes over the final command post, but make sure she passes by and garrisons in Cuvale Ruins to collect War Funds 7000G. This will be on the way so it will not deter you from your goal. Also, feel free to use Liza's Valor Skill, Smoke Bolt whenever possible. After successfully defeating Gloucester, you will receive a Golden Ram Shield. |
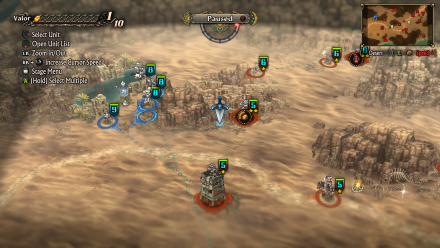
Black Knight of the Dunes Stage Info
| Black Knight of the Dunes Stage Map | ||
|---|---|---|
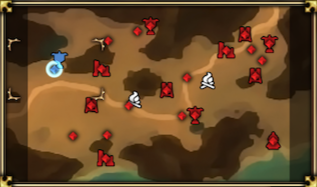 |
||
| Enemy Level | 12 | |
| Victory Condition | ・Capture All Enemy Command Post | |
| Defeat Condition |
・The Liberation's command post is captured ・The time limit expires |
|
Unicorn Overlord Related Guides
All Main Quest Stages
All Side Quest Stages
All Overworld Quests
| Overworld Quests | |
|---|---|
| An Angel's Request | Palevia's Escaped Chickens |
| Carved of Cornia Stone | Cemeteries of Cornia |
| Carved of Drakenhold Stone | Cemeteries of Drakenhold |
| Drakenhold's Escaped Chickens | - |
All Liberation Quests
Comment
Author

Black Knight of the Dunes Walkthrough
Rankings
- We could not find the message board you were looking for.
Gaming News

![Death Stranding 2: On The Beach Review [PC] | A Port That Delivers](https://img.game8.co/4447392/15310a0c9aa1b6843bb713b2ea216930.jpeg/show)

![Death Stranding 2: On The Beach Review [PC] | A Port That Delivers](https://img.game8.co/4447392/15310a0c9aa1b6843bb713b2ea216930.jpeg/thumb)

Popular Games

Genshin Impact Walkthrough & Guides Wiki
Umamusume: Pretty Derby Walkthrough & Guides Wiki
Crimson Desert Walkthrough & Guides Wiki
Monster Hunter Stories 3: Twisted Reflection Walkthrough & Guides Wiki
Honkai: Star Rail Walkthrough & Guides Wiki
Pokemon Pokopia Walkthrough & Guides Wiki
The Seven Deadly Sins: Origin Walkthrough & Guides Wiki
Wuthering Waves Walkthrough & Guides Wiki
Zenless Zone Zero Walkthrough & Guides Wiki
Arknights: Endfield Walkthrough & Guides Wiki


Recommended Games
Fire Emblem Heroes (FEH) Walkthrough & Guides Wiki
Diablo 4: Vessel of Hatred Walkthrough & Guides Wiki
Cyberpunk 2077: Ultimate Edition Walkthrough & Guides Wiki
Yu-Gi-Oh! Master Duel Walkthrough & Guides Wiki
Super Smash Bros. Ultimate Walkthrough & Guides Wiki
Pokemon Brilliant Diamond and Shining Pearl (BDSP) Walkthrough & Guides Wiki
Elden Ring Shadow of the Erdtree Walkthrough & Guides Wiki
Monster Hunter World Walkthrough & Guides Wiki
The Legend of Zelda: Tears of the Kingdom Walkthrough & Guides Wiki
Persona 3 Reload Walkthrough & Guides Wiki


All rights reserved
©ATLUS. ©SEGA. All rights reserved. SEGA is registered in the U.S. Patent and Trademark Office. ATLUS and the ATLUS logo are registered trademarks or trademarks of ATLUS Co., Ltd. SEGA, the SEGA logo and UNICORN OVERLORD are registered trademarks or trademarks of SEGA CORPORATION.
The copyrights of videos of games used in our content and other intellectual property rights belong to the provider of the game.
The contents we provide on this site were created personally by members of the Game8 editorial department.
We refuse the right to reuse or repost content taken without our permission such as data or images to other sites.