The General in Black Walkthrough
☆Get to know Alain and the other characters
★Choices | Gammel | Mandrin
☆Farm Divine Shards for Ochlys!
★Classes | How to Promote and How to Change Class
☆Let us know who you'll marry in our Romance guide!
This is a walkthrough and guide for The General in Black in Unicorn Overlord. See a walkthrough guide for The General in Black, its location and rewards, the stage's objectives, recommended units and formations, item locations, and battle strategies!
| Related Articles | |
|---|---|
| Berengaria Aramis Primm |
The General in Black |
List of Contents
The General in Black Location and Rewards
Location
| Map Location | Overworld Location |
|---|---|
 |
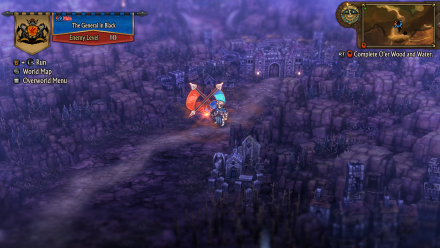 |
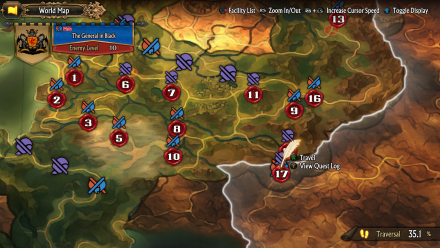
| Region: Drakenhold Location: After passing through the gates to Drakenhold |
|
Rewards
| Rewards |
|---|
|
・Silver Bangle x1 ・Detoxifying Amulet x1 ・House Zechshelm x1 |
The General in Black Recruitable Characters
| Recruitable Characters | ||
|---|---|---|
 Berengaria Berengaria
|
 Aramis Aramis
|
 Primm Primm
|
The General in Black marks the first stage where Berengaria, Aramis, and Primm will join during the battle and will be in the Liberation after the quest has been finished.
List of All Recruitable Characters
The General in Black Recommended Units
| Recommended Unit Leaders | ||||
|---|---|---|---|---|
 Fran
Fran |
 Clive
Clive |
 Miriam
 |
 Josef
Josef |
 Monica
 |
Before doing this quest, it is recommended that you have all the recruitable characters from Cornia in your roster as this stage will be difficult without them. Also, make sure that you have expanded your units from 4 to 5 and 5 of your party's unit slots from 3 to 4. You can expand your units, and hire Mercenaries by spending Honor in Forts you own.
In The General in Black, you will have to prioritize mobility since the map is quite large and there is no boss in this stage. Each team is designed to have a Cavalry, a Healer, and a Defender. We recommend the Unit Leaders listed above. Click on the leader's name to see our recommended Unit Formation for that leader in this stage.
Fran's Unit
| Fran's Unit | ||
|---|---|---|
 Chloe Chloe (Soldier) |
 Fran Fran (Gryphon Knight) |
 Rolf Rolf (Hunter) |
| - |
 Virginia Virginia (Crusader) |
- |
Fran's Unit will be the one to defeat the Wyvern Knights since this team is composed of a Hunter and a Soldier who are both effective against flying enemies. Virginia can easily take the damage that is meant for anyone in the back row and receive minimal damage in their stead with her supreme Guard Rate. Virginia can also make use of her Vertical Edge which deals increased damage to flying enemies.
Having Fran as the leader will make use of her leader effect which ignores terrain when moving. She can travel in the woods without worry of slowing down.
Recruiting Fran
Fran is a recruitable character and will join the Liberation after successfully finishing the The Priestess, Abducted main quest.
Having Fran in this unit will make traversing easier, especially in terrains where normal Cavalry units will have low mobility.
The Priestess, Abducted Walkthrough
Clive's Unit
| Clive's Unit | ||
|---|---|---|
 Clive Clive (Knight) |
 Tatiana Tatiana (Cleric) |
 Mordon Mordon (Warrior) |
| - |
 Hodrick Hodrick (Hoplite) |
- |
Clive's Unit is built to cut through almost every class in this stage.
Mordon can easily cripple the Hoplites and destroy enemy Defense while Clive assures multiple damage using his Assaulting Lance. Tatiana will be the healer for this party, while Hodrick stays in the frontline making sure nobody gets hurt and takes the fall using his Heavy Guard.
Miriam's Unit
| Miriam's Unit | ||
|---|---|---|
 Ochlys Ochlys (Feathersword) |
 Melisandre Melisandre (Swordfighter) |
 Miriam Miriam (Radiant Knight) |
| - |
 Bruno Bruno (Gladiator) |
- |
Miriam's Unit is designed for pure offense and can deal with any enemy units in this stage.
Ochlys is a swift combatant that can deal great damage to the enemy and at the same time incur debuffs with her Spiral Sword and Shield Smite. Melisandre's attacks never fail to hit as all are truestrikes and critical. Miriam will be responsible for healing with her Row Heal and can also deal damage simultaneously. Bruno will be the team's protector with his extremely high HP and his healing ability, Bulk Up, not to mention clearing out entire enemy rows with his Wide Smash skill.
Monica's Unit
| Monica's Unit | ||
|---|---|---|
 Yahna Yahna (Witch) |
 Berenice Berenice (Sellsword) |
 Monica Monica (Radiant Knight) |
| - |
 Travis Travis (Thief) |
- |
Monica's Unit is an offensive force to deal with and a unit that can eliminate units with multiple members quite easily.
Berenice boasts continuous attacks thanks to her Killing Chain and Following Slash, while Yahna makes sure that Berenice's attacks deal more damage than usual with her Magick Conferral. Monica will be the healer for this team with her Row Heal and she can also inflict dangerous attacks on the enemies at the same time. Travis will ensure that nobody gets hurt as he takes on the frontline and Evade every single attack, except for hunters.
Recruiting Monica
Monica is a recruitable character and will join the Liberation if you choose the option for her to fight by your side after finishing the The Unyielding Shield side quest.
Having Monica in this stage will prove really useful, since she can provide healing, can get to garrisons easily with her mobility, and can deal high damage as well. Since the stage will prioritize mobility, it is recommended that you have enough Cavalries to lead each team, and recruiting Monica before this quest will be quite essential.
The Unyielding Shield Walkthrough
Josef's Unit
| Josef's Unit | ||
|---|---|---|
 Nina Nina (Warrior) |
 Sharon Sharon (Cleric) |
- |
 Alain Alain (Lord) |
- |
 Josef Josef (Paladin) |
Josef's Unit has two defenders who are high damagers as well, making this team useful in battling any enemy unit.
Josef and Sharon are the healers for this party. Josef can attack multiple times with the use of his Pursuit passive skill, while Nina makes sure the enemies get defeated with her Heavy Smash skill, which ignores DEF and armor. Alain will be dealing damage as well with his Lean Edge. It is important that Alain is in a party since he will be having a conversation with Berengaria in which she will join the Liberation after successfully doing so.
The General in Black Walkthrough
| # | Step by Step Guide |
|---|---|
| 1 |
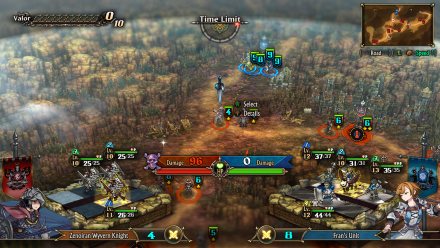 Deal With the Wyvern Knights Deploy Fran, Miriam, Clive, and Josef's Unit. At the beginning of the stage, you will be approached by two Gryphon Knight enemies. Be on standby while Fran's Unit deals with these enemies. After Fran successfully defeats the two Wyvern Knight units, have her collect the treasure nearby and get a Giant's Canopy. |
| 2 |
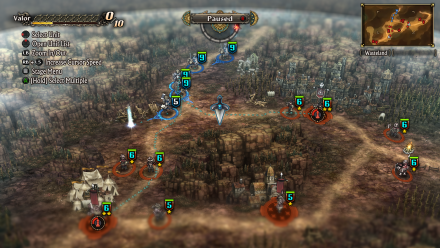 Deploy Monica and Move After filling up 1 Valor Point, deploy Monica's unit and have everyone on the move. Since the Wyvern Knights are ousted, have Fran go the path near the woods nearby, use her unit as Fran ignores terrain when moving. A treasure will be lying on the ground once you exit the woods, collect it, and receive a Silver Hourglass. Have Josef and Monica's Unit go toward Einsel Garrison, and Clive and Miriam's Unit toward the nearby enemy command post to the right. |
| 3 |
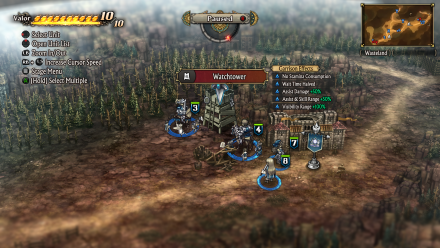 Continue to the Next Garrison After claiming their designated garrison, you will have to change your target to another nearby garrison. Have Josef and Monica head towards Einsel Church while Clive and Miriam go to the Watchtower near the enemy command post at the far right. Do not engage with the command post yet. After clearing out the watchtower, you can have them stand by. |
| 4 |
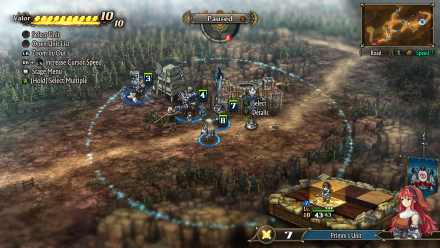 Welcome Primm and Aramis A cutscene will trigger once you are on the way to the enemy command post on the rightmost part of the map. Primm will be on the battlefield alongside you, once near her, she will be joining the Liberation and you will be able to control her unit. Have her collect the treasure near the mountains below her position and collect a Revival Orb (M). After this, her next destination will be to talk to Aramis, who is now at the command post. Have her talk to him so Aramis will also join the party. After Aramis joins you, the command post will automatically be taken over. |
| 5 |
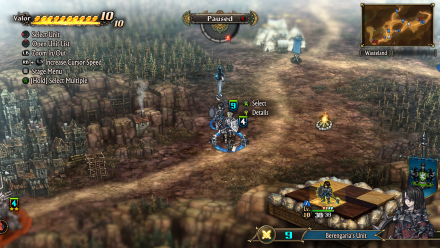 Welcome Berengaria After the Aramis and Primm story event, Berengaria will appear from the enemy command post located on the bottom left area of the map. Since Josef's team has Alain as a member of the unit and is still in the church nearby, have his unit talk to Berengaria so she will join you in the battle. You do not have to change the party leader for Alain to talk to Berengaria, as long as Alain is in the party, the talk option is available. |
| 6 |
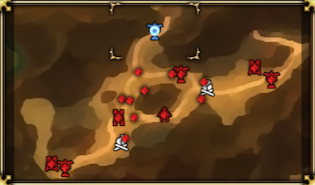
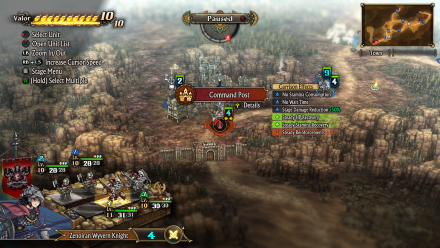 Take Over the Last Garrison Now that almost all garrisons have been taken over, the last garrison remains at the bottom left area of the map. Use Fran's unit to defeat these but make sure to destroy the Watchtower first to avoid Ranged Assist from the enemy. In the meantime, have both Berengaria and Josef's units on standby, defeating incoming enemies that will be deployed by the opposing command post while waiting for Fran's unit to finish the quest. |
The General in Black Stage Info
| The General in Black Stage Map | ||
|---|---|---|
 |
||
| Enemy Level | 10 | |
| Victory Condition | ・Liberate All Towns and Fortresses | |
| Defeat Condition |
・The Liberation's command post is captured ・The time limit expires |
|
Unicorn Overlord Related Guides
All Main Quest Stages
All Side Quest Stages
All Overworld Quests
| Overworld Quests | |
|---|---|
| An Angel's Request | Palevia's Escaped Chickens |
| Carved of Cornia Stone | Cemeteries of Cornia |
| Carved of Drakenhold Stone | Cemeteries of Drakenhold |
| Drakenhold's Escaped Chickens | - |
All Liberation Quests
Comment
Author
The General in Black Walkthrough
improvement survey
03/2026
improving Game8's site?

Your answers will help us to improve our website.
Note: Please be sure not to enter any kind of personal information into your response.

We hope you continue to make use of Game8.
Rankings
- We could not find the message board you were looking for.
Gaming News
Popular Games

Genshin Impact Walkthrough & Guides Wiki

Honkai: Star Rail Walkthrough & Guides Wiki

Umamusume: Pretty Derby Walkthrough & Guides Wiki

Pokemon Pokopia Walkthrough & Guides Wiki

Resident Evil Requiem (RE9) Walkthrough & Guides Wiki

Monster Hunter Wilds Walkthrough & Guides Wiki

Wuthering Waves Walkthrough & Guides Wiki

Arknights: Endfield Walkthrough & Guides Wiki

Pokemon FireRed and LeafGreen (FRLG) Walkthrough & Guides Wiki

Pokemon TCG Pocket (PTCGP) Strategies & Guides Wiki
Recommended Games

Diablo 4: Vessel of Hatred Walkthrough & Guides Wiki

Cyberpunk 2077: Ultimate Edition Walkthrough & Guides Wiki

Fire Emblem Heroes (FEH) Walkthrough & Guides Wiki

Yu-Gi-Oh! Master Duel Walkthrough & Guides Wiki

Super Smash Bros. Ultimate Walkthrough & Guides Wiki

Pokemon Brilliant Diamond and Shining Pearl (BDSP) Walkthrough & Guides Wiki

Elden Ring Shadow of the Erdtree Walkthrough & Guides Wiki

Monster Hunter World Walkthrough & Guides Wiki

The Legend of Zelda: Tears of the Kingdom Walkthrough & Guides Wiki

Persona 3 Reload Walkthrough & Guides Wiki
All rights reserved
©ATLUS. ©SEGA. All rights reserved. SEGA is registered in the U.S. Patent and Trademark Office. ATLUS and the ATLUS logo are registered trademarks or trademarks of ATLUS Co., Ltd. SEGA, the SEGA logo and UNICORN OVERLORD are registered trademarks or trademarks of SEGA CORPORATION.
The copyrights of videos of games used in our content and other intellectual property rights belong to the provider of the game.
The contents we provide on this site were created personally by members of the Game8 editorial department.
We refuse the right to reuse or repost content taken without our permission such as data or images to other sites.


![Monster Hunter Stories 3 Review [First Impressions] | Simply Rejuvenating](https://img.game8.co/4438641/2a31b7702bd70e78ec8efd24661dacda.jpeg/thumb)


