
This survey will take about 1 minute.
Your answers will help us to improve our website.
Unicorn Overlord
Tempest of White Walkthrough
☆Get to know Alain and the other characters
★Choices | Gammel | Mandrin
☆Farm Divine Shards for Ochlys!
★Classes | How to Promote and How to Change Class
☆Let us know who you'll marry in our Romance guide!
This is a walkthrough and guide for Tempest of White in Unicorn Overlord. See a walkthrough guide for Tempest of White, its location and rewards, the stage's objectives, recommended units and formations, item locations, and battle strategies!
| Related Articles | |
|---|---|
| Yunifi | Morard |
| Ramona | Tempest of White |
List of Contents
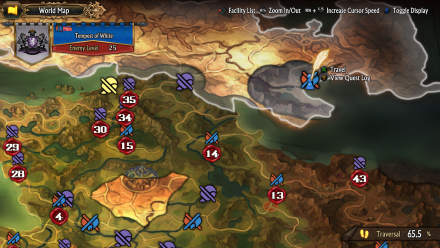
Tempest of White Location and Rewards
Location
| Map Location | Overworld Location |
|---|---|
 |
 |
| Region: Bastorias Location: Beside Tem Varkan Harbor |
|
Rewards
| Rewards |
|---|
|
・Gold Bangle x1 ・Empowering Draught x1 ・ Owl Bloodline x1 |
Tempest of White Recruitable Characters
| Recruitable Characters | ||
|---|---|---|
 Yunifi Yunifi
|
 Morard Morard
|
 Ramona Ramona
|
Tempest of White marks the first stage where Yunifi, Morard, and Ramona will automatically join the Liberation upon successful victory. Yunifi and Morard will be joining you as you start the quest.
List of All Recruitable Characters
Tempest of White Recommended Units
| Recommended Unit Leaders | ||||
|---|---|---|---|---|
 Gammel
 |
 Celeste
 |
 Renault
 |
||
Before doing this quest, make sure that you have expanded your unit slots from 3 to 4. Additionally, your Renown should be at rank A or B by now, and promoting your party members is a must since the enemies have become much stronger and every enemy is at an advanced class at this point in the game. You can expand your units, hire Mercenaries, and promote your allies by spending Honor in Forts you own.
In Tempest of White, using 3 units will suffice as you will be joined by an additional unit in this stage. The stage is riddled with Werewolves, which are easy to deal with since they don't really have that high of a DEF, so having your team be composed of heavy hitters is the way to go. We recommend the Unit Leaders listed above. Click on the leader's name to see our recommended Unit Formation for that leader in this stage.
Gammel's Unit
| Gammel's Unit | ||
|---|---|---|
 Magellan Magellan (Sellsword) |
 Berenice Berenice (Sellsword) |
 Jeremy Jeremy (Sellsword) |
| - |
Gammel (Rogue) |
- |
Gammel's unit is actually the only unit to deal with the human enemies, most especially the Vanguards' and Conrad's Unit. Gammel may seem oddly positioned in this unit but this is all very strategic as he can easily Evade all the potential massive hits the enemy units will deal, except for that one Swordmaster unit on the way, but worry not as there will be a strategy for them in this guide.
While the enemies are busy trying to even touch Gammel, your back row will be doing all the damage from here on out. Equip Gammel with a Lapis Pendant for more PP so he can evade until the end of the battle.
Recruiting Gammel
Gammel is a recruitable character and will automatically join the Liberation if you have chosen to spare him on A Solitary Resistance and after successfully finishing the A Shifting Tide side quest.
Alternatively, you can replace Gammel with Travis if you have picked the option to execute him. Gammel is preferred because compared to Travis, his class is much more advanced and has more PP and Evades
Promoting Sellswords
Before starting this quest, it is highly recommended that you promote your Sellswords to Landsknechts so you will gain access to their skill, the Bastard's Cross, which deals lethal damage to Armored units.
Once the ability is learned, this unit will also be able to defeat almost all enemies that come its way, provided they have great support.
How to Promote to Advanced Classes
Celeste's Unit
| Celeste's Unit | ||
|---|---|---|
 Berengaria Berengaria (Dark Marquess) |
Celeste (Gryphon Master) |
 Railanor Railanor (Elven Fencer) |
| - |
 Virginia Virginia (Crusader) |
- |
Celeste's unit is another unit built on the offensive side. This unit, along with Yunif and Renault, will be battling the Bestral enemies on the east side of the map.
This team composition will most likely end battles easily and in your favor as well. Virginia can handle herself in the frontlines as she has extremely high DEF and can guard enemy strikes.
Recruiting Celeste
Celeste is a recruitable character and will automatically join the Liberation after successfully finishing the A Shifting Tide side quest. Additionally, Mandrin and Gammel will also join with her if you had chosen to spare them on your previous encounters.
Alternatively, you can replace Celeste with Fran if you haven't recruited Celeste yet. Celeste is preferred because compared to Fran, her class is much more advanced and has more PP and AP.
Renault's Unit
| Renault's Unit | ||
|---|---|---|
| - |
 Bruno Bruno (Gladiator) |
- |
 Aramis Aramis (Swordfighter) |
Renault (Great Knight) |
 Melisandre Melisandre (Swordfighter) |
Renault's unit is composed of Swordfighters who have high Initiative and ensure that your team will be the first to strike. It may seem weird that there are three people on the frontlines but this is actually a well-calculated maneuver.
Swordfighters have the ability to Parry an attack and therefore render the potential incoming heavy damage nullified. Giving the enemies the option to choose whoever they wanna attack in your frontline will benefit you survival-wise. This does not mean that this party is weak though, as Swordfighters deal a lot of damage, Bruno alone can kill a row of enemies in one strike with his Wide Smash, and Renault with his Pile Thrust is the cherry on top for this team.
Recruiting Renault
Renault is a recruitable character and will automatically join the Liberation after certain conditions are met.
First, you must have the quest The Priestess, Abducted already finished. After this, you must finish four Liberation Quests, any Liberation Quest will do. Doing these steps will guarantee that Renault will join the Liberation's forces.
The Priestess, Abducted Walkthrough
Tempest of White Walkthrough
| # | Step by Step Guide |
|---|---|
| 1 |
Start the Quest by the Harbor There are two ways to arrive at Bastorias, either by land or by ship. If you wish to go here by land, you will have to finish the The Battle for Umbalcons Liberation quest which has an enemy level of 25. On the other hand, should you wish to go here by sea, you will need to finish the The Battle for Krannich Liberation quest which only has an enemy level of 24. The only difference this will make though, is the position of Conrad on the map, which has the same distance traveled depending on where you start the quest. It is recommended that you travel to Bastorias by sea as the Liberation quest required to go here is lower compared to the former. |
| 2 |
 Deploy and Separate Deploy Celeste, Gammel, and Renault's team. You will be joined by Yunifi's team here. Your goal is to bring Yunifi's team to Ramona's Command Post to talk to her and defeat Conrad on the other side of the map. First things first, use Celeste's Hastened Call II so every unit will get double the speed. Then, have Gammel's unit go towards Porchiba Ruins, defeating enemies on the way and collecting a Dew of Knowledge. Renault's team, along with Yunifi, will go to Fort Sedorosha and obtain a Concealing Cloak. Meanwhile, Celeste's team will head directly north to defend Ramona as early as possible, since the barricades don't last that long. |
| 3 |
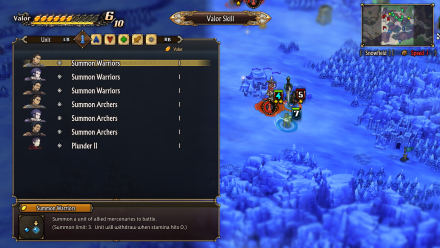 Summon Warriors Back to Gammel's team on the way to Lekkseva Garrison, they will be encountering a Swordmaster unit enemy here, make sure Gammel's unit will not engage them in battle as the enemy has truestrikes and will kill Gammel in one turn. The strategy is to use any of the Sellswords' Summon Warrior Valor Skill to defeat this unit first then you may go and garrison to the said place, do so and there will be a quick scene with Yunifi. |
| 4 |
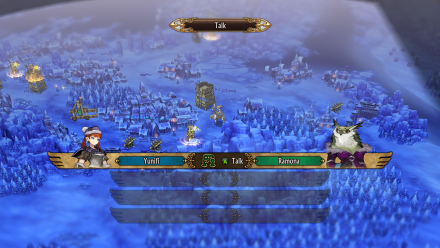 Protect Ramona and Claim the Treasures After claiming Fort Sedorosha, have Yunifi and Renault's team immediately go towards Ramona's command post and rendezvous with Celeste's team. Defeat all the enemies here to ensure the safety of Ramona, then have Yunifi's unit talk to her. Once done, you can start collecting all the treasures nearby. There is one found at the east gate, which will give you a Hallowed Corne Ash and one just beside the catapult, this one contains a Holy Herb. |
| 5 |
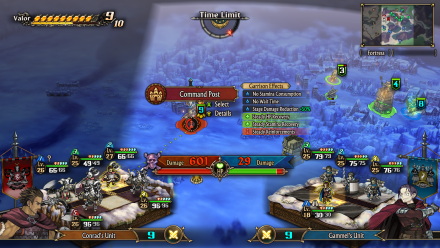 Defeat Conrad Once Ramona is safe and everything is done, you can have Gammel's unit head towards Conrad and defeat him. There will be a treasure here near the campfire, which you may also use to regenerate your health, collect this and acquire a Grilled Steak. You will have no problem in defeating Conrad if your Sellswords have been promoted to Landsknechts since they will have access to Bastard's Cross which deals crippling damage to Conrad's unit. Alternatively, if you haven't, you can use your remaining Valor Points to summon as many Warriors and Archers as you need to weaken them first before you finish them off. Once defeated, you will receive a Bestral Guard. |
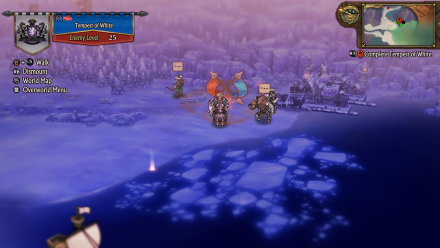
Tempest of White Stage Info
| Tempest of White Stage Map | ||
|---|---|---|
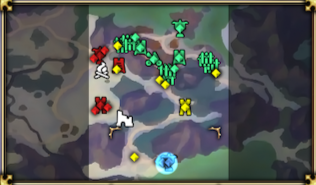 |
||
| Enemy Level | 25 | |
| Victory Condition |
・Ramona's unit is defeated ・Defeat Conrad |
|
| Defeat Condition |
・Enemy or neutral forces capture the allied command post ・The time limit expires ・Ridiel's unit is defeated |
|
Unicorn Overlord Related Guides
All Main Quest Stages
All Side Quest Stages
All Overworld Quests
| Overworld Quests | |
|---|---|
| An Angel's Request | Palevia's Escaped Chickens |
| Carved of Cornia Stone | Cemeteries of Cornia |
| Carved of Drakenhold Stone | Cemeteries of Drakenhold |
| Drakenhold's Escaped Chickens | - |
All Liberation Quests
Comment
Author

Tempest of White Walkthrough
Please participate in our site
improvement survey
03/2026
improvement survey
03/2026
Would you assist in
improving Game8's site?
improving Game8's site?

×
We are listening to our users' valuable opinions and discussing how to act on them.
The information collected through this survey will be used for the purpose of improving our services. In addition, the information will only be disclosed a part of a statistic in a format that will not allow identification of personal information.
Begin Survey
Not Now
×
Please rate each item regarding Game8.co's Advertisements.
Amount of Ads
Very Dissatisfied
Somewhat Dissatisfied
Fine
Somewhat Satisfied
Highly Satisfied
Placement of Ads
Timing of Ad Display
Ad Loading Speed
Safeness of Ads
Content of Ads
×
Please rate each item regarding Game8.co's Quality of Articles.
Amount of information
Very Dissatisfied
Somewhat Dissatisfied
Fine
Somewhat Satisfied
Highly Satisfied
Frequency of updates
Speed of new information
Accuracy of articles
Understandibility of articles
Readability of sentences
×
Please rate each item regarding Game8.co's Usability of the Site.
Ease of finding information
Very Dissatisfied
Somewhat Dissatisfied
Fine
Somewhat Satisfied
Highly Satisfied
Loading Speed
Use of Color
Font Size
Visibility of Images
Easy to Understand Layout
×
Please rate each item regarding Game8.co's Message Boards, Comments.
Ease of Writing
Very Dissatisfied
Somewhat Dissatisfied
Fine
Somewhat Satisfied
Highly Satisfied
Readability
Ease in Finding Information
Comment Quality
Comment Quantity
Admin Response
×
Please rate each item regarding Game8.co's Site's new design.
Please rate our site's new design
Very Dissatisfied
Somewhat Dissatisfied
Fine
Somewhat Satisfied
Highly Satisfied
Do you think that the website's design change makes the site easier to use?
Has the new design made it easier for you to find information on the site?
Has the new design improved the overall visual appeal of the site?
How would you rate your overall satisfaction with the new design of the site?
×
How likely are you to recommend Game8 to someone you know?
Very Unlikely
0
1
2
3
4
5
6
7
8
9
10
Very Likely
If you have other opinions regarding potential improvement to the website, please share them with us. We would appreciate your honest opinion.
Note: This is a free response section, so you can proceed without entering anything.
Note: Please be sure not to enter any kind of personal information into your response.
Note: Please be sure not to enter any kind of personal information into your response.
×
Thank You
×
Thank you for participating in our survey! Your answers will help us to improve the quality of our website and services.
We hope you continue to make use of Game8.
We hope you continue to make use of Game8.
Close
Rankings
- We could not find the message board you were looking for.
Gaming News


![Monster Hunter Stories 3 Review [First Impressions] | Simply Rejuvenating](https://img.game8.co/4438641/2a31b7702bd70e78ec8efd24661dacda.jpeg/thumb)
Popular Games

Genshin Impact Walkthrough & Guides Wiki
Honkai: Star Rail Walkthrough & Guides Wiki
Umamusume: Pretty Derby Walkthrough & Guides Wiki
Pokemon Pokopia Walkthrough & Guides Wiki
Resident Evil Requiem (RE9) Walkthrough & Guides Wiki
Monster Hunter Wilds Walkthrough & Guides Wiki
Wuthering Waves Walkthrough & Guides Wiki
Arknights: Endfield Walkthrough & Guides Wiki
Pokemon FireRed and LeafGreen (FRLG) Walkthrough & Guides Wiki
Pokemon TCG Pocket (PTCGP) Strategies & Guides Wiki


Recommended Games
Diablo 4: Vessel of Hatred Walkthrough & Guides Wiki
Cyberpunk 2077: Ultimate Edition Walkthrough & Guides Wiki
Fire Emblem Heroes (FEH) Walkthrough & Guides Wiki
Yu-Gi-Oh! Master Duel Walkthrough & Guides Wiki
Super Smash Bros. Ultimate Walkthrough & Guides Wiki
Pokemon Brilliant Diamond and Shining Pearl (BDSP) Walkthrough & Guides Wiki
Elden Ring Shadow of the Erdtree Walkthrough & Guides Wiki
Monster Hunter World Walkthrough & Guides Wiki
The Legend of Zelda: Tears of the Kingdom Walkthrough & Guides Wiki
Persona 3 Reload Walkthrough & Guides Wiki


All rights reserved
©ATLUS. ©SEGA. All rights reserved. SEGA is registered in the U.S. Patent and Trademark Office. ATLUS and the ATLUS logo are registered trademarks or trademarks of ATLUS Co., Ltd. SEGA, the SEGA logo and UNICORN OVERLORD are registered trademarks or trademarks of SEGA CORPORATION.
The copyrights of videos of games used in our content and other intellectual property rights belong to the provider of the game.
The contents we provide on this site were created personally by members of the Game8 editorial department.
We refuse the right to reuse or repost content taken without our permission such as data or images to other sites.