This survey will take about 1 minute.
Your answers will help us to improve our website.
Unicorn Overlord
The Battle for Solvaquad Walkthrough
☆Get to know Alain and the other characters
★Choices | Gammel | Mandrin
☆Farm Divine Shards for Ochlys!
★Classes | How to Promote and How to Change Class
☆Let us know who you'll marry in our Romance guide!
This is a walkthrough and guide for The Battle for Solvaquad in Unicorn Overlord. See a walkthrough guide for The Battle for Solvaquad, its location and rewards, the stage's objectives, recommended units and formations, item locations, and battle strategies!
| Related Articles | |
|---|---|
| Bryce | The Battle for Solvaquad |
List of Contents
The Battle for Solvaquad Location and Rewards
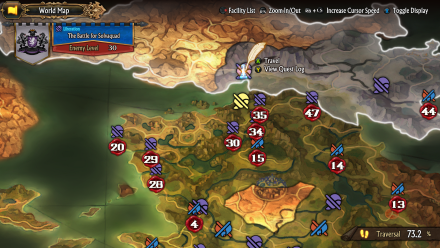
Location
| Map Location | Overworld Location |
|---|---|
 |
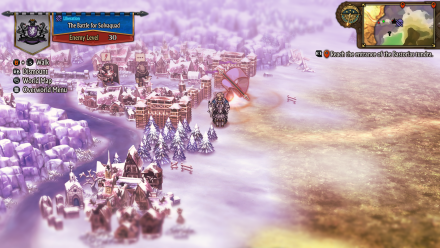 |
| Region: Bastorias Location: At the gates of the Fortified City of Solvaquad |
|
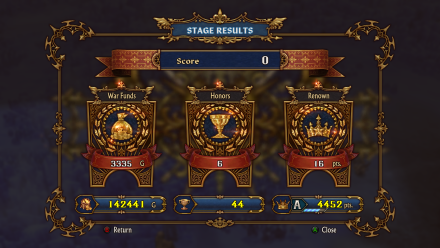
Rewards
| Rewards |
|---|
|
・Honors x16 ・Galette x1 ・Rock Rats x1 |
The Battle for Solvaquad Recruitable Characters
| Recruitable Characters | ||
|---|---|---|
 Bryce Bryce
|
||
The Battle for Solvaquad marks the first stage where Bryce will join the Liberation if you choose upon successful victory if you choose to recruit him.
List of All Recruitable Characters
The Battle for Solvaquad Recommended Units
| Recommended Unit Leaders | ||||
|---|---|---|---|---|
 Bruno
Bruno |
 Celeste
 |
|||
Before doing this quest, make sure that you have expanded your unit slots from 3 to 4. Additionally, your Renown should be at rank A or B by now, and promoting your party members is a must since the enemies have become much stronger and every enemy is at an advanced class at this point in the game. You can expand your units, hire Mercenaries, and promote your allies by spending Honor in Forts you own.
In the Battle for Solvaquad using only 2 units and a sneaky strategy will be enough to finish this stage. We recommend the Unit Leaders listed above. Click on the leader's name to see our recommended Unit Formation for that leader in this stage.
Bruno's Unit
| Bruno's Unit | ||
|---|---|---|
 Magellan Magellan (Sellsword) |
 Berenice Berenice (Sellsword) |
 Jeremy Jeremy (Sellsword) |
| - |
Bruno (Gladiator) |
- |
Bruno's Unit is composed of all the heavy damagers and multi-attackers that will make sure any enemy unit is defeated. This unit will have no healers but if you have upgraded your unit slots from 4 to 5, a Cleric would be a nice addition to this lineup.
Recruiting Bruno
Bruno is a recruitable character and will join the Liberation after successfully finishing the As the Tricorns Ride side quest.
Having Bruno in this unit will make your damage fortified and extra heavy as he can deal damage to rows of enemies in one turn with his Wide Smash.
As the Tricorns Ride Walkthrough
Promoting Sellswords
Before starting this quest, you can promote at least one of your Sellswords to Landsknechts so you will gain access to their anti-Hoplite skill, the Bastard's Cross.
Once the ability is learned, this unit will also be able to defeat any shielded enemy that comes its way.
How to Promote to Advanced Classes
Celeste's Unit
| Celeste's Unit | ||
|---|---|---|
 Aramis Aramis (Swordfighter) |
 Leah Leah (Swordfighter) |
 Melisandre Melisandre (Swordfighter) |
| - |
Celeste (Gryphon Master) |
- |
Celeste's unit will only be here to guard the post. Still, it's composed of all the Swordfighters you have to ensure accurate and critical damage.
Celeste also has Eagle Eye that ensures no enemy will miss her attacks.
Recruiting Celeste
Celeste is a recruitable character and will automatically join the Liberation after successfully finishing the A Shifting Tide side quest. Additionally, Mandrin and Gammel will also join here if you had chosen to spare them on your previous encounters.
Alternatively, you can replace Celeste with Fran if you haven't recruited Celeste yet. Celeste is preferred because compared to Fran, her class is much more advanced and has more PP and AP.
The Battle for Solvaquad Walkthrough
| # | Step by Step Guide |
|---|---|
| 1 |
Deploy and WIthdraw Deploy any unit at the furthest possible distance from the command post's range. A catapult, operated by an enemy unit on the island with the Rat Carving to the right, automatically targets deployed units. It's essential to note that the catapult can also hit allied units so what you will do is make the enemy units approach you. As the catapult targets you, you will eventually withdraw your units in the command post so that the target will only be the approaching enemies. Do this trick twice, one for the Doom Knight unit below and one for the Legionnaire unit guarding the gates. |
| 2 |
 Guard Your Command Post In the beginning, a Werewolf enemy unit will use their Hide Valor Skill. This means you will not see them when they go towards you, and since you will be going to Bryce's location now, your command post will be unguarded. Deploy Celeste's Unit to guard your base from potential enemies. Be mindful of the catapult however, if you see it targeting you, the best option is to withdraw the minute the rocks hit you to avoid damage and if there ever is a hidden enemy, it will ensure that they will receive damage. |
| 3 |
 Defeat Bryce If the damage forecast does not seem to be in your favor before battling Bryce, it is best that you employ Warriors and Archers using the Sellswords' Valor Skills using your remaining Valor Points. After doing so, you may finally defeat Bryce and finish the quest. |
The Battle for Solvaquad Stage Info
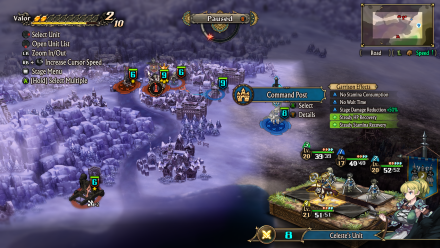
| The Battle for Solvaquad Stage Map | ||
|---|---|---|
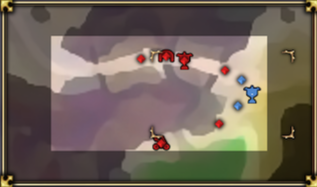 |
||
| Enemy Level | 30 | |
| Victory Condition | ・Capture the enemy command post. | |
| Defeat Condition |
・The Liberation's command post is captured ・The time limit expires |
|
Unicorn Overlord Related Guides
All Main Quest Stages
All Side Quest Stages
All Overworld Quests
| Overworld Quests | |
|---|---|
| An Angel's Request | Palevia's Escaped Chickens |
| Carved of Cornia Stone | Cemeteries of Cornia |
| Carved of Drakenhold Stone | Cemeteries of Drakenhold |
| Drakenhold's Escaped Chickens | - |
All Liberation Quests
Comment
Author
The Battle for Solvaquad Walkthrough
Please participate in our site
improvement survey
03/2026
improvement survey
03/2026
Would you assist in
improving Game8's site?
improving Game8's site?

×
We are listening to our users' valuable opinions and discussing how to act on them.
The information collected through this survey will be used for the purpose of improving our services. In addition, the information will only be disclosed a part of a statistic in a format that will not allow identification of personal information.
Begin Survey
Not Now
×
Please rate each item regarding Game8.co's Advertisements.
Amount of Ads
Very Dissatisfied
Somewhat Dissatisfied
Fine
Somewhat Satisfied
Highly Satisfied
Placement of Ads
Timing of Ad Display
Ad Loading Speed
Safeness of Ads
Content of Ads
×
Please rate each item regarding Game8.co's Quality of Articles.
Amount of information
Very Dissatisfied
Somewhat Dissatisfied
Fine
Somewhat Satisfied
Highly Satisfied
Frequency of updates
Speed of new information
Accuracy of articles
Understandibility of articles
Readability of sentences
×
Please rate each item regarding Game8.co's Usability of the Site.
Ease of finding information
Very Dissatisfied
Somewhat Dissatisfied
Fine
Somewhat Satisfied
Highly Satisfied
Loading Speed
Use of Color
Font Size
Visibility of Images
Easy to Understand Layout
×
Please rate each item regarding Game8.co's Message Boards, Comments.
Ease of Writing
Very Dissatisfied
Somewhat Dissatisfied
Fine
Somewhat Satisfied
Highly Satisfied
Readability
Ease in Finding Information
Comment Quality
Comment Quantity
Admin Response
×
Please rate each item regarding Game8.co's Site's new design.
Please rate our site's new design
Very Dissatisfied
Somewhat Dissatisfied
Fine
Somewhat Satisfied
Highly Satisfied
Do you think that the website's design change makes the site easier to use?
Has the new design made it easier for you to find information on the site?
Has the new design improved the overall visual appeal of the site?
How would you rate your overall satisfaction with the new design of the site?
×
How likely are you to recommend Game8 to someone you know?
Very Unlikely
0
1
2
3
4
5
6
7
8
9
10
Very Likely
If you have other opinions regarding potential improvement to the website, please share them with us. We would appreciate your honest opinion.
Note: This is a free response section, so you can proceed without entering anything.
Note: Please be sure not to enter any kind of personal information into your response.
Note: Please be sure not to enter any kind of personal information into your response.
×
Thank You
×
Thank you for participating in our survey! Your answers will help us to improve the quality of our website and services.
We hope you continue to make use of Game8.
We hope you continue to make use of Game8.
Close
Rankings
- We could not find the message board you were looking for.
Gaming News


![Monster Hunter Stories 3 Review [First Impressions] | Simply Rejuvenating](https://img.game8.co/4438641/2a31b7702bd70e78ec8efd24661dacda.jpeg/thumb)
Popular Games

Genshin Impact Walkthrough & Guides Wiki
Honkai: Star Rail Walkthrough & Guides Wiki
Umamusume: Pretty Derby Walkthrough & Guides Wiki
Pokemon Pokopia Walkthrough & Guides Wiki
Resident Evil Requiem (RE9) Walkthrough & Guides Wiki
Monster Hunter Wilds Walkthrough & Guides Wiki
Wuthering Waves Walkthrough & Guides Wiki
Arknights: Endfield Walkthrough & Guides Wiki
Pokemon FireRed and LeafGreen (FRLG) Walkthrough & Guides Wiki
Pokemon TCG Pocket (PTCGP) Strategies & Guides Wiki


Recommended Games
Diablo 4: Vessel of Hatred Walkthrough & Guides Wiki
Cyberpunk 2077: Ultimate Edition Walkthrough & Guides Wiki
Fire Emblem Heroes (FEH) Walkthrough & Guides Wiki
Yu-Gi-Oh! Master Duel Walkthrough & Guides Wiki
Super Smash Bros. Ultimate Walkthrough & Guides Wiki
Pokemon Brilliant Diamond and Shining Pearl (BDSP) Walkthrough & Guides Wiki
Elden Ring Shadow of the Erdtree Walkthrough & Guides Wiki
Monster Hunter World Walkthrough & Guides Wiki
The Legend of Zelda: Tears of the Kingdom Walkthrough & Guides Wiki
Persona 3 Reload Walkthrough & Guides Wiki


All rights reserved
©ATLUS. ©SEGA. All rights reserved. SEGA is registered in the U.S. Patent and Trademark Office. ATLUS and the ATLUS logo are registered trademarks or trademarks of ATLUS Co., Ltd. SEGA, the SEGA logo and UNICORN OVERLORD are registered trademarks or trademarks of SEGA CORPORATION.
The copyrights of videos of games used in our content and other intellectual property rights belong to the provider of the game.
The contents we provide on this site were created personally by members of the Game8 editorial department.
We refuse the right to reuse or repost content taken without our permission such as data or images to other sites.