This survey will take about 1 minute.
Your answers will help us to improve our website.
Monster Hunter World (MHW)
How To Capture Monsters
★ 2025/2/28: Monster Hunter Wilds is now available!
Join the hunt at our Monster Hunter Wilds Wiki!
A great way to efficiently gather monster material or cut hunting time, Capturing Monsters! Read on to learn how to best capture monsters in Monster Hunter World (MHW).
List of Contents
- Signs That Monster Is Ready To Capture
- Monster's ECG Waves Weak
- Skull On Map
- Monster is Limp While Walking
- How To Capture Monster
- Tranq Bomb
- Shock Trap or Pitfall Trap
- Advantages of Capturing Monster
- Capturing Monsters Will Research Points
- Capturing Monsters Will Reduce Hunting Time
- Capturing Monsters Will Increase Rewards
- Monster Hunter World (MHW) Related Guides
Signs That Monster Is Ready To Capture
Before dropping traps and bombs, there are signs the monster shows to signify that it is ready for capture. Make sure you keep a note of these!
Monster's ECG Waves Weak
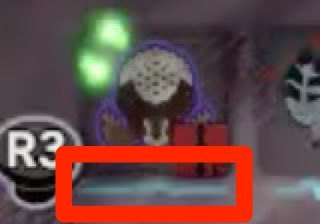
At the bottom left of the screen, monsters in the area are shown. On the bottom of the icon, there is are ECG waves, much like that on a heartbeat monitor. When the line begins to slow down and flatten out, these are one of the signs that the monster is ready for capture.
Skull On Map
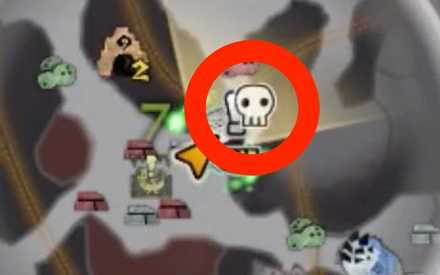
If there are enough Investigation Points collected, the map will show a cross where the monster is as a sign that it is dying or ready for capture.
Monster is Limp While Walking
Another visual cue is how the monster moves. If the monster is ready for capture, you will see a limp in the way it walks.
How To Capture Monster
Once you see the signs that a monster is ready for capture, make sure you have the materials and knowledge to do so!
It can be slightly harder to capture a monster if it is not sleeping because this can cost you some material if the monster is not trapped or if the timing is wrong.
if the monster is already limping, it is most likely that it is going to sleep. You can just follow the monster as it limps away and trap it after it sleeps. Make sure you do not get too close to it before it sleeps, this can aggravate it and it will not go to sleep and instead continue in battle.
| Materials Needed For Capturing Monsters | |
|---|---|
| Shock Trap | 1x Thunderbug 1x Trap Tool |
| Pitfall Trap | 1x Net 1x Trap Tool |
| Tranq Bomb | 1x Parashroom 1x Sleep Herb |
Tranq Bomb
Two Tranq Bombs must be dropped for the monster to be captured, before or while it is on the trap.
If the monster is sleeping, it is better to drop the two Tranq Bombs at the monster's face before applying the trap.
Make sure to have this ready, if not, the trap will not work and you will have to craft them on the spot or fight the monster and not be able to capture it.
Shock Trap or Pitfall Trap
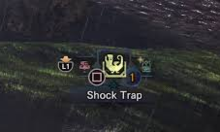
The trap is the next essential object in capturing a monster. The monster must step into the trap for it to work.
If the monster is sleeping, place this under the monster after dropping the Tranq Bombs to immediately capture it. If the monster is moving, make sure you place the trap in the path of the monster as to not waste traps.
Advantages of Capturing Monster
Why would someone go through the trouble of crafting materials and checking for signs when hunting? Well, there are great advantages to capturing a monster instead of slaying it!
Capturing Monsters will Research Points
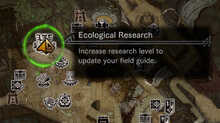
Capturing a monster increases your research points. Once you return after capture, you will see the monster sleeping at the base. Instead of bringing back material and clues for the Ecological Resource Center to study, you've given them the monster itself!
Capturing Monsters will Reduce Hunting Time
Capturing a monster can greatly reduce hunting time. Monsters can be captured once a certain health threshold is reached. This does not mean that if you continue battling a monster when you have seen the signs of weakness that it will easily die.
Capturing the monster removes the entire end of slaying a monster by trapping it instead of waking it up.
Capturing Monsters will Increase Rewards
Capturing a monster increases the rewards that you receive from a quest! If the reason for the hunt or quest is to farm materials for armor or weapons, it is better to capture the monster instead of slaying it to increase the chance of receiving the reward needed. Keep in mind that the number of rare drops does not increase when capturing.
Monster Hunter World (MHW) Related Guides
All Beginner Guides

Beginner's Guide | How to Play MHW
Monster Hunter World Guides
Stat Guides
| Stat Guides | |||||
|---|---|---|---|---|---|
| What Does Attack Do? | What Does Defense Do? | What Does Elemental Resistance Do? | |||
| What Does Affinity Do? | What Does Elemental Attack Do? | What is Elderseal? | |||
How to Track Grimalkynes
| Grimalkyne Tribes | ||
|---|---|---|
| All Grimalkyne Tribes and Rewards | ||
| Bugtrappers | Protectors | Troupers |
| Plunderers | Gajalaka | Boaboa |
Author

How To Capture Monsters
Please participate in our site
improvement survey
03/2026
improvement survey
03/2026
Would you assist in
improving Game8's site?
improving Game8's site?

×
We are listening to our users' valuable opinions and discussing how to act on them.
The information collected through this survey will be used for the purpose of improving our services. In addition, the information will only be disclosed a part of a statistic in a format that will not allow identification of personal information.
Begin Survey
Not Now
×
Please rate each item regarding Game8.co's Advertisements.
Amount of Ads
Very Dissatisfied
Somewhat Dissatisfied
Fine
Somewhat Satisfied
Highly Satisfied
Placement of Ads
Timing of Ad Display
Ad Loading Speed
Safeness of Ads
Content of Ads
×
Please rate each item regarding Game8.co's Quality of Articles.
Amount of information
Very Dissatisfied
Somewhat Dissatisfied
Fine
Somewhat Satisfied
Highly Satisfied
Frequency of updates
Speed of new information
Accuracy of articles
Understandibility of articles
Readability of sentences
×
Please rate each item regarding Game8.co's Usability of the Site.
Ease of finding information
Very Dissatisfied
Somewhat Dissatisfied
Fine
Somewhat Satisfied
Highly Satisfied
Loading Speed
Use of Color
Font Size
Visibility of Images
Easy to Understand Layout
×
Please rate each item regarding Game8.co's Message Boards, Comments.
Ease of Writing
Very Dissatisfied
Somewhat Dissatisfied
Fine
Somewhat Satisfied
Highly Satisfied
Readability
Ease in Finding Information
Comment Quality
Comment Quantity
Admin Response
×
Please rate each item regarding Game8.co's Site's new design.
Please rate our site's new design
Very Dissatisfied
Somewhat Dissatisfied
Fine
Somewhat Satisfied
Highly Satisfied
Do you think that the website's design change makes the site easier to use?
Has the new design made it easier for you to find information on the site?
Has the new design improved the overall visual appeal of the site?
How would you rate your overall satisfaction with the new design of the site?
×
How likely are you to recommend Game8 to someone you know?
Very Unlikely
0
1
2
3
4
5
6
7
8
9
10
Very Likely
If you have other opinions regarding potential improvement to the website, please share them with us. We would appreciate your honest opinion.
Note: This is a free response section, so you can proceed without entering anything.
Note: Please be sure not to enter any kind of personal information into your response.
Note: Please be sure not to enter any kind of personal information into your response.
×
Thank You
×
Thank you for participating in our survey! Your answers will help us to improve the quality of our website and services.
We hope you continue to make use of Game8.
We hope you continue to make use of Game8.
Close
Rankings
- We could not find the message board you were looking for.
Gaming News


![Everwind Review [Early Access] | The Shaky First Step to A Very Long Journey](https://img.game8.co/4440226/ab079b1153298a042633dd1ef51e878e.png/thumb)

![Monster Hunter Stories 3 Review [First Impressions] | Simply Rejuvenating](https://img.game8.co/4438641/2a31b7702bd70e78ec8efd24661dacda.jpeg/thumb)
Popular Games

Genshin Impact Walkthrough & Guides Wiki
Honkai: Star Rail Walkthrough & Guides Wiki
Umamusume: Pretty Derby Walkthrough & Guides Wiki
Pokemon Pokopia Walkthrough & Guides Wiki
Resident Evil Requiem (RE9) Walkthrough & Guides Wiki
Monster Hunter Wilds Walkthrough & Guides Wiki
Wuthering Waves Walkthrough & Guides Wiki
Arknights: Endfield Walkthrough & Guides Wiki
Pokemon FireRed and LeafGreen (FRLG) Walkthrough & Guides Wiki
Pokemon TCG Pocket (PTCGP) Strategies & Guides Wiki


Recommended Games
Diablo 4: Vessel of Hatred Walkthrough & Guides Wiki
Fire Emblem Heroes (FEH) Walkthrough & Guides Wiki
Yu-Gi-Oh! Master Duel Walkthrough & Guides Wiki
Super Smash Bros. Ultimate Walkthrough & Guides Wiki
Pokemon Brilliant Diamond and Shining Pearl (BDSP) Walkthrough & Guides Wiki
Elden Ring Shadow of the Erdtree Walkthrough & Guides Wiki
Monster Hunter World Walkthrough & Guides Wiki
The Legend of Zelda: Tears of the Kingdom Walkthrough & Guides Wiki
Persona 3 Reload Walkthrough & Guides Wiki
Cyberpunk 2077: Ultimate Edition Walkthrough & Guides Wiki


All rights reserved
©CAPCOM CO., LTD. 2018, 2019 ALL RIGHTS RESERVED.
The copyrights of videos of games used in our content and other intellectual property rights belong to the provider of the game.
The contents we provide on this site were created personally by members of the Game8 editorial department.
We refuse the right to reuse or repost content taken without our permission such as data or images to other sites.