Chapter 18F: From the Abyss Story Walkthrough, Dialogue Choices, and Item Locations
★ Follow along with our Story Walkthrough.
┗ Want the Golden Route? Check out our Endings Guide!
┗ Strengthen Serenoa's Conviction as you pursue your path.
★ Learn about the best units to use in your battles!
┗ Find out how to recruit all of the characters to your party.
This is a walkthrough and guide for Chapter 18F (Frederica Route): From the Abyss in Triangle Strategy. Read on to learn more about the Chapter's objectives, dialogue choices, item locations, and battle strategies!
| Previous Chapter | Next Chapter |
|---|---|
| Chapter 17F: One Last Request (Frederica) |
Chapter 19F: Hold Fast to Courage |
Chapter 18F Objectives
From the Abyss Objectives
| From the Abyss Objectives | |
|---|---|
| 1 | The chapter starts with a narration about Serenoa's party heading to the Hyzantian Capital aboard Clarus' Consortium cart. The group then devises a plan on how they're going to get to The Source and convince the Roselle to revolt. |
| 2 | The party manages to sneak into the Holy State with the help of Clarus and makes for the Ministry of Medicine. Exploration Phase unlocked: Central Hyzante |
| 3 | Proceed to Central Hyzante. During the exploration phase, talk to Anna and she will tell you that she will look into the files secured behind the locked door. |
| 4 | After the exploration phase, your party finds out that the Ministry ot Medicine has been harvesting human remains from Roselle corpses to make Aelfric. While the group was busy reading the rest of the contents of the book, Lyla catches them red-handed. You will be sent to the World Map afterwards. Battle Unlocked: Battle at the Ministry |
| 5 | Head to Central Hyzante and prepare for a battle! |
| 6 | After winning the battle, the party proceeds to The Source, Aelfric in hand. End of Chapter 18F: From the Abyss |
Chapter 18F Exploration Phase
Item Locations
| All Item Locations | |
|---|---|
 Enlarge Enlarge |
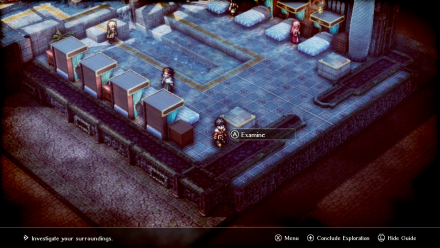
2700 Coin By the bed square structure near Geela |
 Enlarge Enlarge |
3000 Coin In the drawer between the 2nd and 3rd beds near Geela |
 Enlarge Enlarge |
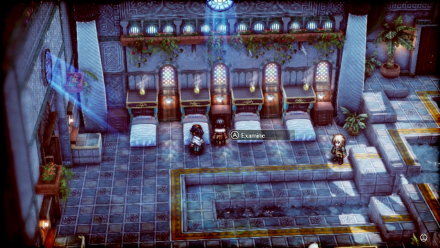
Large Ranged Recovery Pellet By the plant nearest to the Ministry Official |
 Enlarge Enlarge |
3300 Coin Above the bed near the Ministry Official |
 Enlarge Enlarge |
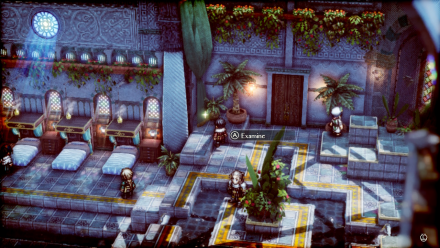
Superior Fiber By the tall potted plant near the locked door |
 Enlarge Enlarge |
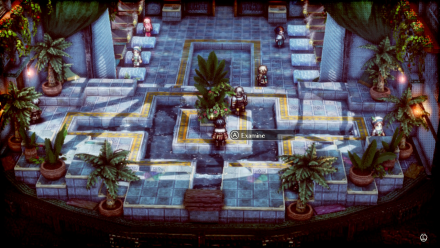
Panacea Pellet Examine the plant surrounded by water in the middle of the room |
 Enlarge Enlarge |
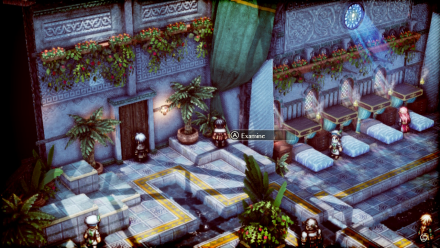
Luck Bracelet By the potted plant and curtain near Anna |
Chapter 18F Battle and Strategies
Battle at the Ministry Map and Battle Information
 Enlarge
| Recommended Level: 28 | Enemy Units: 15 | ||
| Weather: | - | Wind: | - |
|---|---|---|---|
| Victory Conditions: | Decimate the enemy forces. | ||
| Defeat Conditions: | Lose all allied forces. | ||
| Battle Spoils: |
・Uninvigorating Spice x1 ・Quality Stone x4 ・Quality Timber x5 ・Quality Fiber x4 ・Invigorating Spice x1 ・Medal of Valor x1 ・Large Ranged HP Recovery Pellet x1 ・Extra Large HP Recovery Pellet x3 |
||
Recommended Deployed Units
 Serenoa Serenoa Required |
 Lionel Lionel Reco. |
 Geela Geela Reco. |
 Flanagan Flanagan Reco. |
 Erador Erador Reco. |
 Archibald Archibald Reco. |
 Hossabara Hossabara Reco. |
Maximum # of Deployed Units is 10
Battle Strategies
Prepare Sleep Recovery Pellets

Hyzantian Elite Rogues use an ability called Slumber Throw, which has a chance of putting your units to sleep for 2 turns.
| Deal physical damage to a single enemy, and have a chance to put them to sleep for 2 turn(s). Power: 62 Range: 1-2 (Height -5 - +5) |
Make sure to bring enough Sleep Recovery Pellets, Cure-all Pellets, and Panacea or use Geela's Heal What Ails You Ability.
| Heal an ally's status ailments. Power: - Range: 0-4 (Height-10 - +10) |
Using the Restore Quietus will not only recovery an ally's health by 50%, but it will also heal any status ailments.
Quietuses Guide: List and How to Use
Prepare For a Defensive Battle
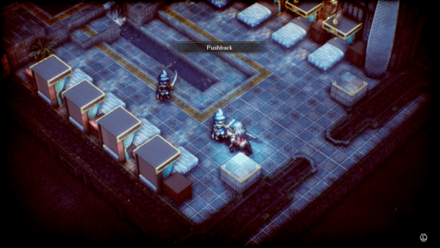
For most of the battle, enemy units will be rushing towards you. It's good to hold the position from where units are first deployed. The strongest enemy units in this battle are at the forefront. Once taken care of Lyla will only have archers and healers to rely on.
| Stop all enemies within range for 2 turn(s), preventing them from taking any actions. Power: - Range: 1-4 (Height -10 - +10) |
Be sure to keep Lyla away from the battle when dealing with her close-range units as her ability Temporal Suspension stops units from taking any action for 2 turns.
| Deal physical damage to a single enemy, knock them back 5 squares and move forward 1 square. Power: 62 Range: 1-1 (Height -2 - +2) |
Players can use Pushback or Ram Foe to forcibly keep her away from ally units.
Beating Lyla

Once the close-combat units like shieldbearers and rogues have been defeated, there is little Lyla can do to stop your party members.
| Deal physical damage to a single enemy and decrease their TP by 1. Power: 56 Range: 1-1 (Height -2 - +2) |
She can be effectvely contained by decreasing her TP using Julio's Not on My Watch Ability. Without her spells, her attacking power decreases making it easy to surround and attack her.
Chapter 18F General Tips
Do Not Crowd Units Together
Plenty of your enemies' attacks, Lyla included, can damage multiple enemies at once. We recommend spacing your units out in the battlefield to avoid getting damage by their attacks.
Bring Sleep Recovery Pellets or Use Geela's Ability
Lyla can put your units to sleep and it can take a long time before you can move them again. Because of this, we recommend bringing Sleep Recovery Pellets so your units can move right away after Lyla puts them to sleep.
Alternatively, you can use Geela's Heal What Ails You ability to heal any of your ally's status ailments.
Triangle Strategy Related Guides
Previous and Next Chapters
| Previous Chapter | Next Chapter |
|---|---|
| Chapter 17F: One Last Request (Frederica) |
Chapter 19F: Hold Fast to Courage |

Author

Chapter 18F: From the Abyss Story Walkthrough, Dialogue Choices, and Item Locations
Rankings
- We could not find the message board you were looking for.
Gaming News

![Monster Hunter Stories 3 Review [First Impressions] | Simply Rejuvenating](https://img.game8.co/4438641/2a31b7702bd70e78ec8efd24661dacda.jpeg/show)


![Monster Hunter Stories 3 Review [First Impressions] | Simply Rejuvenating](https://img.game8.co/4438641/2a31b7702bd70e78ec8efd24661dacda.jpeg/thumb)
Popular Games

Genshin Impact Walkthrough & Guides Wiki
Honkai: Star Rail Walkthrough & Guides Wiki
Umamusume: Pretty Derby Walkthrough & Guides Wiki
Pokemon Pokopia Walkthrough & Guides Wiki
Resident Evil Requiem (RE9) Walkthrough & Guides Wiki
Monster Hunter Wilds Walkthrough & Guides Wiki
Wuthering Waves Walkthrough & Guides Wiki
Arknights: Endfield Walkthrough & Guides Wiki
Pokemon FireRed and LeafGreen (FRLG) Walkthrough & Guides Wiki
Pokemon TCG Pocket (PTCGP) Strategies & Guides Wiki


Recommended Games
Diablo 4: Vessel of Hatred Walkthrough & Guides Wiki
Cyberpunk 2077: Ultimate Edition Walkthrough & Guides Wiki
Fire Emblem Heroes (FEH) Walkthrough & Guides Wiki
Yu-Gi-Oh! Master Duel Walkthrough & Guides Wiki
Super Smash Bros. Ultimate Walkthrough & Guides Wiki
Pokemon Brilliant Diamond and Shining Pearl (BDSP) Walkthrough & Guides Wiki
Elden Ring Shadow of the Erdtree Walkthrough & Guides Wiki
Monster Hunter World Walkthrough & Guides Wiki
The Legend of Zelda: Tears of the Kingdom Walkthrough & Guides Wiki
Persona 3 Reload Walkthrough & Guides Wiki


All rights reserved
©2022 SQUARE ENIX CO., LTD. All Rights Reserved. Nintendo Switch is a trademark of Nintendo. © Nintendo.
The copyrights of videos of games used in our content and other intellectual property rights belong to the provider of the game.
The contents we provide on this site were created personally by members of the Game8 editorial department.
We refuse the right to reuse or repost content taken without our permission such as data or images to other sites.