Chapter 11a: The Bloodstained Conscience Story Walkthrough, Dialogue Choices, and Item Locations
★ Follow along with our Story Walkthrough.
┗ Want the Golden Route? Check out our Endings Guide!
┗ Strengthen Serenoa's Conviction as you pursue your path.
★ Learn about the best units to use in your battles!
┗ Find out how to recruit all of the characters to your party.

This is a walkthrough and guide for Chapter 11a: The Bloodstained Conscience in Triangle Strategy. Read on to learn more about the Chapter's objectives, dialogue choices, item locations, and battle strategies!
| Previous Chapter | Next Chapter |
|---|---|
| Chapter 11: Oppressions Under the Sun |
Chapter 12a: Defiance and Despondence |
List of Contents
Chapter 11a Objectives
The Bloodstained Conscience Objectives
| The Bloodstained Conscience Objectives | |
|---|---|
| 1 | The chapter begins with Serenoa and his allies figuring out a way to deliver the Rosellans from Hyzante. |
| 2 | After a quick cutscene of the return of familiar faces, you will be sent to the World Map. Main Story unlocked: Rosellan Village |
| 3 | Before heading to the Rosellan Village, be sure to drop by the Encampment to prepare yourself for battle. Battle unlocked: Routing the Roselle |
| 4 | After the battle, Serenoa and his allies put a stop to the unnecessary fighting as he only wishes to talk in the first place. Main Story unlocked: Rosellan Village |
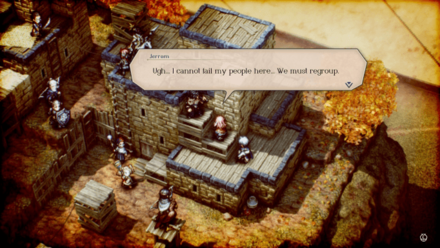
| 5 | Proceed to the Rosellan Village and Serenoa will explain to Jerrom the situation they are in. Jerrom acknowleges the difficulty of the predicament, but humbly declines. |
| 6 | The conversation carries on and Jerrom hints Serenoa and his allies the secret behind the blessing of the Goddess. Main Story unlocked: Rosellan Village Side Story unlocked: Whiteholm Castle |
| 7 | After being sent to the World Map, proceed once more to the Rosellan Village to uncover that someone knows of the masked man's true identity. With this, Jerrom begins to reconsider the offer given to him. End of Chapter 11b: The Bloodstained Conscience |
Chapter 11a Battle and Strategies
Routing the Roselle Map and Battle Information
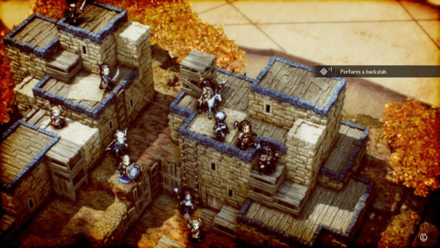 Enlarge
| Recommended Level: 18 | Enemy Units: 15 | ||
| Weather: | Clear | Wind: | Breezy |
|---|---|---|---|
| Victory Conditions: | Decimate the enemy forces. | ||
| Defeat Conditions: | Lose all allied forces. | ||
| Battle Spoils: |
・Timber x3 ・Fiber x3 ・Uninvigorating Spice x1 ・Quality Stone x1 ・Leather x1 ・Medal of Bravery x1 |
||
Recommended Deployed Units
 Serenoa Serenoa Required |
 Erador Erador Reco. |
 Jens Jens Reco. |
 Archibald Archibald Reco. |
 Anna Anna Reco. |
 Lionel Lionel Reco. |
Maximum # of Deployed Units is 10
Battle Strategies
Defeat Enemy Healers First
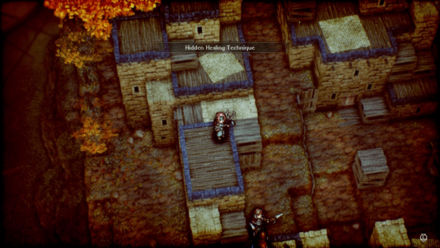
Certain areas of the map can be a little narrow. While this makes it the perfect place to use area of effect spells, your own units are affected in the same way.
| Grant HP to allies within range, and raise their accuracy and evasion for 3 turn(s). Power: 67 Range: 0-4 (Height -10 - +10) |
Enemy healers also have Hidden Healing Technique which can heal multiple enemies at the same time.
Hence, it is highly recommended to take out enemy healers first to prevent prolonging the battle.
Dealing with Jerrom
Despite being a heavy-hitter, Jerrom, can easily be dealt with by inflicting status changes against him.
He only fights in close-combat, making him near useless when hit with Hughette's Shadowstitching Arrow.
Once he is immobile, his only other move is to use Allure. Consequently, try not to have Rufus be afflicted with temptation as he deals massive damage.
Use the Grounding Amulet

Before this battle, players will have a chance at securing the Grounding Amulet.
Since the enemy frontlines consists of spearmen that can push units off the ledge, it's good to have the most forefront unit wear the amulet.
Conversely, units like Erador or Roland can knock close-combat units off the rooftops for extra damage and to temporarily take them off the battle.
Easily Acess the Rooftops with Jens
The hardest part of this battle is trying to climb stairs while absorbing arrow fire from enemy archers.
Jens' Ladder ability is indispensable in transporting units to the location of the archers.
Chapter 11a General Tips
Be Wary of Status Changes

One of Jerrom's tricks up his sleeve during battle is his ability to inflict Fury to your party, causing them to go on a frenzy and attack your very allies.
Should you not have a Fury Recovery Pellet or a Cure-All Pellet, you could possibly hinder your Fury-inflicted allies from attacking you by putting them to sleep, paralyzing them, or even blinding them,.
Being able to familiarize yourself with the different status changes can benefit your party against your foes, and to circumvent situations wherein your party turns against you!
List of All Status Changes and Effects
Triangle Strategy Related Guides
Previous and Next Chapters
| Previous Chapter | Next Chapter |
|---|---|
| Chapter 11: Oppressions Under the Sun |
Chapter 12a: Defiance and Despondence |

Author

Chapter 11a: The Bloodstained Conscience Story Walkthrough, Dialogue Choices, and Item Locations
Rankings
- We could not find the message board you were looking for.
Gaming News


![Monster Hunter Stories 3 Review [First Impressions] | Simply Rejuvenating](https://img.game8.co/4438641/2a31b7702bd70e78ec8efd24661dacda.jpeg/thumb)
Popular Games

Genshin Impact Walkthrough & Guides Wiki
Honkai: Star Rail Walkthrough & Guides Wiki
Umamusume: Pretty Derby Walkthrough & Guides Wiki
Pokemon Pokopia Walkthrough & Guides Wiki
Resident Evil Requiem (RE9) Walkthrough & Guides Wiki
Monster Hunter Wilds Walkthrough & Guides Wiki
Wuthering Waves Walkthrough & Guides Wiki
Arknights: Endfield Walkthrough & Guides Wiki
Pokemon FireRed and LeafGreen (FRLG) Walkthrough & Guides Wiki
Pokemon TCG Pocket (PTCGP) Strategies & Guides Wiki


Recommended Games
Diablo 4: Vessel of Hatred Walkthrough & Guides Wiki
Cyberpunk 2077: Ultimate Edition Walkthrough & Guides Wiki
Fire Emblem Heroes (FEH) Walkthrough & Guides Wiki
Yu-Gi-Oh! Master Duel Walkthrough & Guides Wiki
Super Smash Bros. Ultimate Walkthrough & Guides Wiki
Pokemon Brilliant Diamond and Shining Pearl (BDSP) Walkthrough & Guides Wiki
Elden Ring Shadow of the Erdtree Walkthrough & Guides Wiki
Monster Hunter World Walkthrough & Guides Wiki
The Legend of Zelda: Tears of the Kingdom Walkthrough & Guides Wiki
Persona 3 Reload Walkthrough & Guides Wiki


All rights reserved
©2022 SQUARE ENIX CO., LTD. All Rights Reserved. Nintendo Switch is a trademark of Nintendo. © Nintendo.
The copyrights of videos of games used in our content and other intellectual property rights belong to the provider of the game.
The contents we provide on this site were created personally by members of the Game8 editorial department.
We refuse the right to reuse or repost content taken without our permission such as data or images to other sites.