Chapter 20F: Blessed Freedom Story Walkthrough, Dialogue Choices, and Item Locations
★ Follow along with our Story Walkthrough.
┗ Want the Golden Route? Check out our Endings Guide!
┗ Strengthen Serenoa's Conviction as you pursue your path.
★ Learn about the best units to use in your battles!
┗ Find out how to recruit all of the characters to your party.
This is a walkthrough and guide for Frederica's Final Chapter: Blessed Freedom in Triangle Strategy. Read on to learn more about the Chapter's objectives, dialogue choices, item locations, and battle strategies!
| Previous Chapter | Next Chapter |
|---|---|
| Chapter 19F: From the Abyss |
- |
List of Contents
Chapter 20F Objectives
Blessed Freedom Objectives
| Blessed Freedom Objectives | |
|---|---|
| 1 | The chapter opens with a narration and Idore devising a plan to stop Serenoa's party. You'll be sent back to the World Map afterwards. Battle Unlocked: Fighting Idore the Deluded |
| 2 | After winning the battle, watch a cutscene and the epilogue. End of Chapter 20F: Blessed Freedom |
Chapter 20F Battle and Strategies
Fighting Idore the Deluded Map and Battle Information
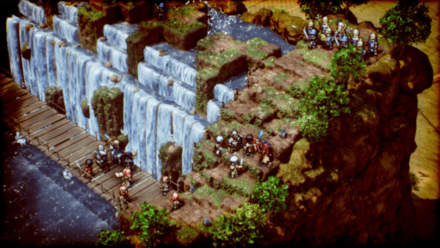 Enlarge
| Recommended Level: 33 | Enemy Units: 20 | ||
| Weather: | Clear | Wind: | Breezy |
|---|---|---|---|
| Victory Conditions: | Defeat Idore. | ||
| Defeat Conditions: | Allow even a single Rosellian to Fall. | ||
| Battle Spoils: |
・Iron x5 ・Stone x5 ・Quality Stone x4 ・Quality Timber x4 ・Defortifying Spice x1 ・Ranged Windstone x1 ・Panacea Pellet x1 |
||
Recommended Deployed Units
 Serenoa Serenoa Required |
 Geela Geela Reco. |
 Erador Erador Reco. |
 Hossabara Hossabara Reco. |
 Corentin Corentin Reco. |
 Jens Jens Reco. |
Maximum # of Deployed Units is 10
Battle Strategies
Protect the Rosellans

Other than losing allied forces, getting even one Roselle ally killed will end in the battle's defeat.
| Create an obstacle across 3 horizontal squares. The obstacle will disappear over time. Power: - Range: 1-4 (Height -10 - +10) |
Hyzantian Automaton Knights both have great movement and strength. Holding them to a chokepoint on the bridge using Wall of Ice will keep them away from the Roselle until players can defeat Idore.
| Grant HP to allies within range. Power: 28 Range: 0-4 (Height -10 - +10) |
Just in case, have a healer like Geela on standby to heal any Roselle taking damage. Finally, Quietuses like Restore can heal allies while Lightwave can transport units away from the battle.
Quietuses Guide: List and How to Use
Use Area of Effect Abilities
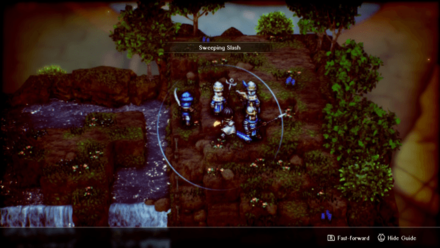
The hill where Idore and his guards deploy is very narrow. Take advantage of the location and number of enemies by using attacks that can damage multiple enemies.
| Deal fire-type magic damage to all enemies within range and set the ground ablaze. Power: 26 Range: 0-4 (Height -10 - +10) |
Frederica's Scorch and Serenoa's Sweeping Slash are both powerful abilities that can be used to take down multiple enemies.
| Deal physical damage to all enemies within range. Power: 65 Range: 1-1 (Height -2 - +2) |
Rush Idore

The easiest way to win the battle is to defeat Idore. Once Idore is defeated, the battle is automatically won.
| Deal wind-type magic damage to all enemies within range and change the direction they face. Power: 144 Range: 1-20 (Height -20 - +20) |
He is a mage-type unit that doesn't do well with close combat-types. With only one offensive spell, Raging Winds, he supports the frontline better using TP Region.
| Grant 1 TP to all allies within range. Power: - Range: 0-0 (Height -0 - +0) |
Surround him with multiple units until he is defeated.
Chapter 20F General Tips
Use Quietuses
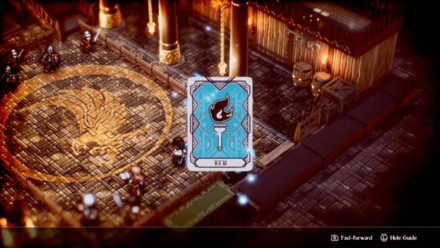
When in a pinch, remember that you can use Quietuses to turn the battle around.
The battlefield is a little hard to traverse and Idore's ice structures make it even more difficult for your units to get to a tile. We recommend getting Lightwave so you can easily get a unit to where you want it to be.
You can also Restore to recover an ally's HP by 50%, heal their status ailments, and restore their lowered stats to normal.
Quietuses Guide: List and How to Use
Triangle Strategy Related Guides
Previous and Next Chapters
| Previous Chapter | Next Chapter |
|---|---|
| Chapter 19F: From the Abyss |
- |

Author

Chapter 20F: Blessed Freedom Story Walkthrough, Dialogue Choices, and Item Locations
Rankings
- We could not find the article you were looking for.
- We could not find the message board you were looking for.
Gaming News

![Death Stranding 2: On The Beach [PC] Review | A Port That Delivers](https://img.game8.co/4447392/15310a0c9aa1b6843bb713b2ea216930.jpeg/show)


Popular Games

Genshin Impact Walkthrough & Guides Wiki
Umamusume: Pretty Derby Walkthrough & Guides Wiki
Crimson Desert Walkthrough & Guides Wiki
Monster Hunter Stories 3: Twisted Reflection Walkthrough & Guides Wiki
Honkai: Star Rail Walkthrough & Guides Wiki
Pokemon Pokopia Walkthrough & Guides Wiki
The Seven Deadly Sins: Origin Walkthrough & Guides Wiki
Wuthering Waves Walkthrough & Guides Wiki
Zenless Zone Zero Walkthrough & Guides Wiki
Arknights: Endfield Walkthrough & Guides Wiki


Recommended Games
Fire Emblem Heroes (FEH) Walkthrough & Guides Wiki
Diablo 4: Vessel of Hatred Walkthrough & Guides Wiki
Cyberpunk 2077: Ultimate Edition Walkthrough & Guides Wiki
Yu-Gi-Oh! Master Duel Walkthrough & Guides Wiki
Super Smash Bros. Ultimate Walkthrough & Guides Wiki
Pokemon Brilliant Diamond and Shining Pearl (BDSP) Walkthrough & Guides Wiki
Elden Ring Shadow of the Erdtree Walkthrough & Guides Wiki
Monster Hunter World Walkthrough & Guides Wiki
The Legend of Zelda: Tears of the Kingdom Walkthrough & Guides Wiki
Persona 3 Reload Walkthrough & Guides Wiki


All rights reserved
©2022 SQUARE ENIX CO., LTD. All Rights Reserved. Nintendo Switch is a trademark of Nintendo. © Nintendo.
The copyrights of videos of games used in our content and other intellectual property rights belong to the provider of the game.
The contents we provide on this site were created personally by members of the Game8 editorial department.
We refuse the right to reuse or repost content taken without our permission such as data or images to other sites.