Link Guide: Matchup Chart and Combos

This is a guide to using Link in Super Smash Bros. Ultimate. Link's bread and butter combos, how to unlock, frame data, alt costumes and skins, as well as Link's matchups, counters, and tier list placement can all be found here.
List of Contents
Link Tier and Overview
Stats and General Info
| Link | |
|---|---|
 |
|
| Game Series | The Legend of Zelda |
| Smash Bros. Debut | Super Smash Bros. (64) |
| Fighter Number | 3 |
| Unlock Order | Default |
| Number of Jumps | 2 |
| Weight | 104 Units (22/87) |
| Dash Speed | 1.534 (71/87) |
| Air Speed | 0.924 (76/87) |
| Fast Fall Speed | 3.04 (6/87) |
| Special Attributes | None |
Tier List Placement
 |
 Tier
Tier
|
Heavy hitting attacks and excellent zoning ability
Link in SSBU has a plethora of zoning tools in his arsenal to deal damage without getting too close. He has great range with both his projectiles and sword attacks, and has plenty ofhard hitting moves that can take a stock off of an opponent. His movement speed is not quite as good as his younger counterparts, and he has some noticeable lag on many of his normals, so he will mainly need to rely on nair when cornered.
Link's Strengths and Weaknesses
| Strengths | ・Excellent zoning tools to rack up damage (→ + B, ↓ + B, B) ・Several KO options (Tilts, Smashes, Dash Attack, as well as edgegaurding with projectiles) ・Can take a lot of damage before getting KO'ed ・Great reach with his long sword ・One of the best Neutral Airs in the game ・Can use bomb offstage on himself to extend his recovery |
|---|---|
| Weaknesses | ・Struggles a bit up close (most of his attacks are a bit slow) ・Gets comboed a lot due to his size ・Slow movement speed |
Link Matchup Chart
Matchup Chart
|
|
|
| -2 | |
|---|---|
| -1 | |
| 0 | |
| +1 | |
| +2 | |
Notes About Matchup Chart
1. -2 = Disadvantage. -1 = Slight Disadvantage or Even. 0 = Even. +1 = Slight Advantage or Even. +2 = Advantage.
2. The matchup chart was based around both the opinions of professional players of each character, as well as our own experience through playing Link.
3. Characters within each tier are unordered
4. Pokemon Trainer's individual Pokemon (Squirtle, Ivysaur, and Charizard) as well as Echo fighters with no significant difference than their regular counterpart are not shown.
5. For other characters who are not shown here, we are still investigating the matchup.
Good Matchups For Link
With a wide array of projectiles in his kit, Link does well against most big body characters (similar to the other Links), since they are an easy target for boomerang and bomb. Out of all three Links, his sword grants him the most range, so he also can do well against characters with short range on their attacks.
Link Counters
Link generally has a pretty good matchup for most characters, although there are some characters who may give him trouble. Characters with good frame data are much better at punishing Link's slower attacks, so ZSS, Pikachu, or Joker may be trouble. His recovery is also easy to exploit for characters with counters, and small body characters may be tough for him to land his attacks on.
How to Beat Link
Countering Remote Bomb
An essential part of Link's gameplan is his remote bomb, which can be pulled and detonated remotely with down B. Since it functions as an item, dash attacks, tilts, jabs, and aerials will all allow you to intercept it and hold it. While you are holding it, he cannot detonate it, so use this to your advantage. There is noticeable startup when he pulls it, so if you throw it offstage and wait for him to pull it again, you can punish him during the move's startup.
Link can also use this move to extend his recovery offstage, so be on the lookout for how he recovers. If Link is already offstage but his bomb is placed somewhere on stage, he will not have enough time to detonate, pull again, and redetonate for a bomb recovery.
Deal with his projectiles
Projectiles are another integral part of Link's gameplay, so you will have to find a way to deal with them. If your character has a reflector, this is rather easyーjust don't be too predictable in using it, or Link can counter it. If your character does not have a reflector, you'll instead need to play patiently, and look for patterns in how he uses his specials.
Careful use of shielding, spotdodging, parrying, as well as jumping are the key to manuevering around Link's projectiles to find an opening. Boomerang is one of Link's best neutral tools, but it does have considerable startup, so you can punish him as he begins the move if you are close enough. Once you have made your way in, keep the pressure up and don't let him get too far away.
Bait out moves for a punish
Many of Link's moves have significant endlag on them, particularly his smashes, tilts, and up special. Since Up Special is such a quick option out of shield, Links may use it to try punishing your moves that hit his shield. If you can feint an aerial by jumping toward his shield, then jumping away without doing anything, you may be able to bait the move out. Since the move only hits once, you can either shield hit and drop shield for any punish you want, or move in at the end to punish it. Up Smash can be dealt with in a similar way.
When in disadvantage, Links (especially at lower levels) may try and land with down air. If he misses the move, it has enough lag to punish easily, so it can even be baited out by waiting underneath him, dodging it, then moving in for a quick move.
Edgeguarding
If the Link you are playing against does not know how to bomb recover, Link's normal recovery is quite easy to deal with. Since it has no hitbox above it, he is still very easily hit with a move that attacks downward (such as a spike). If your character has a counter (Marth, Lucina, etc), you can also use it just before he gets back to the ledge, and you will easily stop his recovery. Just be sure to mix up your timing, or else the Link will just wait until after you finish using the move.
Link Combos
| Bread and Butter Combos |
|---|
| Down Throw → Up Smash |
| Down Throw → Up Tilt |
| Side B → Forward Air |
| Advanced Combos |
| Neutral Air → Fast Fall → Jab (x3) |
| Neutral Air → Forward Smash |
| Back Air →Back Air → Back Air (Up B) |
Link Bread and Butter Combos
| Down Throw → Up Smash |
|---|
| With Link's quick grab, this is an excellent combo that works at low percents and will dish out about 29%. |
| Down Throw → Up Tilt |
|---|
| This is another low percent grab combo, which is less risky than the Up Smash (less punishable if they manage to SDI out). Following up with an uair will also allow you to threaten the opponent's landing. |
| Side B → Forward Air |
|---|
| An essential combo for Link (and all Links, for that matter). Works over a pretty wide range of percents. At higher percents, this is a good way to end a stock. |
Link Advanced Combos
| Neutral Air → Fast Fall → Jab (x3) |
|---|
| With how good Nair is in neutral, fast falling a nair and following up with a gentleman is a quick combo that deals decent damage. This is good for both approaching, and also when an opponent is approaching you. Be sure and fast fall right after the Nair comes out! |
| Neutral Air → Forward Smash |
|---|
| Another good fast fall Nair combo that works at mid percents. While it can be hard to hit, it deals pretty good damage when it does work. |
| Back Air →Back Air → Back Air |
|---|
| A back air string that works very well at low percents. You will need to fast fall after each Bair comes out to do this combo. If spaced properly, you can even end the string with an Aerial Spin Attack (Mid-Air Up B). |
Link Frame Data and Moveset
Link's Best Out of Shield Options
| Move | Frames |
|---|---|
| Up B | 7 Frames |
| Bomb Throw | 7 Frames |
| Back Air | 9 Frames |
| Neutral Air | 10 Frames |
| Up Smash | 10 Frames |
| Grab | 10 Frames |
Up B out of shield is a very fast and powerful move, and can easily KO an opponent depending on % and positioning. However, be warned that it is very easy to punish, so do not use it to try and counterattack a move that is very safe on shield. If you have a bomb in hand, you can throw it for a quick OOS option. Additionally, Nair and Grab will typically come in handy, depending on what you think your opponent is about to do next (grab if you think they will shield, and Nair if you are less certain).
Link Jab (Light Attack)
| Damage | Startup Frames | Active Frames | Cooldown Frames | |
|---|---|---|---|---|
| Jab 1 (A) |
3.6 | 8 | 2 | 15 |
| Jab 2 | 3.6 | 5 | 2 | 18 |
| Jab 3 | 4.8 | 6 | 2 | 27 |
Jab Info
Link's jab is pretty quick, especially when compared to his other grounded options. In particular, it is a good for an easy follow up to a fast fall neutral air. It can be used to break out of combos, but Nair will fit this role as well.
Link Dash Attack / Tilt Attacks
| Damage | Startup Frames | Active Frames | Cooldown Frames | |
|---|---|---|---|---|
| Dash Attack (Dash + A) |
16.8/15.6/14.4 | 20 | 4 | 33 |
| Forward Tilt (← or → + A) |
15.6 | 15 | 5 | 20 |
| Up Tilt (↑ + A) |
13.2 | 8 | 5 | 23 |
| Down Tilt (↓ + A) |
10.8 | 10 | 2 | 19 |
Dash Attack Info
Link's DA is very powerful, although it has significant startup and end lag. It is a bit high risk/high reward, and you should not be reckless with it, but it can sometimes be used to catch opponents that are landing.
Forward Tilt Info
Link's FTilt has excellent range, and it is also very strong. It is a very good KO option for Link, although it does have significant startup and end lag on it.
Up Tilt Info
This move covers a lot of space, and has a pretty quick startup. It covers the entire 180 Degree area above Link, so it is good at snuffing out jumps, or when used as an anti-air. It is also a good follow-up for down throw.
Down Tilt Info
D Tilt has both a quick startup and good range. It is one of Link's best combo tools due to the angle it sends opponents, and can be followed up with a Fair.
Link Smash Attacks
| Damage | Startup Frames | Active Frames | Cooldown Frames | |
|---|---|---|---|---|
| Forward Smash (1) (Smash ← or → + A) |
8.4/16.8/8.4 | 17 | 2 | 32 |
| Forward Smash (2) | 15.6/15.6/14.4/14.4 | 10 | 2 | 49 |
| Forward Smash (Light Beam) | 6.0 | 19 | 30 | -48 |
| Forward Smash (Beam - Charged) | 15.6 | 19 | 38 | -56 |
| Up Smash Hit 1 (Smash ↑ + A) |
4.8 | 10 | 4 | 64 |
| Up Smash Hit 1 (Late) | 4.8 | 14 | 2 | 62 |
| Up Smash Hit 2 | 3.6 | 25 | 4 | 49 |
| Up Smash Hit 2 (Late) | 3.6 | 29 | 2 | 47 |
| Up Smash Hit 3 | 13.2/13.2/12/10.8 | 41 | 5 | 32 |
| Down Smash (1) (Smash ↓ + A) |
16.8/19.2/20.4/19.2 | 12 | 2 | 41 |
| Down Smash (2) | 14.4/14.4/13.2/12 | 24 | 2 | 29 |
Forward Smash Info
FSmash is a strong two-hit move that can KO opponents. Unlike most smash attacks, you need to press the A button (or smash button) twice in order to use both hits. The window for inputting the second hit is pretty long, so you can sometimes throw the first hit on an opponent's shield and delay the second until they drop their shield, if you expect them to try and punish your first hit.
When Link's % is at 0, an F Smash will also shoot out a beam of light that can damage opponents. Although it is not really very good when compared to his other projectiles, it is still a neat feature that Legend of Zelda fans will appreciate.
Up Smash Info
USmash has a very wide range to catch opponents. Like his up tilt, he strikes to cover a 180 degree angle. This attack consists of three hits, and has a long active hitbox. However, because of how long this attack is, you are extremely punishable if you miss.
Down Smash
Link's quickest smash attack, although still very laggy. It is not as strong as his other smash attacks, but it sometimes catch a foe doing normal getup from ledge, or one who has used all of their invulnerability on a ledge. It is also good for a quick punish, and can cover a roll, since it hits both sides.
Link Aerials
| Damage | Startup Frames | Active Frames | Cooldown Frames | |
|---|---|---|---|---|
| Neutral Air (Strong) (A + no direction while airborne) |
13.2/10.8/10.8 | 7 | 2 | 30 |
| Neutral Air (Weak Hit) | 7.2 | 9 | 23 | 7 |
| Forward Air (1) (Hold ← or → in the direction you are facing + A while airborne) |
9.6 | 16 | 2 | 34 |
| Forward Air (2) | 12 | 24 | 2 | 26 |
| Back Air (1) (← or → Opposite of the direction you are facing + A while airborne) |
6.0 | 6 | 3 | 22 |
| Back Air (2) | 8.4 | 15 | 3 | 13 |
| Up Air (Early) (↑ + A While Airborne) |
18 | 11 | 3 | 46 |
| Up Air (Late) | 15.6 | 14 | 27 | 19 |
| Down Air (Early) (↓ + A While Airborne) |
21.6 | 14 | 6 | 60 |
| Down Air (Late) | 18 | 20 | 45 | 15 |
| Down Air (Pogo) | 13.2 | - | - | - |
Neutral Air Info
This is one of Link's best moves in his kit, and possibly one of the best Nairs in the game, thanks to its quick startup, long active hitbox, and low end lag. It is a good Get-Off-Me option, and can even be used to break from untrue combos. In general, this move can be used in a ton of situations, and its utility should not be underestimated. It is -2 on shield for the strong hit and -3 for the weak one. When you aren't sure what else to do, try Nair!
Forward Air Info
Link's Fair is a high damaging multi-hit attack. While its startup is a bit slow, it can combo with boomerang to take stocks.
Back Air Info
Link's Bair has low startup and is good for comboing. Additionally, it is a pretty fast out of shield option, and it is pretty safe on an opponent's shield (-3). Link will not get many KOs off of this move alone, but he can make Bair strings that combo into Up B for tons of damage.
Up Air Info
This move is good at juggling, thanks to its huge range and long lasting hit box. It can KO opponents, and is a good follow-up to things like DTilt, etc.
Down Air Info
This move has a very long lasting hit box, and can deal a ton of damage. While it does not combo from other moves, the initial hit box can spike opponents, leading to early KOs. This is best done with a T-Spikeーa method of grabbing ledge, hitting down, and then immediately pressing jump and dair at the same time to recover while hitting an opponent recovering low. Do not over use this move on stage, as it is pretty easy for an opponent to predict and then punish.
Link Specials
| Damage | Startup Frames | Active Frames | Cooldown Frames | |
|---|---|---|---|---|
| Neutral Special (Uncharged) (B) |
9.6 | 27 | 10 | 9 |
| Neutral Special (Fully Charged) |
14.4 | - | - | 23 |
| Side Special (← or → + B) |
7.2 | 27 | 9 | ? |
| Side Special (Late) |
7.2 | 36 | 28 | ? |
| Side Special (Returning) |
3.6 | 64 | 92 | ? |
| Up Special (↑ + B) |
16.8/13.68 | 7 | 2 | 68 |
| Up Special (Grounded/Late 1) | 14.4/14.4/11.64 | 9 | 5 | 63 |
| Up Special (Grounded/Late 12) | 10.8/10.8/8.64 | 14 | 10 | 53 |
| Up Special (Grounded/Late 13) | 8.4/8.4/6.72 | 24 | 16 | 37 |
| Aerial Up Special (Hit 1) | 4.8 | 8 | 2 | -9 |
| Aerial Up Special (Hit 2) | 2.4 | 16 | 2 | -17 |
| Aerial Up Special (Hit 3) | 2.4 | 22 | 2 | -23 |
| Aerial Up Special (Hit 4) | 2.4 | 31 | 2 | -32 |
| Aerial Up Special (Hit 5) | 4.8 | 47 | 3 | -49 |
| Down Special Grounded/Explosion |
8.4 | 12 | 1 | 27 |
Neutral B (Arrow)
Arrows are Link's neutral special. By holding B longer, the arrow will fly further and deal more damage. It is not one of your main neutral tools, and you mainly only want to use it at a distance. It can fly extremely far when fully charged though, making it excellent for edge guarding. When you fire an arrow onto the ground, you can pick it up and throw it as an item. If you are holding an arrow and you fire from your bow, you can deal 1.5x damage.
Forward B (Boomerang)
Link's side B is the boomerang. This deals a good amount of damage, and can hit your opponents when you first throw it out, as well as on the return. By holding up or down when throwing it out, you can alter the angle that it flies.
This tool is great for keeping opponents from rushing in at you, and it is also one of Link's most important combat tools, so use it as much as possible.
Up B (Spin Attack)
This attack spins around Link and sends the opponent away It can even be charged when grounded by holding B, to deal more damage. It is a very good KO option, and since it comes out in just 7 frames, it is an amazing OOS option as well. It is also Link's recovery when used in the air, and catching opponents with this will send them up and away. Catching an opponent in the air with this move is very strong, so if you can trick an opponent into recovering high, then read their movement, you may be able to take their stock much earlier than expected.
Down B (Remote Bomb)
Down B will pull out a remote bomb, which Link can then use as an item and throw at the opponent. It detonates when you press down B again, when coming into contact withfire, or after enough time has passed. Additionally, when thrown at a charge shot from Samus, Lucario, Mewtwo, etc, it will cancel the shot, so it can shield him from this type of enemy. When combined with Z-Dropping and Fair, bomb throw has unlimited combo potential as well, so it may be worth putting some training time into.
Bombs can also be used to extend Link's recovery. If you pull bomb as soon as you are sent off stage, you can Z-Drop and detonate it to move Link close to the stage before using your Up B as a recovery. While it takes some practice to get used to the timing, it is a great way to both extend your recovery and mix up your route. The way to use a bomb recovery is shown below.
When you have a jump
|
When you have no jump
|
Link Grabs and Throws
| Damage | Startup Frames | Active Frames | Cooldown Frames | |
|---|---|---|---|---|
| Pummel | 1.56 | 1 | 1 | 5.0 |
| Grab (Normal) | - | 6 | 2 | 27 |
| Dash Grab | - | 9 | 2 | 32 |
| Pivot Grab | - | 10 | 2 | 26 |
| Forward Throw (Hitbox) (← or → While Grabbing) |
3.6 | 12 | 2 | 24 |
| Forward Throw (Throw) | 3.0 | 13 | 1 | 24 |
| Back Throw (← or → While Grabbing) |
3.6 | 12 | 2 | 25 |
| Up Throw (Hitbox) (↑ While Grabbing) |
6/4.8 | 26 | 4 | 20 |
| Up Throw (Throw) | 2.4 | 28 | 1 | 21 |
| Down Throw (Hitbox) (↓ While Grabbing) |
3.6 | 22 | 2 | 25 |
| Down Throw (Throw) | 3.6 | 24 | 1 | 24 |
Grab Info
Link no longer has the hookshot/tether grab from previous Smash titles. In its place, he has a standard grab, with a quick startup of only 6 frames. His grab game may not be spectacular, but a quick grab certainly doesn't hurt him.
Forward Throw Info
Forward throw is mostly just used for gaining stage control, or throwing your opponent off stage. It does not combo into anything.
Back Throw Info
Back throw is also just used for gaining stage control, or throwing your opponent off stage. It does not combo into anything either.
Up Throw Info
Up throw will throw the opponent straight up. It does not combo, but it can KO off the top from around 200%.
Down Throw Info
This is generally your go to throw at lower percents, due to the fact that it combos easily into Up Smash, Up Tilt, or Nair.
Final Smash
| Attack | How to Use | Effect |
|---|---|---|
| Ancient Bow and Arrow | Press B after obtaining the Smash Ball | Link shoots an Ancient Arrow that flies straight forward. The arrow explodes if it hits the opponent's terrain. You can only directly hit one opponent, but the explosion also affects surrounding fighters and blows them away. |
Link Balance Changes
Version 13.0.1 Balance Patch
| Change | |
|---|---|
| Neutral Attack 1 | Increased attack speed. |
| Down Tilt Attack | Adjusted launch angle. |
| Up Smash Attack | Extended launch distance for the final attack. |
Version 11.0.0 Balance Patch
| Change | |
|---|---|
| General | Matched the vulnerability with other fighters when falling in place. |
Version 7.0.0 Balance Patch
| Change | |
|---|---|
| Other | Increased shield size. |
Version 4.0.0 Balance Patch
| Change | |
|---|---|
| Basic Movements | Can now shieldstun shuffle when blocking a projectile with his shield. |
| Basic Movements | Adjusted the vulnerability when waking up from sleep to match other fighters. |
| Up Special | Shortened launch distance when the full combo doesn't connect. |
Version 3.0 Balance Patch
| Change | |
|---|---|
| Side Special | Reduced the power against shields. |
Version 2.0.0 Balance Patch
| Change | |
|---|---|
| Up Air | Shortened the landing time after using the move.→Buff |
| Neutral Special | Extended the time from when the arrow is loosed to when it disappears. |
Major Changes from Smash 4
| Change | |
|---|---|
| B | You can now pick up arrows from the ground. |
| Up Special (Up + B) |
Hit box size increased. Buff to size of attack |
| Down Special (↓ + B) |
Bomb replaced with remote bomb. Being able to control detonation is a buff. However, the startup time is a bit longer. |
| Forward Air (← or → in direction facing + A while Airborne) |
Damage output slightly decreased. Nerf |
| Back Air (← or → away from direction faced + A while Airborne) |
Total frames on move have been decreased, making it quicker to come out. Buff |
| Down Air (↓ + A while Airborne) |
Landing lag significantly decreased. Buff |
How to Unlock Link in World of Light
Link can be found in the western area of the Light Realm, by a hill near the sea. He is most quickly found by taking the Villager's path.
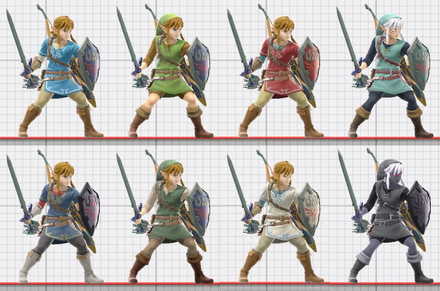
Link Alt Costumes and Skins
Link Reveal Trailer
Smash Ultimate Character Guides
 List of Fighters |
|
 Tier List |
 Unlocking Fighters |
Character Stat Lists
| Character Stats | |
|---|---|
| Weights of All Characters | Run Speeds of All Characters |
| Air Speeds of All Characters | Fast Fall Speeds of All Characters |
Comment
I done this today with my friends I said I come in peace then lobbed remote bombs from across the stage
Author

Link Guide: Matchup Chart and Combos
Rankings
- We could not find the message board you were looking for.
Gaming News


Popular Games

Genshin Impact Walkthrough & Guides Wiki
Umamusume: Pretty Derby Walkthrough & Guides Wiki
Crimson Desert Walkthrough & Guides Wiki
Monster Hunter Stories 3: Twisted Reflection Walkthrough & Guides Wiki
Honkai: Star Rail Walkthrough & Guides Wiki
Pokemon Pokopia Walkthrough & Guides Wiki
The Seven Deadly Sins: Origin Walkthrough & Guides Wiki
Wuthering Waves Walkthrough & Guides Wiki
Zenless Zone Zero Walkthrough & Guides Wiki
Arknights: Endfield Walkthrough & Guides Wiki


Recommended Games
Fire Emblem Heroes (FEH) Walkthrough & Guides Wiki
Diablo 4: Vessel of Hatred Walkthrough & Guides Wiki
Cyberpunk 2077: Ultimate Edition Walkthrough & Guides Wiki
Yu-Gi-Oh! Master Duel Walkthrough & Guides Wiki
Super Smash Bros. Ultimate Walkthrough & Guides Wiki
Pokemon Brilliant Diamond and Shining Pearl (BDSP) Walkthrough & Guides Wiki
Elden Ring Shadow of the Erdtree Walkthrough & Guides Wiki
Monster Hunter World Walkthrough & Guides Wiki
The Legend of Zelda: Tears of the Kingdom Walkthrough & Guides Wiki
Persona 3 Reload Walkthrough & Guides Wiki


All rights reserved
© 2018 Nintendo
Original Game: © Nintendo / HAL Laboratory, Inc.
Characters: © Nintendo / HAL Laboratory, Inc. / Pokémon. / Creatures Inc. / GAME FREAK inc. / SHIGESATO ITOI / APE inc. / INTELLIGENT SYSTEMS /
SEGA / CAPCOM CO., LTD. / BANDAI NAMCO Games Inc. / MONOLITHSOFT / CAPCOM U.S.A., INC. / SQUARE ENIX CO., LTD.
The copyrights of videos of games used in our content and other intellectual property rights belong to the provider of the game.
The contents we provide on this site were created personally by members of the Game8 editorial department.
We refuse the right to reuse or repost content taken without our permission such as data or images to other sites.
Honestly underrated in the tier list, difficult to approach, smash attacks are extremely stong, aerials are very strong, impossible to beat if you play a large character