Cloud Guide: Matchup Chart and Combos
This is a guide to using Cloud in Super Smash Bros. Ultimate. Cloud's bread and butter combos, how to unlock, frame data, alt costumes and skins, as well as Cloud's matchups, counters, and tier list placement can all be found here.
List of Contents
Cloud Tier and Overview
Stats and General Info
| Cloud | |
|---|---|
 |
|
| Game Series | Final Fantasy |
| Smash Bros. Debut | Super Smash Bros. for WiiU/3DS |
| Fighter Number | 61 |
| Unlock Order | 55 |
| Number of Jumps | 2 |
| Weight | 100 Units (31/87) |
| Dash Speed | 2.167 (13/87) |
| Air Speed | 1.155 (20/87) |
| Fast Fall Speed | 2.688 (31/87) |
| Special Attributes | Wall Jump |
Tier List Placement
 |
 Tier
Tier
|
A powerful swordie with amazing range
Smash Ultimate Cloud boasts excellent range, good mobility, and powerful moves. His aerials and limit specials are good for KOs, giving him a few options to finish off his opponents. His Buster Sword gives him some of the best range of all swordies, and he has a projectile, unlike most sword characters. He also has Climhazard (Up Special), which is a very good move out of shield, coming out in just 7 frames, and capable of KOing at higher percents.
In Smash Ultimate, Cloud's limit ability only lasts 15 seconds when charged, so it is important to use it before you lose it. However, Cloud relies on this mechanic for KOing, so opponents can exploit it by getting Cloud off stage and forcing him to use it for recovering. Without limit, his recovery is very poor, so he is susceptible to edgeguards. Additionally, Cloud has poor grab game and somewhat punishable moves, meaning that opponents need to take a very defensive approach when playing against him to exploit these weaknesses.
Cloud's Strengths and Weaknesses
| Strengths | ・Excellent range on attacks ・Powerful moves, especially with limit ・Very good mobility ・Very good OoS (Up Special) |
|---|---|
| Weaknesses | ・Terrible recovery ・Can struggle to KO without Limit, which only lasts 15 second ・Moves are somewhat easy to punish ・Poor grab game |
Cloud Matchup Chart
Matchup Chart
|
|
|
| -2 | |
|---|---|
| -1 | |
| 0 | |
| +1 | |
| +2 | |
Notes About Matchup Chart
1. -2 = Disadvantage. -1 = Slight Disadvantage or Even. 0 = Even. +1 = Slight Advantage or Even. +2 = Advantage.
2. The matchup chart was based around both the opinions of professional players of each character, as well as our own experience through playing Cloud.
3. Characters within each tier are unordered
4. Pokemon Trainer's individual Pokemon (Squirtle, Ivysaur, and Charizard) as well as Echo fighters with no significant difference than their regular counterpart are not shown.
5. For other characters who are not shown here, we are still investigating the matchup.
Cloud Combos
| Bread and Butter Combos |
|---|
| Up Tilt→Nair (20% to 70% only) |
| Up Tilt→Up Air (30% to 70% only) |
| Down Tilt→Up Air (0% to 60% only) |
| Nair→Dash Attack (20% to 60% only) |
| Nair→Side Special (0% to 40% only, reverse hit of Nair is 0% to 30%) |
| Nair→Jab Combo (0% to 30% only) |
| Nair→Down Smash (0% to 30% only) |
| Fair→Jab Combo (0% to 20% only) |
| Fair→Side Special (0% to 20% only) |
| Fair→Down Smash (0% to 20% only) |
Bread and Butter Combos Guide
Up Tilt→Nair (Up Air)
Neutral air does less damage than up air, but can be connected at wider percents.
Down Tilt→Up Air
If you land down tilt as it is ending, the combo will not connect, so make sure to use this combo with the early hit of down tilt.
Nair→Dash Attack
This combo works when your opponent has a bit of damage already (20% to 60%). Dash Attack will send your opponnent flying, so this can lead into a good opportunity to exploit their landing or recovery.
Nair→Side Special
This combo can land with either the front or back hit of neutral air. This is the strongest neutral air combo.
Nair→Jab Combo
This combo is one of the weakest neutral air combos, but it is a reliable combo that is easy to connect in early percents.
Nair→Down Smash
This combo will not connect with the back hit of neutral air. Also, if you miss this combo, there is a large opening so be careful.
Fair→Jab Combo (Down Smash, Side Special)
If you can land forward air while close to your opponent, the next attack will connect easier.
Cloud Frame Data and Moveset
Best Out of Shield Options
| Move | Frames |
|---|---|
| Up B | 7 Frames |
| Neutral Air | 8 Frames |
| Up Air | 11 Frames |
| Up Smash | 12 Frames |
| Shield Grab | 13 Frames |
| Jump > Side Special | 13 Frames |
Cloud has great out of shield game, primarily thanks to his up special and neutral air. Up special will be his go-to out of shield option, as it comes out very fast, has great range, and can be hard to punish if using the second hit to land. Neutral air is another quick and less committal option that can be used to pressure an opponent, and its wide range makes it very easy to hit.
Jab (Neutral Attack)
| 1v1 Damage (%) | Startup Frames | |
|---|---|---|
| Jab 1 (A) |
3.0 | 4 |
| Jab 2 | 2.4 | 5 |
| Jab 3 | 4.2 | 6 |
Jab
Cloud's jab has quick startup. Many of Cloud's attacks are prone to slow startup, so jab is useful as a get-off-me tool while grounded.
Dash Attack / Tilts
| 1v1 Damage (%) | Startup Frames | |
|---|---|---|
| Dash Attack (Dash + A) |
13.2 | 9 |
| Dash Attack (Weak Hit) | 9.6 | 14 |
| Forward Tilt (← or → + A) |
13.2 | 9 |
| Up Tilt (↑ + A) |
9.6 | 6 |
| Down Tilt (↓ + A) |
8.4/7.2 | 7/9 |
Dash Attack
Cloud's dash attack deals two strong hits. It has a wide range, making it excellent for catching landings. It is also capable of KOing options with the sweetspot.
Forward Tilt
Cloud's forward tilt knocks the oppoent forward. It has a slow startup and short range, so it is mainly used out of an initial dash back from the opponent.
Up Tilt
Cloud's up tilt has a wide upper range. The hitbox reaches behind Cloud, so you can use it as a get-off-me tool after landing. However, note that the back hitbox won't reach short characters such as Ness.
Down Tilt
Cloud's down tilt is a slide attack, which keeps Cloud very close to the ground. You can dodge projectiles or aerial attacks by going under them with the attack. The attack primarily benefits Cloud for both approaching and repositioning.
Smash Attacks
| 1v1 Damage (%) | Startup Frames | |
|---|---|---|
| Forward Smash Hit 1 (Smash ← or → + A |
3.6 | 19 |
| Forward Smash Hit 2 | 3.6/2.4/4.8 | 24 |
| Forward Smash Hit 3 | 15.6/14.4 | 28 |
| Up Smash - Start (Smash ↑ + A) |
15.6 | 12 |
| Up Smash | 14.4/15.6/15.6/13.2 | 13 |
| Up Smash - Lingering | 9.6 | 15 |
| Down Smash - Front (Smash ↓ + A) |
3.6 | 8 |
| Down Smash - Rear | 14.4 | 21 |
Forward Smash
Cloud's forward smash has great range and knockback. It has a slow startup, but since there are two lingering hitboxes, you can use it effectively out of a dash back or right up against the ledge to try and cover a getup option.
Up Smash
Cloud's up smash has a wide range. The move doesn’t have a hitbox behind Cloud, so it’s better for reading a jump or using as an anti-aerial than it is for punishing a move out of shield.
Down Smash
Cloud's down smash has a quick startup. It knocks back opponents in front of and behind Cloud, so by turning away from the ledge and using it, you can possibly KO an opponent trying to roll in. It's also great for catching an opponent’s roll.
Aerials
| 1v1 Damage (%) | Startup Frames | |
|---|---|---|
| Neutral Air (A + no direction while airborne) |
9.6 | 5 |
| Forward Air (Hold ← or → in the direction you are facing + A while airborne) |
16.8/16.8/15.6/15.6 | 18 |
| Forward Air (Weak Hit) | 13.2 | 20 |
| Back Air (← or → Opposite of the direction you are facing + A while airborne) |
15.6 | 11 |
| Up Air (↑ + A While Airborne) |
13.2 | 8 |
| Up Air (Weak Hit) | 9.6 | 10 |
| Down Air (↓ + A While Airborne) |
18/15.6 | 11 |
| Down Air (Weak Hit) | 9.6 | 14 |
Neutral Air
Cloud's neutral air has a quick startup and great range. The hitbox this move generates behind Cloud is a convenient way to attack opponents behind him. Overall, it's great for pressuring an opponent and as a get-off-me tool, but keep in mind you will not hit short opponents standing on the ground if you use a rising aerial via Jump + Attack.
Forward Air
Cloud's forward air is great for range, damage, and knockback. It can act as both a combo starter and a KO option, since it can meteor smash opponents both on and off stage. Because of its slow startup, its important to keep its spacing in mind.
Back Air
Cloud's back air has quick startup, as well as great damage and knockback. Its quick startup makes it great for spacing opponents who try to approach out. It is very safe on shield (-3), and it's also used as a KO move due to its strong knockback.
Up Air
Cloud's up air thrusts his sword upwards parallel to the ground, covering a wide area on both sides of Cloud's head. While its knockback is a bit lacking, it is a quick move with great range and a disjointed hitbox, making it excellent for juggling opponents in disadvantage.
Down Air
Cloud's down air covers a long downward range. It has can meteor smash, which makes it a powerful edgeguarding tool. Cloud has poor recovery though, so be careful not to SD and lose your own stock in the process.
Specials
| 1v1 Damage (%) | Startup Frames | |
|---|---|---|
| Neutral Special - Windbox, Ground (B) |
0 | ? |
| Neutral Special - Ground | 9.6 | 18 |
| Neutral Special - Ground, Lingering | 7.2 | 36 |
| Neutral Special - Aerial | 7.68 | 18 |
| Neutral Special - Aerial, Lingering | 5.76 | 36 |
| Neutral Special - Ground, With Limit | 7.2 | 16 |
| Neutral Special - Ground, With Limit, Explosion, Multi Hit | 2.4 | 1/7/13/19/25 |
| Neutral Special - Ground, With Limit, Explosion, Finisher | 3.6 | 28 |
| Neutral Special - Aerial, With Limit | 5.76 | 16 |
| Neutral Special - Aerial, With Limit, Explosion, Multi Hit | 1.92 | 1/7/13/19/25 |
| Neutral Special - Aerial, With Limit, Explosion, Finisher | 2.88 | 28 |
| Side Special - Cross Slash 1 (← or → + B) |
4.8 | 10 |
| Side Special - Cross Slash 2 | 3.6 | 2 |
| Side Special - Cross Slash 3 Hit 1 | 3.6 | 2 |
| Side Special - Cross Slash 3 Hit 2 | 3.6 | 11 |
| Side Special - Cross Slash 3 Hit 3 | 7.2 | 25 |
| Side Special - With Limit, Hit 1 | 6.0 | 10 |
| Side Special - With Limit, Hit 2 | 6.0 | 15 |
| Side Special - With Limit, Hit 3 | 3.6 | 21 |
| Side Special - With Limit, Hit 4 | 3.6 | 28 |
| Side Special - With Limit, Hit 5 | 12.0 | 38 |
| Up Special Hit 1 (↑ + B) |
3.6 | 7 |
| Up Special Hit 2 | 4.8 | 10/11/12 |
| Up Special - Followup, Falling | 5.4 | 12 |
| Up Special - Followup, Landing | 4.2 | 1 |
| Up Special - With Limit, Hit 1 | 7.2 | 7 |
| Up Special - With Limit, Hit 2 | 8.4 | 10/11 |
| Up Special - With Limit, Followup, Falling | 5.4 | 12 |
| Up Special - With Limit, Followup, Landing | 4.2 | 1 |
| Down Special - Ground (↓ + B) |
1.2 | 14/15 |
| Down Special - Ground, Windbox | 0 | 24 |
| Down Special - Aerial | 1.2 | 16/19 |
| Down Special - Aerial, Windbox | 0 | 27 |
Neutral Special (Blade Beam)
Cloud fires a crescent-shaped energy beam in his neutral special. Due to its slow startup, it can be beaten out by a fast opponent or an opponent's projectiles. The special also forces opponents to jump or shield, which can open a window for you to hit them in air with a forward air.
When used after gaining Limit Break, the attack will have multi-staged hits and significantly increased knockback. It can KO even from a long distance, unless activated mid-air. An effective application is to throw out a forward air to force the opponent to dodge backward, and then use the Blade Beam to deal damage.
Side Special (Cross Slash)
Cloud's Cross Slash has excellent range and damage output. If you press the special again after landing the first hit, it will be connected to the second and third hits. The side special will connect even if the opponent tries to use an out of shield option to break the combo, so mix up hitting twice the opponents shield and dashing away with hitting twice and delaying the third hit to bait and punish and out of shield option.
When used with Limit Break, all five hits are released at once, regardless of whether or not the first hit connects. Cloud gains brief intangibility before performing the attack. Damage and knockback are also increased for Limit Break, but be wary of the lag once the effect wears off.
Up Special (Climhazzard)
Cloud's up special has very quick startup. Combined with its range, it can be used as a powerful out of shield punish. As a recovery, it is a rather poor move because of the weak vertical and non-existant lateral movement and inability to cancel it when coming down afterward.
When used with Limit Break, the knockback is increased. It's a powerful out of shield option that can easily lead to a KO. The recovery power is also greatly improved, as you can move laterally as well as keep Cloud's momentum as he falls. Having limit break offstage makes recovery much better, however it is much better to save it and use it as an attack on stage when possible.
Down Special (Limit Charge/Finishing Touch)
Cloud's down special charges his Limit Gauge. When the Limit Gauge is charged, each special move is enhanced, and the down special changes from Limit Charge to Finishing Touch. You can cancel the charge anytime by pressing the Special button, the shield button, the jump button (which will lead to a jump), or rolling. There is a bit of lag between cancelling the charge and performing the next move.
Finishing Touch deals powerful knockback, despite dealing 1% damage and having a short range.
When fully charged, Cloud receives a buff to his mobility. Once fully charged, the limit meter goes back to 0 after 15 seconds pass, or one of his specials is used. Make use of this move each time an opponent is KO'ed or sent offstage to have Limit ready to go for quick damage or an early KO.
Grab / Throws
| 1v1 Damage (%) | Startup Frames | |
|---|---|---|
| Pummel | 1.56 | 1 |
| Grab (Normal) | - | 9 |
| Dash Grab | - | 12 |
| Pivot Grab | - | 13 |
| Forward Throw (Hitbox) (← or → While Grabbing) |
4.8 | 7 |
| Forward Throw (Throw) | 3.6 | 9 |
| Back Throw (Hitbox) (← or → While Grabbing) |
3.6 | 13 |
| Back Throw (Throw) | 3.6 | 15 |
| Up Throw (Hitbox 1) (↑ While Grabbing) |
2.4 | 8 |
| Up Throw (Hitbox 2) | 3.0 | 13 |
| Up Throw (Throw) | 4.8 | 15 |
| Down Throw (Throw) (↓ While Grabbing) |
8.4 | 18 |
Forward Throw
Cloud kickflips the opponent in front of him. It can't be used for combos, due to the lengthy end lag, so use it primarly for sending your opponents off the stage.
Back Throw
Cloud kicks his opponent behind him. It similarly can't be used for combos due to the lengthy end lag, so also use it for sending your opponents off the stage or gaining stage control.
Up Throw
Cloud kicks his opponent into the air. It also can't be used for combos due to the lengthy end lag, but you can juggle the launched opponent via an up air. Cloud's dash attack can also be used to catch the opponent's landing, so this is the go-to throw for racking up quick damage.
Down Throw
Cloud throws his opponent downward and sends them into the air. Like all of Cloud's throws, it doesn't have any true follow ups.
Final Smash
| Attack | How to Use | Effect |
|---|---|---|
| Omnislash | Press B after obtaining the Smash Ball | Knocks an opponent into the air and deals several strikes with his sword before using a powerful slash to end it, dealing heavy damage and knockback. |
Cloud Balance Changes
Version 13.0.1 Balance Patch
| Change | |
|---|---|
| Down Special | Increased attack speed for Finishing Touch. |
Version 7.0.0 Balance Patch
| Change | |
|---|---|
| Dash Attack | Extended launch distance when hit in the high-damage range. |
| Side Smash Attack | Made it easier to hit multiple times. |
| Up Smash Attack | Extended launch distance when hit with the sword tip. Increased attack speed. |
| Up Special | Increased the speed of the edge-grab timing. |
| Down Special | Increased the speed at which the gauge fills up with Limit Charge. |
| Other | Increased shield size. |
Version 3.1.0 Balance Patch
| Change | |
|---|---|
| Down Smash Attack | Made it easier to hit multiple times. |
Version 3.0.0 Balance Patch
| Change | |
|---|---|
| Neutral Special | Reduced the normal shockwave’s power against shields. |
Version 2.0.0 Balance Patch
| Change | |
|---|---|
| Forward Air Attack | Shortened the amount of time you cannot grab edges after using the move. |
| Down Special | Increased the range of Finishing Touch at the beginning of the move. |
Major Changes From Smash 4
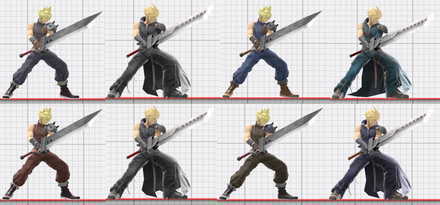
Access to both FF7 and Advent Children Outfits
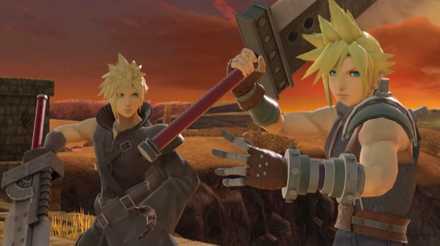
Cloud has an alt costume, in the form of his Advent Children outfit. Both outfits have several color variations.
Limit Gauge is always shown
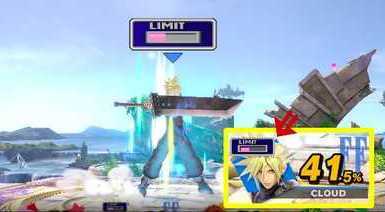
In Smash Ultimate, Cloud's Limit Gauge is always visible, allowing you to more reliably predict when it will come out. The limit ability was considerably nerfed, as it will now dissappear if not used within 15 seconds.
How to Unlock Cloud
| Unlocking Via Smash Mode |
|---|
| 55th Fighter Unlocked After unlocking Dark Pit, let 10 minutes pass OR play another battle in smash after soft-resetting OR return to the menu from World of Light |
| Unlocking via Classic Mode |
| Clear Classing Mode 6 times using Samus. |
| Unlocking via World of Light |
| Sacred Land / Master Sword region |
There are three ways to unlock Cloud. Completing any of these, then defeating Cloud when they appear in the “a New Challenger Appears” screen will allow you to use them afterward.
Cloud Alt Costumes and Skins
 Enlarge
Cloud Reveal Trailer
Smash Ultimate Character Guides
 List of Fighters |
|
 Tier List |
 Unlocking Fighters |
Character Stat Lists
| Character Stats | |
|---|---|
| Weights of All Characters | Run Speeds of All Characters |
| Air Speeds of All Characters | Fast Fall Speeds of All Characters |
Comment
How the hell is young link at such a disadvantage to cloud?
Author

Cloud Guide: Matchup Chart and Combos
Rankings
- We could not find the message board you were looking for.
Gaming News

![Star Savior Review [First Impressions] | Engaging, Entertaining, and Expensive](https://img.game8.co/4447603/8f500e9bf666bdb8adb1af478e9dfdbd.png/show)


Popular Games

Genshin Impact Walkthrough & Guides Wiki
Umamusume: Pretty Derby Walkthrough & Guides Wiki
Crimson Desert Walkthrough & Guides Wiki
Monster Hunter Stories 3: Twisted Reflection Walkthrough & Guides Wiki
Honkai: Star Rail Walkthrough & Guides Wiki
Pokemon Pokopia Walkthrough & Guides Wiki
The Seven Deadly Sins: Origin Walkthrough & Guides Wiki
Wuthering Waves Walkthrough & Guides Wiki
Zenless Zone Zero Walkthrough & Guides Wiki
Arknights: Endfield Walkthrough & Guides Wiki


Recommended Games
Fire Emblem Heroes (FEH) Walkthrough & Guides Wiki
Diablo 4: Vessel of Hatred Walkthrough & Guides Wiki
Cyberpunk 2077: Ultimate Edition Walkthrough & Guides Wiki
Yu-Gi-Oh! Master Duel Walkthrough & Guides Wiki
Super Smash Bros. Ultimate Walkthrough & Guides Wiki
Pokemon Brilliant Diamond and Shining Pearl (BDSP) Walkthrough & Guides Wiki
Elden Ring Shadow of the Erdtree Walkthrough & Guides Wiki
Monster Hunter World Walkthrough & Guides Wiki
The Legend of Zelda: Tears of the Kingdom Walkthrough & Guides Wiki
Persona 3 Reload Walkthrough & Guides Wiki


All rights reserved
© 2018 Nintendo
Original Game: © Nintendo / HAL Laboratory, Inc.
Characters: © Nintendo / HAL Laboratory, Inc. / Pokémon. / Creatures Inc. / GAME FREAK inc. / SHIGESATO ITOI / APE inc. / INTELLIGENT SYSTEMS /
SEGA / CAPCOM CO., LTD. / BANDAI NAMCO Games Inc. / MONOLITHSOFT / CAPCOM U.S.A., INC. / SQUARE ENIX CO., LTD.
The copyrights of videos of games used in our content and other intellectual property rights belong to the provider of the game.
The contents we provide on this site were created personally by members of the Game8 editorial department.
We refuse the right to reuse or repost content taken without our permission such as data or images to other sites.
Just so you know Rosalina and Luma are +1 for Cloud