This survey will take about 1 minute.
Your answers will help us to improve our website.
Super Smash Bros. Ultimate (SSBU)
Mario Guide: Matchup Chart and Combos
This is a guide to Mario in the game Super Smash Bros. Ultimate. Everything about Mario, including how to unlock them, bread and butter combos, frame data, alt costumes and skins, as well as Mario matchups and counters, can be found here.
List of Contents
Mario Tier and Overview
Stats and General Info
| Mario | |
|---|---|
 |
|
| Game Series | Super Mario Bros. |
| Smash Bros. Debut | Super Smash Bros. (64) |
| Fighter Number | 1 |
| Unlock Order | Default |
| Number of Jumps | 2 |
| Weight | 98 Units (33/87) |
| Dash Speed | 1.76 (37/87) |
| Air Speed | 1.208 (13/87) |
| Fast Fall Speed | 2.4 (57/87) |
| Special Attributes | Wall Jump |
Tier List Placement
 |
 Tier
Tier
|
An easy to use all-arounder
Smash Ultimate Mario is a relatively straight forward all-around fighter. Matchup wise, he can more or less battle with any other character on a mostly even playing ground, and doesn't rely on a heavy gimmick. While his range is not quite as good as many other characters, his moveset gives him access to a wide variety of combos, which when utilize can deal devastating damage and take stocks from his opponents.
Mario's Strengths and Weaknesses
| Strengths | ・Good frame data with many quick moves ・Can land combos that deal tons of damage or deplete enemy stocks ・Can reflect projectiles with his Side Special (→ + B) ・Has a good projectile in his Neutral Special (B) ・Neutral Aerial (A while midair) is both fast, and has a long lasting hit box that is great for interrupting combos |
|---|---|
| Weaknesses | ・Rather poor range ・Doesn't have good tools for poking from the front ・Somewhat mediocre recovery (can be edgeguarded if caution is exerted) |
Mario Matchup Chart
Matchup Chart
|
|
|
| -2 | |
|---|---|
| -1 | |
| 0 | |
| +1 | |
| +2 | |
Notes About Matchup Chart
1. -2 = Disadvantage. -1 = Slight Disadvantage or Even. 0 = Even. +1 = Slight Advantage or Even. +2 = Advantage.
2. The matchup chart was based around both the opinions of professional players of each character, as well as our own experience through playing Mario.
3. Characters within each tier are unordered
4. Pokemon Trainer's individual Pokemon (Squirtle, Ivysaur, and Charizard) as well as Echo fighters with no significant difference than their regular counterpart are not shown.
5. For other characters who are not shown here, we are still investigating the matchup.
Good Matchups For Mario
Mario has great frame data and a very versatile kit, which gives him a pretty good matchup spread. He truly shines in his advantage state, where he can rack up tons of damage or even KO in a single combo. This makes big body characters like R.O.B. or Ganondorf easy for him to deal with. His reflector is also great against a large part of the cast, giving him great options for dealing with zoning based characters.
Mario Counters
Mario's biggest weakness is his short range on his attacks. Sword characters like Shulk, Cloud, or Lucina can outspace his aerials with their swords, allow them to snuff out his main approach options. One of Mario's greatest strengths is how safe his aerials are on shields, making them hard to punish for most characters. However, characters with very fast out of shield options, like Mr. Game & Watch, make Mario have to play a totally different neutral.
How to Beat Mario
Outspace him
As mentioned earlier, Mario's greatest weakness is his poor range. He has very quick aerials that are safe on shield, so the key is to try and use a disjointed hitbox to outspace these attacks, if you have one. This will allow you to beat out his attempts to combo you with his aerials or a grab.
Escaping combos
If Mario is comboing you in the air, you can often DI away from him to escape the combo (by holding the stick in the opposite direction of Mario). However, there are times when you should instead DI inward, such as when you are near the ledge, and he might combo you into a Fair, which can spike.
Watch out for his edgeguarding
Mario has decent edgeguarding game that he can use to KO you offstage. Recover low when possible to avoid FLUDD, but note that he may jump down and try to use cape to reverse your direction, so try and work around this, or even recovery after it hits you by B-Reversing.
Mario Combos
| Aerial Combos |
|---|
| Nair→Up Smash |
| Jump→Up Air→Jump→Up Air→Bair |
| Jump→Up Air→Jump→Fair |
| Ground Combos |
| Up Smash→Up Tilt→Jump→Up air→Up air→Up Special |
| Down Throw→Up Special |
Explanation of Aerial Combos
Combo 1
Combo 2
Combo 3
| Nair→Up Smash |
|---|
| This combo can be used on opponents with lower percents. Use this combo when the opponent is facing your back. |
| Jump→Up Air→Jump→Up Air→Bair (Nair) |
|---|
| This combo can be used on opponents with middle percentage or lower. When the opponent is in the air, use this combo to add even more attacks. |
| Jump→Up Air→Jump→Fair |
|---|
| This combo can be used on opponents with high percents. Use in on the ledge to spike your opponent. |
Explanation of Ground Combos
Combo 4
Combo 5
| Down Throw→Up Special |
|---|
| This combo can be used on opponents with middle percentage or lower. After grabbing your opponent, perform a down throw and use this combo. |
| Up Smash→Up Tilt→Jump→Up Air→Up Air→Up Special |
|---|
| This combo can be used on opponents with lower percents. You can add on 52% damage in one go with this combo. |
Mario Frame Data and Moveset
Best Out of Shield Options
| Move | Frames |
|---|---|
| Up B | 3 Frames |
| Neutral Air | 6 Frames |
| Up Air | 7 Frames |
| Up Smash | 9 Frames |
| Shield Grab | 10 Frames |
Mario has great out of shield options, with Up B coming out at frame 3, making it one of the fastest OOS options, meaning it can punish many unsafe attacks, although it is not always the best punish. Coming in at only 6 frames is Nair, which is a great oos punish option to send opponents away and potentially set up for a jab lock.
Jab (Neutral Attack)
| 1v1 Damage (%) | Startup Frames | |
|---|---|---|
| Jab 1 (A) |
2. | 2 |
| Jab 2 | 1.7 | 2 |
| Jab 3 | 4 | 3 |
Jab Information
With its extremely quick startup, Mario's jab is an excellent get off me tool. This move is especially good to use when landing, against opponents who are trying to catch Mario as he touches the ground.
Dash Attack / Tilts
| 1v1 Damage (%) | Startup Frames | |
|---|---|---|
| Dash Attack (Dash + A) |
9.6% | 6 |
| Dash Attack (Weak Hit) | 7.2% | 10 |
| Forward Tilt (← or → + A) |
8.4 | 5 |
| Up Tilt (↑ + A) |
6.6% | 5 |
| Down Tilt (↓ + A) |
8.4% | 5 |
| Down Tilt (Weak Hit) | 6.0% | 5 |
Dash Attack Info
Mario slides in the direciton of his run and slides with a kick. It has pretty quick startup, and a long lasting hitbox, making it excellent for for catching landings, and even 2-Framing opponents.
Forward Tilt Info
Mario kicks forward. This move has decent range, and quick startup. This move is good if you need to space out your opponent, if they are trying to get in too close. It can even be angled upward or downward, but not that it is not safe on shield.
Up Tilt Info
Mario punches upward, sending an opponent up. This move is excellent as a combo starter, as it will send opponents directly above him.
Down Tilt Info
Mario sweeps his leg under an opponent, sending them upward and setting up for a combo.
Smash Attacks
| 1v1 Damage (%) | Startup Frames | |
|---|---|---|
| Forward Smash (Smash ← or → + A) |
21.3% | 15 |
| Forward Smash (Weak Hit + A) |
17.6% | 15 |
| Up Smash (Smash ↑ + A) |
16.8% | 9 |
| Down Smash 1 (Smash ↓ + A) |
12% | 5 |
| Down Smash 2 | 14.4% | 14 |
Forward Smash Info
Mario attacks forward with the fire effect directly in front of him for a powerful smash. The end of it does more damage and knockback, so be sure to space it correctly when using it.
Up Smash Info
At only 9 frames, this is a quick smash attack that attacks above mario, and grants his head invulnerability during the move. Excellent for attacking opponents directly above you, and as an out of shield punsh for a poorly spaced move on shield.
Down Smash Info
Mario kicks on either side of him. The back end hit box is actually stronger than the front one, so if you want to KO with it, you are better off using it while turned away from your opponent.
Aerials
| 1v1 Damage (%) | Startup Frames | |
|---|---|---|
| Neutral Air (A + no direction while airborne) |
9.6% | 3 |
| Neutral Air (Weak Hit) |
5.1% | 6 |
| Forward Air Initial (Hold ← or → in the direction you are facing + A while airborne) |
14.4% | 16 |
| Forward Air (Sweet Spot) | 16.8% | 17 |
| Forward Air (Late) | 12 % | 21 |
| Back Air (← or → Opposite of the direction you are facing + A while airborne) |
12.6% | 6 |
| Back Air (Late) |
8.4% | 8 |
| Up Air 1 (↑ + A While Airborne) |
8.4% | 4 |
| Down Air (↓ + A While Airborne) |
1.68% | 5 |
| Down Air (Big Hit) |
7.5% | 23 |
| Down Air (Landing) |
2.1% | 1 |
Neutral Air Info
This is one of Mario's best tools, as it has a long lasting hitbox, and very quick startup. It is extremely safe on shield when spaced properly (-2/-3), so most opponents won't be able to punish it if used to pressure their shield. It's fast startup also makes it useful as a combo breaker for an opponent that misses their confirm. It functions as a good out of shield option as well (at just 6 frames), and is also good for ledge trapping.
Forward Air Info
Mario punches downward, which will spike an opponent if hit with the sweetspot hitbox. This move is an excellent combo finisher, sense it can end an opponent's stock, and it is also useful for edgeguarding in general.
Back Air Info
Another aerial with quick startup, Mario extends his body and kicks behind him. This move has decent range, and is very safe on shield (-2/-3), making it excellent for poking an opponent and applying pressure. It can even KO at higher percents, so this is an excellent move for Mario players.
Up Air Info
Mario kicks the area above him and sends the opponent slightly up, making it very useful as a combo extender, and essential to his combo game. Use this move to juggle opponents, and it can even be used together with platforms to combo into an Up B for a ladder combo confirm.
Down Air Info
This move has a long hitbox, and can send opponents pretty far, making it a good KO move at higher percents. You can also land with it and the last hit will change slightly, making it good against opponents trying to catch your landing.
Specials
| 1v1 Damage (%) | Startup Frames | |
|---|---|---|
| Neutral Special (B) |
6.0 | 17 |
| Neutral Special (Late) |
6.0 | 21 |
| Neutral Special (Weak Hit) |
4.8 | 47 |
| Side Special (← or → + B) |
8.4 | 12 |
| Up Special (↑ + B) |
6.0 | 3 |
| Up Special (Damage per hit while rising) |
0.72 | 7 |
| Up Special (Last hit) |
3.6 | 17 |
| Down Special (↓ + B) |
0 | 2+19 |
Neutral Special Info
Mario throws a fireball ahead of him, which travels far ahead and bounces. Mario can follow the fireballs and use it as an opporunity to get in.
Up Special Info
Mario's recovery is also a pretty good move for sending opponents upward, and is used as a combo finisher (especially on stages like Battlefield that have platforms). It has a very fast startup, and also works well out of shield. When recovering, it can sometimes even lead to a reverse edgeguard if the opponent isn't careful, as it can easily stage spike.
Side Special Info
This move works as a projectile for reflectors, and will also turn an opponent in the opposite direction if hit on them directly. It is very good for edgeguarding too, as it can be used to make opponents recover in the opposite direction. If used in the air, it temporarily halts Mario's fall, making it good for mixing up your recovery to prevent getting edgeguarded.
Down Special Info
Mario uses F.L.U.D.D., which can be charged to fire water at an opponent. While it doesn't deal any damage, it is very good in particular matchups, like against Ike or Snake's recovery. It is also good for gaining stage control, so be sure to charge it up when you have time.
Grabs and Throws
| 1v1 Damage (%) | Startup Frames | |
|---|---|---|
| Pummel | 1.56 | 1 |
| Grab (Normal) | - | 6 |
| Dash Grab | - | 9 |
| Pivot Grab | - | 10 |
| Forward Throw (← or → While Grabbing) |
9.6 | 13 |
| Back Throw (← or → While Grabbing) |
13.2 | 44 |
| Up Throw (↑ While Grabbing) |
8.4 | 18 |
| Down Throw (↓ While Grabbing) | 6.0 | 18 |
Forward Throw Info
Launches an opponent forward. Not particularly good for KOing, so it is mainly used for stage control or to throw an opponent offstage.
Back Throw Info
Spins an opponent and throws them behind Mario, and can KO at higher percents. If playing a free for all, it will even hurt other nearby opponents if they are pulled in.
Up Throw Info
Throws an opponent up and allows for a follow up with up air or up B.
Down Throw Info
This throw is used as a combo starter, and is easily comboed with Up B.
Final Smash
| Attack | How to Use | Effect |
|---|---|---|
| Mario Finale | Press B after obtaining the Smash Ball | Matio blasts two streams of fire forward. The stream expands outward the further it travels, so it's best used midair. |
Mario Balance Changes
Version 8.0.0 Balance Patch
| Change | |
|---|---|
| Final Smash | Increased power. Increased attack range. |
Version 4.0.0 Balance Patch
| Change | |
|---|---|
| Basic Movements | Adjusted the vulnerability when waking up from sleep to match other fighters. |
Version 3.0.0 Balance Patch
| Change | |
|---|---|
| Final Smash and FS Meter | At the start of the move, nearby opponents will be slowed more and slowed longer. |
| Neutral Special | Reduced the power against shields. |
Version 2.0.0 Balance Patch
| Change | |
|---|---|
| Dash Attack | Adjusted launch angle. |
| FS Meter | Extended launch distance. |
Changes From Smash 4
| Change | |
|---|---|
| Up Special (↑ + B) |
Goes higher than in Smash 4 and now works as a combo finisher. Buff |
| Up Smash (↑ + A) |
End lag increased and launch distance decreased. Difficult to combo = Nerf. |
| Down Aerial (↓ + A while midair) |
Fixed a buf where the final hit would sometimes not land. |
| Down Throw (Z + ↓) |
Changed launch angle to be more diagonalHarder to confirm with = Nerf. |
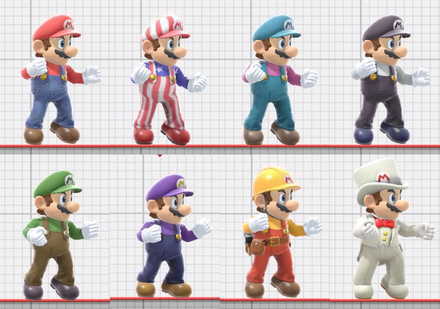
Mario Alt Costumes and Skins
Mario Reveal Trailer
Smash Ultimate Character Guides
 List of Fighters |
|
 Tier List |
 Unlocking Fighters |
Character Stat Lists
| Character Stats | |
|---|---|
| Weights of All Characters | Run Speeds of All Characters |
| Air Speeds of All Characters | Fast Fall Speeds of All Characters |
Author

Mario Guide: Matchup Chart and Combos
Please participate in our site
improvement survey
03/2026
improvement survey
03/2026
Would you assist in
improving Game8's site?
improving Game8's site?

×
We are listening to our users' valuable opinions and discussing how to act on them.
The information collected through this survey will be used for the purpose of improving our services. In addition, the information will only be disclosed a part of a statistic in a format that will not allow identification of personal information.
Begin Survey
Not Now
×
Please rate each item regarding Game8.co's Advertisements.
Amount of Ads
Very Dissatisfied
Somewhat Dissatisfied
Fine
Somewhat Satisfied
Highly Satisfied
Placement of Ads
Timing of Ad Display
Ad Loading Speed
Safeness of Ads
Content of Ads
×
Please rate each item regarding Game8.co's Quality of Articles.
Amount of information
Very Dissatisfied
Somewhat Dissatisfied
Fine
Somewhat Satisfied
Highly Satisfied
Frequency of updates
Speed of new information
Accuracy of articles
Understandibility of articles
Readability of sentences
×
Please rate each item regarding Game8.co's Usability of the Site.
Ease of finding information
Very Dissatisfied
Somewhat Dissatisfied
Fine
Somewhat Satisfied
Highly Satisfied
Loading Speed
Use of Color
Font Size
Visibility of Images
Easy to Understand Layout
×
Please rate each item regarding Game8.co's Message Boards, Comments.
Ease of Writing
Very Dissatisfied
Somewhat Dissatisfied
Fine
Somewhat Satisfied
Highly Satisfied
Readability
Ease in Finding Information
Comment Quality
Comment Quantity
Admin Response
×
Please rate each item regarding Game8.co's Site's new design.
Please rate our site's new design
Very Dissatisfied
Somewhat Dissatisfied
Fine
Somewhat Satisfied
Highly Satisfied
Do you think that the website's design change makes the site easier to use?
Has the new design made it easier for you to find information on the site?
Has the new design improved the overall visual appeal of the site?
How would you rate your overall satisfaction with the new design of the site?
×
How likely are you to recommend Game8 to someone you know?
Very Unlikely
0
1
2
3
4
5
6
7
8
9
10
Very Likely
If you have other opinions regarding potential improvement to the website, please share them with us. We would appreciate your honest opinion.
Note: This is a free response section, so you can proceed without entering anything.
Note: Please be sure not to enter any kind of personal information into your response.
Note: Please be sure not to enter any kind of personal information into your response.
×
Thank You
×
Thank you for participating in our survey! Your answers will help us to improve the quality of our website and services.
We hope you continue to make use of Game8.
We hope you continue to make use of Game8.
Close
Rankings
- We could not find the message board you were looking for.
Gaming News


![Slay the Spire 2 Review [Early Access] | Still the Deckbuilder to Beat](https://img.game8.co/4433115/44e19e1fb0b4755466b9e516ec7ffb1e.png/thumb)

![Resident Evil Village Review [Switch 2] | Almost Flawless Port](https://img.game8.co/4432790/e1859f64830960ce4248d898f8cd38d9.jpeg/thumb)
Popular Games

Genshin Impact Walkthrough & Guides Wiki
Honkai: Star Rail Walkthrough & Guides Wiki
Umamusume: Pretty Derby Walkthrough & Guides Wiki
Pokemon Pokopia Walkthrough & Guides Wiki
Resident Evil Requiem (RE9) Walkthrough & Guides Wiki
Monster Hunter Wilds Walkthrough & Guides Wiki
Wuthering Waves Walkthrough & Guides Wiki
Arknights: Endfield Walkthrough & Guides Wiki
Pokemon FireRed and LeafGreen (FRLG) Walkthrough & Guides Wiki
Pokemon TCG Pocket (PTCGP) Strategies & Guides Wiki


Recommended Games
Fire Emblem Heroes (FEH) Walkthrough & Guides Wiki
Diablo 4: Vessel of Hatred Walkthrough & Guides Wiki
Yu-Gi-Oh! Master Duel Walkthrough & Guides Wiki
Super Smash Bros. Ultimate Walkthrough & Guides Wiki
Pokemon Brilliant Diamond and Shining Pearl (BDSP) Walkthrough & Guides Wiki
Elden Ring Shadow of the Erdtree Walkthrough & Guides Wiki
Monster Hunter World Walkthrough & Guides Wiki
The Legend of Zelda: Tears of the Kingdom Walkthrough & Guides Wiki
Persona 3 Reload Walkthrough & Guides Wiki
Cyberpunk 2077: Ultimate Edition Walkthrough & Guides Wiki


All rights reserved
© 2018 Nintendo
Original Game: © Nintendo / HAL Laboratory, Inc.
Characters: © Nintendo / HAL Laboratory, Inc. / Pokémon. / Creatures Inc. / GAME FREAK inc. / SHIGESATO ITOI / APE inc. / INTELLIGENT SYSTEMS /
SEGA / CAPCOM CO., LTD. / BANDAI NAMCO Games Inc. / MONOLITHSOFT / CAPCOM U.S.A., INC. / SQUARE ENIX CO., LTD.
The copyrights of videos of games used in our content and other intellectual property rights belong to the provider of the game.
The contents we provide on this site were created personally by members of the Game8 editorial department.
We refuse the right to reuse or repost content taken without our permission such as data or images to other sites.