Chyornaya Peschera Cave: Walkthrough Part 3
☆ Fox Hunt Multiplayer releases Oct. 30!
★ How to Get FOXHOUND Rank | Titles
☆ Missables | Unlockables
★ Best Weapons | Best Camos
☆ Which MGS Game to Pick at Start?
This is part 3 of the Operation Snake Eater walkthrough in Metal Gear Solid Delta Snake Eater (MGS3 Remake). Read on for a guide to all objectives and collectibles inside Chyornaya Peschera Cave, including info on The Pain boss fight midway through.
| ◀ Previous | Next ▶ |
|---|---|
| Dremuchij to Bolshaya Past | Ponizovje to Graniny Gorki |
List of Contents
Chyornaya Peschera Cave Walkthrough
| Chyornaya Peschera Cave Summary | |
|---|---|
| 1 | Chyornaya Peschera Cave Branch |
| 2 | Chyornaya Peschera Cave (Boss: The Pain) |
| 3 | Chyornaya Peschera Cave Entrance |
Chyornaya Peschera Cave Branch
| Chyornaya Peschera Cave Branch Loot | |
|---|---|
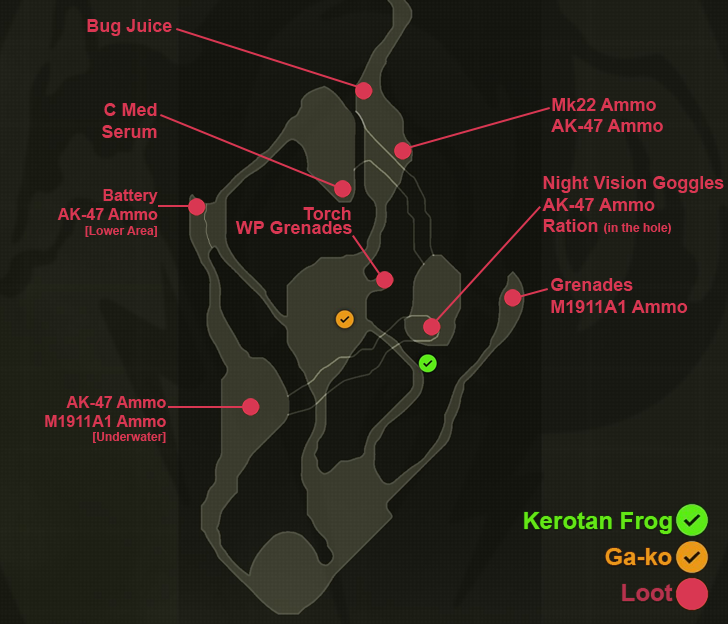 Kerotan | Ga-ko |
|
| Walkthrough | |
| 1 | If you beat Ocelot non-lethally, the Animals Camo will be directly in front of you once you load into the area. After picking it up wait for bit to let Snake's eyes adjust to the dark. As time passes, you'll gradually start seeing better in the darkness. |
| 2 | Once you're ready, take the path to the northeast. Note: If you don't have the Flecktarn Camo, you may want to head northwest first. Swim all the way north to get an extra Battery, then backtrack once you have it. |
| 3 | After taking the path northeast, you'll arrive at a cavern with 3 branching paths. First, we'll need new equipment, so take the path to the northwest. |
| 4 | After a short walk, you'll find yourself in a large cavern with shallow water and a waterfall off to your right. Go northeast towards the waterfall and you should see a small alcove with a glowing green mushroom. Pick up the loot here to get the Torch and a few WP Grenades. |
| 5 | Next, look southwest and take the path you see in front of you. Follow it (while being careful not to fall off the edge) until you see a small tunnel with a glowing green mushroom beside it. Crawl through this tunnel until you reach a large cave bats off to the north of the map. |
| 6 | There isn't much in this cave, so immediately head east and start crawling again until you reach a much larger cave with lots of natural light. This area will contain a Kerotan, Night Vision Goggles, as well as AK-47 Ammo. Loot everything you can then drop down the hole and into the water. |
| 7 | As soon as you're in the water, dive and swim southwest, following the underwater tunnel. Do this fast since a full O2 gauge will barely clear this swim if you dilly-dally. |
| 8 | As soon as you surface, you'll find yourself in a rather deep water area. Swim south to return to your original spawn location, then loop back up to the northeast in order to reach the original cave with 3 branching paths. |
| 9 | This time, take the small tunnel in the middle. Go prone and start crawling until you reach the upper level of the waterfall at the center of the cave. Note: As you emerge, you'll see a Ga-ko on top of the rocks. Shoot it before continuing. |
| 10 | Finally, follow the path northeast until you reach Chyornaya Peschera Cave. Along the way, you should find some extra ammo for the Mk22 and AK-47 if you need them, as well as Bug Juice. |
Chyornaya Peschera Cave (Boss)
| Chyornaya Peschera Cave Loot | |
|---|---|
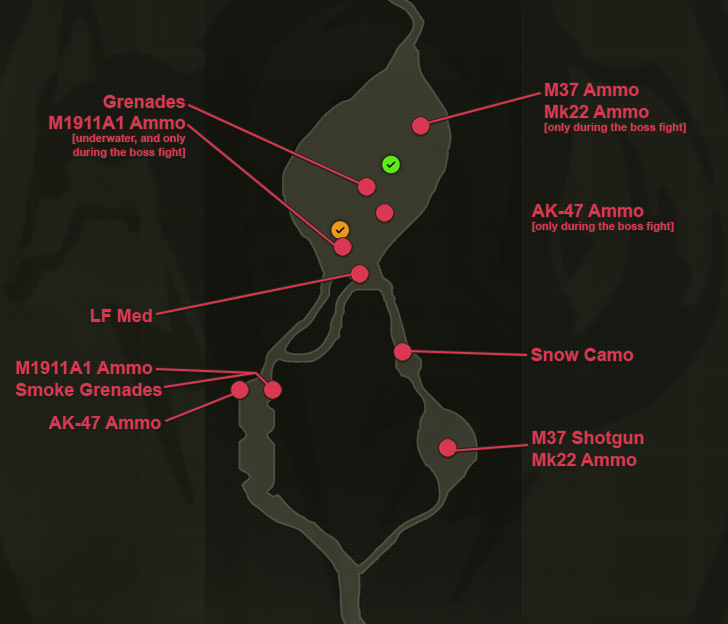 Kerotan | Ga-ko |
|
| Walkthrough | |
| 1 | As soon as you arrive in Chyornaya Peschera Cave, equip your new Night Vision Goggles to see the path to your right. |
| 2 | Follow the path to the right to reach a small cavern that contains a new weapon - the M37 Shotgun - as well as some ammo for your Mk22. |
| 3 | After picking up the M37, go prone and crawl north into the small tunnel. After a short while, you'll find yourself in a narrow passage that contains the Snow Camo. Loot it then move to the end of the narrow passage. |
| 4 | Go prone again and follow this new tunnel until you reach the west side of the map. |
| 5 | As soon as you emerge from the tunnel, look south. There should be some loot to your left and right in case you need them. This area will also have a ton of crab and snakes. Hunt a few if you're running low on food. |
| 6 | Equip the Water Camo and the Brown Face Paint if you have it. Then, add the M37, Grenades, Smoke Grenades, and WP Grenades to your weapon window to prep for the upcoming boss fight. You'll also want to keep some Bug Juice handy, so go ahead and equip that to your Equipment wheel. |
| 7 | Once you're ready, follow the path north until you reach the main cave that triggers a cutscene showcasing the area boss - The Pain. |
| 8 | The Pain is a pretty straightfoward boss to beat. Stand on any of the 2 platforms in the arena then start nailing him with headshots. When he uses his Bee Armor, shoot him with the M37 or throw a few Grenades (or WP Grenades) at him to remove the armor. Be wary of his two signature moves: Tommy Gun (which he announces) and the Bullet Bee (which leaves a distinct red trail). |
| 9 | Defeat The Pain to unlock the way forward to Chyornaya Peschera Cave Entrance. If you beat The Pain non-lethally, hop on his platform to get the Hornet Stripe Camo before you exit north. |
Chyornaya Peschera Cave Entrance
| Chyornaya Peschera Cave Entrance Loot | |
|---|---|
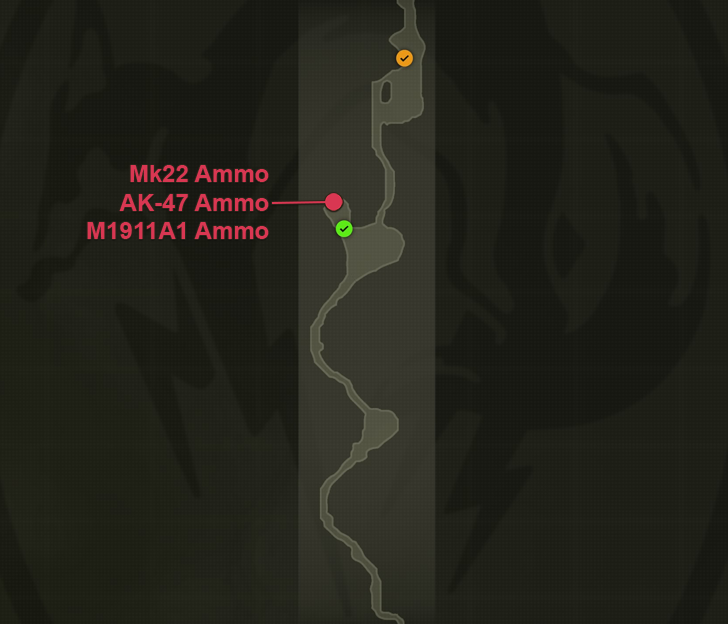 Kerotan | Ga-ko |
|
| Walkthrough | |
| 1 | Chyornaya Peschera Cave Entrance is basically one long corridor. Follow the path north until you trigger a cutscene showing the arrival of Hover Soldiers. |
| 2 | Once the cutscene ends, keep heading north until you exit out to Ponizovje South. There will be tons of loots and animals along the way that you can pick up. However, do be careful of the small cave with the Kerotan since it will be lined with claymores. ▶ Next Mission: Ponizovje to Graniny Gorki |
Chyornaya Peschera Cave Collectibles
Kerotan Frog Locations
| Chyornaya Peschera Cave Kerotan Frogs | |
|---|---|
| 1 |
 |
| Chyornaya Peschera Cave Branch After reaching the cave with 3 branching paths, take the one that leads west then keep following it until it loops around the area and into a cave with a hole. The Kerotan will be inside this cave along with the NVGs. |
|
| 2 |
 |
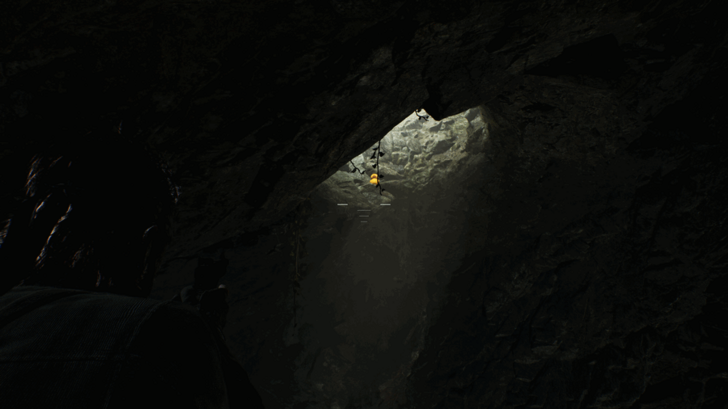
| Chyornaya Peschera Cave Perched on the large cave roof opening near The Pain's platform. After beating the boss, simply look up to find the opening with the Kerotan. |
|
| 3 |
 |
| Chyornaya Peschera Cave Entrance Found inside the small cave with ammo and 3 claymores. Disable the claymores then look behind and up as soon as you enter to see the Kerotan. |
|
Ga-ko Locations
| Chyornaya Peschera Cave GA-KO | |
|---|---|
| 1 |
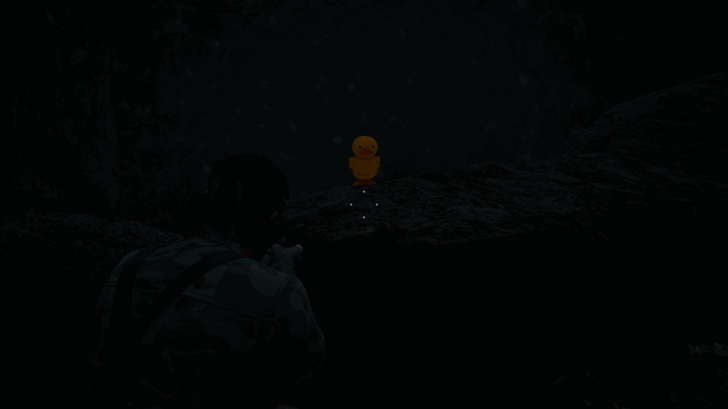 |
| Chyornaya Peschera Cave Branch As soon as you reach the cave with 3 branching paths, take the middle path. After you crawl through the small tunnel, you'll emerge at the top of a small waterfall. The camouflaged GA-KO will be on the rock directly in front of you as you emerge from the tunnel. |
|
| 2 |
 |
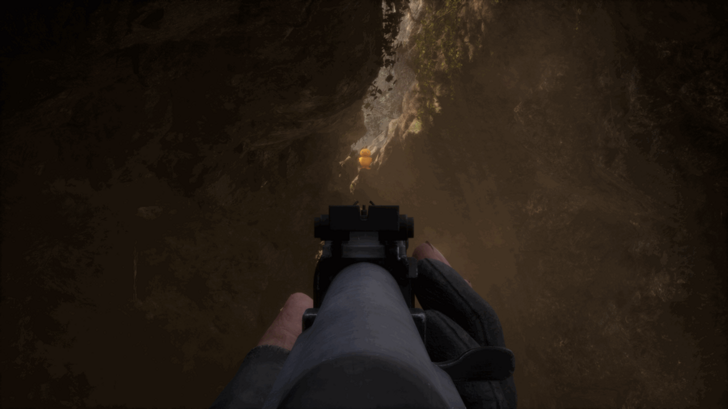
| Chyornaya Peschera Cave Perched on one of the cave roof openings south of The Pain's platform. After beating the boss, look up to find the opening with the camouflaged GA-KO. |
|
| 3 |
 |
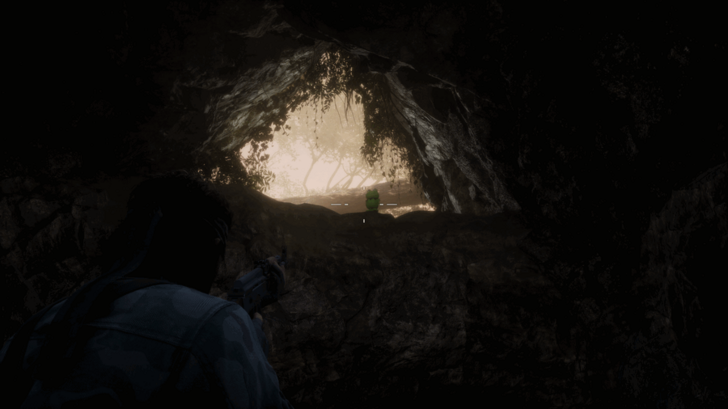
| Chyornaya Peschera Cave Entrance As you exit into the northernmost cave area, you'll see a green mushroom on the ground. Stop here and look at the large gap across from you. The GA-KO will be camouflaged along these ledges. |
|
Metal Gear Solid Delta Related Guides
All Walkthrough Guides
| 1 | Virtuous Mission |
|---|---|
| 2 | Dremuchij to Bolshaya Past |
| 3 | Chyornaya Peschera Cave |
| 4 | Ponizovje to Graniny Gorki |
| 5 | Svyatogornyj and Sokrovenno |
| 6 | Krasnogorje Mountain |
| 7 | Groznyj Grad |
| 8 | Zaozyorje to Rokovoj Bereg |
Comment
Author
Metal Gear Solid Delta: Snake Eater Walkthrough & Guides Wiki
Chyornaya Peschera Cave: Walkthrough Part 3
Rankings
- We could not find the message board you were looking for.
Gaming News

![The Liar Princess and the Blind Prince Review [PC] | Lovely to Look at but Tedious to Play](https://img.game8.co/4442586/8d95f5faf05780f1765ce7e0938bd825.jpeg/show)
![Monster Hunter Stories 3 Review [First Impressions] | Simply Rejuvenating](https://img.game8.co/4438641/2a31b7702bd70e78ec8efd24661dacda.jpeg/thumb)
![The Seven Deadly Sins: Origin [First Impressions] | A Promising Start](https://img.game8.co/4440581/584e0bfb87908f12c4eab6e846eb1afd.png/thumb)

Popular Games

Genshin Impact Walkthrough & Guides Wiki
Umamusume: Pretty Derby Walkthrough & Guides Wiki
Pokemon Pokopia Walkthrough & Guides Wiki
Honkai: Star Rail Walkthrough & Guides Wiki
Monster Hunter Stories 3: Twisted Reflection Walkthrough & Guides Wiki
Arknights: Endfield Walkthrough & Guides Wiki
Wuthering Waves Walkthrough & Guides Wiki
Zenless Zone Zero Walkthrough & Guides Wiki
Pokemon TCG Pocket (PTCGP) Strategies & Guides Wiki
Monster Hunter Wilds Walkthrough & Guides Wiki


Recommended Games
Diablo 4: Vessel of Hatred Walkthrough & Guides Wiki
Cyberpunk 2077: Ultimate Edition Walkthrough & Guides Wiki
Fire Emblem Heroes (FEH) Walkthrough & Guides Wiki
Yu-Gi-Oh! Master Duel Walkthrough & Guides Wiki
Super Smash Bros. Ultimate Walkthrough & Guides Wiki
Pokemon Brilliant Diamond and Shining Pearl (BDSP) Walkthrough & Guides Wiki
Elden Ring Shadow of the Erdtree Walkthrough & Guides Wiki
Monster Hunter World Walkthrough & Guides Wiki
The Legend of Zelda: Tears of the Kingdom Walkthrough & Guides Wiki
Persona 3 Reload Walkthrough & Guides Wiki


All rights reserved
©Konami Digital Entertainment
The copyrights of videos of games used in our content and other intellectual property rights belong to the provider of the game.
The contents we provide on this site were created personally by members of the Game8 editorial department.
We refuse the right to reuse or repost content taken without our permission such as data or images to other sites.