Story Walkthrough
☆ Fox Hunt Multiplayer releases Oct. 30!
★ How to Get FOXHOUND Rank | Titles
☆ Missables | Unlockables
★ Best Weapons | Best Camos
☆ Which MGS Game to Pick at Start?
This is a full walkthrough for Metal Gear Solid Delta Snake Eater (MGS3 Remake). Read on to see a full story walkthrough and a list of all walkthrough guides starting from the Virtuous Mission all the way to the final showdown in Rokovoj Bereg.
List of Contents
All Walkthrough Guides
| All MGS Delta Walkthroughs | |
|---|---|
| 1 | Virtuous Mission |
| 2 | Dremuchij to Bolshaya Past |
| 3 | Chyornaya Peschera Cave |
| 4 | Ponizovje to Graniny Gorki |
| 5 | Svyatogornyj and Sokrovenno |
| 6 | Krasnogorje Mountain |
| 7 | Groznyj Grad |
| 8 | Zaozyorje to Rokovoj Bereg |
MGS Delta Full Story Walkthrough
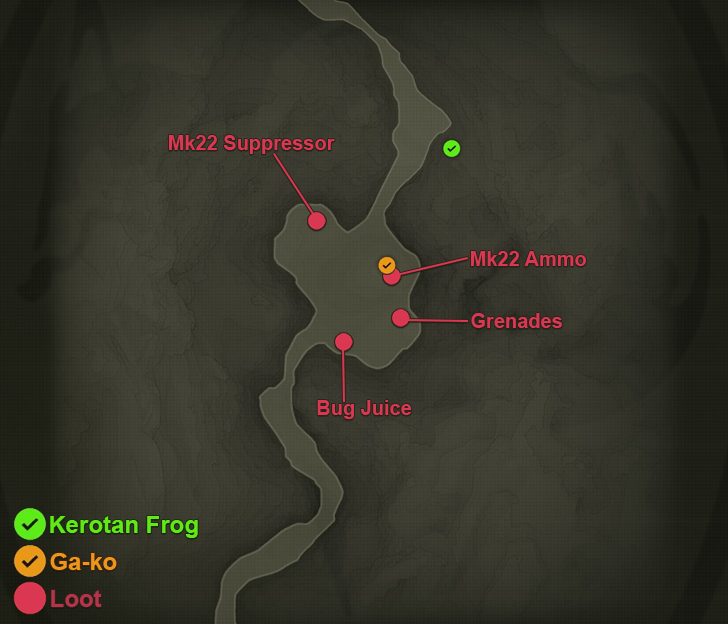
Dremuchij South
| Dremuchij South Loot | |
|---|---|
 |
|
| Walkthrough | |
| 1 | 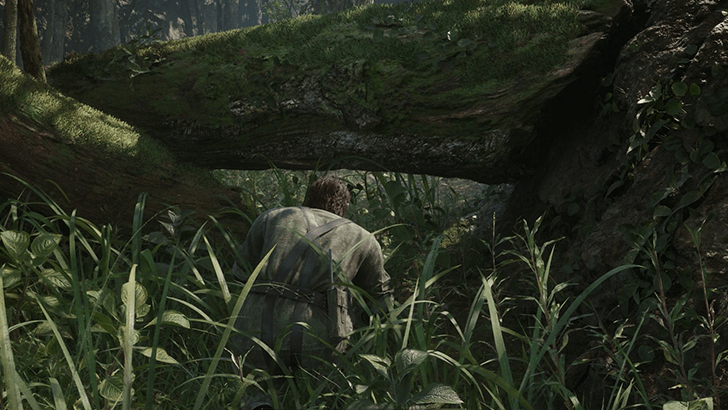 Upon landing, head north and crawl under the log to reach the large clearing with a climbable tree. |
| 2 | 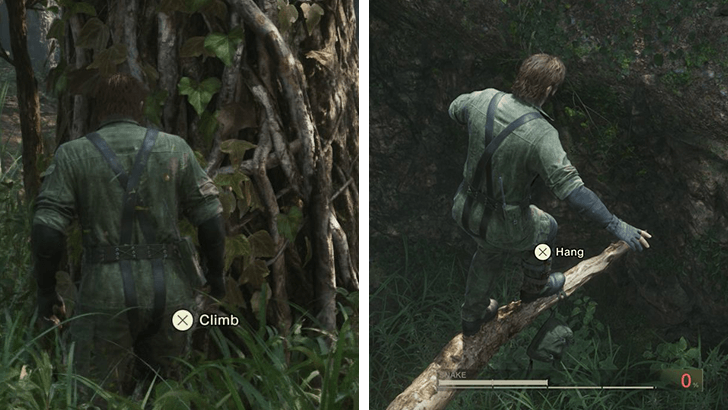 Approach the tree and interact with the vines in order to climb up. Once on the branch, approach your hanging backpack then drop down once you're right on top of it. |
| 3 | Watch the cutscene after Snake retrieves his backpack. When it ends, head north into a new area called Dremuchij Swampland. |
Dremuchij Swampland
| Dremuchij Swampland Loot | |
|---|---|
 |
|
| Walkthrough | |
| 1 | After entering Dremuchij Swampland, keep heading north until you reach a large marsh with a lot of crocodiles. |
| 2 | 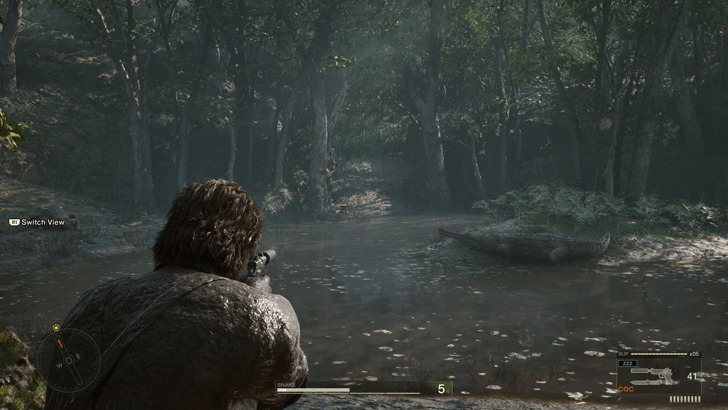 Make your way to the other side of the marsh by rolling. Use the center island as a bridge to get across and don't stay too long in the muck or you'll sink and die. Tip: If you want to try killing one of the Indian Gavials for food, go prone next to its head with your Knife out (not too close), then swing away. |
| 3 | Once across, keep heading north until you enter Dremuchij North. |
Dremuchij North
| Dremuchij North Loot | |
|---|---|
 |
|
| Walkthrough | |
| 1 |  After entering Dremuchij North, a cutscene will play. Once it ends, change your camo to Leaf (or Flecktarn) and face paint to Woodland. Then, you'll want to make your way north. A few enemies will be patrolling the area, but you can easily knock them out with a headshot using the Mk22 or by using a CQC throw when their backs are turned. |
| 2 | 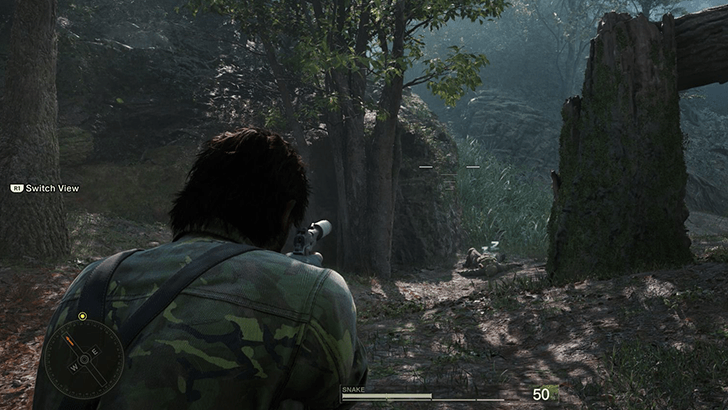 Once you reach the clearing with fallen leaves, go northeast to reach the next area - Dolinovodno. Note: While there are a few guns to collect during this entire mission, you'll lose them at the end of it so it's safe to skip them for now. |
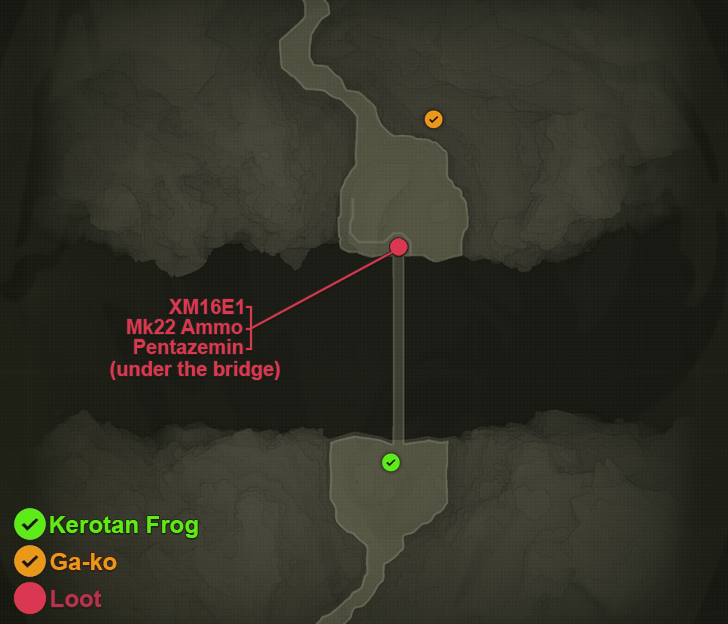
Dolinovodno
| Dolinovodno Loot | |
|---|---|
 |
|
| Walkthrough | |
| 1 | 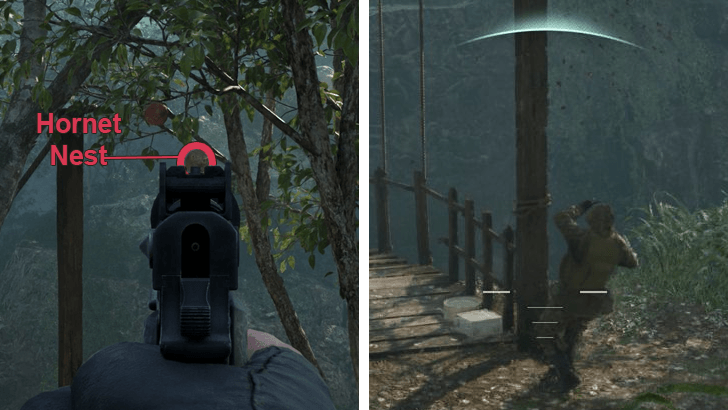 Another cutscene triggers when you first enter Dolinovodno. When it ends, shoot the hornet nest above the soldier in front of you. |
| 2 | 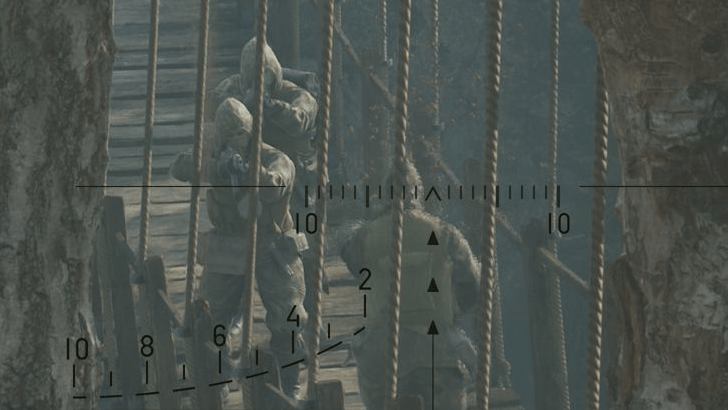 The hornets will cause the soldier to flee across the bridge. The 2 other soldiers patrolling the bridge will also flee. All 3 will leave the area, allowing you to cross the bridge safely. Note: There is another soldier on the northern end of the bridge. Sometimes he will not get swept up by the hornets along with the first 3, so be wary after crossing the bridge. |
| 3 | 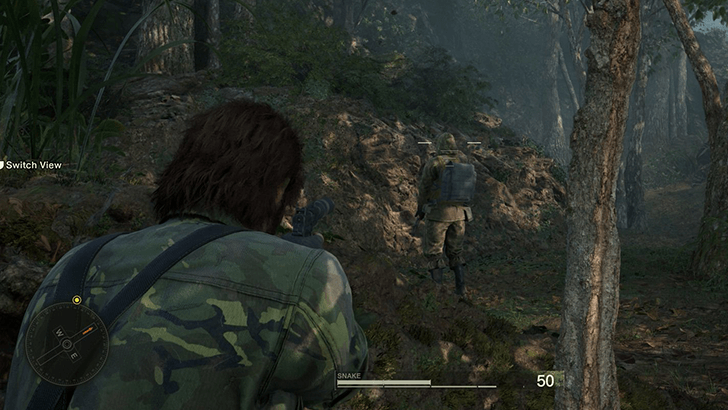 Once across, if there's a remaining soldier, take him out before quickly making your way to the northwest. Speed is key since the soldiers who fled will eventually return to the area. |
Rassvet
| Rassvet Loot | |
|---|---|
 |
|
| Walkthrough | |
| 1 |  Rassvet will be patrolled by a ton of soldiers. Take out the first 2 guards directly to your north to start. Note: On Extreme, there will be one more guard on overwatch, so it'll be better to skip knocking them out entirely to avoid an Alert. |
| 2 |  After knocking out the 2 guards, you'll find yourself at the west side of the building. Head into the structure and take out the 3 guards patrolling inside. |
| 3 |  Then, make your way to the northeast room of the building and approach the door to finally meet Sokolov. |
| 4 | A rather long cutscene will play. When it ends, you'll get a call from the major before exiting the room. Then, you'll meet Ocelot and his elite unit. |
| 5 | 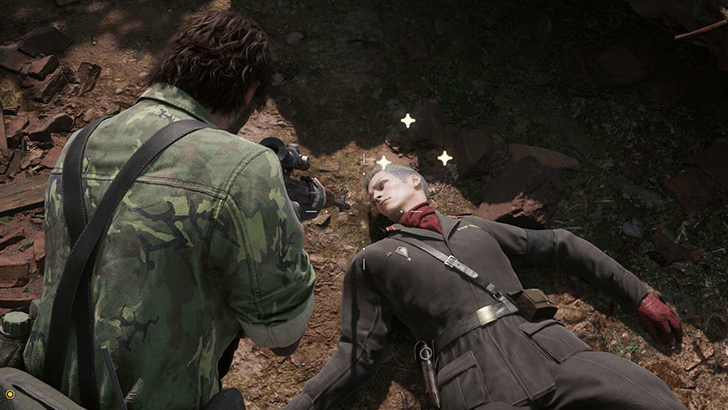 After you knock out Ocelot and his unit during the cutscene, head back south towards Dolinovodno to chase after Sokolov. Hidden Trophy: To get the trophy, Time Paradox, shoot or knife the knocked out Ocelot to trigger a unique continue screen. |
Dolinovodno Riverbank
| Walkthrough | |
|---|---|
| 1 | 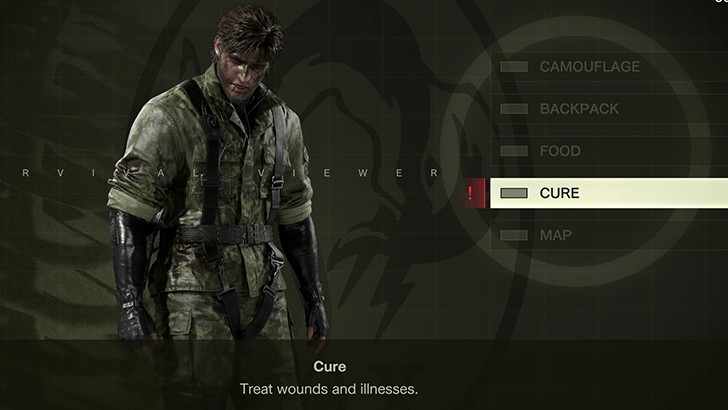 After the call with Para-Medic ends, open your Survival Viewer and go to the Cure menu. |
| 2 | 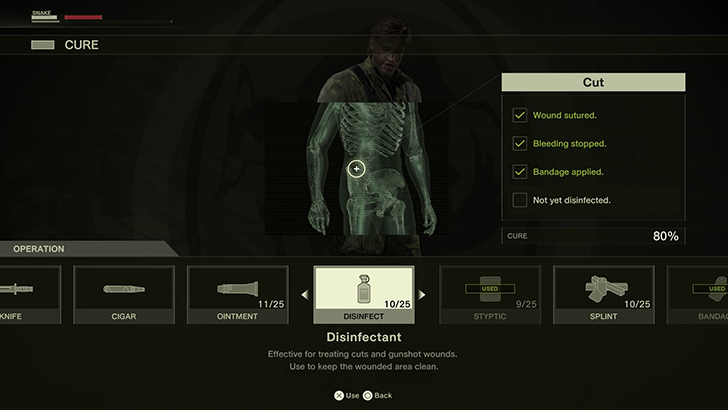 You'll need to treat Snake's 4 Cuts and 2 Bone Fractures. Use a Suture Kit, Bandage, Styptic, and Disinfectant to treat Cuts. Use a Splint and Bandage to treat Bone Fractures. |
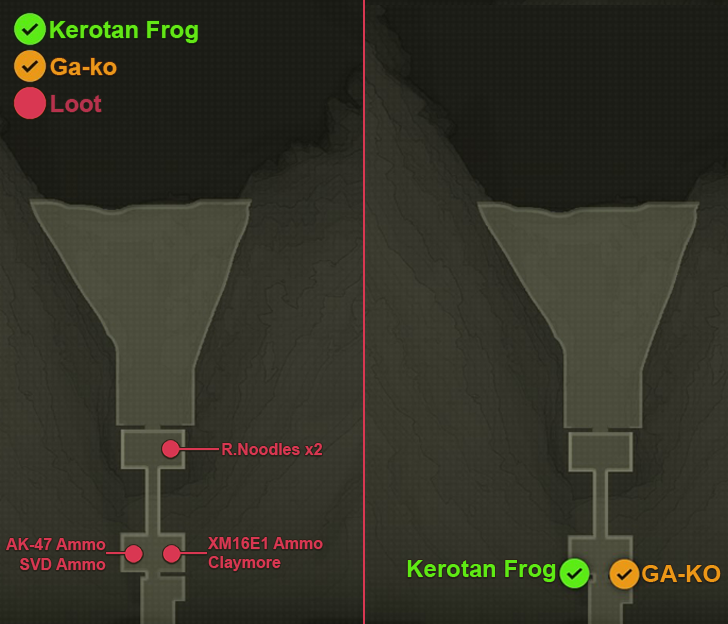
Dremuchij East
| Dremuchij East Loot | |
|---|---|
 |
|
| Walkthrough | |
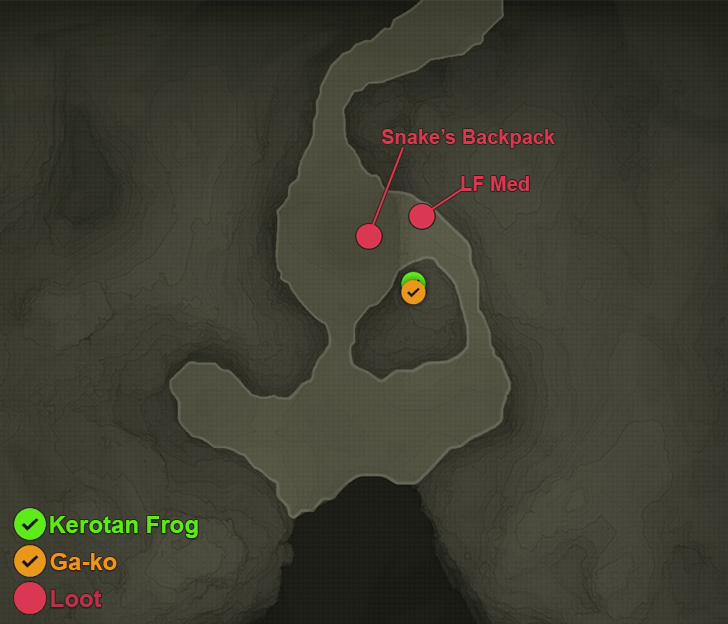
| 1 | After your aircraft crashes, Snake will find himself in Dremuchij East. Head northwest to begin the mission. |
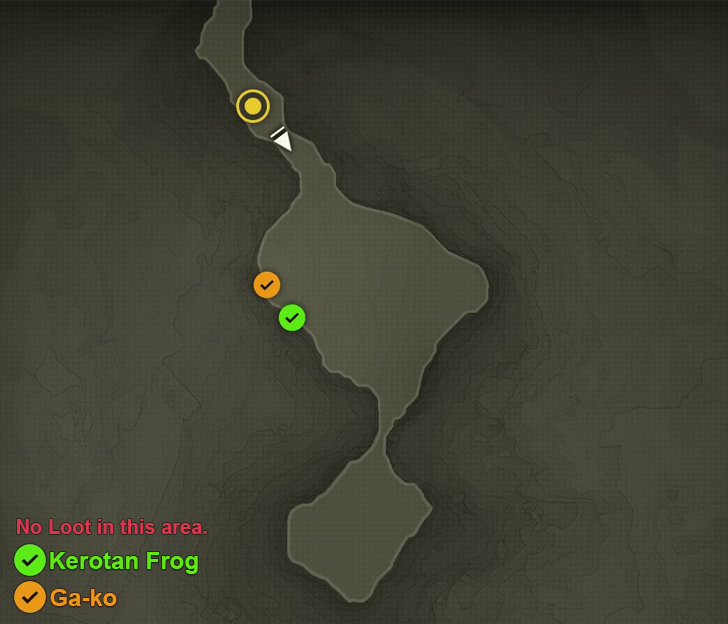
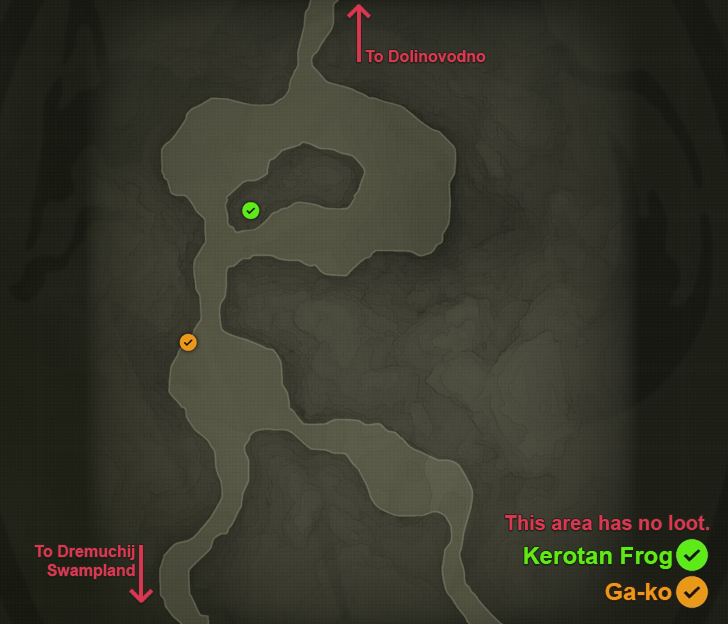
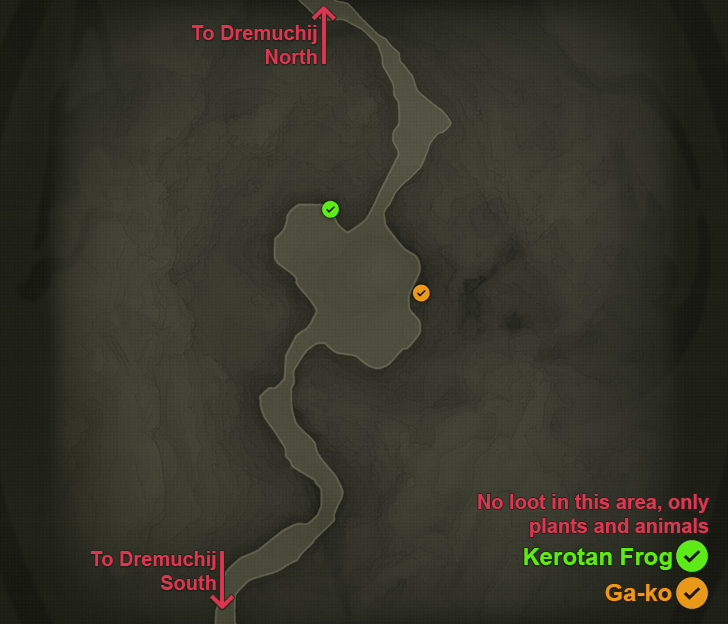
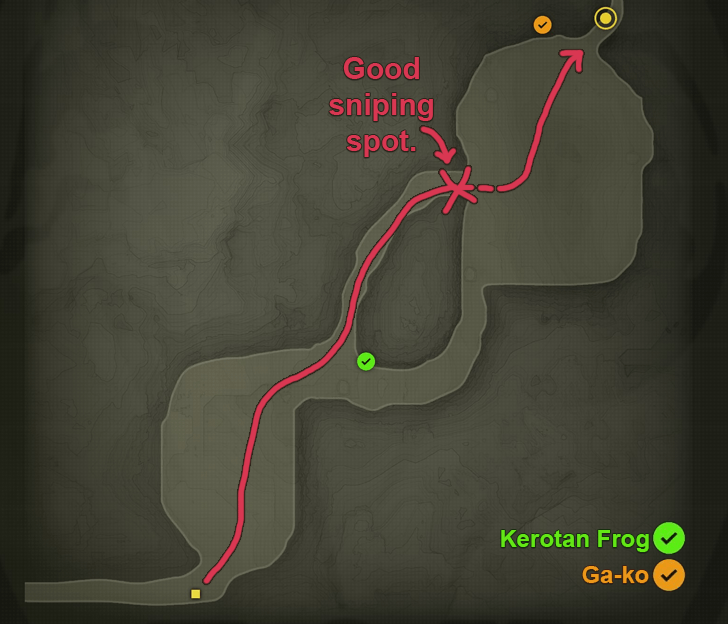
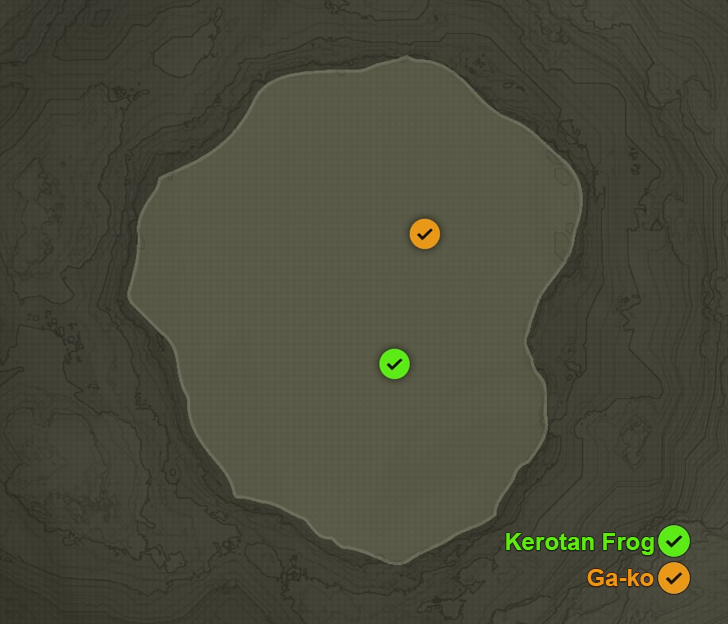
| 2 | 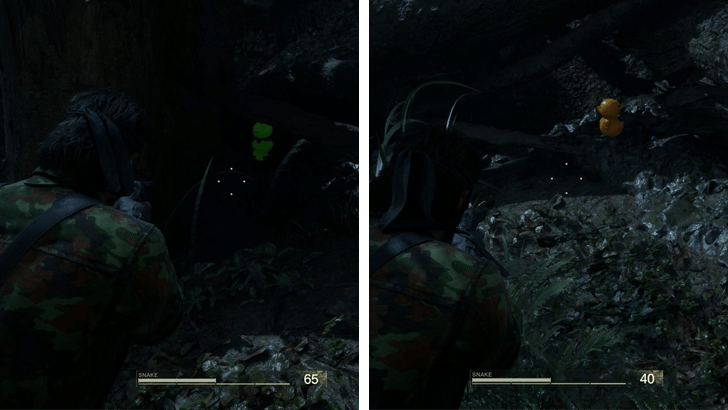 On the west side of the large clearing, you'll find a Kerotan and a GA-KO. Since you won't be able to backtrack to this location, make sure you shoot both before leaving. |
| 3 | Once you're ready, continue heading northwest until you reach Dremuchij North. |
Dremuchij North
| Dremuchij North Loot | |
|---|---|
 |
|
| Walkthrough | |
| 1 | 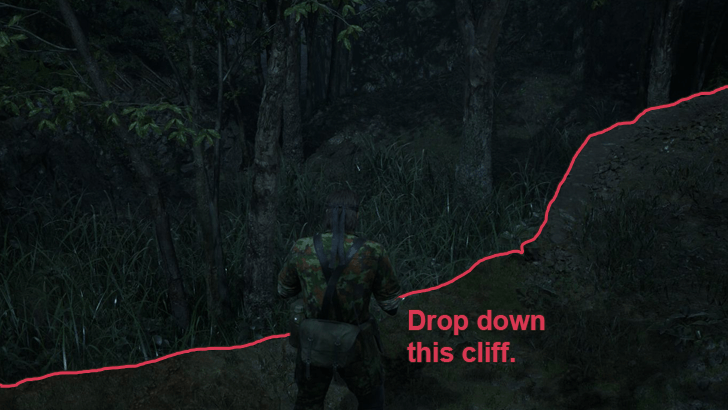 After emerging into Dremuchij North, drop down the cliff. Then, keep heading northwest until you reach the crash site. This triggers a cutscene where Snake meets The Boss. Note: There are a few snakes in the area after you drop down. You can kill them to stock up on food before you lose your gun to The Boss. |
| 2 | 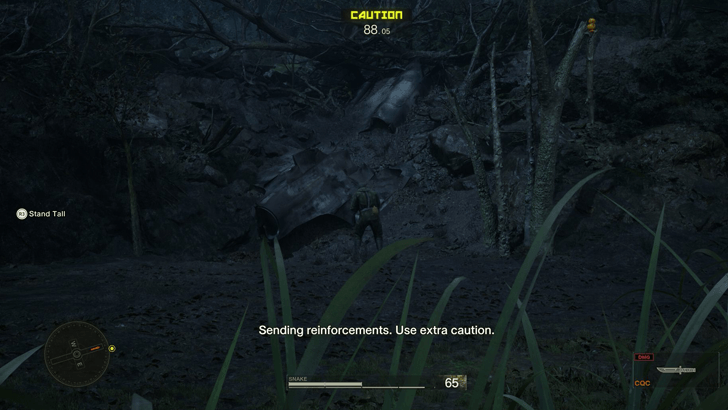 During the cutscene, The Boss destroys your M1911A1, rendering you weaponless. As soon as it ends, soldiers will approach the crash site, triggering a Caution phase that will last for 100 seconds. |
| 3 | Now, you have the option of pushing on or waiting out the 90 second Caution phase. If you want to push onwards, then keep heading north. Note: If you want to wait out the 100 seconds, the best option would be to head south into Dremuchij Swampland. There are no enemies here, and you can get a bunch of supplies while waiting out the Caution phase. |
| 4 | Once you hit the northwest corner of the area, start going northeast to reach Dolinovodno. There is a Kerotan and GA-KO in this area but you won't be able to get either until you have a gun. Backtrack to this area after you finish up in Rassvet to get both collectibles. |
Dremuchij Swampland (Optional)
| Dremuchij Swampland Loot | |
|---|---|
 |
|
| Walkthrough | |
| 1 | Dremuchij Swampland is pretty much the same as when you first visited it during the Virtuous Mission. You can use your knife to kill crocodiles for food before moving on to Dremuchij South where the real juice is. There is a Kerotan and GA-KO in this area but you won't be able to get the latter until you have a gun. Backtrack to this area after you finish up in Rassvet to get both collectibles. |
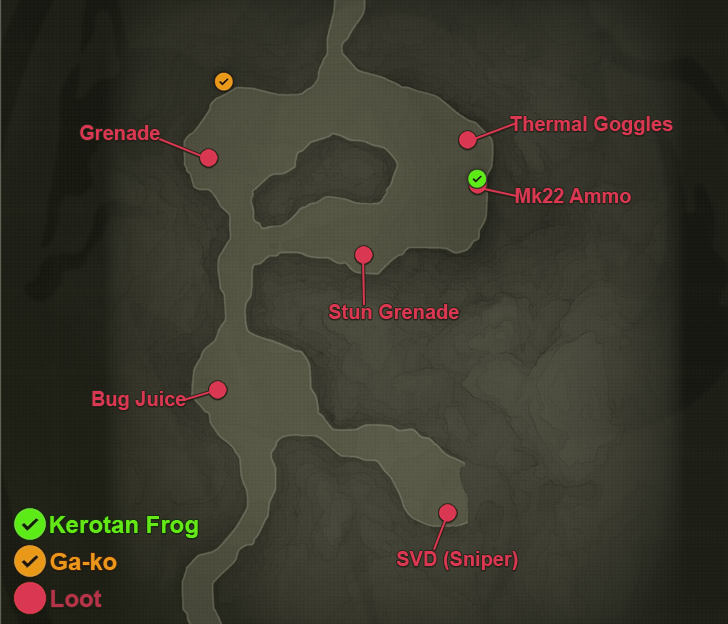
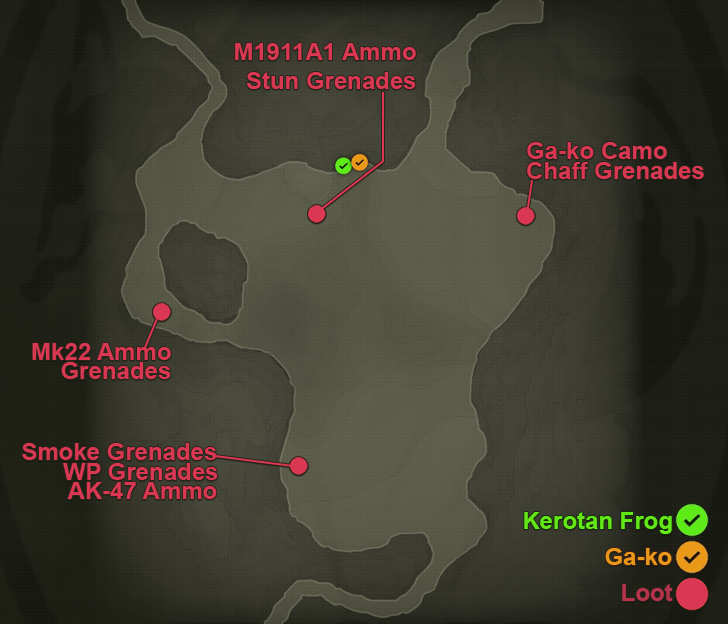
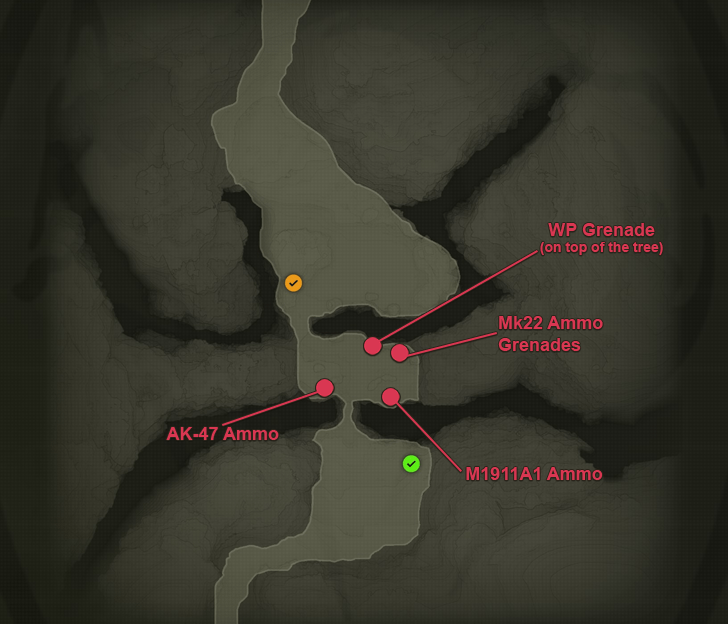
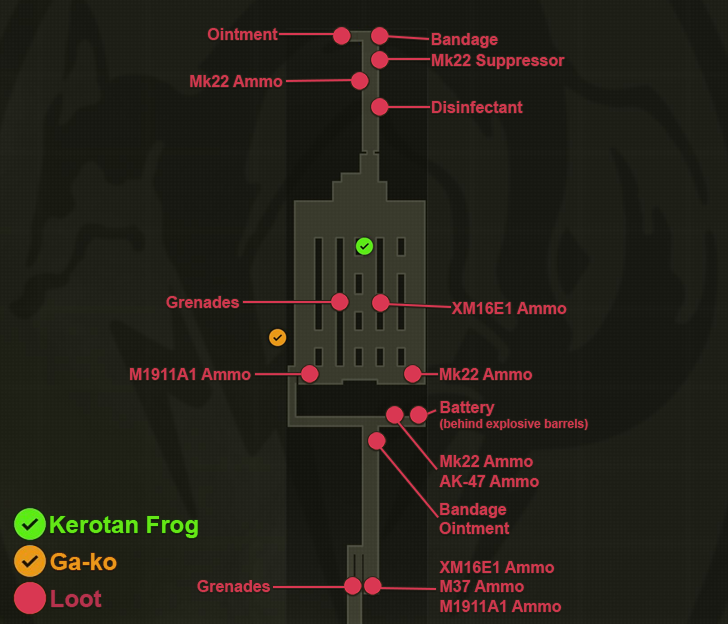
Dremuchij South (Optional)
| Dremuchij South Loot | |
|---|---|
 |
|
| Walkthrough | |
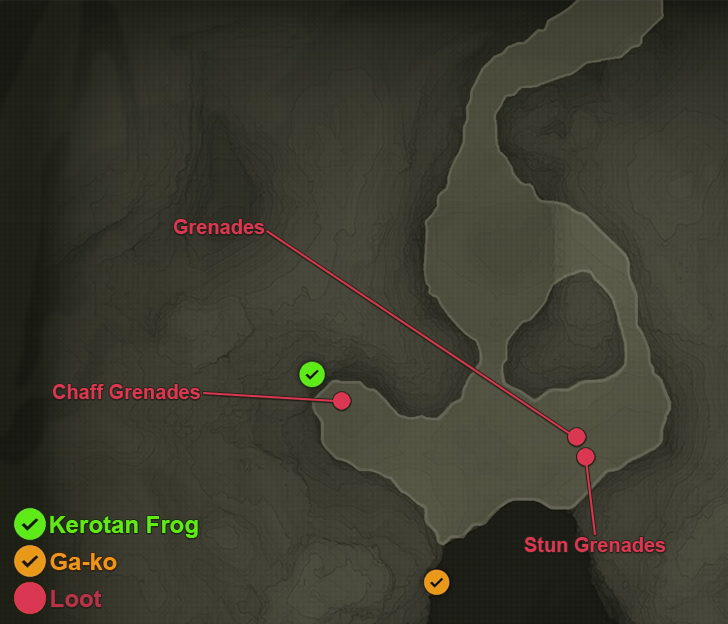
| 1 | Dremuchij South will have a bunch of items and animals that you can loot and capture. Stock up on Grenades, Stun Grenades, and Chaff Grenades, before killing the Markhor (a goat) and the snakes in the area for food. There is a Kerotan and GA-KO in this area but you won't be able to get either until you have a gun. Backtrack to this area after you finish up in Rassvet to get both collectibles. |
| 2 | Once you're done resupplying, head back north, past Dremuchij Swampland, until you make it back to Dremuchij North to resume the main story. From there, keep heading north to reach Dolinovodno. |
Dolinovodno
| Dolinovodno Loot | |
|---|---|
 |
|
| Walkthrough | |
| 1 |  If you don't have the Caution phase active, you can go ahead and approach the soldier directly in front of you and CQC Throw him to knock him out. Tip: Before crossing the rope bridge, pick up the knocked out guard twice to get some loot. |
| 2 | 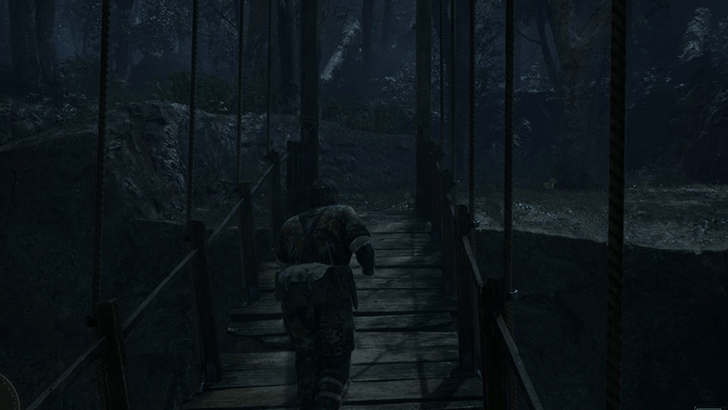 With the way clear, cross the bridge to reach the northern side of Dolinovodno. |
| 3 | 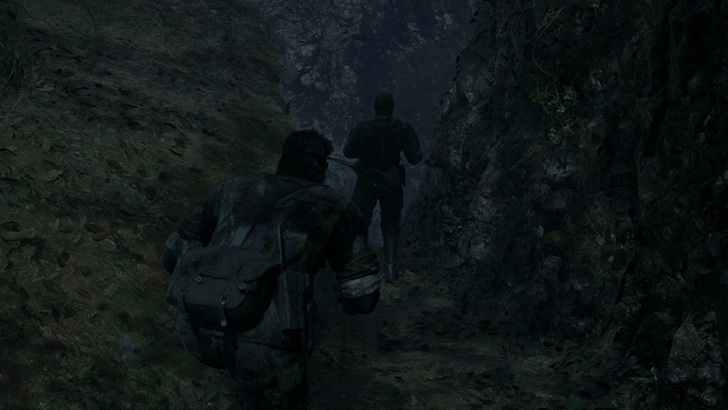 Once across, look for the nearby guard and CQC Throw him to knock him out as well. |
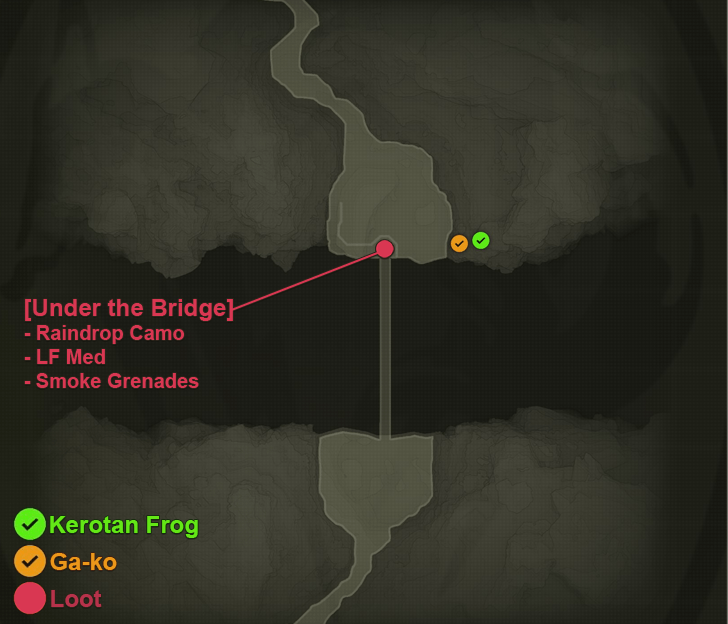
| 4 | Then, look for a small path on the west side of the rope bridge that leads to the small ledge beneath it. Make your way over to this ledge to get the Raindrop Camo as well as an LF Med and Smoke Grenades. |
| 5 | After looting everything, head back up and go northwest to reach Rassvet. |
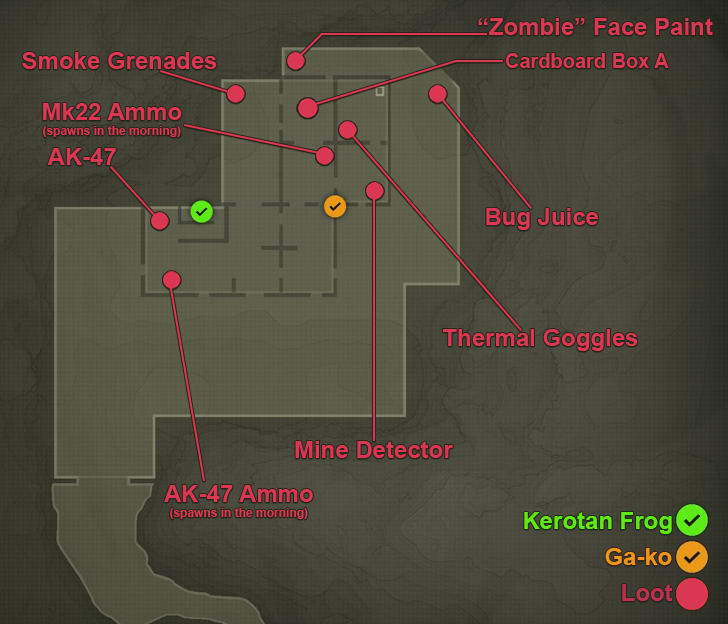
Rassvet
| Rassvet Loot | |
|---|---|
 |
|
| Walkthrough | |
| 1 | 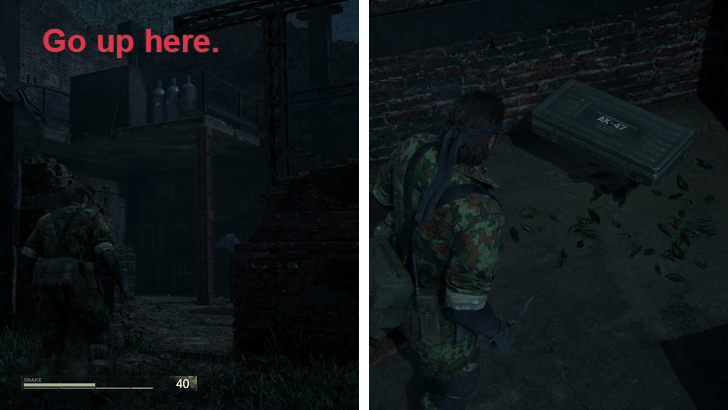 Upon arriving in Rassvet, take your time to loot everything in the vicinity. Your first stop is the second floor of the building's west side. Head up the stairs to get the AK-47 behind a few explosive barrels. |
| 2 | 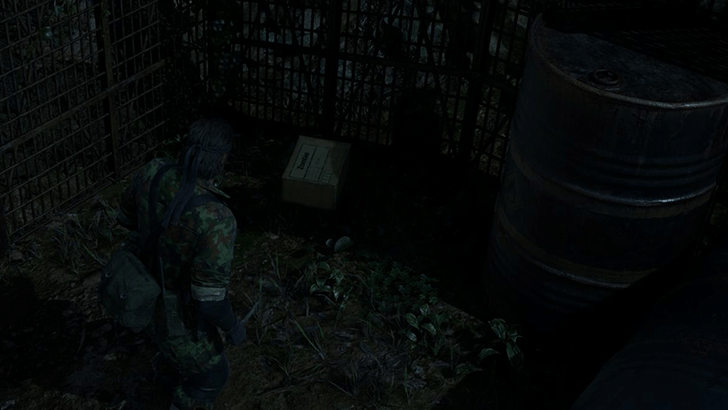 Next, head outside and over to the north side of the building. Behind another set of explosive barrels, you'll find the Zombie Face Paint. |
| 3 | 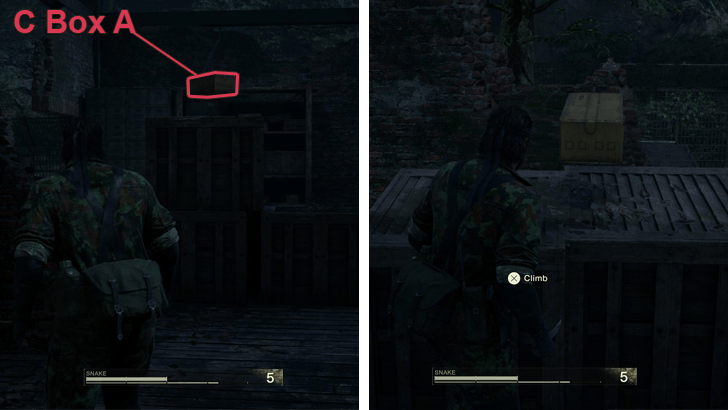 Next, head to the middle room of the building and look for a stack of crates that has an item above it. Climb up the crates to get Cardboard Box A. |
| 4 | Then, make your way over to the room where you first met Sokolov during the Virtuous Mission. But, before going through the door, go to the southeast corner of the room right before it. Pick up the Mine Detector before proceeding. |
| 5 | 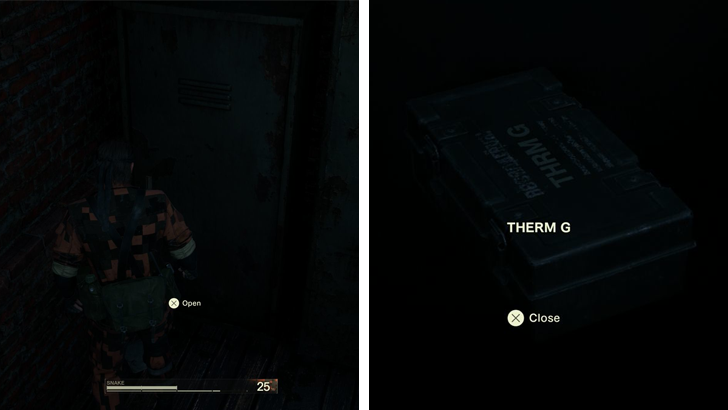 Inside Sokolov's room, there will be a locker that you can open. Loot the Thermal Goggles inside it. |
| 6 | 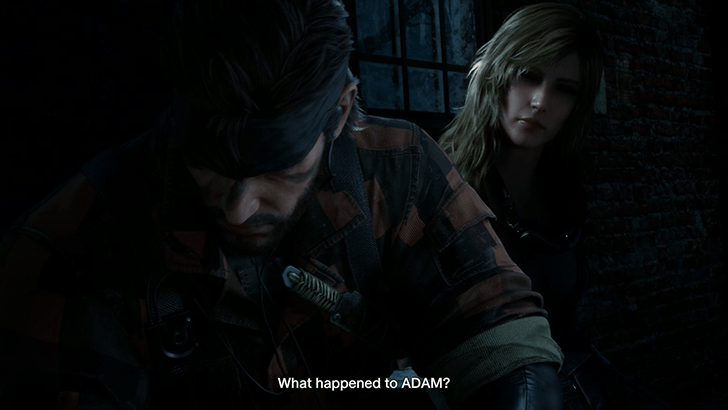 Now you should be set. Equip the Squares Camo and the Splitter Face Paint before exiting the room to trigger a cutscene where you meet EVA for the first time. During this scene, she'll give you the Scientist outfit, the M1911A1, and an Mk22. Save your progress when prompted. |
| 7 | 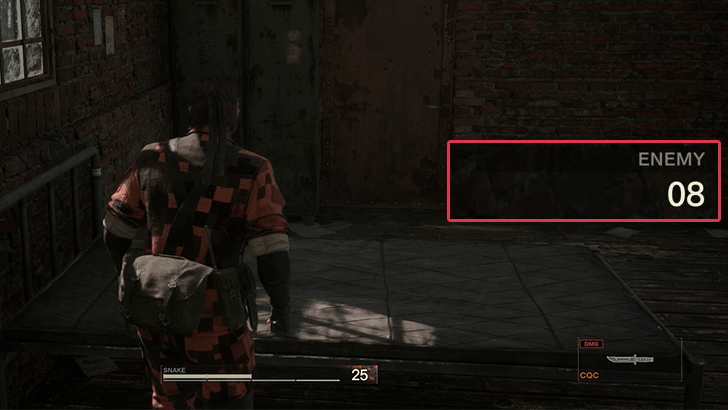 You'll wake up in the morning to the sounds of the Ocelot Unit assaulting the building. You'll need to take out a fixed amount of enemies to progress. The number depends on your difficulty. On Normal, you'll need to take out 8 soldiers. |
| 8 | To avoid an alert, start by going prone under the bed and preparing Stun Grenades. Once the squad of 4 breaks down the door, throw 2 flashes into the open doorway. Throw one a bit to the left and the other to the right to get all 4 enemies. You'll know you did it right if the enemy counter drops down to 4 enemies. |
| 9 | 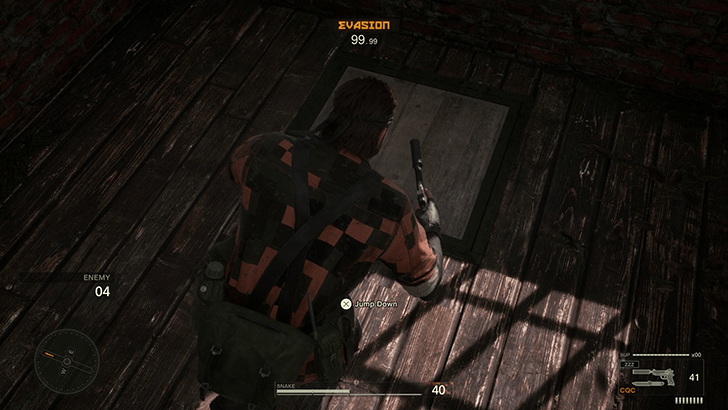 Once all 4 are down, go down the trap door next to the bed. This takes you to the underside of the building where small metal grates allow you to see the outside perimeter. |
| 10 | 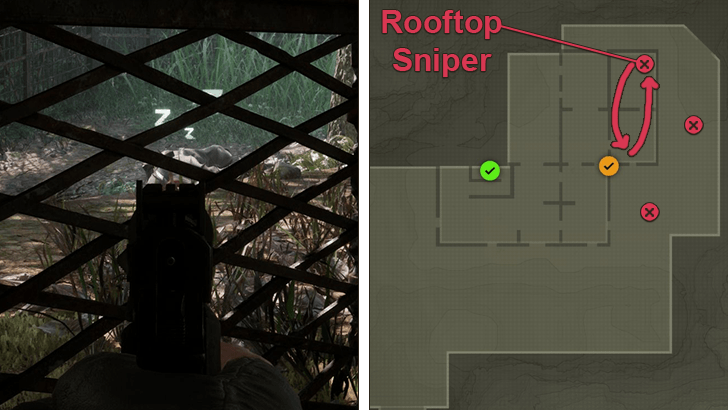 Equip a suppressed weapon (Mk22 or M1911A1) then start dealing with the soldiers patrolling the perimeter. There should be 1 to the east and another to the south. |
| 11 | 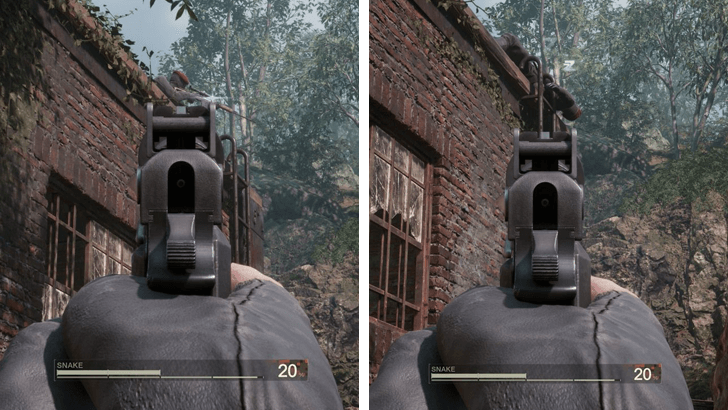 After dealing with those 2 soldiers, crawl out of the building while still hugging the eastern wall. There is a rooftop sniper right above this section of the building. Once he peeks out from the north or southern corner of the roof, aim for a headshot to knock him out without triggering an Alert. |
| 12 | 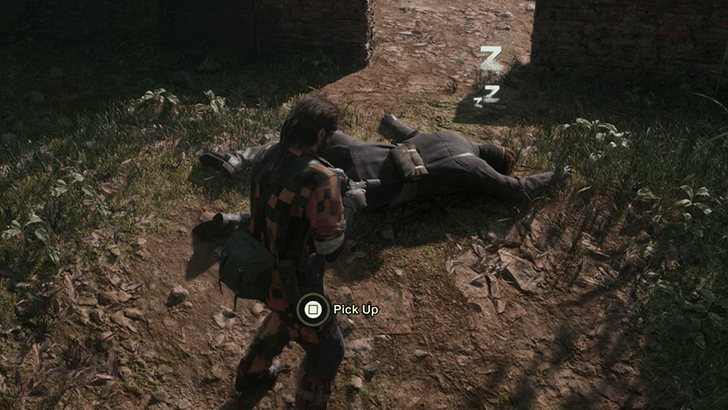 The final soldier (on Normal) will be found at the western perimeter of the building. Approach this last one with caution since he'll be facing towards you. Nail him with a headshot from a distance to complete the encounter. |
| 13 | With the entire Ocelot Unit dealt with, head over to the northeast of Rassvet to trigger a cutscene. Once it ends, you're free to backtrack to the ff. locations to get any collectibles you missed: ・Dolinovodno ・Dremuchij North ・Dremuchij Swampland ・Dremuchij South |
| 14 | 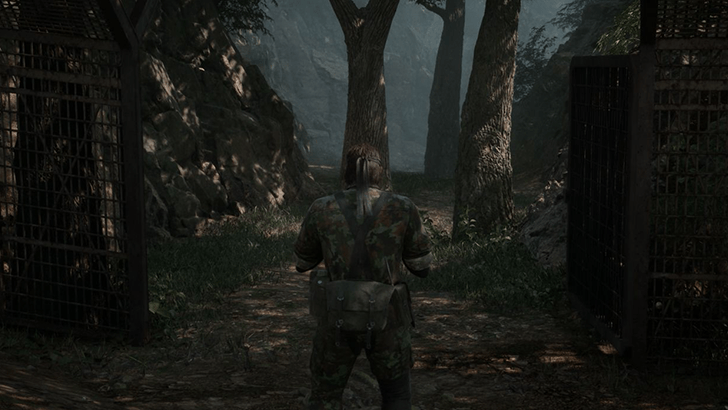 If you're done getting collectibles or if you want to move forward, simply head back over to the northeast corner of Rassvet where the gate should now be unlocked. Switch to more appropriate camo then continue onwards to reach Chyornyj Prud. |
Chyornyj Prud
| Chyornyj Prud Loot | |
|---|---|
 |
|
| Walkthrough | |
| 1 | 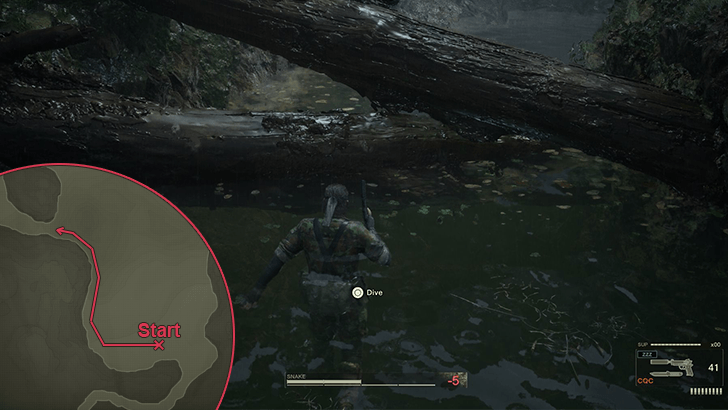 Upon arriving, head west until you hit the wall of the area. Then, follow this western wall and swim until you reach a fallen log that you can swim under. Note: If your Stamina bar starts going down rapidly, it probably means you have a leech stuck to you. Open the Cure menu and use the Cigar to remove leeches. |
| 2 | Dive and swim under the log to reach an elevated area on the west edge of the map. Head north to trigger a call from EVA. |
| 3 | After finishing the call, climb the nearby tree and complete the platforming segment that takes you to an isolated ledge at the north of the area. Here, you'll be able to get the Crocodile Cap. Tip: During the rope sequence, spam the grab button as you're dropping down to the second rope to avoid falling back into the swamp. |
| 4 | 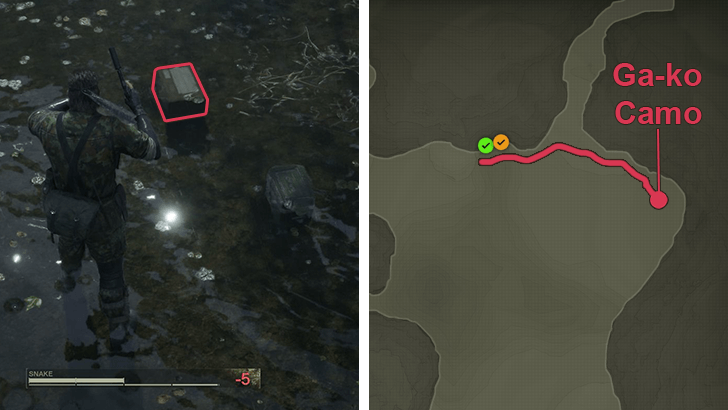 Next, drop off the ledge to your east. Swim until you reach land and keep heading east until you hit shallow water. You should be able to find the GA-KO Camo here along with Chaff Grenades. |
| 5 |  With all key items looted, take the northeast path. Dodge roll forward over the trap wire to avoid the swinging trap then make your way into Bolshaya Past South. |
Bolshaya Past South
Note: Dropping down to the other side of the electric fence in Bolshaya Past South is a point of no return. Make sure any collectibles in past areas have been collected before continuing.
| Bolshaya Past South Loot | |
|---|---|
 |
|
| Walkthrough | |
| 1 |  Upon entering Bolshaya Past South, you'll be greeted by an electric fence and an active mine field. Approach the easternmost fence and crawl under the broken wire to get to the other side. |
| 2 | 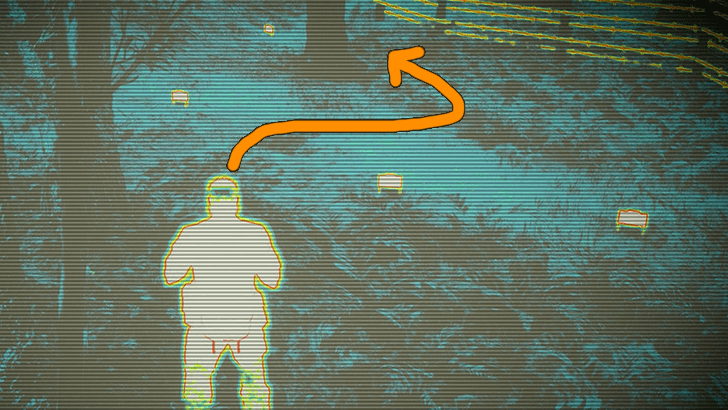 This next area is a mine field. Rather than use the Mine Detector, equip your Thermal Goggles instead. This will allow you to see the mines and the safe path you can take to avoid getting blown up. Make your way to the next electric fence. |
| 3 | 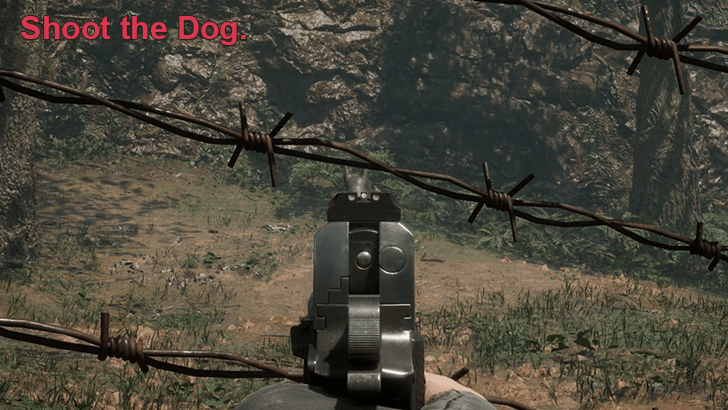 Once you're hugging this new electric fence, take out your silenced M1911A1 and shoot the guard dog on the other side. They don't count as "kills", so any title you're gunning for should be safe. |
| 4 | 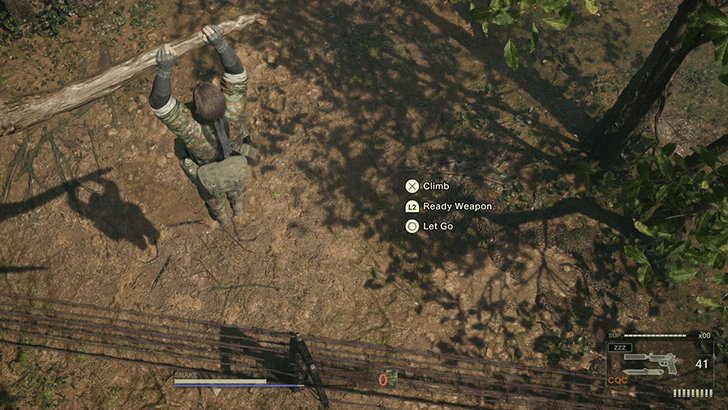 Then, follow the electric fence west until you reach a climbable tree. Interact with it then make your way to the branch that hangs over the other side of the fence. Note: Before dropping, look back towards the tree to see a GA-KO. Make sure to shoot it because you might not have an angle to hit it once you're on the other side. |
| 5 | 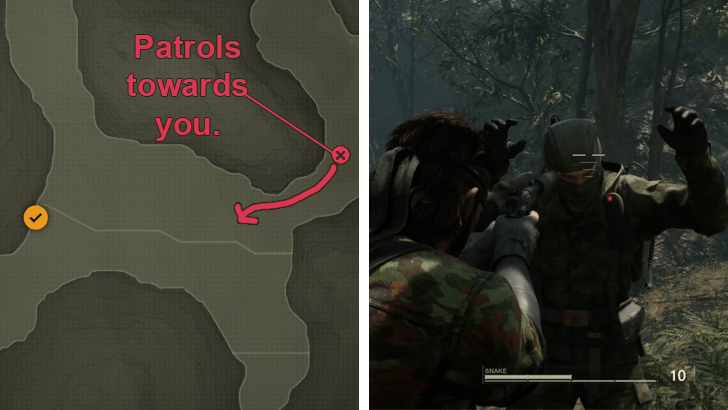 When ready, drop down to the other side and head east. There will be a patrolling soldier here that you need to knock out before proceeding. |
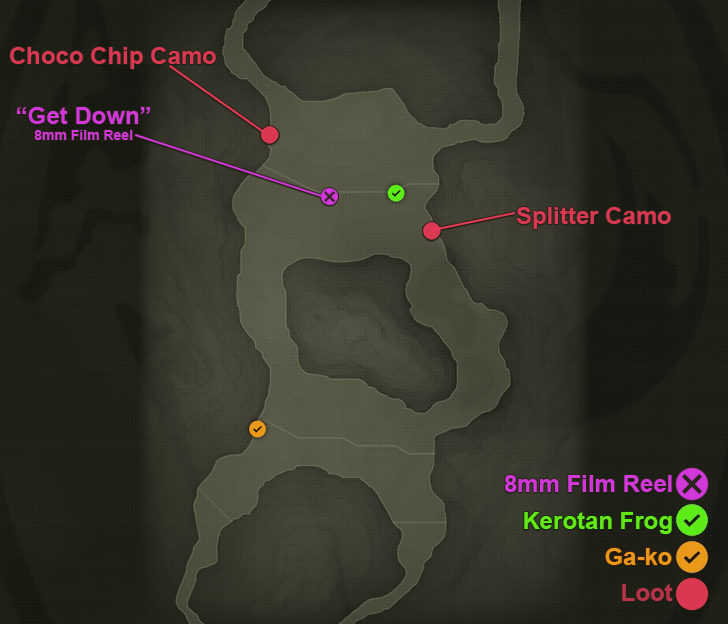
| 6 |  Along this east wall is a ledge you can shimmy on. It's a bit tricky since you'll most likely fall off midway through. However, keep at it until you reach the wider ledge to the north. Here, you can loot the Splitter Camo. |
| 7 |  Next, backtrack south and loop down and over to the west end of the area. |
| 8 | 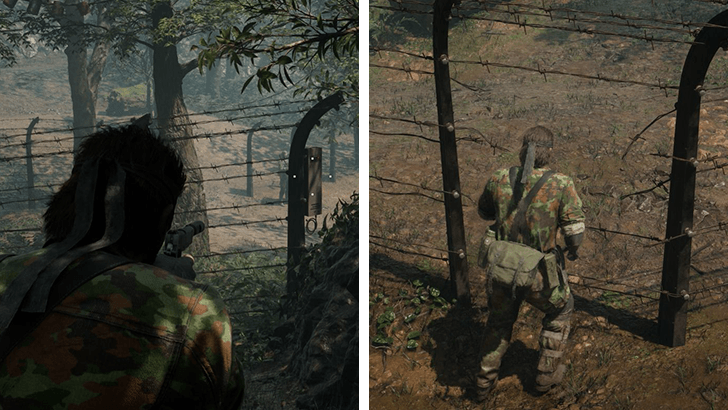 Disable the electric fence by shooting out its control panel before dodge rolling into the hole in the fence to reach the other side. |
| 9 | 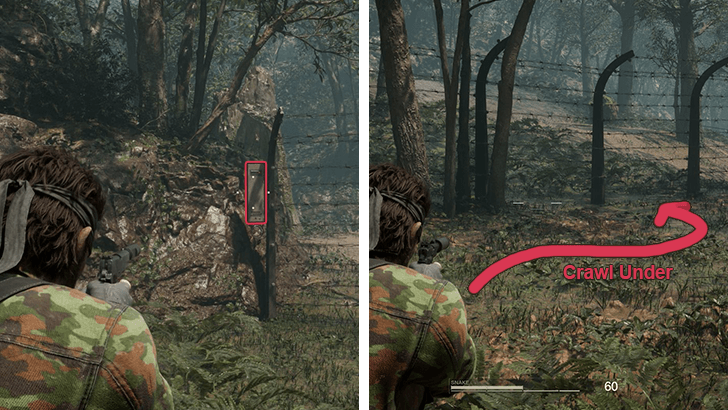 At the other side, shoot the control panel of the electric fence directly in front of you (it should be near the west end of the fence). Then, go prone and crawl under the hole on the fence to bypass the two guards guarding the gap. |
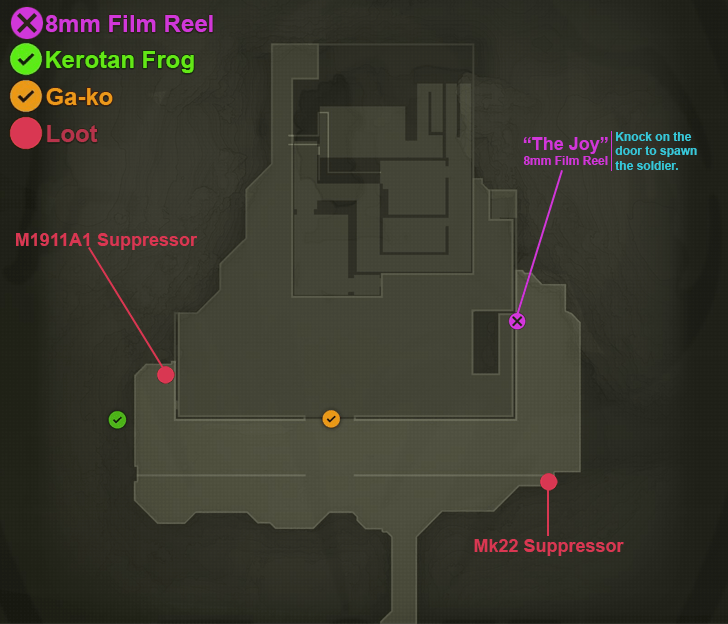
| 10 | 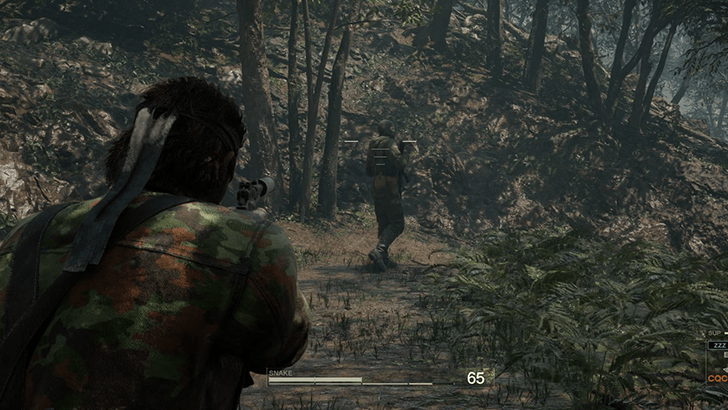 On the other side, take out the lone soldier patrolling the area. Note: This is optional, but the guard with the radio on the west side of the fence gap will have an 8mm Film Reel. Take out the guard beside him before getting into CQC range to hold him up for the film reel. |
| 11 | 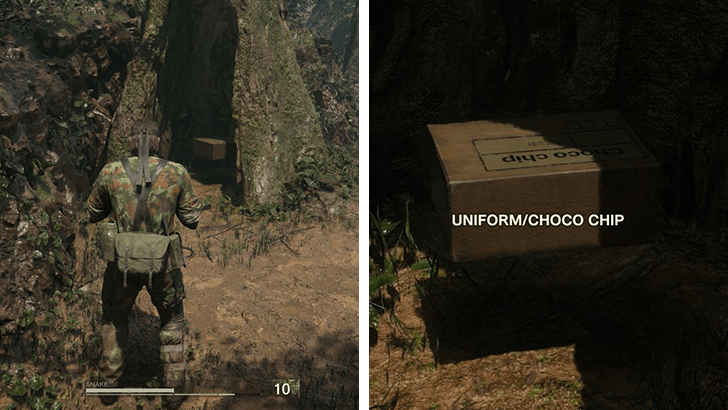 Finally, head over to the northwest side of the area and look for a hollow tree stump. Inside, you'll find the Choco Chip Camo. After looting it, go northwest towards Bolshaya Past Base. |
Bolshaya Past Base
| Bolshaya Past Base Loot | |
|---|---|
 |
|
| Walkthrough | |
| 1 |  Having taken the northwest path from Bolshaya Past South, you'll soon emerge on the west side of Bolshaya Past Base. Head north and take out the soldier patrolling the area. |
| 2 |  Once he's out, follow the trail east until you hit a machine gun nest manned by another soldier. Take him out to proceed. |
| 3 |  Next, face southeast towards the broken brick wall. Another soldier should be here with a patrol pattern that goes around the helicopter. Take him out before he can gain distance. |
| 4 | 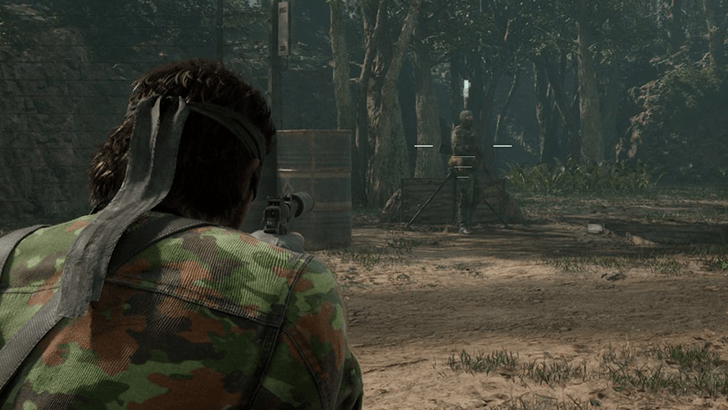 Directly south of you is another machine gun nest. If you timed it correctly, a different soldier should have his back to you. Take him out to freely explore most of the base. |
| 5 | 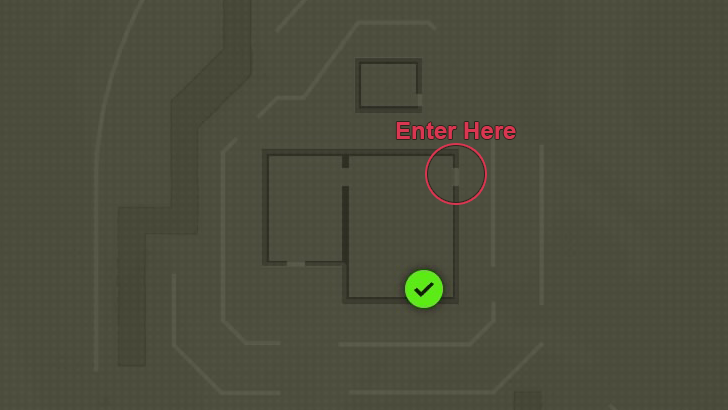 Now, you can focus on getting the guard near the building. To start, head over to the east side of the building and enter through the door there. |
| 6 | 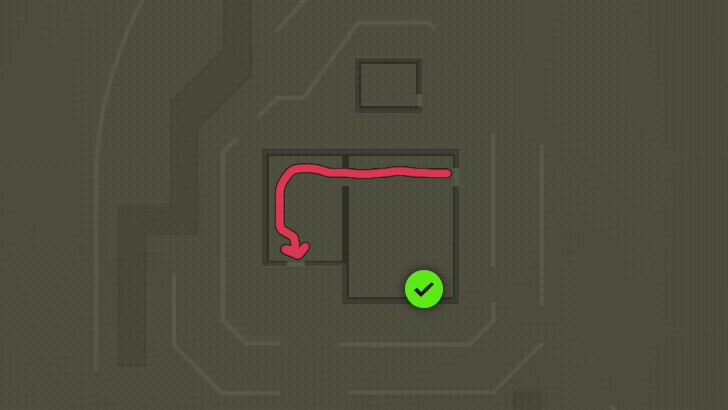 Once inside, go over to the western room then open the door leading to the south. |
| 7 | 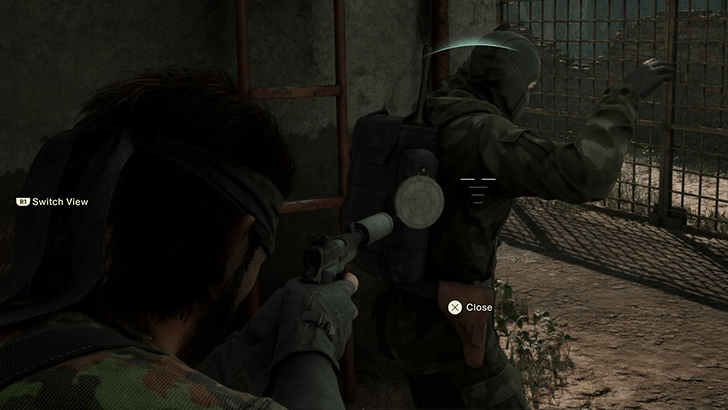 Directly in front of you will be the soldier holding an 8mm Film Reel. You'll immediately be in CQC range, so hold him up to get the reel before taking him out. |
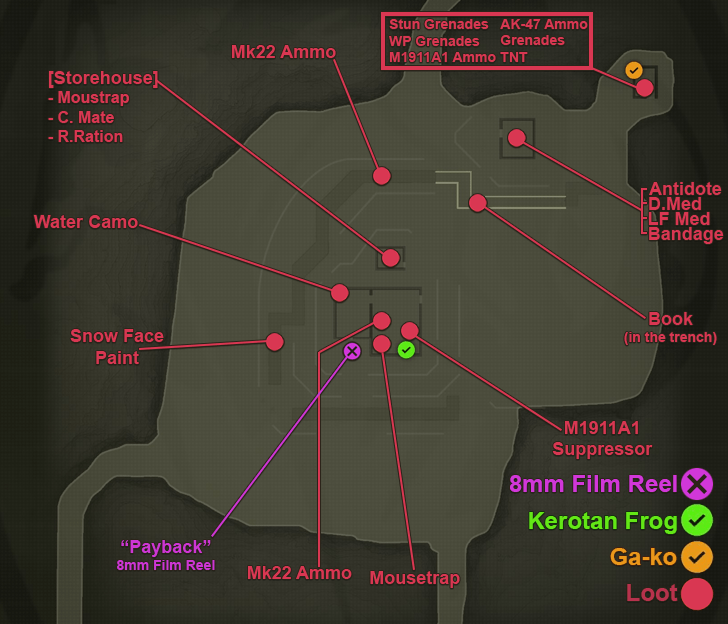
| 8 | 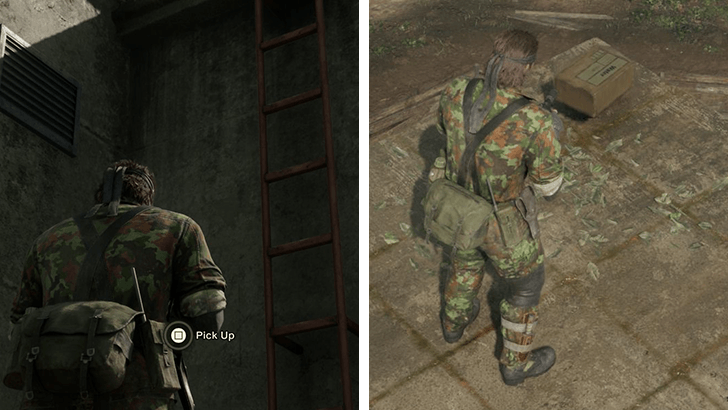 Now, all that's left is to loot the place. First, head up to the roof via the nearby ladder. Go to the northwest side to get the Water Camo. |
| 9 | 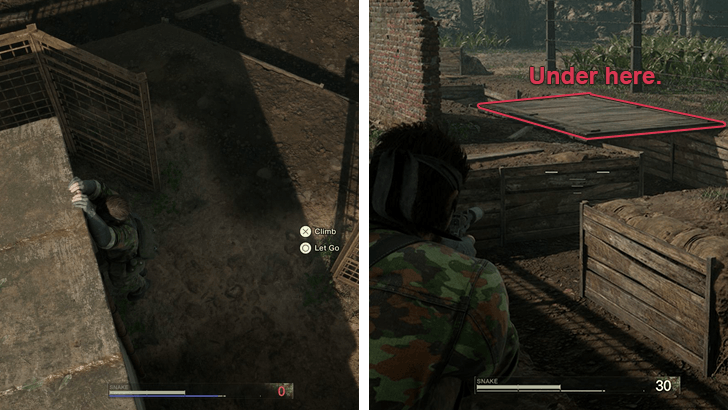 Next, immediately drop down the ledge and face southwest. Go to that location in the trench (by going prone) to get the Snow Face Paint. |
| 10 | 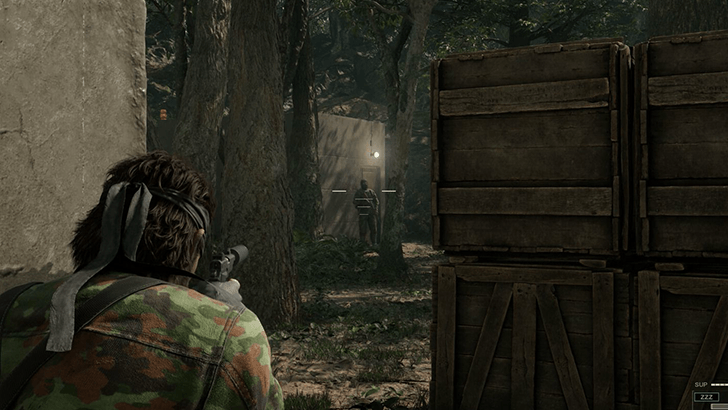 Finally, head on over to the northeast side of the area to find a storehouse guarded by one last soldier. Take him out and head inside to get some ammo, grenades, and TNT. |
| 11 | 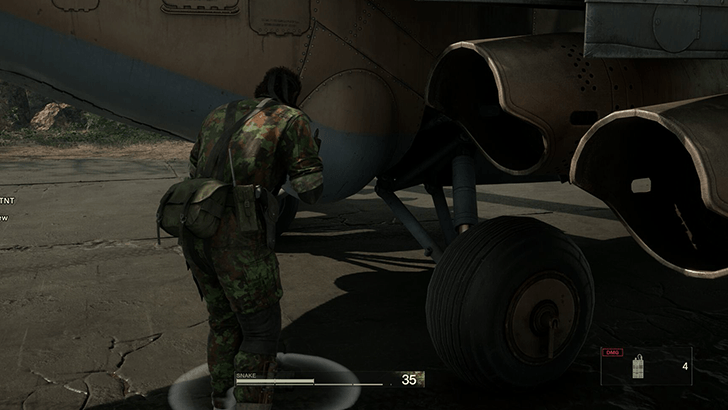 Before leaving the area, equip the TNT and plant one under the helicopter. This is optional, but doing this step prevents the helicopter from spawning later on in the game when you reach the Krasnogorje Mountainside. |
| 12 | 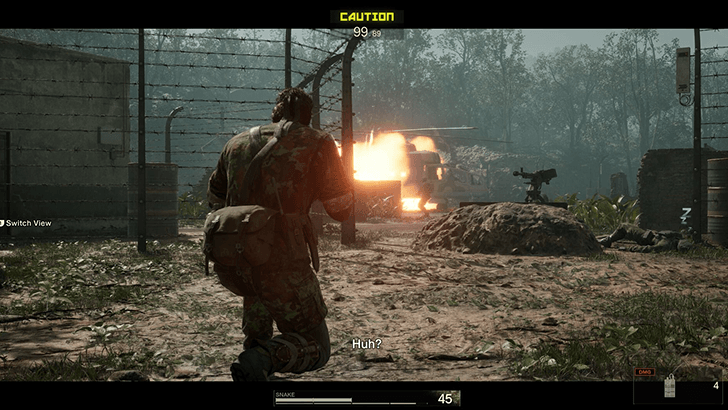 Once the TNT is planted, head north and detonate the TNT before you leave for Bolshaya Past Crevice. |
Bolshaya Past Crevice (Boss Fight)
| Bolshaya Past Crevice Loot | |
|---|---|
 |
|
| Walkthrough | |
| 1 | 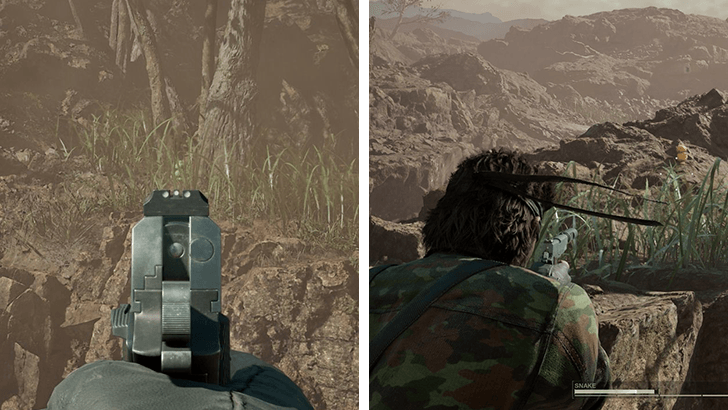 Entering Bolshaya Past Crevice will trigger a cutscene that will soon be followed by a boss battle against Ocelot. Before you fight him, make sure to get both the Kerotan and the GA-KO here since you will no longer be able to backtrack once the fight ends. Tip: Unequip your suppressor before fighting him to avoid wearing it out during combat. |
| 2 | Defeat Ocelot to progress. This boss fight is pretty easy. Stay behind the rocks and wait for Ocelot to peek you. Go for headshots if you can, but body shots are prefectly fine on Normal difficulty. There are a number of things you can use to distract Ocelot to get free shots like shooting off his hat or killing the Markhor behind him. |
| 3 | 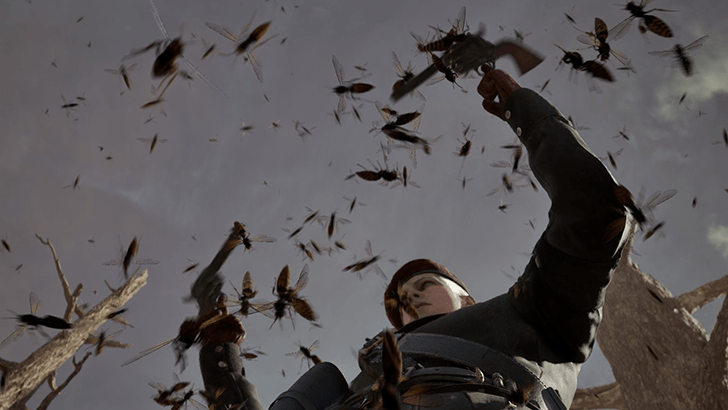 Once Ocelot drops to low HP, you'll be attacked by hornets sent by The Pain. Watch the cutscene and wait until you get dropped into the next area. |
Chyornaya Peschera Cave Branch
| Chyornaya Peschera Cave Branch Loot | |
|---|---|
 |
|
| Walkthrough | |
| 1 | If you beat Ocelot non-lethally, the Animals Camo will be directly in front of you once you load into the area. After picking it up wait for bit to let Snake's eyes adjust to the dark. As time passes, you'll gradually start seeing better in the darkness. |
| 2 | Once you're ready, take the path to the northeast. Note: If you don't have the Flecktarn Camo, you may want to head northwest first. Swim all the way north to get an extra Battery, then backtrack once you have it. |
| 3 | After taking the path northeast, you'll arrive at a cavern with 3 branching paths. First, we'll need new equipment, so take the path to the northwest. |
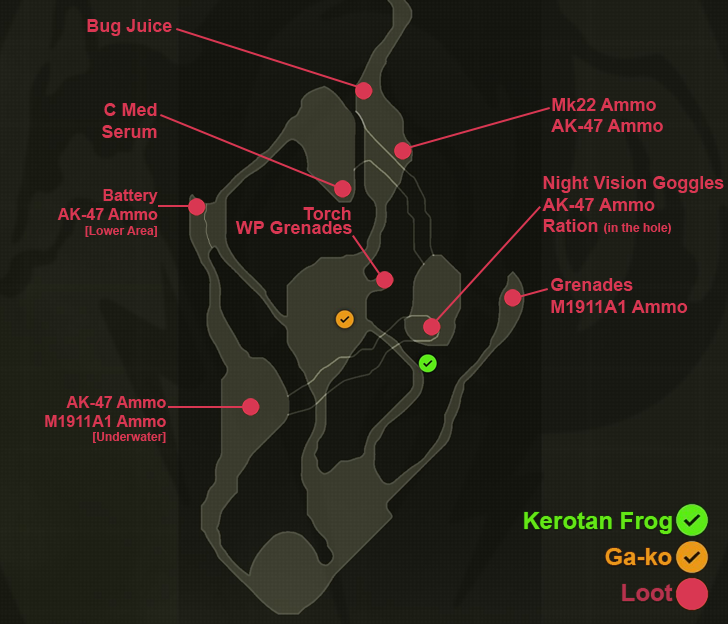
| 4 | After a short walk, you'll find yourself in a large cavern with shallow water and a waterfall off to your right. Go northeast towards the waterfall and you should see a small alcove with a glowing green mushroom. Pick up the loot here to get the Torch and a few WP Grenades. |
| 5 | Next, look southwest and take the path you see in front of you. Follow it (while being careful not to fall off the edge) until you see a small tunnel with a glowing green mushroom beside it. Crawl through this tunnel until you reach a large cave bats off to the north of the map. |
| 6 | There isn't much in this cave, so immediately head east and start crawling again until you reach a much larger cave with lots of natural light. This area will contain a Kerotan, Night Vision Goggles, as well as AK-47 Ammo. Loot everything you can then drop down the hole and into the water. |
| 7 | As soon as you're in the water, dive and swim southwest, following the underwater tunnel. Do this fast since a full O2 gauge will barely clear this swim if you dilly-dally. |
| 8 | As soon as you surface, you'll find yourself in a rather deep water area. Swim south to return to your original spawn location, then loop back up to the northeast in order to reach the original cave with 3 branching paths. |
| 9 | This time, take the small tunnel in the middle. Go prone and start crawling until you reach the upper level of the waterfall at the center of the cave. Note: As you emerge, you'll see a GA-KO on top of the rocks. Shoot it before continuing. |
| 10 | Finally, follow the path northeast until you reach Chyornaya Peschera Cave. Along the way, you should find some extra ammo for the Mk22 and AK-47 if you need them, as well as Bug Juice. |
Chyornaya Peschera Cave (Boss)
| Chyornaya Peschera Cave Loot | |
|---|---|
 |
|
| Walkthrough | |
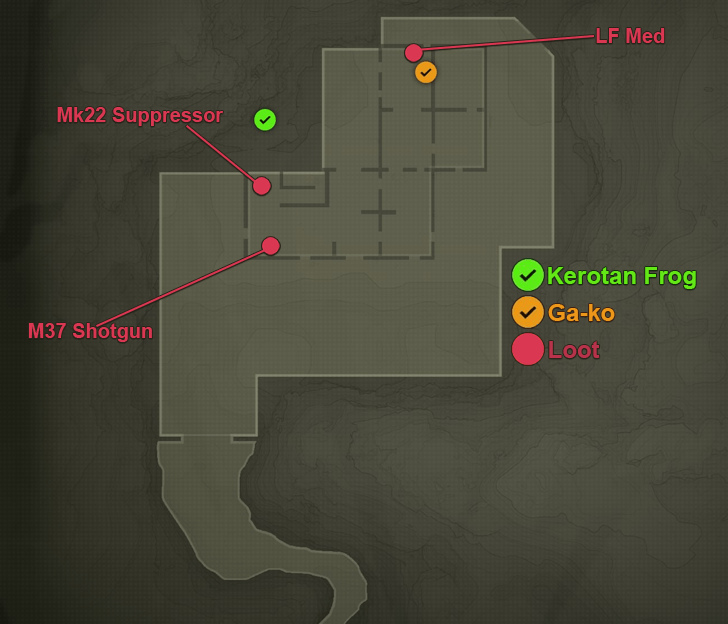
| 1 | As soon as you arrive in Chyornaya Peschera Cave, equip your new Night Vision Goggles to see the path to your right. |
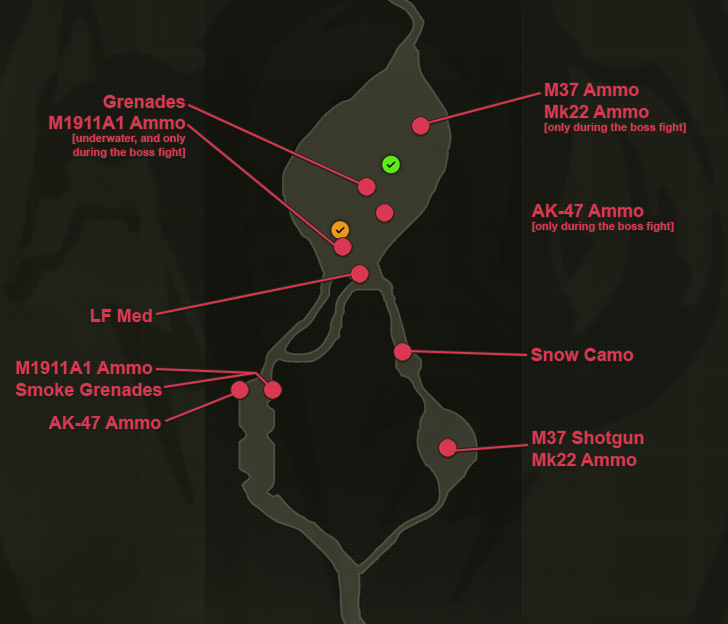
| 2 | Follow the path to the right to reach a small cavern that contains a new weapon - the M37 Shotgun - as well as some ammo for your Mk22. |
| 3 | After picking up the M37, go prone and crawl north into the small tunnel. After a short while, you'll find yourself in a narrow passage that contains the Snow Camo. Loot it then move to the end of the narrow passage. |
| 4 | Go prone again and follow this new tunnel until you reach the west side of the map. |
| 5 | As soon as you emerge from the tunnel, look south. There should be some loot to your left and right in case you need them. This area will also have a ton of crab and snakes. Hunt a few if you're running low on food. |
| 6 | Equip the Water Camo and the Brown Face Paint if you have it. Then, add the M37, Grenades, Smoke Grenades, and WP Grenades to your weapon window to prep for the upcoming boss fight. You'll also want to keep some Bug Juice handy, so go ahead and equip that to your Equipment wheel. |
| 7 | Once you're ready, follow the path north until you reach the main cave that triggers a cutscene showcasing the area boss - The Pain. |
| 8 | The Pain is a pretty straightfoward boss to beat. Stand on any of the 2 platforms in the arena then start nailing him with headshots. Tips: When he uses his Bee Armor, shoot him with the M37 or throw a few Grenades (or WP Grenades) at him to remove the armor. Be wary of his two signature moves: Tommy Gun (which he announces) and the Bullet Bees (which leave a distinct red trail). |
| 9 | Defeat The Pain to unlock the way forward to Chyornaya Peschera Cave Entrance. If you beat The Pain non-lethally, hop on his platform to get the Hornet Stripe Camo before you exit north. |
Chyornaya Peschera Cave Entrance
| Chyornaya Peschera Cave Entrance Loot | |
|---|---|
 |
|
| Walkthrough | |
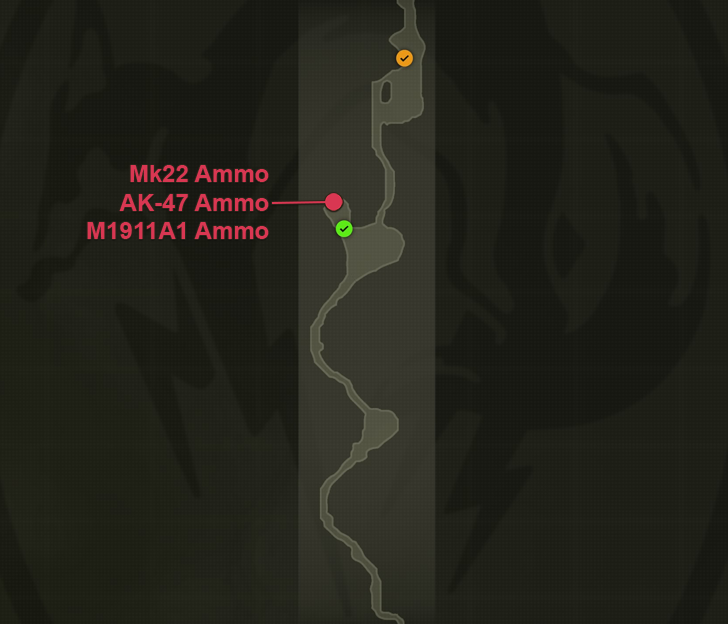
| 1 | Chyornaya Peschera Cave Entrance is basically one long corridor. Follow the path north until you trigger a cutscene showing the arrival of Hover Soldiers. |
| 2 | Once the cutscene ends, keep heading north until you exit out to Ponizovje South. There will be tons of loots and animals along the way that you can pick up. However, do be careful of the small cave with the Kerotan since it will be lined with claymores. |
Ponizovje South
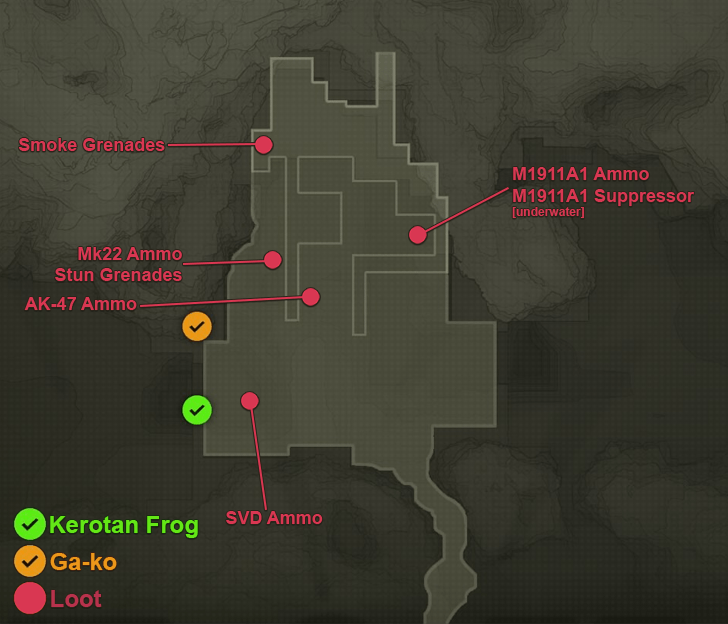
| Ponizovje South Loot | |
|---|---|
 |
|
| Walkthrough | |
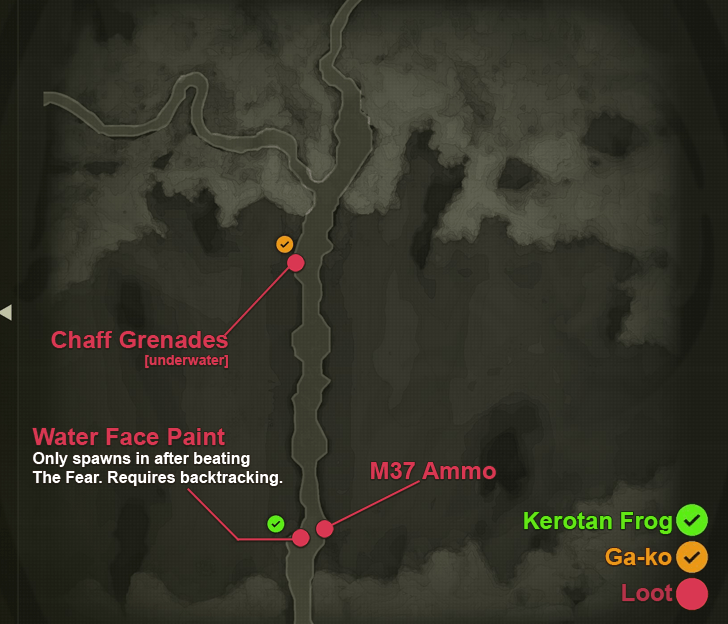
| 1 | 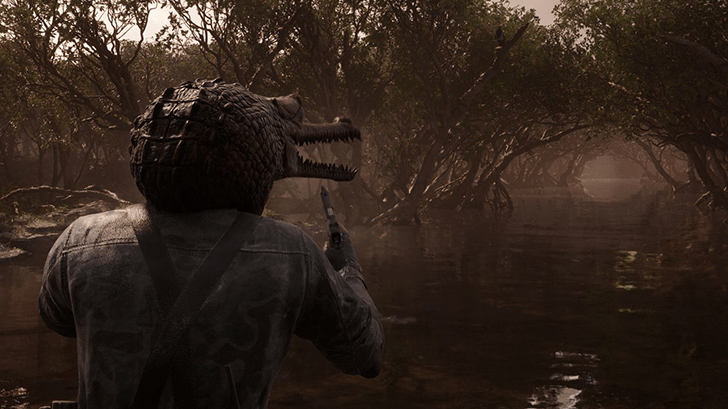 Ponizovje South is a mangrove forest that has a small river with waist-deep water running through it. You'll need to head north while avoiding the Hover Soldiers patrolling the area. Equip the Crocodile Cap and switch to the Water Camo before proceeding. If you have the Brown Face Paint unlocked, equip it as well to get an unlimited O2 gauge. |
| 2 | 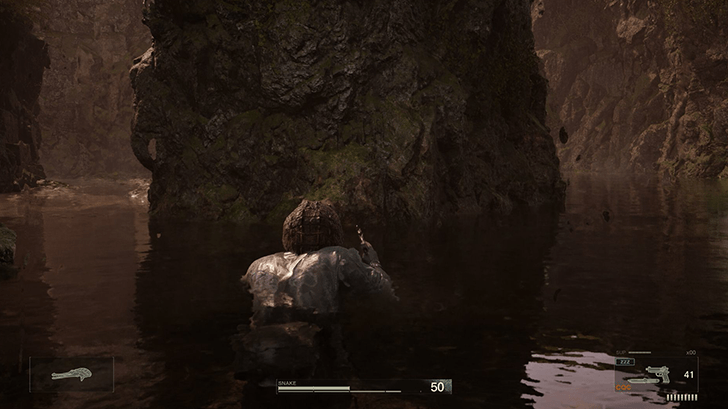 Once you're ready, dive and start swimming north until you reach a fork in the river. For now, take the path that leads west since we'll want to make a detour to get one of the best weapons in the game. |
Note: The Water Face Paint indicated in the loot map only spawns after you beat the next boss. Backtrack to this location after beating The Fear and you'll find this face paint underwater.
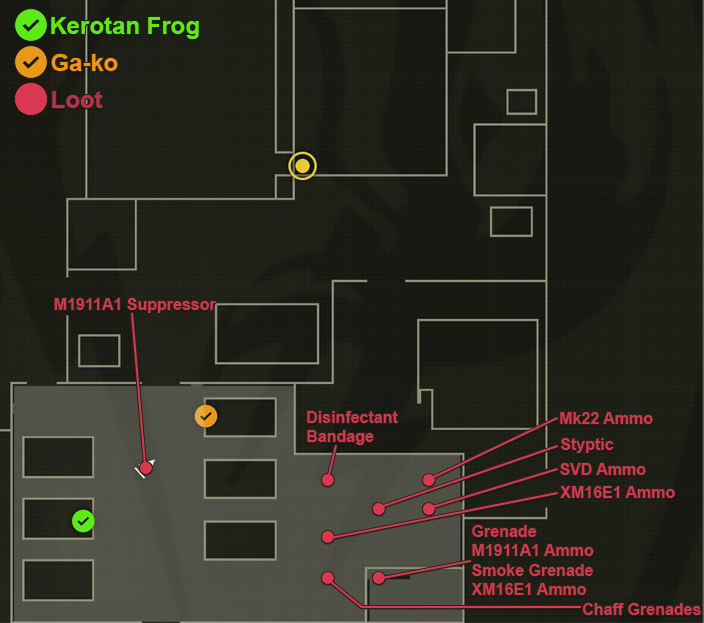
Ponizovje West
| Ponizovje West Loot | |
|---|---|
 |
|
| Walkthrough | |
| 1 | 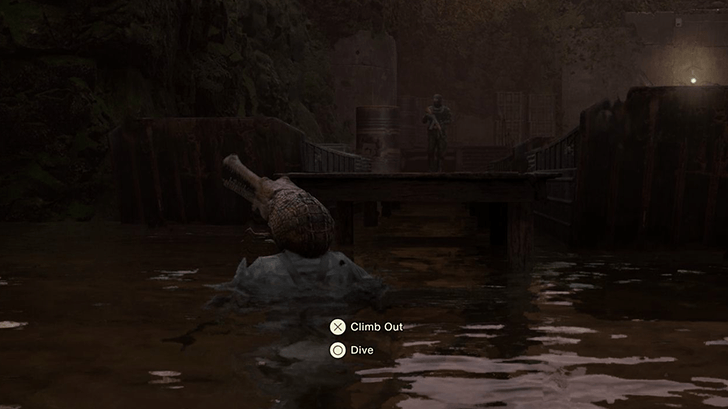 Upon arriving in Ponizovje West, dive back underwater and swim towards the south side of the docks. Only resurface once you're hugging the edge of the pier. |
| 2 | 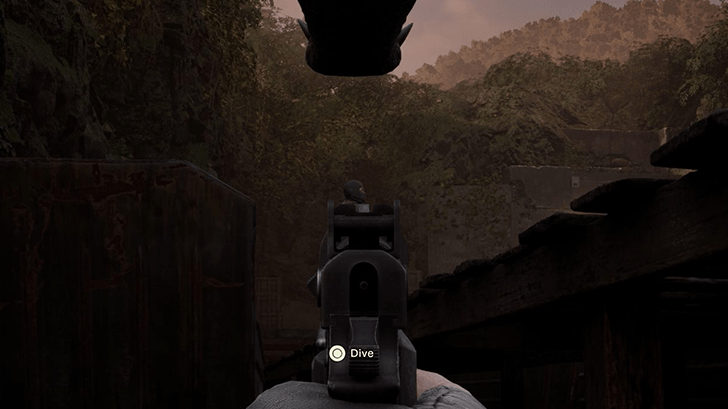 One guard is patrolling along the pier. Take him out after he moves south towards you and faces east (otherwise you alert the other guard). However, don't shoot the guard with the radio just yet. |
| 3 | The remaining guard holds an 8mm Film Reel. You'll want to hold him up if you want to get that particular collectible (otherwise, just shoot him). Once he's out, you can start looting the area. Tip: Since the docks are narrow, you'll probably want to distract the guard with something like thrown food to give you more space for the hold up. |
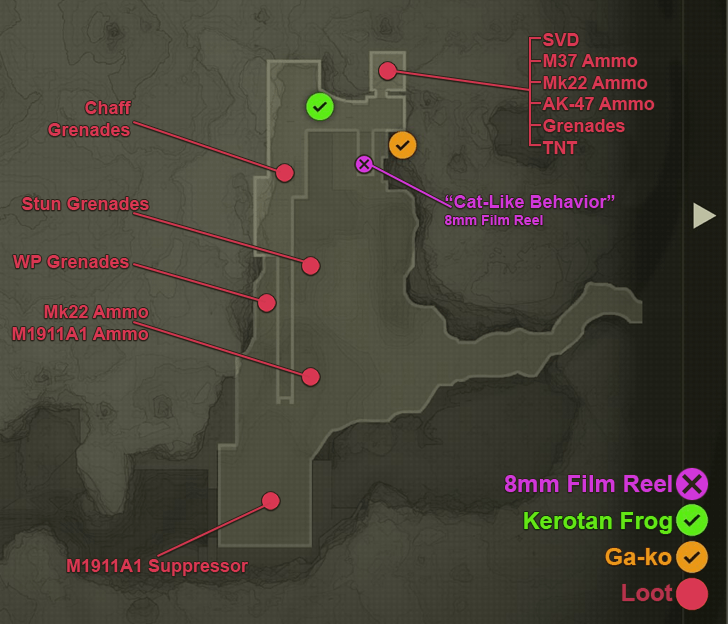
| 4 | 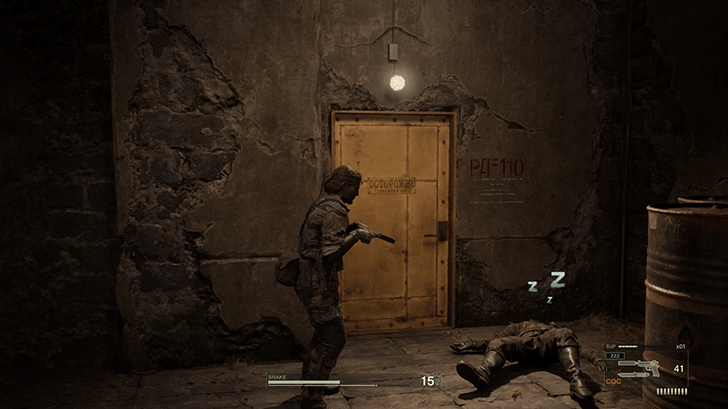 Start with the dock warehouse to the northeast. Inside, you'll find the SVD - a lethal sniper rifle that makes short work of most bosses if used correctly. |
| 5 | Next, you can start raiding the docks and skiffs for grenades and ammo. The deep water south of the docks will also hold an M1911A1 Suppressor if you need it. |
| 6 | Once you're done looting, exit east into Ponizovje South, then go north from there to reach Ponizovje Warehouse: Exterior. |
Ponizovje Warehouse: Exterior
| Ponizovje Warehouse: Exterior Loot | |
|---|---|
 |
|
| Walkthrough | |
| 1 | 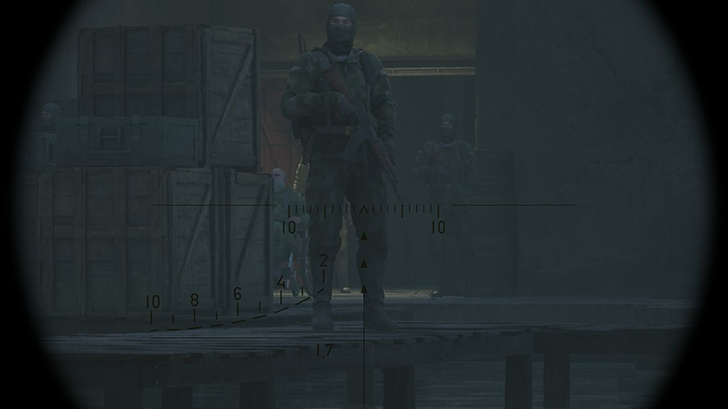 Before arriving in Ponizovje Warehouse: Exterior, you'll first trigger a cutscene. Once it ends, you'll have the option of killing The End early. Assuming you don't (to get the Mosin Nagant), then equip your silenced M1911A1 then shoot the barrel next to The End. This only triggers a Caution phase. However, The End will end up damaged and he'll start with less HP and stamina when you fight him later on. |
| 2 | 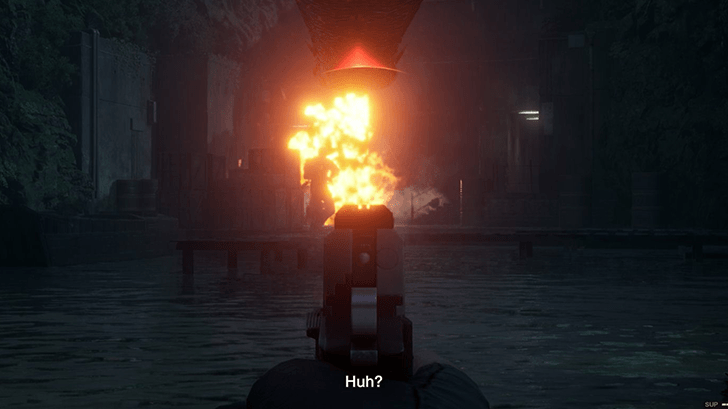 Wait out the Caution phase or simply go prone and start sniping the different barrels around the dock to take care of the reinforcements. Once everyone is down and out, head over to the docks. |
| 3 | 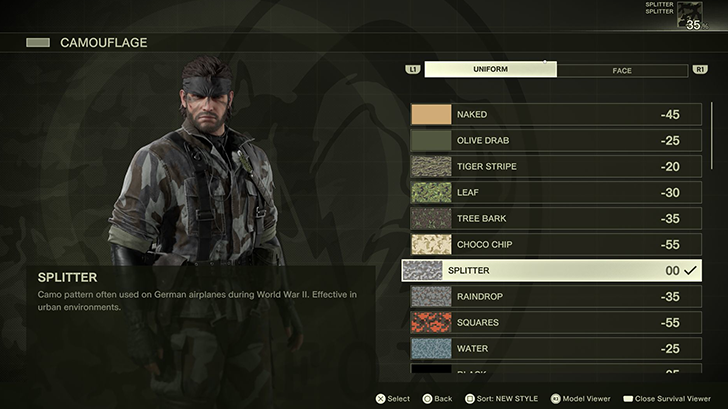 Loot everything you can in the area before changing your camo to Splitter Camo and Splitter Face Paint. When ready, go up the small set of stairs and head into Ponizovje Warehouse. |
Ponizovje Warehouse
| Ponizovje Warehouse Loot | |
|---|---|
 |
|
| Walkthrough | |
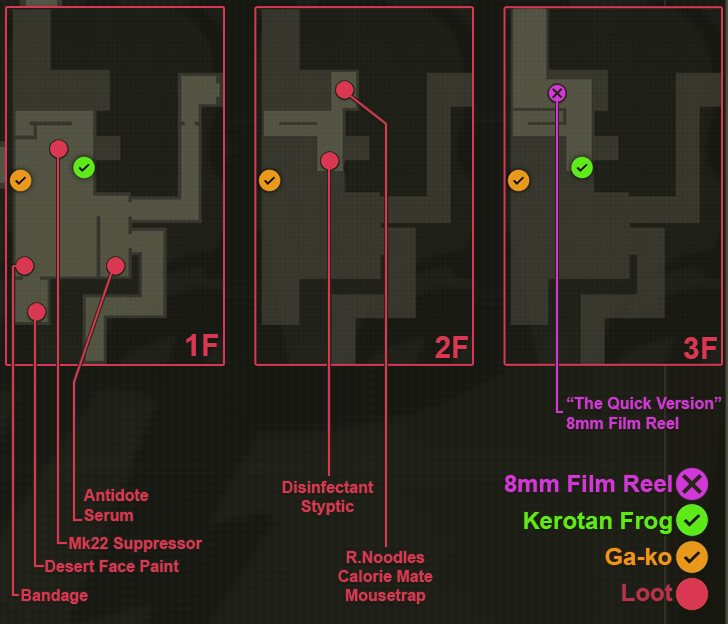
| 1 | 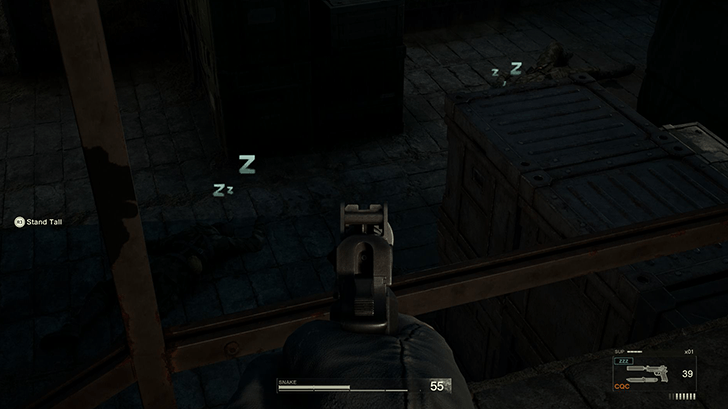 As soon as you load in, head up the stairs and take a left at the top. This should take you into a large room with 3 floors. This room will have 3 soldiers guarding it - 2 soldiers on the ground floor and another on the 3rd floor balcony. Take out the two guards on the ground floor first. |
| 2 | 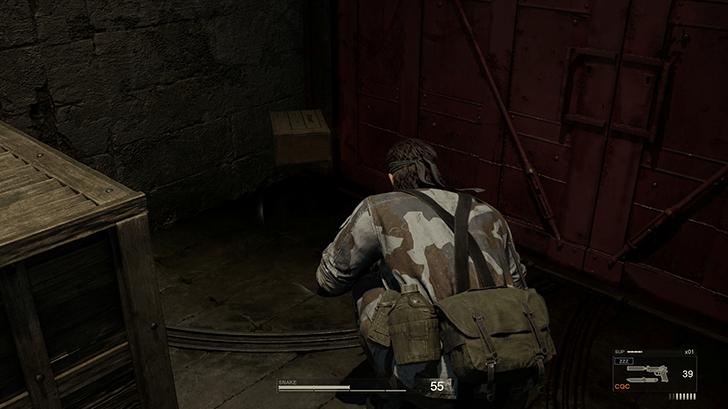 At the southwest corner of the first floor (next to the locked red door), you'll find the Desert Face Paint. Loot it before heading up to the 3rd floor. |
| 3 | 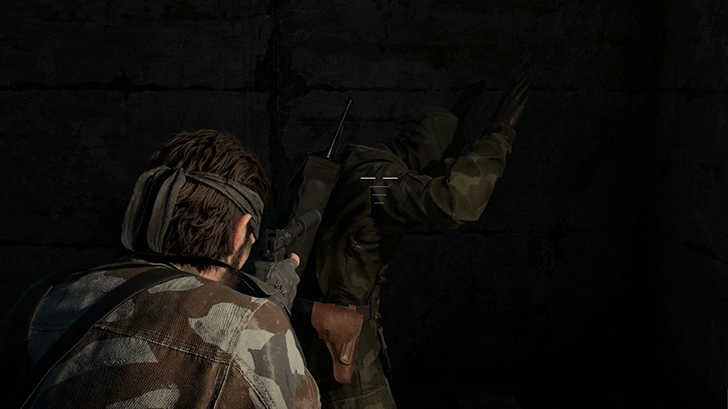 Track the third guard until you see his back turned. This one will have an 8mm Film Reel. Hold him up or take him out when you have the chance. Now you're free to loot the rest of the area. Atop the boxes on the first floor is an Mk22 Suppressor. The second floor will also have a small room with good food items. |
| 4 | Once you're stocked up, exit via the door on the 3rd floor. This takes you out into Graniny Gorki South. |
Graniny Gorki South
| Graniny Gorki South Loot | |
|---|---|
 |
|
| Walkthrough | |
| 1 | 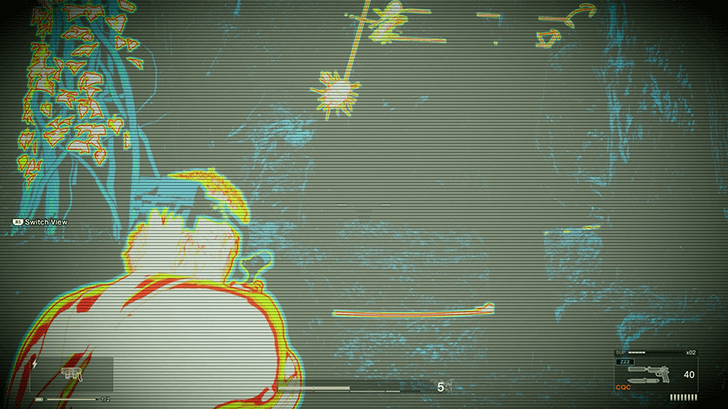 There isn't really anything here in Graniny Gorki South aside from a load of traps. Equip your Thermal Goggles to see them easily before proceeding. |
| 2 | You'll want to head north while avoiding the traps. Equip some appropriate camo (like Flecktarn and Woodland Face Paint before climbing up the ledge on the northern side to reach the outskirts of Graniny Gorki Lab. |
Graniny Gorki Lab Exterior: Outside Walls
| Graniny Gorki Lab Exterior: Outside Walls Loot | |
|---|---|
 |
|
| Walkthrough | |
| 1 |  As soon as you arrive, head west and follow the perimeter of the electric fence. Stick to the darkness and tall grass to avoid the prying eyes of the 2 soldiers and guard dog on the other side of the fence. |
| 2 |  At the westernmost side of the fence, you'll find a gap that you can crawl through. Go prone and crawl to the other side of the fence. |
| 3 |  Now, instead of dealing with the soldiers and guard dog, keep heading north while hugging the west wall of the compound. You'll find a small gap here that you can crawl through which leads into Graniny Gorki Lab: Interior Walls. |
Graniny Gorki Lab Exterior: Inside Walls
| Graniny Gorki Lab Exterior: Inside Walls Loot | |
|---|---|
 |
|
| Walkthrough | |
| 1 | 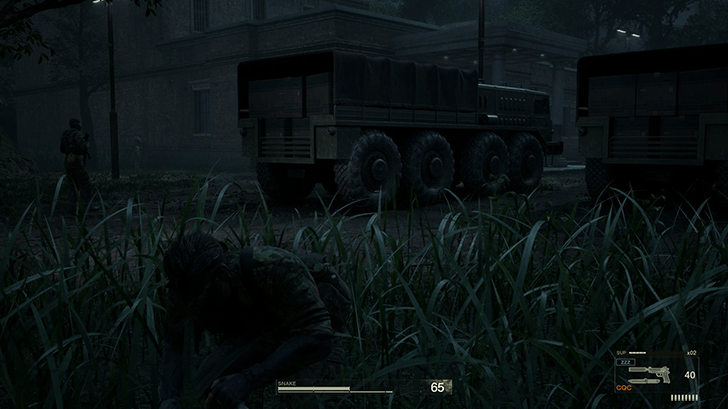 After emerging from the small hole in the wall, you'll find yourself behind 2 parked trucks with 2 soldiers patrolling the area to your north. |
| 2 | 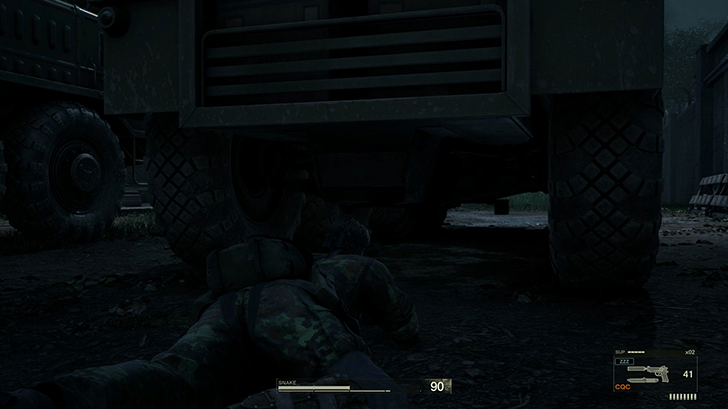 Crawl under the truck nearest to you (there should be some Mk22 and M1911A1 ammo underneath it) and over to the east side of the compound. There'll be a guard there, but you can easily get rid of him so long as you're in the tall grass nearby. |
| 3 | 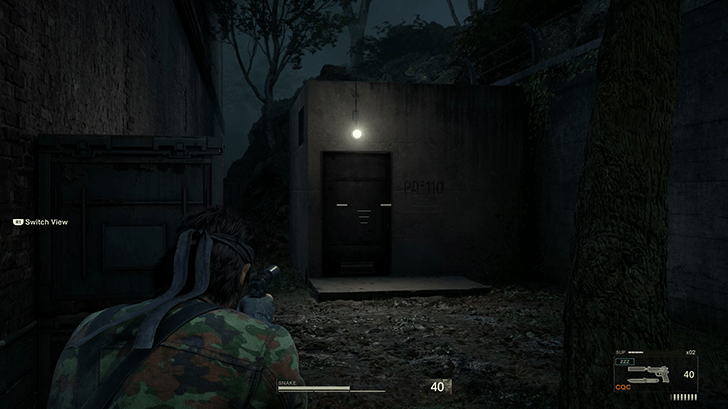 Once the east side is clear, head over to the northeast side of the inner compound to find a small armory. Inside, you'll find a new weapon - the XM16E1. |
| 4 | 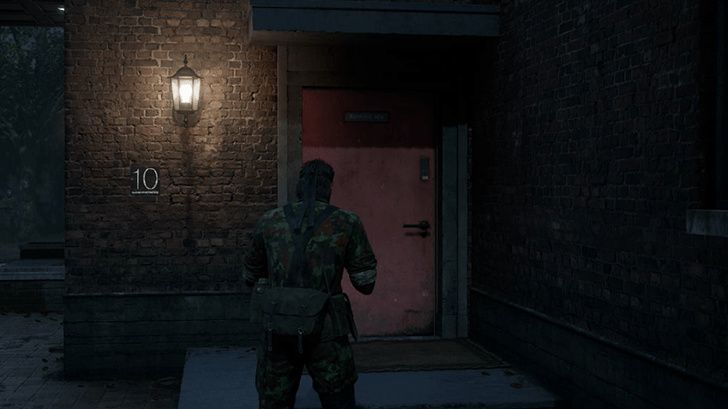 After raiding the armory for supplies, head inside the building to reach Graniny Gorki Lab 1F. |
Graniny Gorki Lab 1F
| Graniny Gorki Lab 1F Loot | |
|---|---|
 |
|
| Walkthrough | |
| 1 | 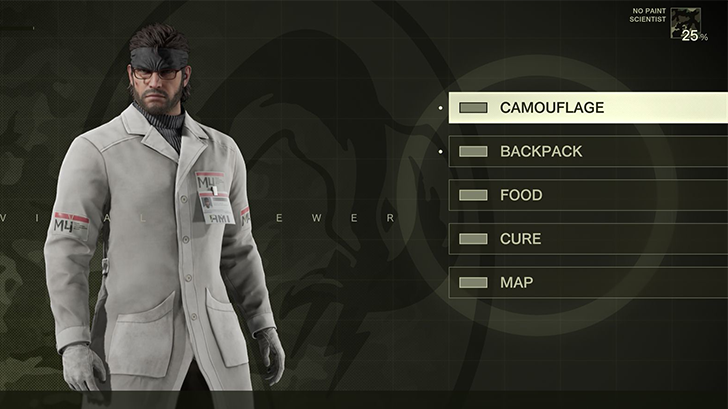 As soon as you load in, change into the Scientist Outfit and remove any equipped face paint. This uniform will allow you to avoid drawing suspicion from the guards. |
| 2 | 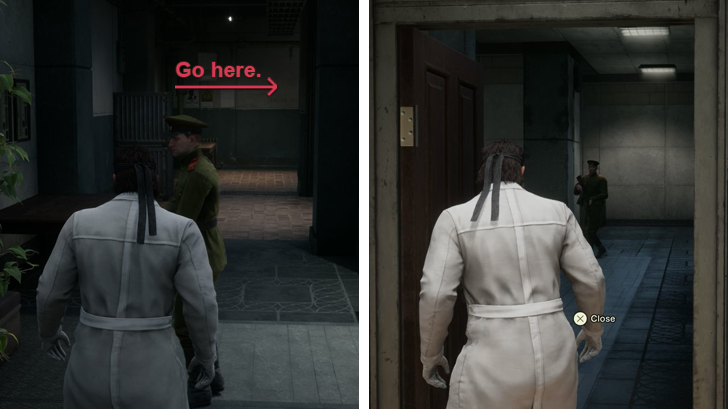 To start, follow the hallway and enter the door at the end of it. This takes you into the main lobby of the building. |
| 3 | 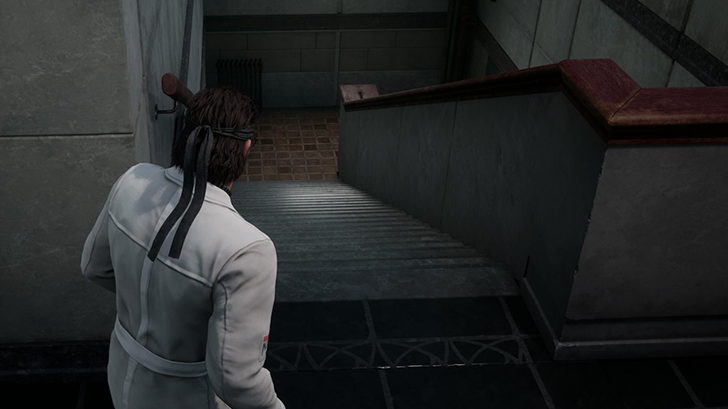 Next, head east and take the stairs on the opposite end of the lobby down to Graniny Gorki Lab: B1 West. |
Graniny Gorki Lab B1 West
| Graniny Gorki Lab B1 West Loot | |
|---|---|
 |
|
| Walkthrough | |
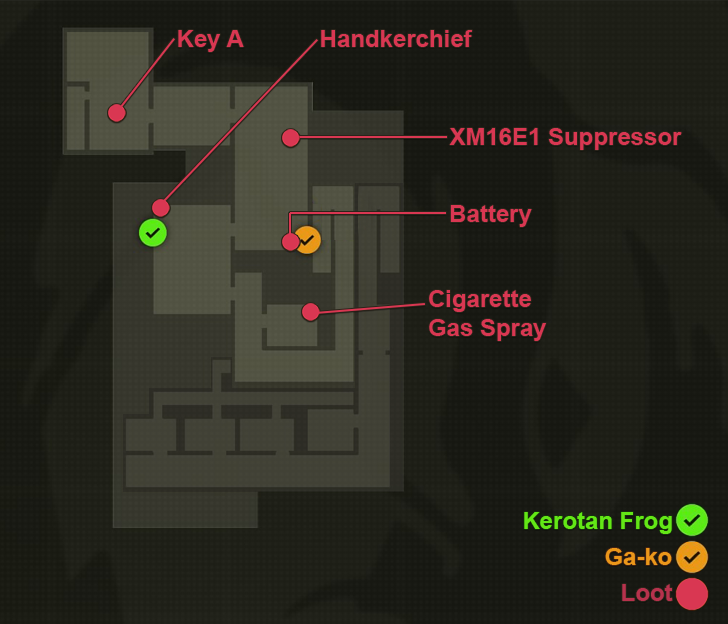
| 1 | 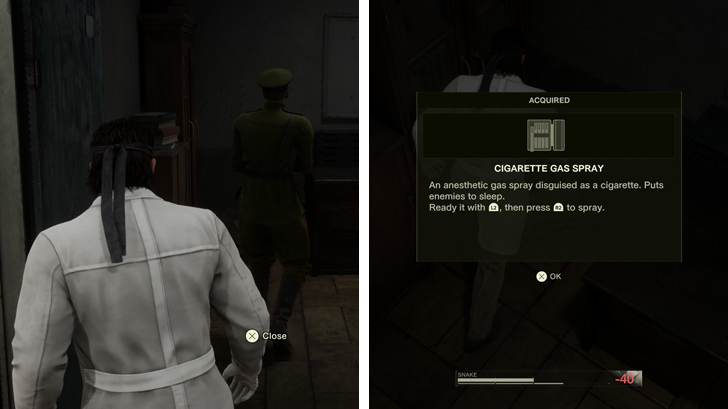 Once in the B1 West, follow the hallway and head into the guardroom to your right. While carefully avoiding the guard inside, pick up the Cigarette Gas Spray on the ground. Equip it before proceeding. |
| 2 |  Next, enter the only other door in the hallway. This takes you into a small break room with a scientist inside. Knock him out using the Cigarette Gas Spray then open the nearby locker to get the Handkerchief - another non-lethal weapon to knock out enemies. |
| 3 | In the next room, you'll find at least 2 scientists doing work among the computer terminals. You can choose to knock them out, but it'll be easier to just run through the middle of room and exit out the door on the opposite end. Note: Scientists are immediately suspicious of you when you get too close. If you don't plan on knocking them out, ignore the ! alert when you get close and simply keep running to prevent an Alert from being triggered. |
| 4 |  After you enter the door, immediately head over to the next one to trigger a cutscene where you meet Granin. He'll give you the item called Key A which lets you pass through the locked door back in Ponizovje Warehouse 1F. |
| 5 | Once the cutscene ends, retrace your steps and head back up to Graniny Gorki Lab 1F. Any scientist or guards you knocked out will be conscious again, so make liberal use of the Cigarette Gas Spray and Handkerchief if any of them get in your way. |
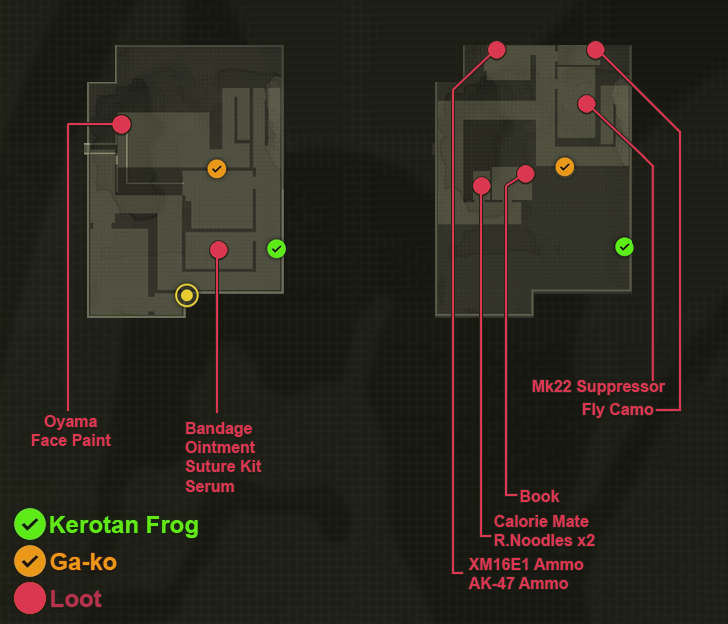
Graniny Gorki Lab 1F and 2F
| Graniny Gorki Lab 1F and 2F Loot | |
|---|---|
|
|
| Walkthrough | |
| 1 | 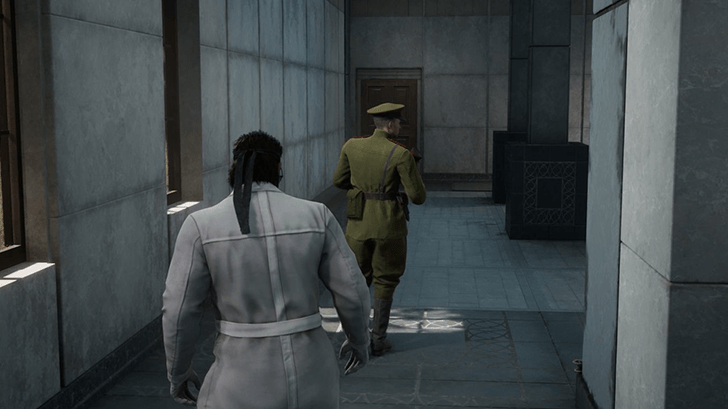 Upon loading into Graniny Gorki Lab 1F, go right (west) and exit the main lobby. |
| 2 | 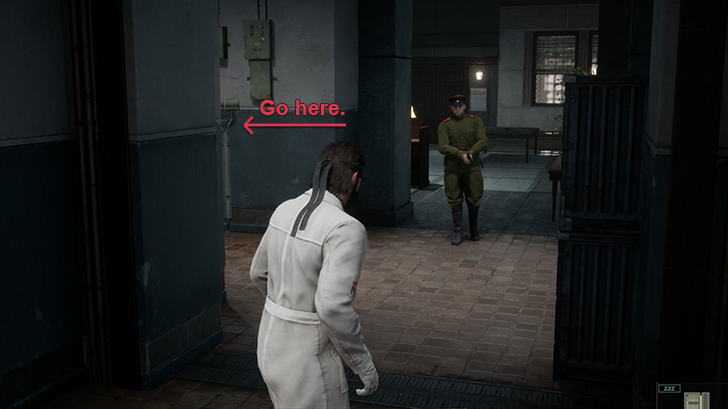 Once you're out of the lobby, hang a left at the next turn and follow this hallway all the way to the end. |
| 3 | 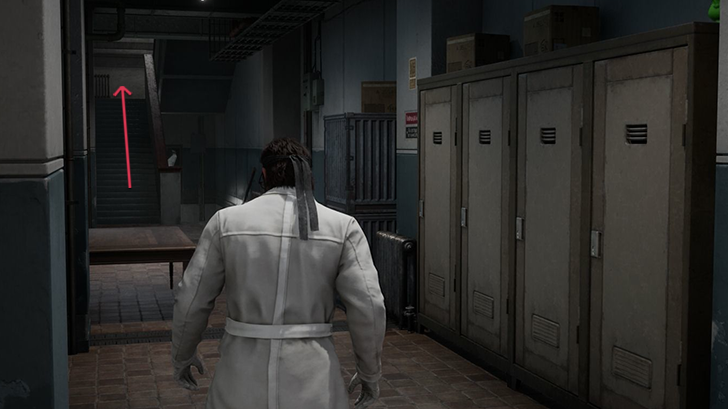 At the corridor with the lockers and Kerotan, keep heading north and up the stairs to reach Graniny Gorki Lab 2F. |
| 4 | 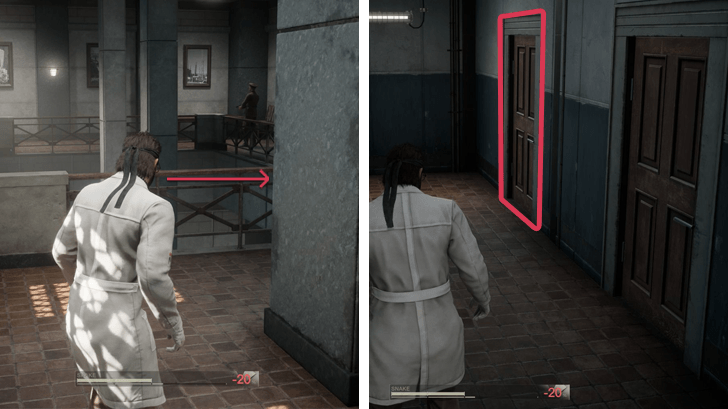 Once you reach the second floor, your first visit will need to be the nearby restroom (hang a right up the stairs and go straight; it will be the second door to your left). |
| 5 | 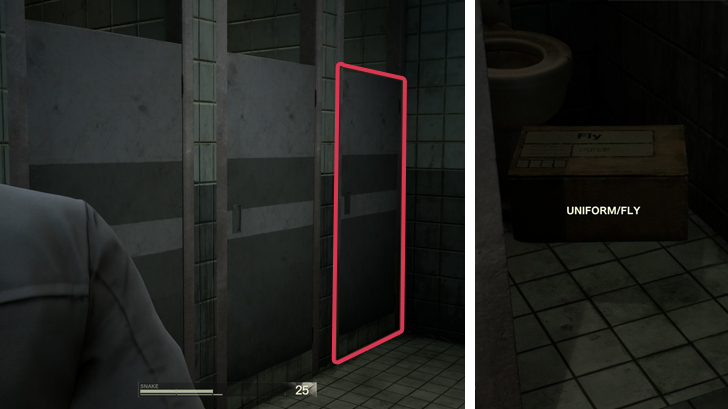 Punch out the door of the final stall to find the Fly Camo. |
| 6 | 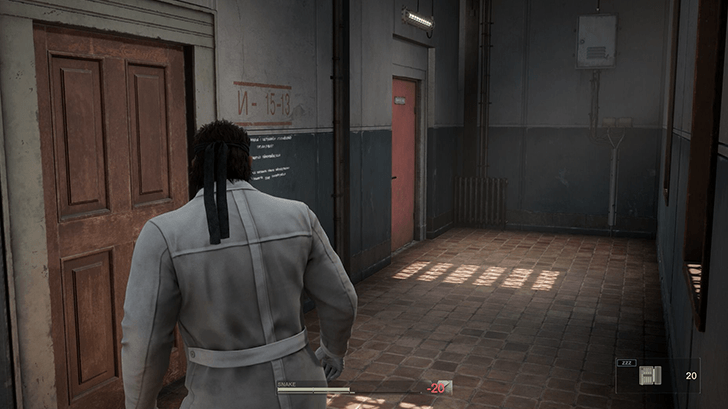 Next, exit the restroom and follow the path overlooking the main lobby. This will loop around the lobby until you reach a hallway with two doors on your left. This first door will lead to a food storeroom. After looting it, exit through the remaining door (red door) in that hallway. |
| 7 | 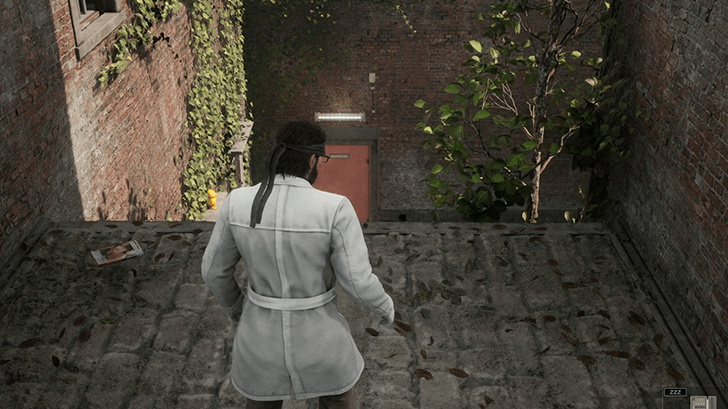 As soon as you exit, you'll find yourself on a ledge above the lab's central outdoor courtyard. Pick up the book nearby then drop down to the courtyard. |
| 8 | Once you're down, face west and you should see a small vent on the ground you can crawl into. Go through this to reach Graniny Gorki Lab Exterior: Inner Walls. Note: While crawling, you'll also obtain the Oyama Face Paint since it'll be inside the vents as you go through them. |
Graniny Gorki Lab Exterior
| Graniny Gorki Lab Exterior Loot | |
|---|---|
|
|
| Walkthrough | |
| 1 | 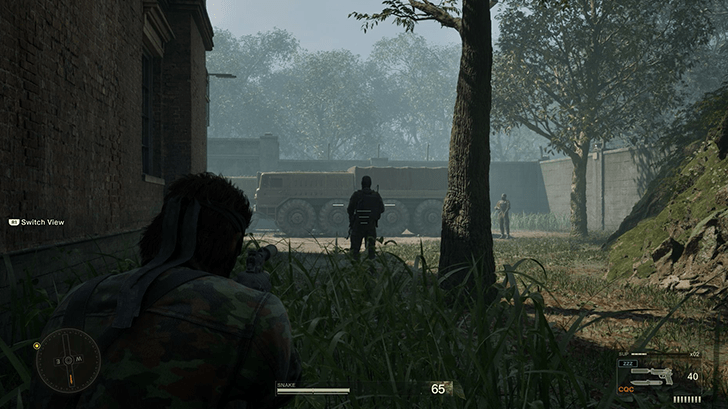 As soon as you exit from the vents, change camos then face south. Deal with the two soldiers patrolling near the trucks. |
| 2 | 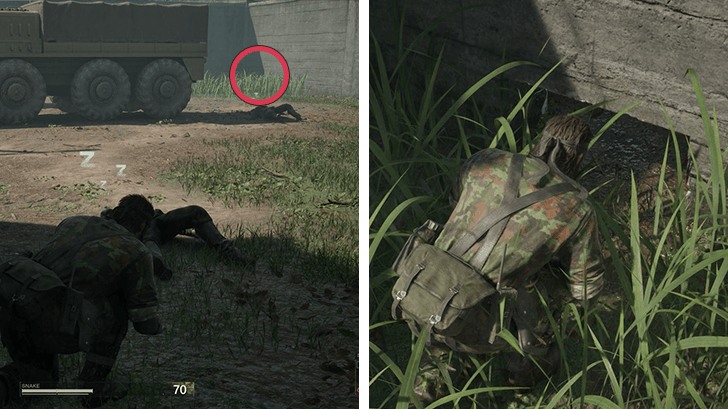 When both soldiers are down, go to the southwest corner of the inner compound and look for the hole in wall (hidden by tall grass). Go through the hole to reach Graniny Gorki Lab Exterior: Outer Walls. |
| 3 |  After emerging from the hole, go south and crawl under the electric fence. There'll be some soldiers patrolling the front perimeter of the outer walls, but you should be able to dodge them for the most part as long as you keep moving while crouched. |
| 4 | Once you're through the fence, head east until you return to the southern path that leads back to Graniny Gorki South. Before leaving the area though, equip your best forest camo and have your Thermal Goggles included in your Equipment Window before you move south. |
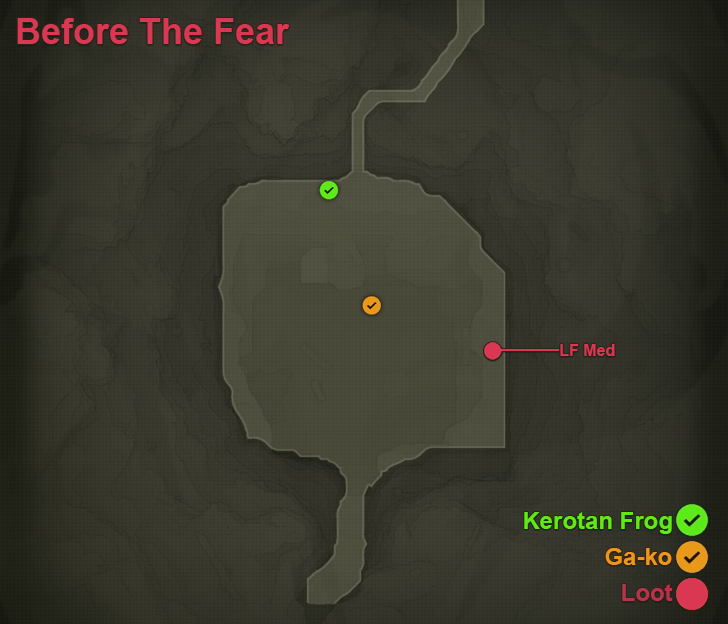
Graniny Gorki South (Boss Fight)
| Graniny Gorki South Loot | |
|---|---|
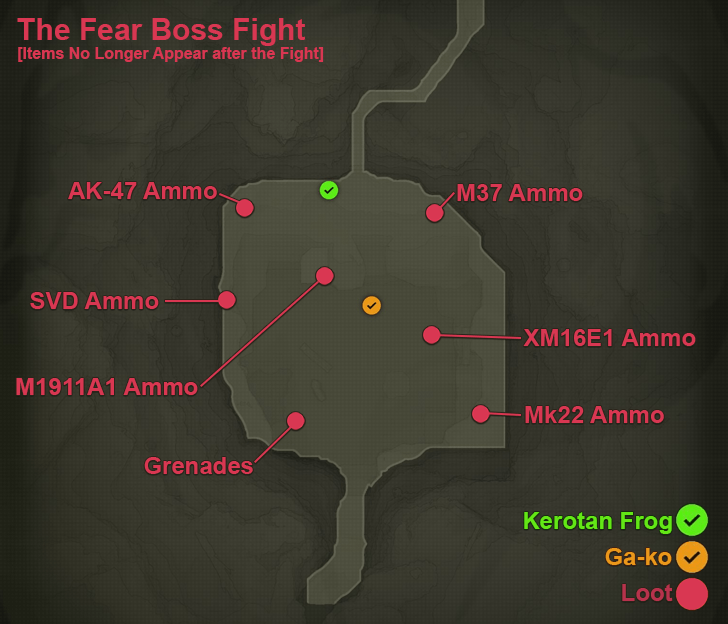 |
|
| Walkthrough | |
| 1 |  As soon as you go to Graniny Gorki South, you'll trigger a cutscene where you're introduced to The Fear. You'll get shot by a crossbow bolt which you'll have to heal as soon as the cutscene ends. |
| 2 | 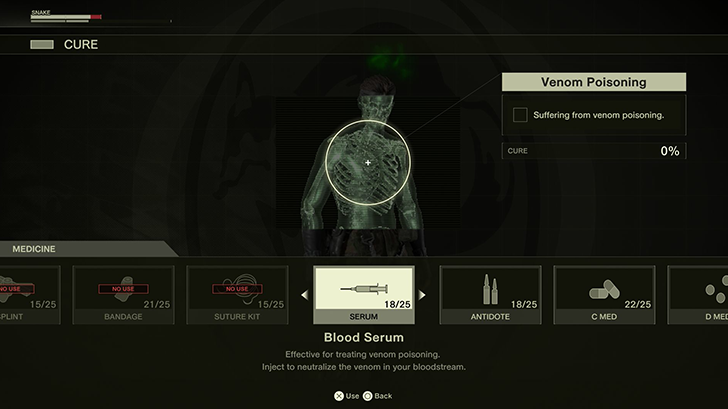 Once the cutscene ends, pull up your Cure menu and heal the venom and crossbow bolt injuries before starting the boss fight. |
| 3 | 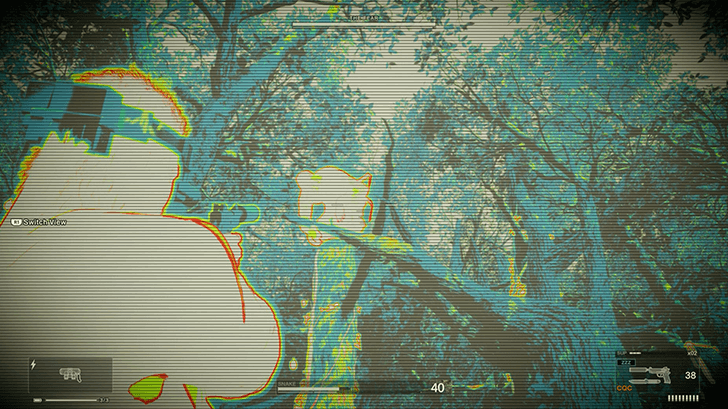 Defeat The Fear to progress. As long as you're confident in your aim, then The Fear should be a breeze. Keep your Thermal Goggles on at all times so you see past his stealth camo during the fight. If you have Flecktarn unlocked, you can simply wear that so you don't have to worry about battery. |
| 4 | After defeating The Fear, watch the short cutscene. When it ends, you'll find yourself back in Graniny Gorki South. Note: If you took down The Fear non-lethally, you'll be rewarded with the Spider Camo. You'll find it on the ground in front of you after the cutscene. |
| 5 | 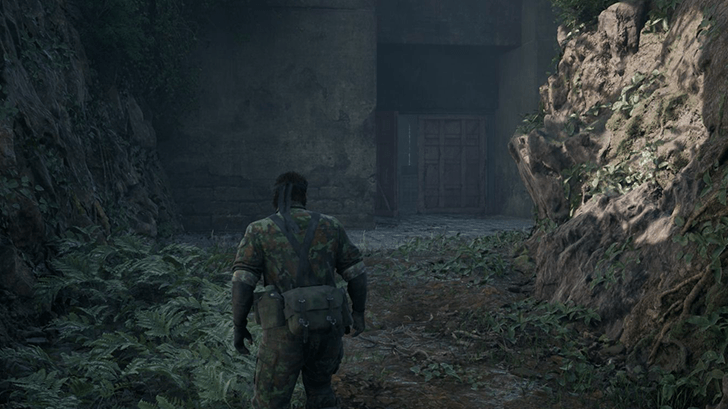 Now, all that's left to do is exit south back into Ponizovje Warehouse. Note: If you're looking to capture a Tsuchinoko for your food collection, you can find one here in Graniny Gorki South after beating The Fear. |
Ponizovje Warehouse
| Ponizovje Warehouse Loot | |
|---|---|
|
|
| Walkthrough | |
| 1 | 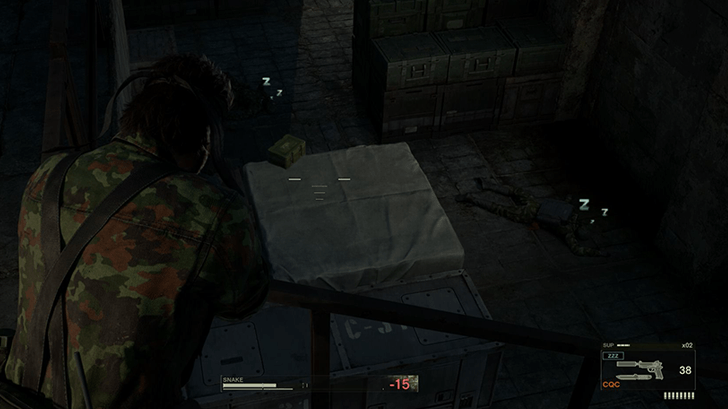 Again, this area will be pretty similar to when you first visited it except the soldier on the 3rd floor will now be walking around on the 2nd floor. Deal with him and the two soldiers on the first floor first. |
| 2 | 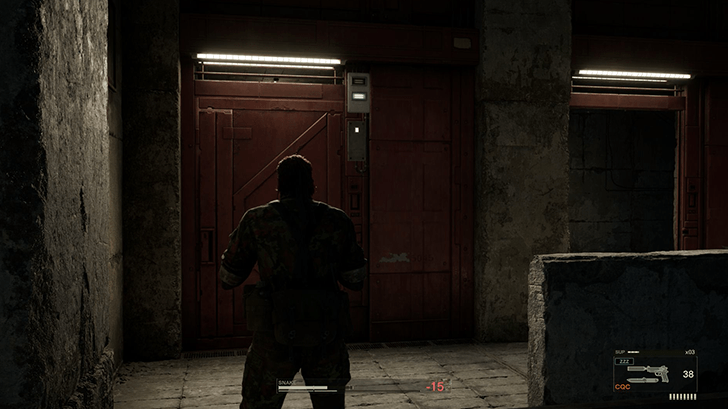 Once all three are knocked out, head back down to the 1st floor. Go up the small flight of stairs that lead up to a red door (shown to you during the Granin cutscene back in Graniny Gorki Lab). |
| 3 | With Key A now in your possession, this previously locked door should now swing open, granting you access to Svyatogornyj South. |
Svyatogornyj South
| Svyatogornyj South Loot | |
|---|---|
 |
|
| Walkthrough | |
| 1 | Walking a few paces forward after entering Svyatogornyj South will trigger a call sequence. Listen to it before proceeding. |
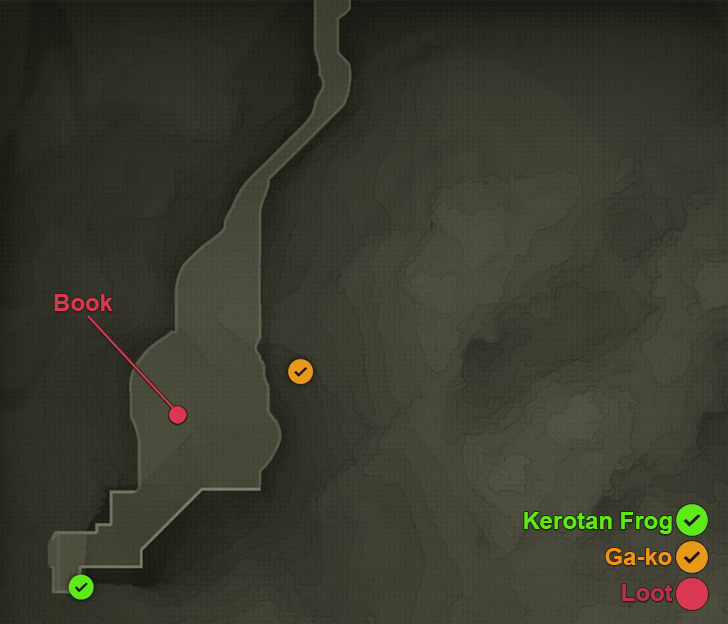
| 2 | Svyatogornyj South won't have much in it, but it'll be the perfect place to get a few of the medicines and animals needed to 100% your Food Collection. There is also a Kerotan and GA-KO here that you can get before leaving. |
| 3 | Once you've pretty much collected everything you need (including the Book hiding in the tall grass), head northeast into Svyatogornyj West. |
Svyatogornyj West
| Svyatogornyj West Loot | |
|---|---|
 |
|
| Walkthrough | |
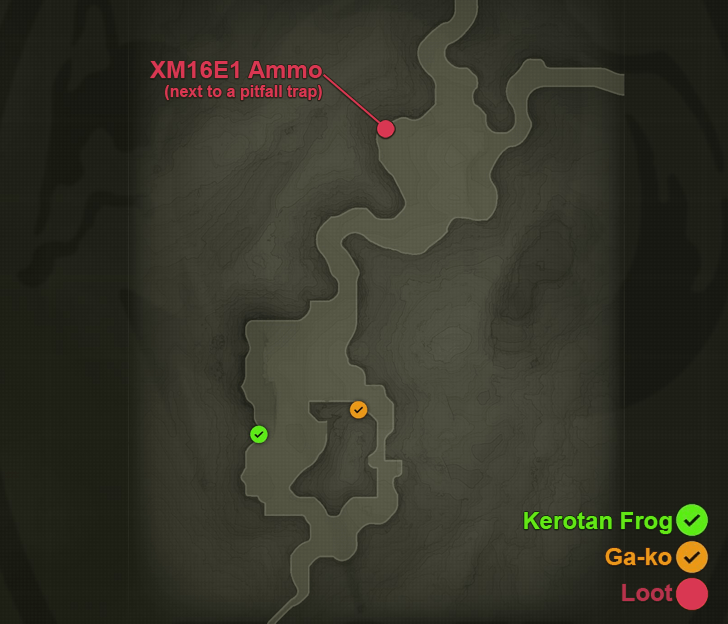
| 1 | While not immediately evident, Svyatogornyj West is filled with traps and hard-to-see soldier patrols. To ensure you aren't caught unawares, you can use your Thermal Goggles to see hidden pitfalls and wire traps. |
| 2 | Of the 2 starting paths, the eastern path is probably the safer choice. Take it then head north. Keep hugging the eastern wall of this area until you reach a branching path that leads north and east. |
| 3 | The northern path leads to a boss fight so, for now, you'll want to head northeast into Svyatogornyj East so we can get some much needed supplies before fighting The End. |
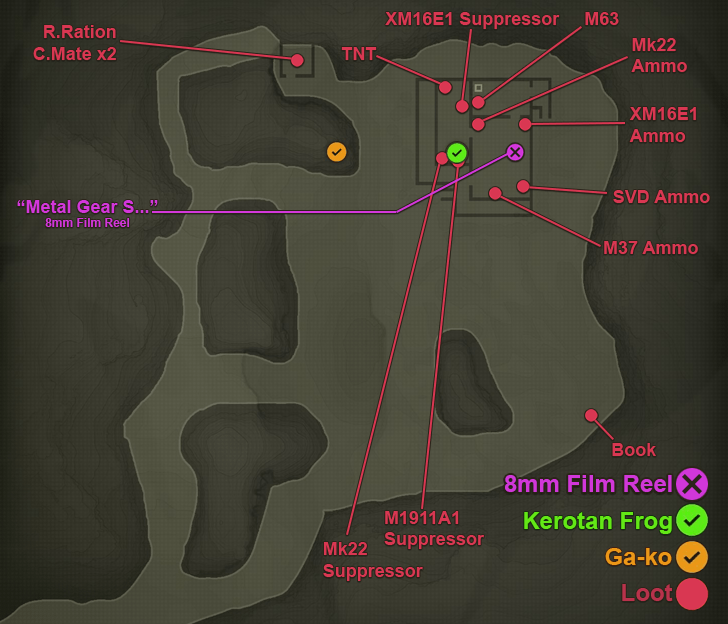
Svyatogornyj East 1F (Optional)
| Svyatogornyj East 1F Loot | |
|---|---|
 |
|
| Walkthrough | |
| 1 | You'll spawn in at the southwest end of Svyatogornyj East. To start, go north first and take out the 2 soldiers patrolling the western path of the area. If you leave these 2 unattended, they'll loop back up to the house and may trigger a Caution phase if they see the bodies of your victims. |
| 2 | Once those 2 are dealt with, go northeast until you find the large house patrolled by at least 3 soldiers (Normal difficulty). |
| 3 | Take out the 2 soldiers patrolling outside, then enter the house and hold up the one soldier inside. If done correctly, they should drop you the Metal Gear S... 8mm Film Reel. |
| 4 | With all guards down and out, you can freely explore and loot up. Of all the items here, don't forget to pick up the M63 LMG hidden behind a few crates in the northeast storeroom of the house. |
| 5 | Once you're done, simply head back down (southwest) and exit the area back to Svyatogornyj East. Once there, head north, this time heading into a new area - Sokrovenno South. |
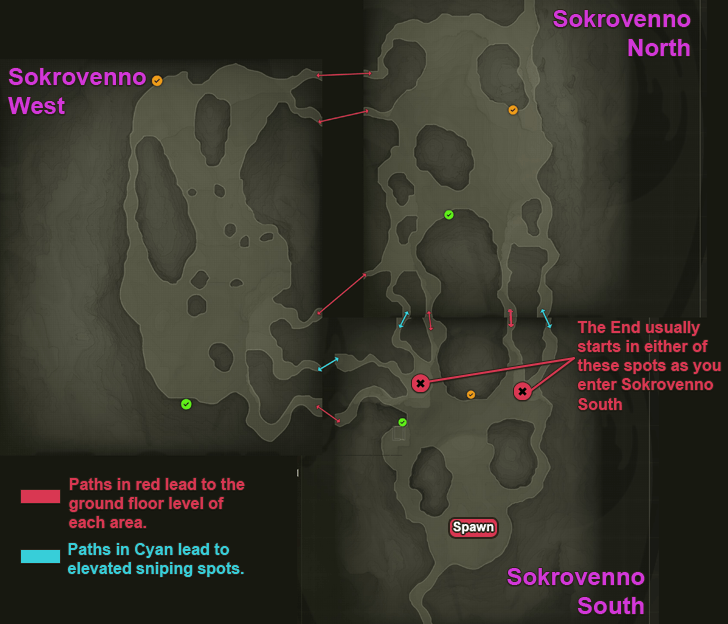
Sokrovenno South, North, and West
| Sokrovenno South, North, and West Map | |
|---|---|
 |
|
| Walkthrough | |
| 1 | As soon as you enter Sokrovenno South, a cutscene will trigger, signalling the start of the boss fight against The End. Note: If you killed him after first seeing him in Ponizovje Warehouse: Exterior, he'll be replaced by the Ocelot Unit. |
| 2 | Assuming you're fighting The End, he'll usually spawn in either of the two ledges to the north (depending on difficulty). To avoid getting shot, stay low (crouched or prone), then take the small path to your east (from where you spawned). Tip: The End's position is given away by the glint of his sniper scope. Make sure you're behind cover if you see it glinting in the distance. |
| 3 | Then, once on that path, hug the east wall of the arena until you can safely pass under the sniping overlooks. You're goal is to reach Sokrovenno North. |
| 4 | Once you're in Sokrovenno North, simply take any of the paths that lead up to the sniping overlooks to confront The End. Defeat The End to progress. Tip: You can try holding up The End the first time you approach him to get the Moss camo as well as the You Snooze, You Lose trophy. |
| 5 | If you managed to beat The End non-lethally (recommended), then he'll drop the Mosin Nagant after the battle. Loot it then head up to the northeast corner of Sokrovenno North to reach the Krasnogorje Tunnel. |
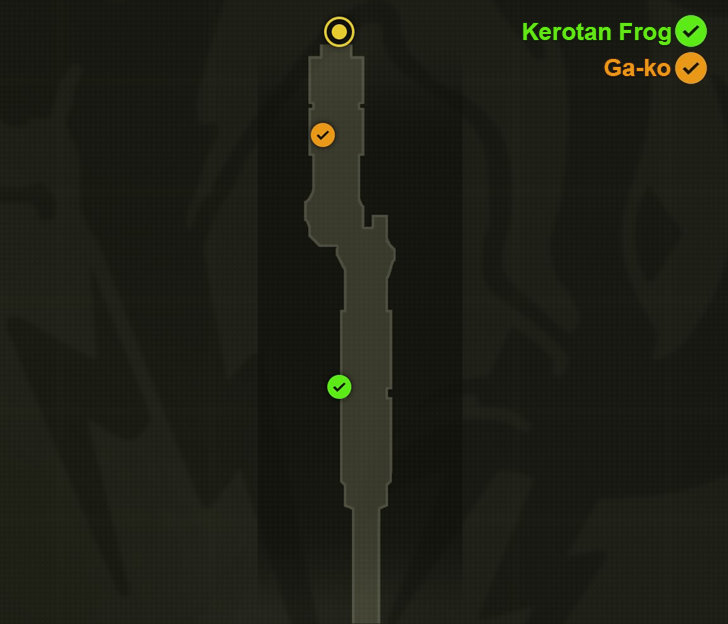
Krasnogorje Tunnel
| Krasnogorje Tunnel Loot | |
|---|---|
 |
|
| Walkthrough | |
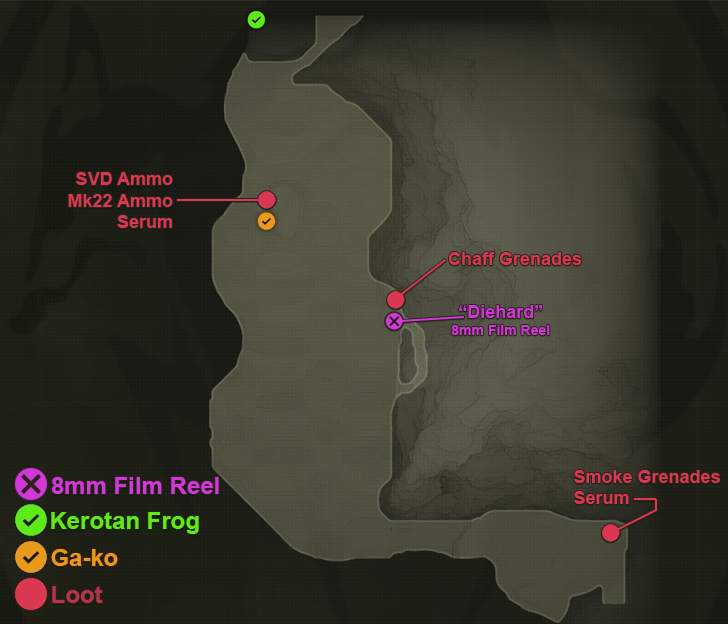
| 1 | 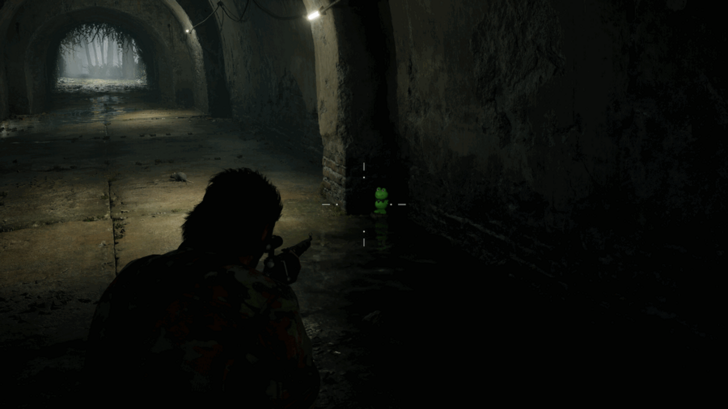 There isn't really much to see in Krasnogorje Tunnel. After getting the Kerotan on the first floor, climb the ladder and prepare yourself for a long climbing sequence. |
| 2 | 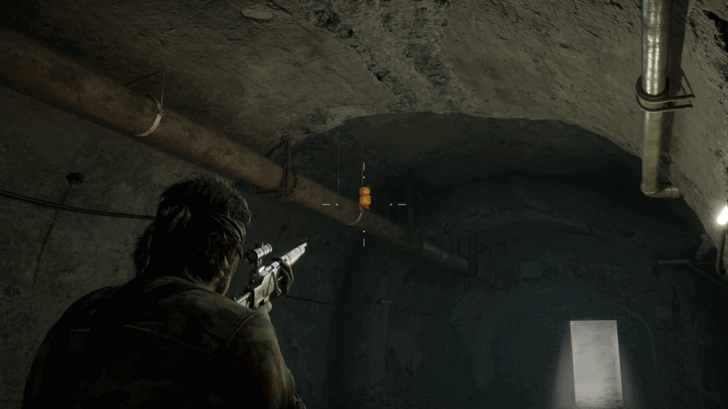 After reaching the top, shoot out the GA-KO on the pipes before exiting north and into Krasnogorje Mountain Base. |
Krasnogorje Mountain Base
| Krasnogorje Mountain Base Loot | |
|---|---|
 |
|
| Walkthrough | |
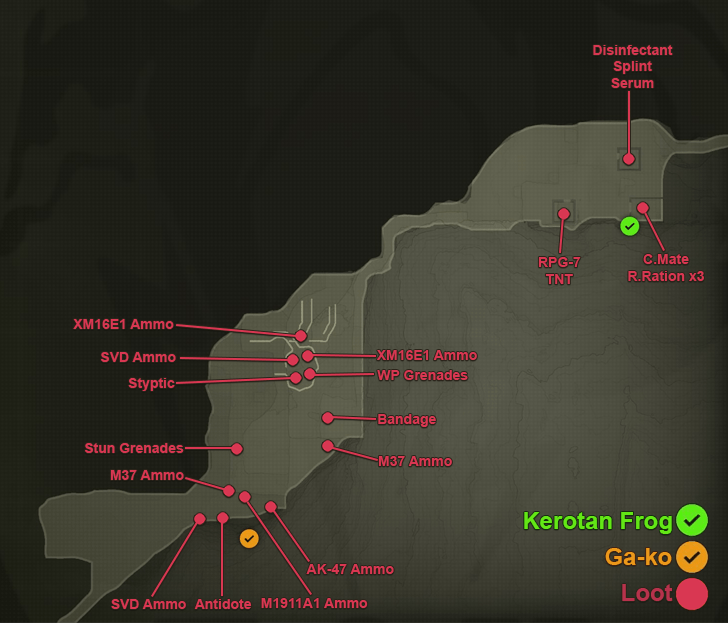
| 1 | As soon as you arrive in Krasnogorje, switch over to Choco Chip or Desert Tiger Camo and apply Desert Face Paint to increase your camo index in this new area. |
| 2 | Once you're set, start trekking west and drop down into the lower area once you reach a small ledge. |
| 3 | When you round the bend, you'll found yourself in a very wide and hilly area filled with soldiers and scorpions. While intimidating, the rolling terrain helps hide your presence as long as you keep moving while crouched. |
| 4 | Of all the soldiers here, keep track of the one standing on overwatch along the east side of the mountain. He'll have the high ground along with an RPG-7 that could ruin your day. You can take him out from a distance or drop a Book at the foot of his ledge. When you do this, he'll come down allowing you to hold him up for the Diehard 8mm Film Reel. |
| 5 | After dealing with him, all the other soldiers should be a cakewalk. Knock them out or kill them, then proceed north and into the Krasnogorje Mountainside. |
Krasnogorje Mountainside
| Krasnogorje Mountainside Loot | |
|---|---|
 |
|
| Walkthrough | |
| 1 | The Krasnogorje Mountainside will have a Helicopter patrolling it. However, if you blew up the helicopter back in Bolshaya Past Base it should now be replaced by a Hover Soldier instead. Regardless, make sure to stick to the walls when navigating the mountainside so that your camo index remains high (preventing the helicopter from spotting you). |
| 2 | As you enter, there should be a bunch of ammo to your right that you can pick up. Just make sure to watch out for the lone scorpion that stings you if you walk over it. This is considered a Serious Injury and it adds +1 to your tally. Remember, certain titles require 20 Serious Injuries or less to get. |
| 3 | Once you're stocked up, head up the path north. There will be 2 soldiers here - one next to the anti-aircraft gun and another on the cliff below. Deal with them and keep making your way up. Whenever you hear the helicopter nearby, stick to the cliff wall. Your camo should help you blend in while it passes. |
| 4 | As you go further up, you'll encounter 2 more soldiers. The one at the top requires a bit of waiting since you usually reach his location as he's facing the only way up. Wait until his back is turned before popping him. |
| 5 | There are two paths here that lead to the northeast - one that leads to a sniping position above the huts one that leads towards the foot of the small holdout. Take the lower path since it'll be easier to deal with the soldiers using this path. |
| 6 | Once you arrive at the base of the huts, tuck yourself against the rock beneath one of the AA emplacements. Wait here until one of the soldiers breaks away from their formation. |
| 7 | Shoot the lone soldier as he breaks away from his comrades. Once he's out, you can take care of the other 2 guarding the huts with ease (just make sure to keep track of the helicopter). |
| 8 | Before leaving, check the small huts for loot. One of them will contain the RPG-7 - a weapon important for a different boss fight later in the game. Once you're set, exit towards the east to reach the Krasnogorje Mountaintop. |
Krasnogorje Mountaintop
| Krasnogorje Mountaintop Loot | |
|---|---|
 |
|
| Walkthrough | |
| 1 | 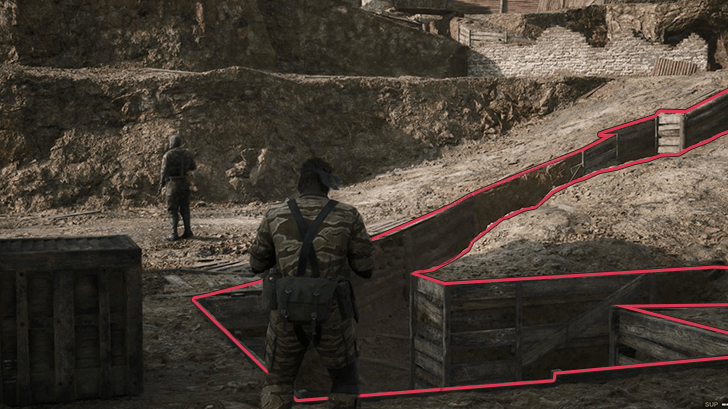 Krasnogorje Mountaintop will feature a series of trenches that wind throughout the upward slope. If you want to avoid detection, the easiest way to get through this area is to go through the trenches. As soon as you arrive, hop into the trench directly in front of you. Ignore the soldiers for now since they won't see you anyway. |
| 2 |  Crouch walk then follow the trench east. Stop when you reach a dugout that has 2 small tunnels (one leading east and another leading south). |
| 3 | 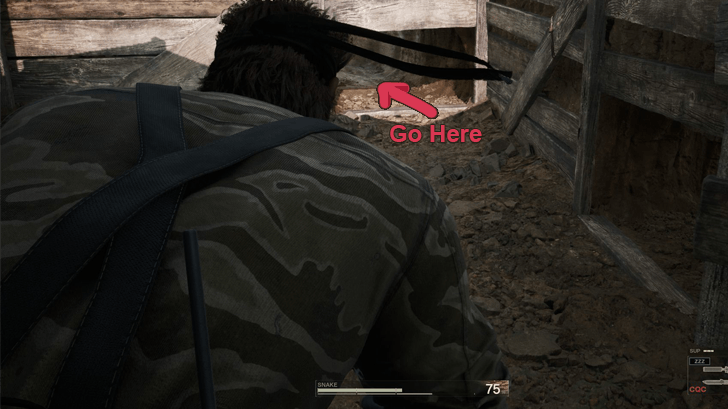 Go through the tunnel that leads east. It'll loop north as you enter, so keep following it to get further up the slope. |
| 4 |  At the end of the tunnel, you'll see another small tunnel directly across from it. Crawl through that as well. |
| 5 | 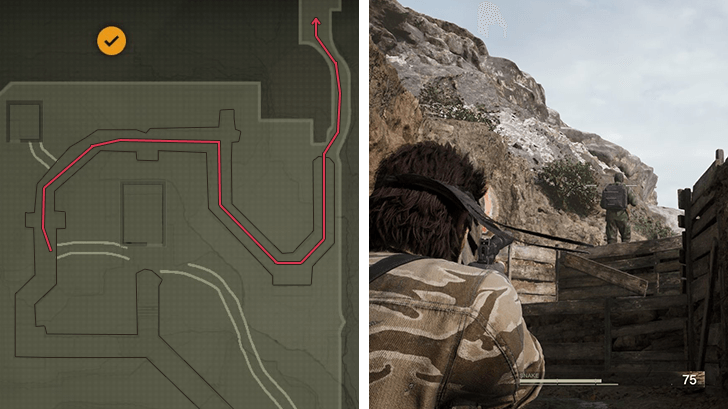 As soon as you emerge from the tunnel, turn right and follow the trench. At the next fork, head right (south) and follow that trench. There will be at least 1~2 soldiers along these trenches, but you can easily deal with them before continuing. |
| 6 | 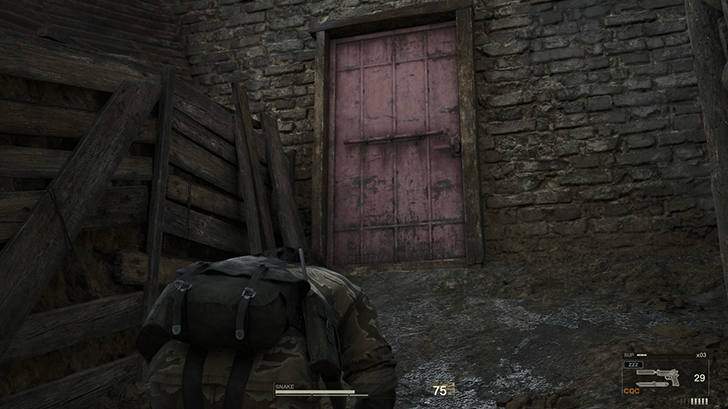 If all goes well, you should arrive at the entrance to the Krasnogorje Mountaintop Ruins without tipping off any soldiers. |
Krasnogorje Mountaintop Ruins
| Krasnogorje Mountaintop Ruins Loot | |
|---|---|
 |
|
| Walkthrough | |
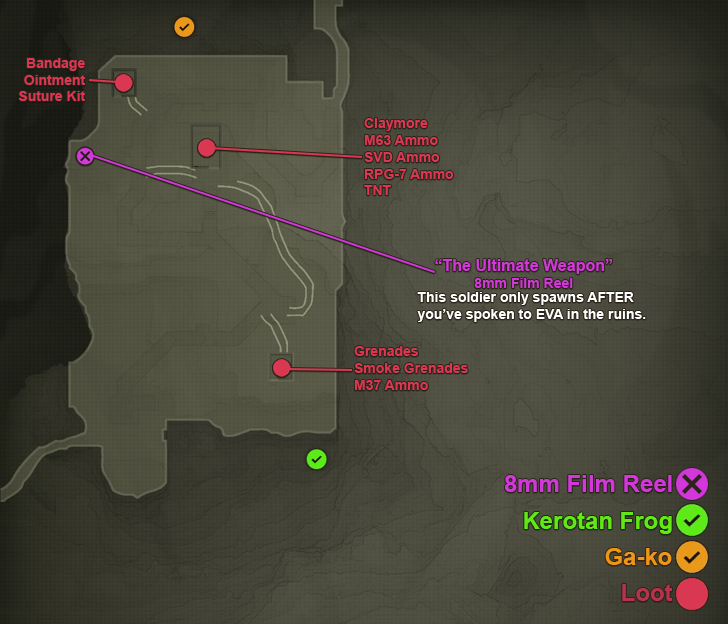
| 1 | As you enter the ruins, a series of cutscenes will trigger where you meet EVA again and talk about your next steps. Once the final cutscene ends, you'll find yourself in Krasnogorje Mountaintop: Behind Ruins. |
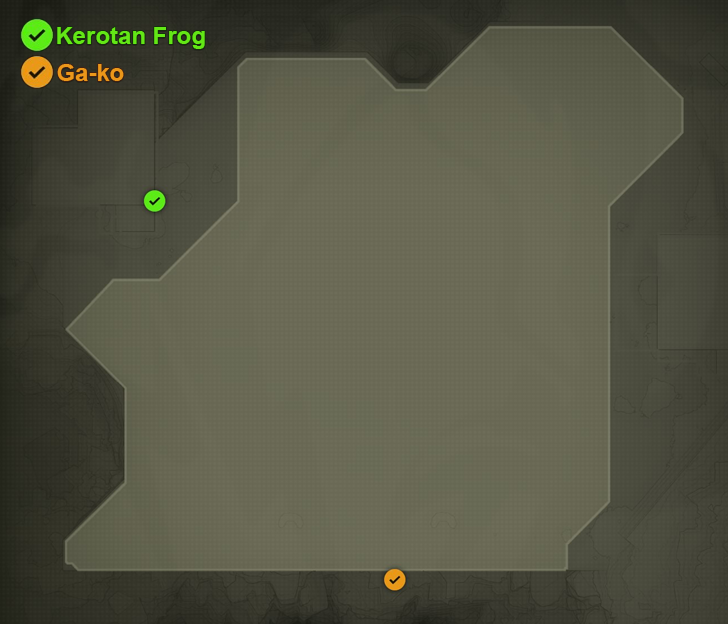
| 2 | There isn't really much to do here aside from getting the Kerotan and GA-KO so, once both are collected, turn around and head back into the Krasnogorje Mountaintop Ruins. |
| 3 | Inside the ruins, you'll find a few Instant Noodles as well as an assortment of ammo. Resupply then exit south to return to Krasnogorje Mountaintop. |
Krasnogorje Mountaintop
| Krasnogorje Mountaintop Loot | |
|---|---|
8mm Film Reel |
|
| Walkthrough | |
| 1 | As soon as you exit, head south along the trench. At the bend, crouch and wait. |
| 2 | After a short while, a Flame Trooper will head up towards the anti-aircraft gun. When his back is turned, tranq (or kill) him. |
| 3 | Next, clamber up next to the AA gun. Head over to its left side to see a small ramp that leads down onto series of ledges that take you all the way down to the ground level of this area. Start dropping down until you're level with the small hut below. |
| 4 | As soon as you land on the ground floor, turn around (south) to see a red door. Go through it to reach the Groznyj Grad Underground Tunnel. |
Groznyj Grad Underground Tunnel
| Groznyj Grad Underground Tunnel Loot | |
|---|---|
 |
|
| Walkthrough | |
| 1 | Upon arriving at the tunnel, swap out your camo. You'll want to use either Splitter or Black camo as well as Black Face Paint. Then, start prepping your weapons for the upcoming boss fight. If you have it, the Mosin Nagant will be the best weapon for the job. |
| 2 | When ready, head down the stairs then go north. You'll arrive at a metal walkway overlooking the boss arena. Hang a left at as you reach the fork and go down the ladder into the boss arena. |
| 3 | As soon as your feet touch the arena, a cutscene will trigger. Defeat The Fury to progress onwards to Groznyj Grad. The Fury is the toughest boss so far due to his flamethrower's AoE attacks that have a ton of range. To deal any type of damage to him, you'll need to breach his flight suit. You'll know he's open to attack if you hear the line "my suit's been ripped!" |
| 4 | After defeating The Fury, you'll find yourself on the opposite end of the arena. Collect his Fire Camo drop (if you got the non-lethal kill) and any nearby loot before taking the ladder up to Groznyj Grad Southwest. |
Groznyj Grad Southwest
| Groznyj Grad Southwest Loot | |
|---|---|
 |
|
| Walkthrough | |
| 1 | Upon arriving in Groznyj Grad Southwest, head up the stairs then make your way towards the vehicle bays. |
| 2 | There are at least 2 soldiers here. Drop them before proceeding. |
| 3 | There are a few collectibles and loot in the area, but your next move will be to head north towards the red door leading to Groznyj Grad Northeast. |
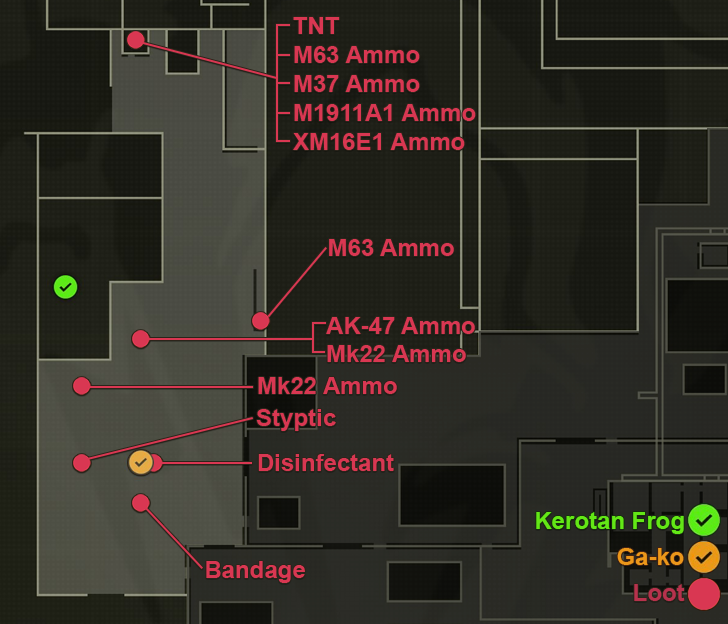
Groznyj Grad Northeast
| Groznyj Grad Northeast Loot | |
|---|---|
 |
|
| Walkthrough | |
| 1 | Your objective now is to enter the Groznyj Grad Weapons Lab. There are 2 ways to do so: ① Use Cardboard Box A to get inside. ② Enter via the Groznyj Grad Northeast door. For now though, you can explore this new area. There are a bunch of guards, but you can easily sneak past them once you have their rotations learned. |
| 2 | One optional target here is the food storehouse located in the northeast corner of the area. If you can destroy that with TNT, then all guards in Groznyj Grad will suffer from hunger, making it easier to distract them with food for the rest of the playthrough. |
| 3 | Once you're ready to leave, head over to the southeast corner of the area. Go through the red door to reach Groznyj Grad Southeast. |
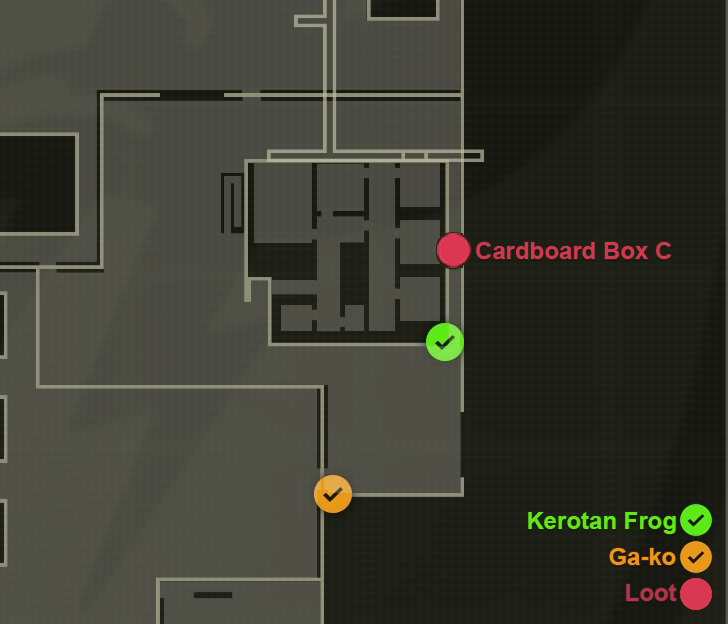
Groznyj Grad Southeast (Optional)
| Groznyj Grad Southeast Loot | |
|---|---|
 |
|
| Walkthrough | |
| 1 | As soon as you arrive, look towards the red stairs to your right. There should be a guard there you can take out. After that, you can explore and take out the rest of the guards as you see fit. |
| 2 | Again, there isn't much here to loot aside from Cardboard Box C. If you're done exploring, head inside the building into the Groznyj Grad Torture Room. |
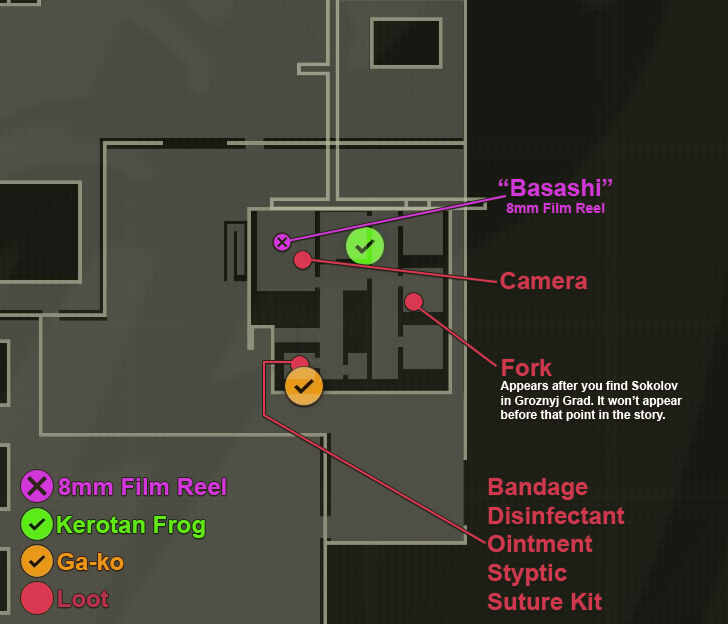
Groznyj Grad Torture Room (Optional)
| Groznyj Grad Torture Room Loot | |
|---|---|
 |
|
| Walkthrough | |
| 1 | Inside the torture room, there will be at least 2 guards. Deal with the one patrolling the jail cell hallway before holding up the guy inside the guard room. If successful, he should drop the Basashi 8mm Film Reel. |
| 2 | With both guards out, you're free to explore again. Grab the Camera from the guard room then loot everything else before leaving the building. |
| 3 | As soon as you exit into Groznyj Grad Southeast, go right (west) towards the western wall of the compound. You'll find a small opening along the wall there that leads you back to Groznyj Grad Northeast. |
| 4 | Then, in Groznyj Grad Northeast, go left (west) towards the western wall of the compound. Go through the red door to reach Groznyj Grad Northwest. NOTE: If you don't have Cardboard Box A, then you'll want to follow the yellow objective marker in Groznyj Grad Northeast and enter via the door there. Just make sure you wear the Scientist disguise before you go in. |
Groznyj Grad Northwest
| Groznyj Grad Northwest Loot | |
|---|---|
 |
|
| Walkthrough | |
| 1 | As soon as you arrive in Groznyj Grad Northwest, go right (north) while crouch walking to avoid detection. Don't mind the watchtower spotlight since there aren't really any soldiers nearby that can spot you at the moment. |
| 2 | Once you're across and near the wooden barricades, take out the guard blocking your way before continuing north. There will be a sleeping dog off to your right, but as long as you remain crouch walking, it shouldn't wake up when you pass. |
| 3 | Your goal right now is to reach the truck. Clamber aboard then, from your Equipment Window, use Cardboard Box A. Once you do, a cutscene will trigger where Snake gets transported into the Groznyj Grad Weapons Lab: East Wing. |
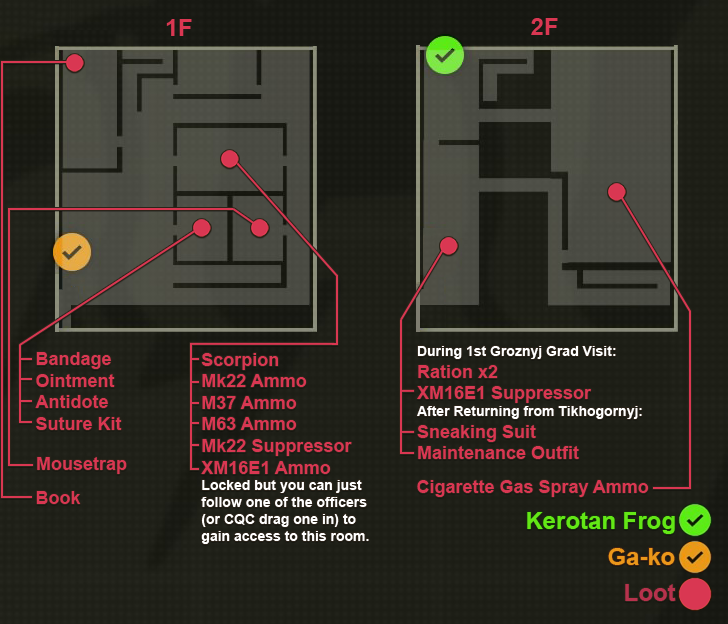
Groznyj Grad Weapons Lab: East Wing
| Weapons Lab East Wing Loot | |
|---|---|
 |
|
| Walkthrough | |
| 1 | Upon loading into the weapons lab, switch to your Scientist disguise and remove and face paint you have on. Once you're ready, exit the room. |
| 2 | You'll soon find yourself in the main lobby of the building. For now, you'll need to wait around until Raikov comes down from the second floor. Go west then watch the stairs. A few guards will come down but keep an eye out for Raikov. |
| 3 | Once Raikov is on the first floor, his first destination will be the small library at the northwest corner of the lab. Wait until he enters the library. |
| 4 | After Raikov enters, go around the first floor and look for any and all guards. Knock them out using the Cigarette Gas Spray or the Handkerchief. Once you're sure all guards are sound asleep, head into the library. |
| 5 | Knock out Raikov and the scientist inside. |
| 6 | Then, drag Raikov up the northern set of stairs up towards the office area and break room of the building. At the second floor, keep dragging him towards the locker room in the south. As soon as you cross the threshold a cutscene plays where you stuff Raikov into a locker. This nets you the Officer disguise. |
| 7 | With Raikov successfully stuffed inside the locker, equip the Officer disguise as well as the Mask (for your face). You can now freely explore the first and second floor of this building to loot items. For now, the only notable piece of loot here is the Scorpion you get in the first floor armory. |
| 8 | Once you're ready to depart, head back up to the second floor and go through the door in the locker room area. This should lead you to the Groznyj Grad Weapons Lab: Main Wing. |
| 9 | Follow the hallway all the way until the end to reach the Groznyj Grad Weapons Lab: West Wing Corridor. |
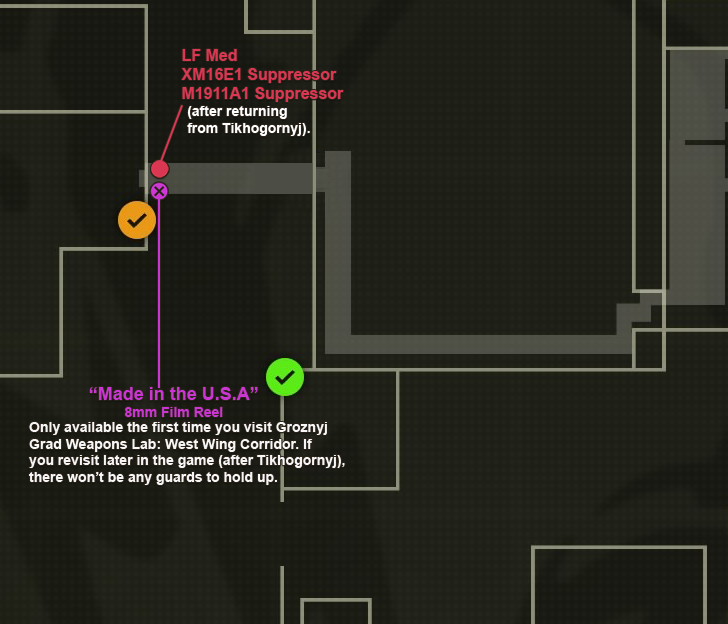
Groznyj Grad Weapons Lab: West Wing Corridor
| Weapons Lab West Wing Corridor Loot | |
|---|---|
 |
|
| Walkthrough | |
| 1 | At the West Wing corridor, all you need to do is approach the guards to trigger the cutscene where Snake and Sokolov are reunited. Note: One of the sentries here will have an 8mm Film Reel for the secret theater. |
| 2 | Watch the cutscene and the subsequent chaos that ensues when Volgin susses you out as not-Raikov. After saving your game, you'll find yourself in the Groznyj Grad Torture Room. |
Groznyj Grad Torture Room
| Groznyj Grad Torture Room Loot | |
|---|---|
|
|
| Walkthrough | |
| 1 | There isn't really much to do here except watch the cutscene. After getting thoroughly beaten to a pulp, you'll wake up in a jail cell. |
| 2 | As soon as you wake up in the jail cell, pick up the Fork on the ground and use it via the Cure menu to treat your injuries. In doing so, you'll get a Fake Death Pill. |
| 3 | After the guard throws you an R.Bat consumable, use the Fake Death Pill. This procs a Continue Screen but don't press continue! |
| 4 | Instead, wait for the guard to finish checking you then, once he walks away, use your Revival Pill from the Equipment Window to return back to life (you can still do so even while in the Continue Screen). |
| 5 | Once you're up, head towards the hallway across from your jail cell. Follow it to exit the building into Groznyj Grad Southeast. Note: You can technically also knock out the guard by rolling into him thrice. Just make sure you do it consecutively to prevent him from calling an Alert. Afterwards, he can be looted for some Instant Noodles and some Smoke Grenades. |
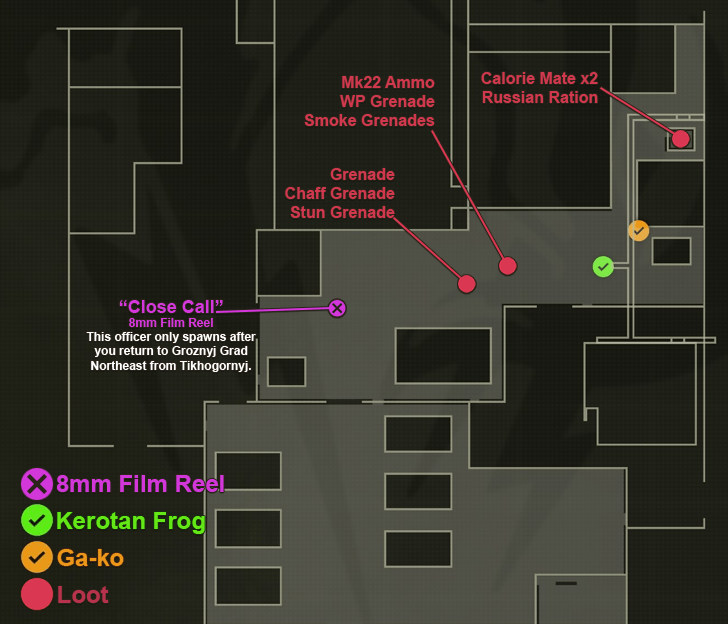
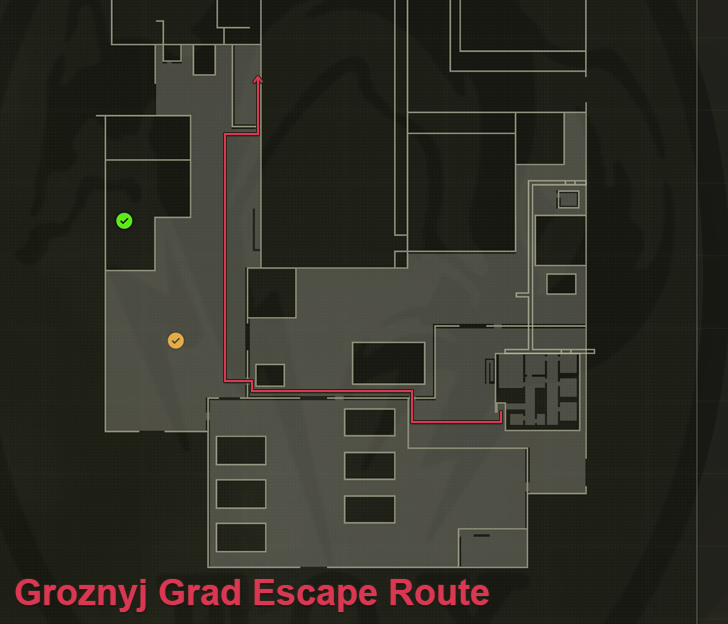
Groznyj Grad Southeast, Northeast, and Northwest
WARNING: This next section will have you escaping with no guns, equipment, or camos available to you. Focus on escaping instead of trying to explore.
| Groznyj Grad Escape Route Map | |
|---|---|
 |
|
| Walkthrough | |
| 1 | Once you're in Groznyj Grad Southwest, head towards the west wall of the compound. You'll want to go through the hole in the wall again to reach Groznyj Grad Northeast. Note: On Normal, this is as easy as simply crouch walking over. However, on Extreme, you'll probably have to wait until the patrols rotate out before going for it. |
| 2 | Once you're in Groznyj Grad Northeast, head west. Be careful of the open area between the two vehicle bays since the soldier there can spot you easily due to your poor camo index. Once he's turned away, cross over to the other side. Go through the red door on the other side to reach Groznyj Grad Northwest. |
| 3 | Groznyj Grad Northwest will have a few more soldiers on patrol than before. However, on Normal, it's the same deal. As soon as you enter, hang a right and keep going north. Space yourself away from the sleeping dog before going towards the fenced-off area to the northeast. Crawl under the pipes and keep going north until you reach the ladder that takes you down to the Groznyj Grad Sewers. |
Groznyj Grad Sewers
| Groznyj Grad Sewers Loot | |
|---|---|
 |
|
| Walkthrough | |
| 1 | At the sewers, you'll receive a call from EVA. Answer it then head down to the lowest level. |
| 2 | Once at the main sewer line, head north until the path forward is blocked. |
| 3 | Next, clamber up the ledge to your west. Crawl through the opening then keep going north. At the end of this short section is another opening to your east. Crawl through that to return to the main sewer line. |
| 3 | Once you're out, cross over to the other side of the tunnel. Climb up the stairs before continuing north. There are two holes here you can crawl through. You'll want to go through the one furthest away from you. |
| 3 | Again, it'll be the same thing. Go to the end of this short corridor and exit via the hole to your west to return to the main sewer line. |
| 3 | Finally, head towards the light at the end of the tunnel. Once you reach it, a cutscene will trigger, ending the Groznyj Grad escape segment. |
The Sorrow's River (Boss Fight)
| Walkthrough | |
|---|---|
| 1 | After Snake jumps into the river, you'll soon find yourself in a boss fight against The Sorrow. This one is a unique fight since you won't have weapons and its difficulty depends entirely on how many soldiers you've killed. |
| 2 | The goal is to reach the end of the river while dodging any ghosts and projectiles The Sorrow sends your way. However, if you can't be bothered to go through this section, there is a very easy way to skip this boss fight. |
| 3 | Regardless of your chosen method, The Sorrow will zap and kill you at the end. Use a Revival Pill when the Continue Screen pops up to progress the story. |
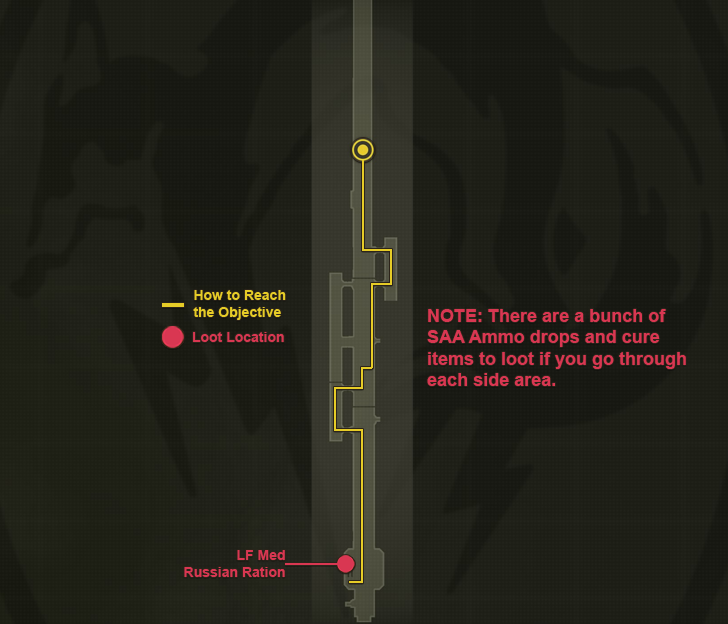
Tikhogornyj
| Tikhogornyj Loot | |
|---|---|
 |
|
| Walkthrough | |
| 1 | After that rather surreal experience, Snake will find himself in Tikhogornyj. EVA tells you to find the waterfall upstream so go east for now and hug the edge of the area until you reach a fallen log. |
| 2 | Climb the log then drop down the other side. Follow the stream north to reach the waterfall. |
| 3 | Once at the waterfall, use the path to its right to reach the cave beyond it. This triggers a cutscene which also allows you to save your game right after. |
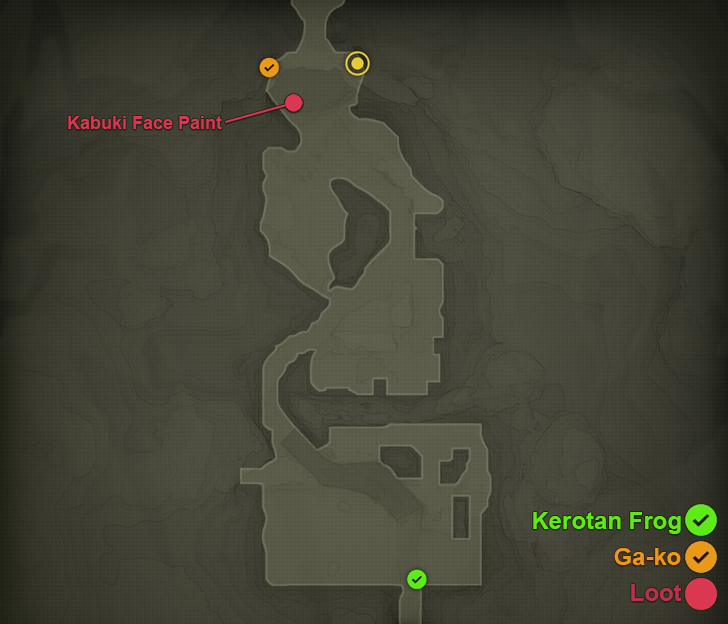
Note: After meeting with EVA and getting your stuff back, you can backtrack to this area to get the collectibles before you leave. The Kabuki face paint in particular only spawns after you've met with EVA.
Tikhogornyj: Behind Waterfall
| Tikhogornyj: Behind Waterfall Loot | |
|---|---|
 |
|
| Walkthrough | |
| 1 | Again, mores cutscenes will trigger. Once they end, Snake will be fully clothed and have access to all of his equipment (minus the food). Before moving on, re-arrange your backpack. It'll be all wonky now so make sure to fix your equipped camo, equipment, and weapons before moving on. |
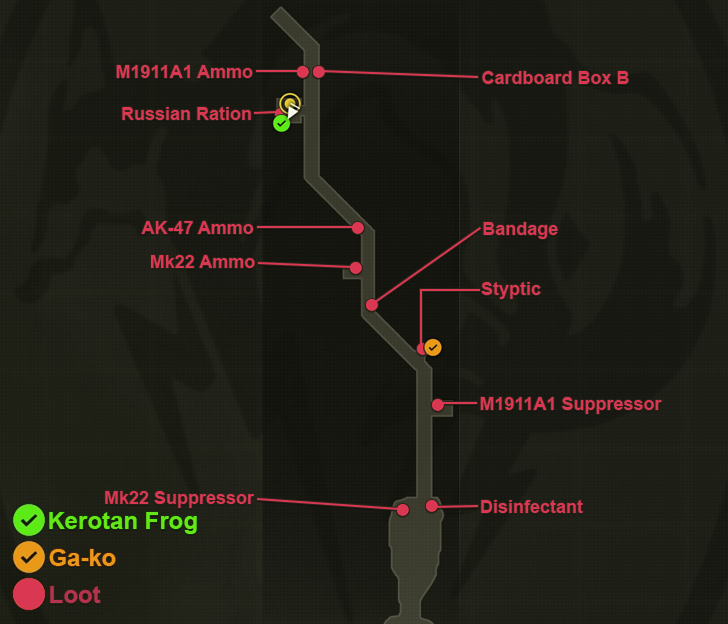
| 2 | Once you're ready, head north. Follow the long hallway all the way to the end to reach the ladder room. Before entering the ladder room, make sure to grab Cardboard Box B at the end of the hallway. |
| 3 | Inside the ladder room, do a last minute equipment check before heading back up to Groznyj Grad Northwest. |
Groznyj Grad Northwest
| Groznyj Grad Northwest Loot | |
|---|---|
 |
|
| Walkthrough | |
| 1 | It will be day when you return to Groznyj Grad. Once you arrive at Groznyj Grad Northwest, head towards the northeast. Your goal is getting to the truck again. The easiest way to do this is to head south then hug the compound wall. Loop east (while still hugging the wall) to avoid all the guard patrols then keep hugging the east wall while going north to reach the truck. |
| 2 | Once you reach the truck, climb aboard and use Cardboard Box A to get transported back into the East Wing of the weapons lab. |
Note: You can use your newly acquired Cardboard Box B while on the truck to get transported directly to where the Shagohod is. However, you'll have to backtrack to the East Wing if you want to get both the Sneaking Suit and the Maintenance worker disguise.
Groznyj Grad Weapons Lab: East Wing
| Weapons Lab East Wing Loot | |
|---|---|
 |
|
| Walkthrough | |
| 1 | Inside the East Wing, re-equip your Scientist disguise before making a beeline for the second floor locker room. |
| 2 | Head over to the locker where you stuffed Raikov in previously (it'll have a red stripe) to get the Sneaking Suit. |
| 3 | Next, face the lockers opposite Raikov's and go the the second to the last one on your left. Open it to get the Maintenance uniform. |
| 4 | Equip the Maintenance uniform, then head on over to the only door in the locker room area. This should take you to the Weapons Lab Main Wing. |
Groznyj Grad Weapons Lab: Main Wing
| Weapons Lab Main Wing Loot | |
|---|---|
 |
|
| Walkthrough | |
| 1 | Snake immediately goes into the Hangar where the Shagohod is. After a brief chat with Major Zero and Sigint, you'll be free to explore. |
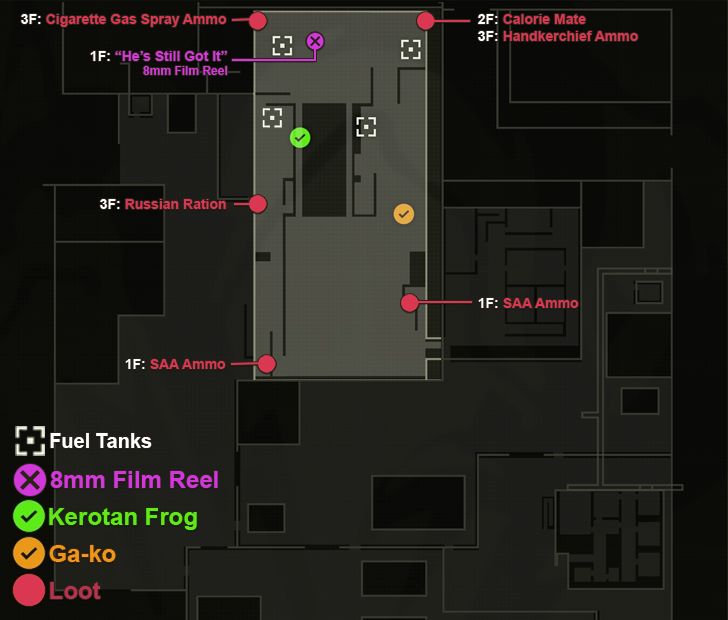
| 2 | In this area, you'll have to plant 4 C3 charges on the 4 Fuel Tanks scattered around the hangar. Head over to each one and, while making sure no one is looking, plant the C3. |
| 3 | Once you've planted 2 charges, EVA will give you a call. When it ends, you'll be free to plant the last 2. |
| 4 | There are a bunch of collectibles in this area including an 8mm Film Reel. If you plan to get them all, your safest course of action would be to knock everyone out in the hangar (excluding the film holder; he needs to be held up first). |
| 5 | After you manage to plant your third C3 charge, head over to the last fuel tank then change your camo. Equip the Sneaking Suit then plant the final C3 charge to trigger a cutscene. Save your game before proceeding. |
Groznyj Grad B1F (Boss Fight)
| Groznyj Grad B1F Loot | |
|---|---|
 |
|
| Walkthrough | |
| 1 | Once the cutscene ends, you'll immediately be pitted against Volgin in a boss fight. Defeat him before the timer runs out to progress. Tip: Staying close to Volgin is key to the fight since his biggest weakness will be your CQC throws. |
| 2 | If you beat Volgin non-lethally, make sure to pick up the Cold War camo he drops before the boss fight ends. You can also equip it before the incoming chase sequence to prevent enemy soldiers from immediately shooting at you. |
Groznyj Grad Runway
This entire segment will be you and EVA running away from the Shagohod in a sidecar. You'll have infinite ammo the entire time, so fire away. There will be several area transitions along the way, including several, hard-to-get Kerotan and GA-KO.
Tip: If you plan to get all the Kerotan Frogs and GA-KO after finishing MGS Delta, then make sure you have a save at the very first sidecar section. This allows you to replay the segment without having to go through Volgin again.
Groznyj Grad Rail Bridge (Boss Fight)
| Groznyj Grad Rail Bridge Loot | |
|---|---|
 |
|
| Walkthrough | |
| 1 | When you arrive at the Groznyj Grad Rail Bridge, you'll be forced into a sniping sequence. Detonate one of the charges to begin. |
| 2 | Next, wait on EVA to give you the signal before blowing up the second one. If timed correctly, you'll transition over to the Shagohod boss fight. Note: On Extreme difficulty there will be 4 charges instead of 2 that you have to blow up. |
| 3 | The first phase of the Shagohod boss fight will have you trying to shoot its exposed weak point at the front of the vehicle. Use the RPG-7 to hit both of its treads (immobilizing it), before waiting on EVA to drive to the front to give you a clear shot. Rinse and repeat until its HP bar drops to 0. Tip: Make sure to learn how to quick reload so you don't have to wait for your RPG-7 to slowly reload. |
| 4 | Its second phase will have Volgin perched atop the Shagohod while chasing down EVA. Again, equip your RPG-7 and shoot out any of the two treads. Once the Shagohod is immobilized, Volgin will look towards the damaged tread. Shoot his exposed back to deal damage. Rinse and repeat until Volgin perishes. You can also do this non-lethally but you'll need to have the Mosin Nagant if you want an easy time of it. |
| 5 | After the boss fight, you'll transition into 3 more chase sequences across 3 different areas. Finish those to reach the final stretch of the game. |
Zaozyorje West
| Zaozyorje West Loot | |
|---|---|
 |
|
| Walkthrough | |
| 1 | After the chase sequence, you and EVA will end up getting injured. Open the Cure menu to treat EVA's injuries as well as yours. |
| 2 | Next, loot all the ammo and food nearby. Once you have enough, open the Food menu and feed EVA to replenish her stamina levels. |
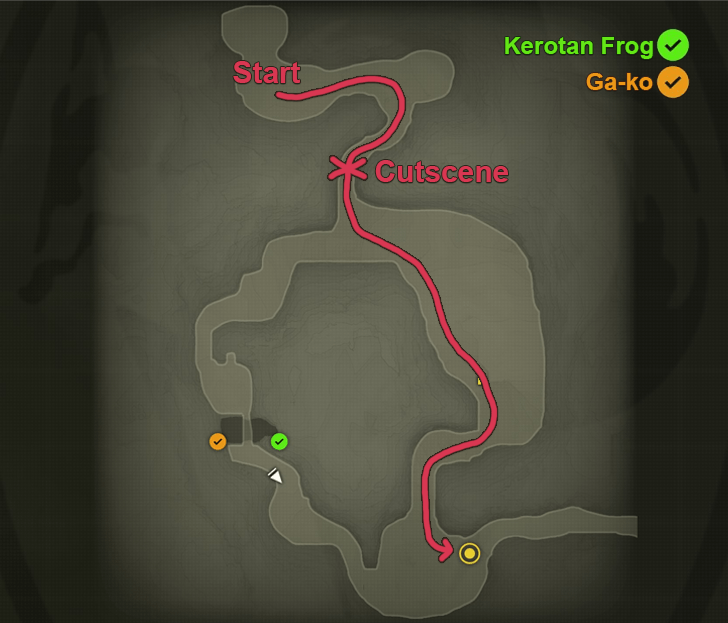
| 3 | Once you're ready, start heading east. Stop intermittently to Call EVA so she hobbles over to you. Once you reach the path that leads south, you'll trigger a cutscene where soldiers start chasing you. |
| 4 | As soon as the cutscene ends call EVA over. Start going southeast all while stopping quickly to call EVA over. Don't look back. Keep moving and spamming call EVA to avoid the soldiers. Follow this southeast path until you reach the bottom of the map where you can trigger the area transition as soon as EVA is within range of the area's exit. |
Note: The Kerotan and GA-KO figures here are missable. However, if you plan to get them, you'll have a high chance of triggering an Alert. The solution will be to get them first then reload back to your last autosave to repeat the escape.
Zaozyorje East
| Zaozyorje East Loot | |
|---|---|
 |
|
| Walkthrough | |
| 1 | In Zaozyorje East, switch up your tactics. There is a finite amount of soldiers here. Leave EVA at the starting location then start picking off the soldiers in the first clearing (there should be a total of 5 on Normal). Note: One of these soldiers will have an 8mm Film Reel. |
| 2 | Once the first clearing has no more hostiles, head northeast towards the next clearing. On Normal, there will be 4 soldiers here hidden in the bushes and tall grass. Turn on your Thermal Goggles to see them, then fire away to dispatch of them. |
| 3 | With all enemies dealth with, all that's left is to return to EVA (feed her if you have to) and escort her towards the northeast corner of the map. |
Rokovoj Bereg
| Rokovoj Bereg Loot | |
|---|---|
 |
|
| Walkthrough | |
| 1 | Rokovoj Bereg will be where you finally confront The Boss. Once the cutscene ends, prepare to parry The Boss's attack. You can do this by hitting your CQC Button after she grapples you. |
| 2 | After that initial tussle, equip your best camo for the location then defeat The Boss. One of the easiest ways to do this is to use the Mosin Nagant while skirting around the edges of the arena. Go for headshots and watch her stamina bar drop. |
| 3 | If you beat her non-lethally, she drops the Snake Camo. After that, all that's left are the closing segments of the game. Congratulations, you've beaten MGS Delta. Note: If you want to unlock the SAA permanently, make sure to pick the SAA on the right during your duel with Ocelot. |
Metal Gear Solid Delta Related Guides
Metal Gear Solid Delta Wiki
| Metal Gear Solid Delta Guides | |
|---|---|
 Walkthrough Walkthrough |
 Bosses Bosses |
 Tips and Tricks Tips and Tricks |
 Interactive Map Interactive Map |
 Weapons Weapons |
 Camos Camos |
 Food Collection Food Collection |
 Trophies Trophies |
 Equipment Equipment |
 Snake vs. Monkey Snake vs. Monkey |
 Snake vs. Bomberman Snake vs. Bomberman |
 Characters Characters |
 News News |
- |
Recommended Guides
Comment
The note at the end is terrible, it is important to pick the up all the items and weapons. By picking them they will be available to be picked up again in the next chapter. So you can have a sniper and thermal goggles early on in the game instead of finding them much later I hope this might be helpful to keep this best place for guides
Author
Metal Gear Solid Delta: Snake Eater Walkthrough & Guides Wiki
Story Walkthrough
Rankings
- We could not find the message board you were looking for.
Gaming News

![Monster Hunter Stories 3 Review [First Impressions] | Simply Rejuvenating](https://img.game8.co/4438641/2a31b7702bd70e78ec8efd24661dacda.jpeg/show)
![Monster Hunter Stories 3 Review [First Impressions] | Simply Rejuvenating](https://img.game8.co/4438641/2a31b7702bd70e78ec8efd24661dacda.jpeg/thumb)
![The Seven Deadly Sins: Origin [First Impressions] | A Promising Start](https://img.game8.co/4440581/584e0bfb87908f12c4eab6e846eb1afd.png/thumb)

Popular Games

Genshin Impact Walkthrough & Guides Wiki
Umamusume: Pretty Derby Walkthrough & Guides Wiki
Pokemon Pokopia Walkthrough & Guides Wiki
Honkai: Star Rail Walkthrough & Guides Wiki
Monster Hunter Stories 3: Twisted Reflection Walkthrough & Guides Wiki
Arknights: Endfield Walkthrough & Guides Wiki
Wuthering Waves Walkthrough & Guides Wiki
Zenless Zone Zero Walkthrough & Guides Wiki
Pokemon TCG Pocket (PTCGP) Strategies & Guides Wiki
Monster Hunter Wilds Walkthrough & Guides Wiki


Recommended Games
Diablo 4: Vessel of Hatred Walkthrough & Guides Wiki
Cyberpunk 2077: Ultimate Edition Walkthrough & Guides Wiki
Fire Emblem Heroes (FEH) Walkthrough & Guides Wiki
Yu-Gi-Oh! Master Duel Walkthrough & Guides Wiki
Super Smash Bros. Ultimate Walkthrough & Guides Wiki
Pokemon Brilliant Diamond and Shining Pearl (BDSP) Walkthrough & Guides Wiki
Elden Ring Shadow of the Erdtree Walkthrough & Guides Wiki
Monster Hunter World Walkthrough & Guides Wiki
The Legend of Zelda: Tears of the Kingdom Walkthrough & Guides Wiki
Persona 3 Reload Walkthrough & Guides Wiki


All rights reserved
©Konami Digital Entertainment
The copyrights of videos of games used in our content and other intellectual property rights belong to the provider of the game.
The contents we provide on this site were created personally by members of the Game8 editorial department.
We refuse the right to reuse or repost content taken without our permission such as data or images to other sites.
Super helpful, thanks for the time spent putting it together!