Cooperative Battle Guide
★ New Events: Bonus Battle (Until 3/16), Encirclement Breakthrough Battles (Until 3/18), Blitz Mission (Until 3/22) Total War (Until 3/27), Battle Rush EX (Until 3/27)
★ New MS and Pilot: Gerbera Tetra and Cima Garahau || Gundam Unit 5 (Bst) and Fold Romfellow
★ Tier Lists: MS (PvE / PvP) and Pilots (PvE / PvP)
★ Check out our Arena Strategy Guide!
★ Answer our survey for Gundam UCE or try our gacha simulators!
Cooperative Battles in Gundam UCE are where players across the server team up to defeat powerful enemies and win modules. Read on to see an overview of the event, how to play Cooperative Battle, Tips and Tricks, and Rewards.
List of Contents
Cooperative Battle Overview
Cooperative Battle Event Information
| How to Unlock | Reach Player Rank 20 |
|---|---|
| Rewards | Modules |
| Game Mode Unique Mechanic | Ability to send SOS signals for player assistance |
How to Play Cooperative Battle
Cooperative Battle Game Mode
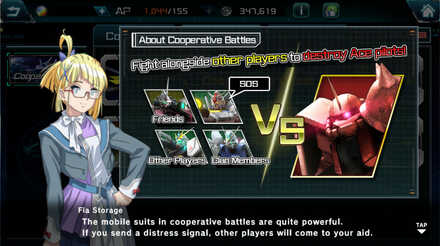
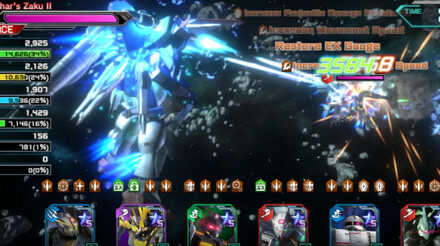
Cooperative Battles are midgame PvE content separated by difficulties and types of opponents. These stages drop modules that can be equipped on mobile suits to raise their stats. These stages are also quite difficult, and players taking these battles on have the option to send out SOS signals to get other players' assistance.
Cooperative Battles can be accessed when Player Rank 20 is reached. Although every stage does not visibly demand large amounts of Combat Power, it can be very difficult to clear a raid alone, especially at the early stages of the game. The cooperative aspect of the game mode becomes apparent with this limitation, as players can call on others to assist them, or players can answer calls for help to finish a fight that other players have started.
This game mode lets the player decide the type of enemy they fight, as well as the lineup they will use to face them. As a result, players can make the conditions of the fight easier for their squad. Besides having options for the battle's conditions, the option to send out an SOS Signal and to whom that signal will be sent can be decided at the start of the raid's first run.
For example, if the team is occupied predominantly by Blue-types like the [M0239] S Gundam and the [M0040] Hi-Nu Gundam, it is possible to initiate fights against Red-type enemies so that the Blue-types can deal more damage.
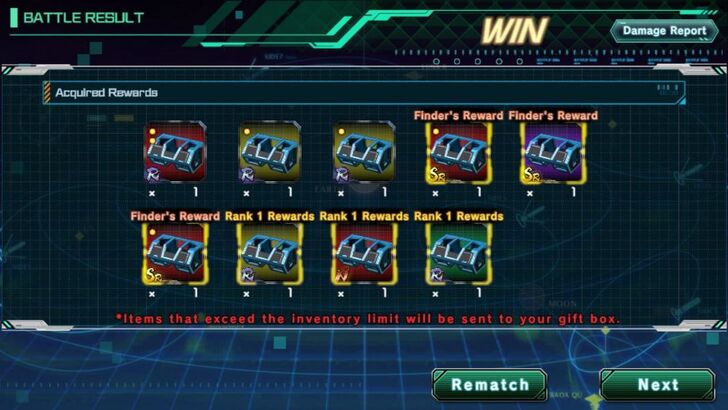
The reward is based on how well the player does in the battle. The better they do, the higher their chances of getting good-quality modules. Bonus modules are also granted to whoever starts the Co-op Battle and whoever deals the most damage.
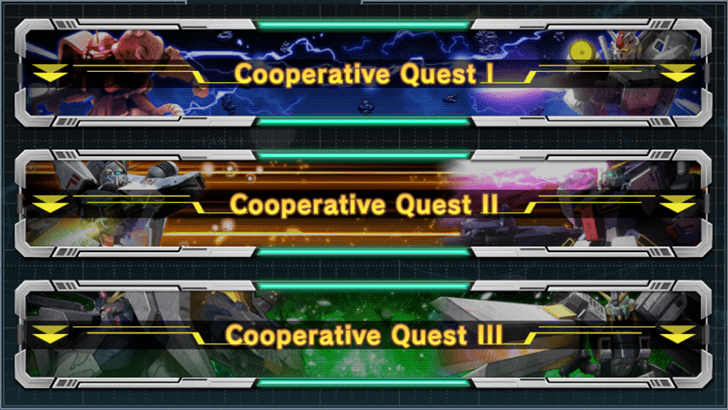
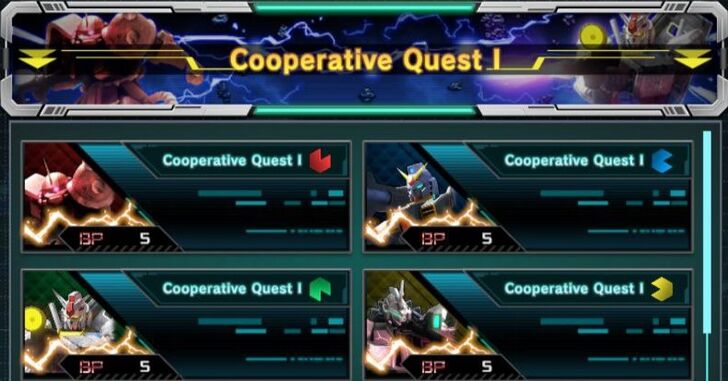
These battles come in different difficulties, with Cooperative Quest I granting certain color types of modules (Blue, Red, Green, Yellow, Purple), and Cooperative Quest II granting certain kinds of modules. Below is a table that shows which Cooperative Quests reward their associated modules.
| Cooperative Quest | Reward |
|---|---|
| Cooperative Quest I (Red) | Red Type Modules of all rarities and base skills |
| Cooperative Quest I (Blue) | Blue Type Modules of all rarities and base skills |
| Cooperative Quest I (Green) | Green Type Modules of all rarities and base skills |
| Cooperative Quest I (Yellow) | Yellow Type Modules of all rarities and base skills |
| Cooperative Quest I (Purple) | Purple Type Modules of all rarities and base skills |
| Cooperative Quest II (Red) | Evasion Regulator Modules of all types and rarities |
| Cooperative Quest II (Blue) | AD-ASL-A Modules of all types and rarities |
| Cooperative Quest II (Green) | Augmentation Frame Modules of all types and rarities |
| Cooperative Quest II (Yellow) | Beam and Projectile Enhancement Program Modules of all types and rarities |
| Cooperative Quest II (Purple) | EX Damage Enhancement Program Modules of all types and rarities |
Cooperative Battle Tips and Tricks
Bosses Target Highest HP Unit
Cooperative Battle bosses target the highest HP unit on the team. That said, it is possible to skip adding Gyan to the lineup and make the intended tank the highest HP unit on the team through modules and Unit Enhancement.
Once strong enough, Cooperative Battles I and II can be completed with 0 Armored units. Use high DPS mobile suits with sustain like the Yellow Sazabi or the Unicorn Gundam Perfectibility NT-D, or MSs with Perfect Guard or Absolute Evade. That way, it becomes easier to deal even more damage to the boss, while still having a defensive unit to protect the rest of the team.
Higher Difficulty Coop Quests Yield Better Rewards
The more difficult the Coop Quest, the more and better rewards players earn. More modules are awarded in higher-difficulty Coop Quests, and more modules are always a good thing, especially since unused modules can be traded in for Unit Enhancement Pts., which is a very valuable resource in the game.
While it has not been confirmed, it seems as if the drop rates for SR-rarity modules are higher in Coop Quest II and III than they are in Coop I, since players have reported winning higher-quality modules from the higher-tier Coop Quests.
Be the One to Start The Battles
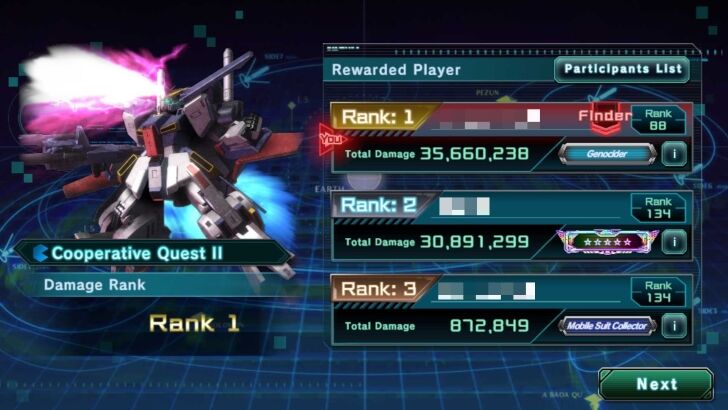
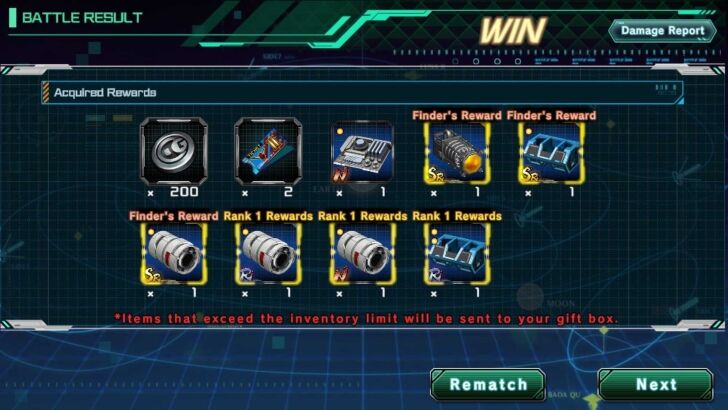
Joining an existing Co-op Raid only costs 1 BP, while starting one costs 5 BP. While starting these battles costs more BP, it's almost always better to do so. This is because of how the player who starts the Raid gets a bonus reward module, and so will the player who deals the most damage.
Starting matches will guarantee that the player who starts the battle will get at least 2 modules, as they will get both their standard reward and the finder's reward. It is also possible to rejoin these battles for free whenever a loss happens, so players can keep going at it and accumulate damage that way. That said, the chances of dealing the most damage in the battle are boosted when players start the battle themselves, considering that they control when to send the SOS Signal to invite other players in.
Use a Clanmate's Powerful Units
Before starting or joining a co-op raid, there will be the option to select a paired mobile suit and pilot belonging to clanmates to fight with the lineup, taking up the rightmost slot on the team. Unless a player has been playing for a long time or they have spent a lot on this game, these units will probably end up carrying the team and doing ridiculous amounts of damage. It might even solo an entire battle for the player and hand the victory in just one attempt.
Because these units will be key to gaining victory and topping the damage rankings, try to use units that can enhance their damage. For example, if a player borrows a powerful Zeong, using a Re-GZ and a Gundam Ez8 alongside it will further amplify its power. After these, look to add owned powerful DPS units.
Use the remaining slots for powerful debuffers or buffers that will help the team deal even more damage. Some of the best in this role are the Awakened Magna Martell, Phenex, Cima's Gelgoog Marine, Alex, and Char's Z'Gok (situationally).
On the other hand, more advanced players who are already capable of soloing Cooperative Battles are likely better off running their best DPS units, along with some support units to boost their damage. Use the absolute best units even in stages where they suffer from a type disadvantage. Maximize their damage output and try to analyze the built team. Check the units that are possibly replaceable, and then see the best options for improving the team's overall damage output.
Best Cooperative Battle & Raid Battle Mobile Suit Tier List (PvE)
Secure 1st Place By Sending SOS Halfway Through The Battle
When starting battles, the person who starts it gets to decide when to use the SOS feature. They can definitely solo these Cooperative Battles later on when their units are already very powerful, but when they are in the early and mid-game, they probably cannot. Even if it is possible to rejoin as many times as wanted, it will take an unreasonable amount of time to solo a boss when a player just does not have the firepower to do so.
That said, a good way to ensure that the reward for dealing the most damage is won is to only call for other players once the opponent's health is below half. That way, even if the strongest teams in the world join the Coop Battle, the SOS sender will still be able to secure the top rank in terms of damage.
Use The Reward Boost Feature
The Reward Boost feature allows players to double or triple the rewards of a Cooperative Battle in exchange for twice or thrice the BP and Coop Tickets if needed. Cooperative Battles can take a while, so using this feature is a foolproof way to save some time.
How To Start Cooperative Battles
| 1 |
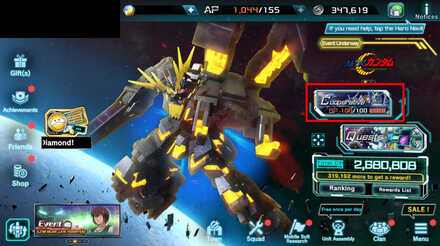
The Cooperative Battle mode can be selected directly from the home menu. It is located right above Quests and below the Events panel. |
|---|---|
| 2 |
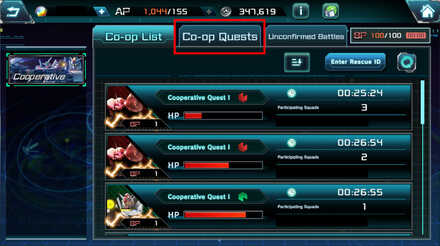
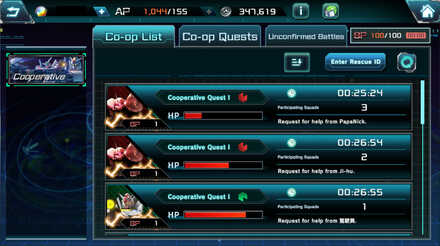
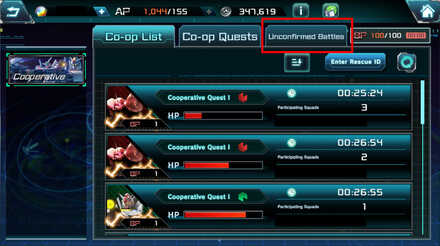
Once at the Cooperative Battle window, there will be three relevant tabs: Co-op List, Co-op Quests, and Unconfirmed Battles. In this case, head over to the Co-op Quests tab |
| 3 |
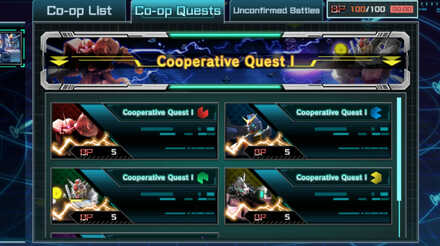
Among the list of Cooperative Quest missions, select the appropriate difficulty and enemy type that will be faced. |
| 4 |
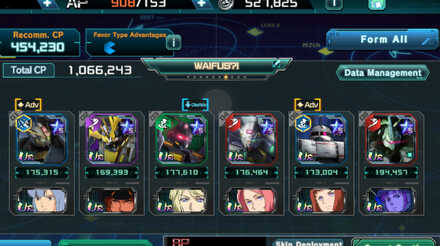
Select the team that will be used. After that, the team will be brought to the Unit Deployment screen. |
| 5 |
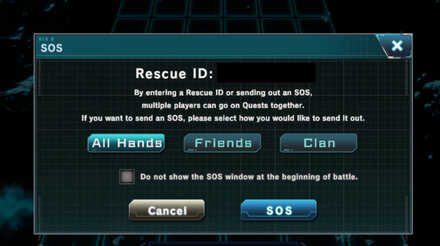
There will be an option to release an SOS Signal or not. The window will also let those who will receive the SOS Signal be chosen. |
| 6 |
Continue the fight as usual. |
How to Join Cooperative Battles
| 1 |
The Cooperative Raid mode can be selected directly from the home menu. It is located right above Quests and below the Events panel. |
|---|---|
| 2 |
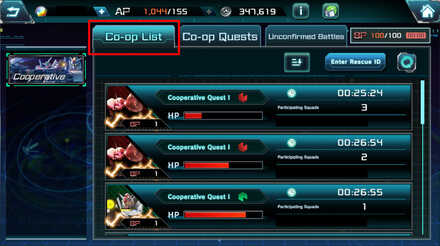
Once at the Cooperative Raid window, there will be three relevant tabs: Co-op List, Co-op Quests, and Unconfirmed Battles. In this case, head over to the Co-op List tab. |
| 3 |
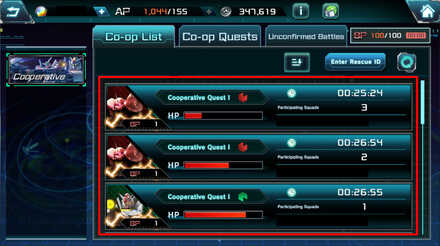
There will be a list of ongoing Cooperative battles that can be freely joined. This list will include raids that the player has been invited to, as well as all public ones. |
| 4 |
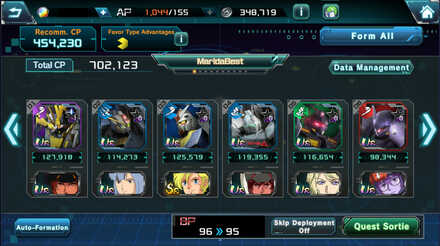
If a fight is found, simply click on the listed item and select the squad |
| 5 |
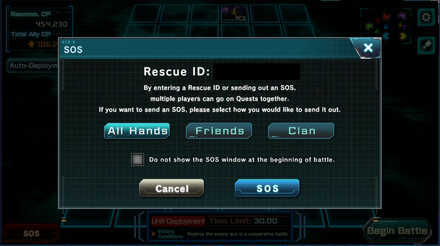
It is possible to spread the SOS Signal to the raid to more people. Just select the appropriate options once the Unit Deployment phase is reached. |
How to Claim the Rewards
| 1 |
The Cooperative Battle mode can be selected directly from the home menu. It is located right above Quests and below the Events panel. |
|---|---|
| 2 |
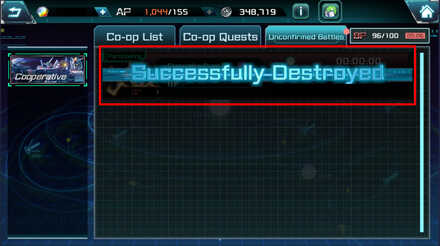
Once at the Cooperative Battle window, there will be three relevant tabs: Co-op List, Co-op Quests, and Unconfirmed Battles. In this case, head over to the Unconfirmed Battles tab |
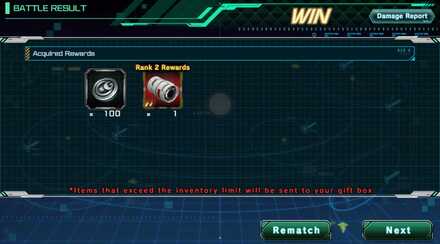
| 3 |
Cooperative battles that have been participated in will be listed here upon the fight's conclusion. If the player wants to claim their prize, simply click on any listed item, view the results, and check the rewards. |
| 4 |
Note that if the fight is cleared by any participant by the time the stage is finished, the player will be directed to this window immediately after. |
How To Beat Each Cooperative Battle Stage
Cooperative Quest I and II Stages
Cooperative Quest I stages are the easiest of the bunch, and do not necessarily need much planning outside of the tips and tricks already discussed above. While Cooperative Quest II stages are a little bit harder, it is pretty much the same as Coop I, but with different enemy bosses with better stats. Like with Coop I, Coop II Quests do not need much planning.
Even when at a very low level, it is still possible to solo Coop Quest I stages by borrowing extremely powerful self-sustaining carries from Friends and Clanmates. Some of the best units to borrow for this purpose are the Yellow Sazabi, Sinanju, Unicorn Gundam PF (NT-D), and the Awakened Magna Martell. The gap between Coop I and II is not that big, so if it is possible to do Coop I, then Coop II will not be much trouble either.
Cooperative Quest III Stages
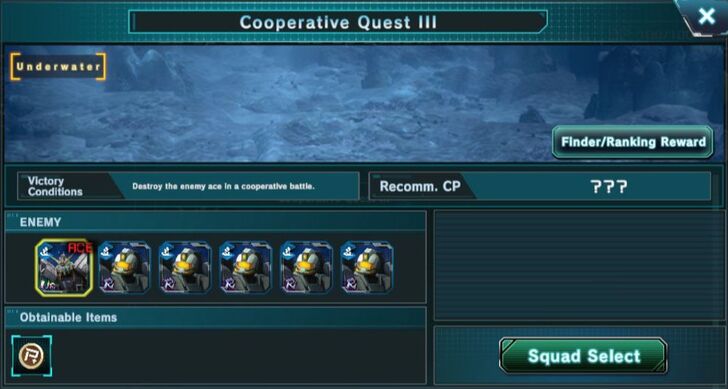
Coop III is a whole new ballpark and is extremely difficult when compared to all the other Coop Quests. The biggest change here is how the battle is held in an Underwater map, which means that plenty of very powerful DPS mobile suits, like the Zeong and the Yellow Sazabi, are rendered useless. Players will want to use mobile suits that thrive Underwater, or at least have a △ rating for the map in question. Players could still use mobile suits with the ✖ terrain disadvantage for Underwater maps, just know that their stats will be debuffed.
Another key difference in Coop III is how the Cooperative Battle boss is accompanied by 5 Aqua GMs, so they won't be alone this time. Unlike the Coop Bosses before.
The final big difference between Coop III and the other Coop Quests is how the stats of the enemy units in Coop III are ridiculously high. Players will need to deal around 220 million damage to win the battle by themselves, which is significantly more than the 52 million needed to clear Coop II. The enemies here also deal plenty of damage, so it is easy to lose key units.
 Gedlav Gedlav
|
The most effective unit for Coop III is the Gedlav by far. It thrives in Underwater maps, deals good damage, and can actually serve as the team's tank thanks to its 99% damage resistance buff. The key here is to keep the Gedlav above its 90% max HP threshold to keep its offensive and defensive buffs active. Do this with healers such as the V2A Gundam, the Green Nu, the Awakened Yonfavin, or the R-rarity GM-GR. When picking the borrowed unit, try to borrow a clanmate or friend's Gedlav, as this will help the team last longer as well as deal more damage.
As for the rest of the team's core, look to add more firepower with powerful DPS units, ideally those with the 〇 or △ terrain compatibility. Notable picks for this role include the PF NT-D and the Sinanju (Generic).
To round out the team, look to field a Support, be it a buffer or a debuffer. Notable picks here include the Phenex, the Ez8, and Awakened Magna Martell. At first glance, it could be assumed that Char's Z'Gok would perform well here, since it not only has a 〇 terrain advantage for Underwater maps, but receives further buffs when in these maps. However, these will force other units to ignore the GMs, which in turn would be left unchecked and deal unnecessary damage to the team's units. It is much better to just take them down early, so just leave Char's Z'Gok out of the Coop III lineup.
Cooperative Battle Rewards
Cooperative Quest I
| Icon | Description |
|---|---|
| [Red] Projectile Enhancement Program A (SR) When battle begins: red type mobile suit projectile damage is increased by 9% | |
| [Red] Beam Enhancement Program A (SR) When battle begins: red type mobile suit beam damage is increased by 9% | |
| [Red] AD-ASL-A (SR) When battle begins: red type mobile suit accuracy is increaased by 7% | |
| [Red] Evasion Regulator A (SR) When battle begins: red type mobile suit evasion is increased by 7% | |
| [Red] Augmentation Frame A (SR) When battle begins: red type mobile suit Max HP is increased by 16% | |
| [Red] Projectile Enhancement Program A (R) When battle begins: red type mobile suit projectile damage is increased by 6% | |
| [Red] Beam Enhancement Program A (R) When battle begins: red type mobile suit beam damage is increased by 6% | |
| [Red] AD-ASL-A (R) When battle begins: red type mobile suit accuracy is increased by 4% | |
| [Red] AD-ASL-A (R) When battle begins: red type mobile suit accuracy is increased by 4% | |
| [Red] AD-ASL-A (R) When battle begins: red type mobile suit accuracy is increased by 4% | |
| [Red] AD-ASL-A (R) When battle begins: red type mobile suit accuracy is increased by 4% | |
| [Red] AD-ASL-A (R) When battle begins: red type mobile suit accuracy is increased by 4% | |
| [Red] AD-ASL-A (R) When battle begins: red type mobile suit accuracy is increased by 4% | |
| [Red] AD-ASL-A (R) When battle begins: red type mobile suit accuracy is increased by 4% | |
| [Red] AD-ASL-A (R) When battle begins: red type mobile suit accuracy is increased by 4% |
| Icon | Description |
|---|---|
| [Blue] Projectile Enhancement Program A (SR) When battle begins: blue type mobile suit projectile damage is increased by 9% | |
| [Blue] Beam Enhancement Program A (SR) When battle begins: blue type mobile suit beam damage is increased by 9% | |
| [Blue] AD-ASL-A (SR) When battle begins: blue type mobile suit accuracy is increaased by 7% | |
| [Blue] Evasion Regulator A (SR) When battle begins: blue type mobile suit evasion is increased by 7% | |
| [Blue] Augmentation Frame A (SR) When battle begins: blue type mobile suit Max HP is increased by 16% | |
| [Blue] Projectile Enhancement Program A (R) When battle begins: blue type mobile suit projectile damage is increased by 6% | |
| [Blue] Beam Enhancement Program A (R) When battle begins: blue type mobile suit beam damage is increased by 6% | |
| [Blue] AD-ASL-A (R) When battle begins: blue type mobile suit accuracy is increased by 4% | |
| [Blue] Evasion Regulator A (R) When battle begins: blue type mobile suit evasion is increased by 4% | |
| [Blue] Augmentation Frame A (R) When battle begins: blue type mobile suit Max HP is increased by 10% | |
| [Blue] Projectile Enhancement Program A (N) When battle begins: blue type mobile suit projectile damage is increased by 3% | |
| [Blue] Beam Enhancement Program A (N) When battle begins: blue type mobile suit beam damage is increased by 3% | |
| [Blue] AD-ASL-A (N) When battle begins: blue type mobile suit accuracy is increased by 1% | |
| [Blue] Evasion Regulator A (N) When battle begins: blue type mobile suit evasion is increased by 1% | |
| [Blue] Augmentation Frame A (N) When battle begins: blue type mobile suit Max HP is increased by 6% |
| Icon | Description |
|---|---|
| [Green] Projectile Enhancement Program A (SR) When battle begins: green type mobile suit projectile damage is increased by 9% | |
| [Green] Beam Enhancement Program A (SR) When battle begins: green type mobile suit beam damage is increased by 9% | |
| [Green] AD-ASL-A (SR) When battle begins: green type mobile suit accuracy is increaased by 7% | |
| [Green] Evasion Regulator A (SR) When battle begins: green type mobile suit evasion is increased by 7% | |
| [Green] Augmentation Frame A (SR) When battle begins: green type mobile suit Max HP is increased by 16% | |
| [Green] Projectile Enhancement Program A (R) When battle begins: green type mobile suit projectile damage is increased by 6% | |
| [Green] Beam Enhancement Program A (R) When battle begins: green type mobile suit beam damage is increased by 6% | |
| [Green] AD-ASL-A (R) When battle begins: green type mobile suit accuracy is increased by 4% | |
| [Green] Evasion Regulator A (R) When battle begins: green type mobile suit evasion is increased by 4% | |
| [Green] Augmentation Frame A (R) When battle begins: green type mobile suit Max HP is increased by 10% | |
| [Green] Projectile Enhancement Program A (N) When battle begins: green type mobile suit projectile damage is increased by 3% | |
| [Green] Beam Enhancement Program A (N) When battle begins: green type mobile suit beam damage is increased by 3% | |
| [Green] AD-ASL-A (N) When battle begins: green type mobile suit accuracy is increased by 1% | |
| [Green] Evasion Regulator A (N) When battle begins: green type mobile suit evasion is increased by 1% | |
| [Green] Augmentation Frame A (N) When battle begins: green type mobile suit Max HP is increased by 6% |
| Icon | Description |
|---|---|
| [Yellow] Projectile Enhancement Program A (SR) When battle begins: yellow type mobile suit projectile damage is increased by 9% | |
| [Yellow] Beam Enhancement Program A (SR) When battle begins: yellow type mobile suit beam damage is increased by 9% | |
| [Yellow] AD-ASL-A (SR) When battle begins: yellow type mobile suit accuracy is increaased by 7 | |
| [Yellow] Evasion Regulator A (SR) When battle begins: yellow type mobile suit evasion is increased by 7% | |
| [Yellow] Augmentation Frame A (SR) When battle begins: yellow type mobile suit Max HP is increased by 16 | |
| [Yellow] Projectile Enhancement Program A (R) When battle begins: yellow type mobile suit projectile damage is increased by 6% | |
| [Yellow] Beam Enhancement Program A (R) When battle begins: yellow type mobile suit beam damage is increased by 6% | |
| [Yellow] AD-ASL-A (R) When battle begins: yellow type mobile suit accuracy is increased by 4% | |
| [Yellow] Evasion Regulator A (R) When battle begins: yellow type mobile suit evasion is increased by 4% | |
| [Yellow] Augmentation Frame A (R) When battle begins: yellow type mobile suit Max HP is increased by 10% | |
| [Yellow] Projectile Enhancement Program A (N) When battle begins: yellow type mobile suit projectile damage is increased by 3% | |
| [Yellow] Beam Enhancement Program A (N) When battle begins: yellow type mobile suit beam damage is increased by 3% | |
| [Yellow] AD-ASL-A (N) When battle begins: yellow type mobile suit accuracy is increased by 1% | |
| [Yellow] Evasion Regulator A (N) When battle begins: yellow type mobile suit evasion is increased by 1% | |
| [Yellow] Augmentation Frame A (N) When battle begins: yellow type mobile suit Max HP is increased by 6% |
| Icon | Description |
|---|---|
| [Purple] Projectile Enhancement Program A (SR) When battle begins: purple type mobile suit projectile damage is increased by 9% | |
| [Purple] Beam Enhancement Program A (SR) When battle begins: purple type mobile suit beam damage is increased by 9% | |
| [Purple] AD-ASL-A (SR) When battle begins: purple type mobile suit accuracy is increaased by 7% | |
| [Purple] Evasion Regulator A (SR) When battle begins: purple type mobile suit evasion is increased by 7% | |
| [Purple] Augmentation Frame A (SR) When battle begins: purple type mobile suit Max HP is increased by 16% | |
| [Purple] Projectile Enhancement Program A (R) When battle begins: purple type mobile suit projectile damage is increased by 6% | |
| [Purple] Beam Enhancement Program A (R) When battle begins: purple type mobile suit beam damage is increased by 6% | |
| [Purple] AD-ASL-A (R) When battle begins: purple type mobile suit accuracy is increased by 4% | |
| [Purple] Evasion Regulator A (R) When battle begins: purple type mobile suit evasion is increased by 4% | |
| [Purple] Augmentation Frame A (R) When battle begins: purple type mobile suit Max HP is increased by 10% | |
| [Purple] Projectile Enhancement Program A (N) When battle begins: purple type mobile suit projectile damage is increased by 3% | |
| [Purple] Beam Enhancement Program A (N) When battle begins: purple type mobile suit beam damage is increased by 3% | |
| [Purple] AD-ASL-A (N) When battle begins: purple type mobile suit accuracy is increased by 1% | |
| [Purple] Evasion Regulator A (N) When battle begins: purple type mobile suit evasion is increased by 1% | |
| [Purple] Augmentation Frame A (N) When battle begins: purple type mobile suit Max HP is increased by 6% |
Cooperative Quest II
| Icon | Description |
|---|---|
|
|
[Red] Evasion Regulator A (SR) When battle begins: red type mobile suit evasion is increased by 7% |
|
|
[Red] Evasion Regulator A (R) When battle begins: red type mobile suit evasion is increased by 4% |
|
|
[Red] Evasion Regulator A (N) When battle begins: red type mobile suit evasion is increased by 1% |
|
|
[Blue] Evasion Regulator A (SR) When battle begins: blue type mobile suit evasion is increased by 7% |
|
|
[Blue] Evasion Regulator A (R) When battle begins: blue type mobile suit evasion is increased by 4% |
|
|
[Blue] Evasion Regulator A (N) When battle begins: blue type mobile suit evasion is increased by 1% |
|
|
[Green] Evasion Regulator A (SR) When battle begins: green type mobile suit evasion is increased by 7% |
|
|
[Green] Evasion Regulator A (R) When battle begins: green type mobile suit evasion is increased by 4% |
|
|
[Green] Evasion Regulator A (N) When battle begins: green type mobile suit evasion is increased by 1% |
|
|
[Yellow] Evasion Regulator A (SR) When battle begins: yellow type mobile suit evasion is increased by 7% |
|
|
[Yellow] Evasion Regulator A (R) When battle begins: yellow type mobile suit evasion is increased by 4% |
|
|
[Yellow] Evasion Regulator A (N) When battle begins: yellow type mobile suit evasion is increased by 1% |
|
|
[Purple] Evasion Regulator A (SR) When battle begins: purple type mobile suit evasion is increased by 7% |
|
|
[Purple] Evasion Regulator A (R) When battle begins: purple type mobile suit evasion is increased by 4% |
|
|
[Purple] Evasion Regulator A (N) When battle begins: purple type mobile suit evasion is increased by 1% |
Mobile Suit Gundam UC Engage Related Guides
All Tips and Tricks Guides
 Arena Beginner's Guide (PvP)
 Arena Guide
 How to Get Started With the Arena?
 Beginner's Guide: Tips and Tricks
 Beginner Mistakes to Avoid
 Dailies Checklist
 Intermediate Guide
 How To Pair Pilots and Mobile Suits
 Team Building Guide
Comment
Author
Cooperative Battle Guide
Rankings
- We could not find the message board you were looking for.
Gaming News


![Everwind Review [Early Access] | The Shaky First Step to A Very Long Journey](https://img.game8.co/4440226/ab079b1153298a042633dd1ef51e878e.png/thumb)

![Monster Hunter Stories 3 Review [First Impressions] | Simply Rejuvenating](https://img.game8.co/4438641/2a31b7702bd70e78ec8efd24661dacda.jpeg/thumb)
Popular Games

Genshin Impact Walkthrough & Guides Wiki
Honkai: Star Rail Walkthrough & Guides Wiki
Umamusume: Pretty Derby Walkthrough & Guides Wiki
Pokemon Pokopia Walkthrough & Guides Wiki
Resident Evil Requiem (RE9) Walkthrough & Guides Wiki
Monster Hunter Wilds Walkthrough & Guides Wiki
Wuthering Waves Walkthrough & Guides Wiki
Arknights: Endfield Walkthrough & Guides Wiki
Pokemon FireRed and LeafGreen (FRLG) Walkthrough & Guides Wiki
Pokemon TCG Pocket (PTCGP) Strategies & Guides Wiki


Recommended Games
Diablo 4: Vessel of Hatred Walkthrough & Guides Wiki
Fire Emblem Heroes (FEH) Walkthrough & Guides Wiki
Yu-Gi-Oh! Master Duel Walkthrough & Guides Wiki
Super Smash Bros. Ultimate Walkthrough & Guides Wiki
Pokemon Brilliant Diamond and Shining Pearl (BDSP) Walkthrough & Guides Wiki
Elden Ring Shadow of the Erdtree Walkthrough & Guides Wiki
Monster Hunter World Walkthrough & Guides Wiki
The Legend of Zelda: Tears of the Kingdom Walkthrough & Guides Wiki
Persona 3 Reload Walkthrough & Guides Wiki
Cyberpunk 2077: Ultimate Edition Walkthrough & Guides Wiki


All rights reserved
Game Copyright© SOTSU・SUNRISE All rights reserved.
The content we provide on this site were created personally by members of the Game8 editorial department.
We refuse the right to reuse or repost content taken without our permission such as data or images to other sites.
© SOTSU・SUNRISE (Provider)