Arkveld Weaknesses, Patterns, and How to Beat
This is a guide to the Arkveld Boss Fight in Monster Hunter Stories 3 (MHS3). Learn how to beat Arkveld, its weaknesses, behaviour and attack pattern, and the best strategy to beat Arkveld including how to charge up Ratha's attack.
List of Contents
Arkveld Boss Weaknesses and Resistances
Arkveld Weakness
| - | ↑ | ↑ | |||
| ↑ | ↑ | ↓↓ |
| ↑↑ | ↓↓ | ↓↓ | |||
| ↓↓ | ↓↓ | ↓↓ |
Arkveld Damage Type Weaknesses
| Body Part | |||
|---|---|---|---|
| Main Body | ◯ | ◯ | ◯ |
| Head | ✕ | ✕ | ◯ |
| Tail | ◯ | ✕ | ✕ |
| Chainblade (Right) | ✕ | ◯ | ✕ |
| Chainblade (Left) | ✕ | ◯ | ✕ |
Status Ailment Resistance and Weaknesses
| ↓ | ↓ | ↑ | ↑ | ||||||||
| ↓↓ | ↑ | ↓↓ | |||||||||
Arkveld Pattern and Behaviour
| Jump to a Section |
|---|
|
2. Normal State |
Attack Behavior
| Normal State | |
|---|---|
| Dragon Mantle State |
Arkveld has 2 states which are its Normal and Dragon Mantle state.
Normal State
| Turn Count | Move |
|---|---|
| Turn 1 | Technical Attack |
| Turn 2 | Blade Crawl |
| Turn 3 After Dragon Mantle State |
Technical Attack Prompt for Ratha to increase Ratha's Attack Power |
| Turn 4 After Dragon Mantle State |
Kaiser Blade |
When Arkveld is in the Normal State it will dish out Technical Attacks when engaging in head to heads. Aside from this it will use very powerful attacks like Blade Crawl (AoE) and Kaiser Blade (Single Target).
Watch out for the Third Turn in the Normal State as this will prompt the Protagonist to charge up Ratha for a powerful attack.
Charge Up Ratha's Attack for Energy Overload
Boost Ratha's Attack to charge it up fully to successfully interrupt Arkveld. This can be done through items or stacking Monstie or skills like Power Paean which can be applied as a Decoration to weapons.
Dragon Mantle State
| Turn Count | Move |
|---|---|
| Turn 0 From the Normal State |
Elemental Release Used when switching to Dragon Mantle State |
| Turn 1 From the Normal State |
Crushing Chain (Power Attack) |
| Turn 2 | Berserk Blade |
| Turn 3 From the Normal State after Charging Up |
Will unleash Elemental Release if Savage Fireball is not charged up. If Ratha successfully charges up and attacks, it will skip its turn. |
| Turn 4 From the Normal State |
Crushing Chain (Power Attack) |
| Turn 5 | Chain Crawl |
| Turn 6 | Crushing Chain (Power Attack) |
| Turn 7 | Berserk Blade |
| Turn 8 | Crushing Chain (Power Attack) |
In its Dragon Mantle State, Arkveld will release Power Attacks and very powerful AoE attacks like Berserk Blade and Chain Crawl. It will also unleash a poweful attack if Ratha does not successfully interrupt it.
Arkveld, during this state, will also acquire weaknesses for all elemental types it had resistances to in the Normal State.
Recommended Monsties for Arkveld
 Ratha Ratha
|
 Deviljho Deviljho
|
 Dreadqueen Rathian Dreadqueen Rathian
|
Arkveld will be very weak against Dragon skills during both of its states so having Deviljho would be a good option to take advantage of this. Keep in mind that Deviljho is also very weak to Dragon attacks so switch them out occasionally.
It is highly recommended to build your Ratha before this fight as you will need to boost their attack and unleash a Savage Fireball during a crucial moment in the battle. On the other hand, Dreadqueen Rathian is also a good pick as it can apply Noxious Poison and cover the Speed type attacks during head to heads.
How to Beat Arkveld
| Jump to a Section |
|---|
|
|
Level Up to at Least Level 50
Arkveld will be at level 58 when you fight it and will unleash powerful attacks that can oneshot you. Level up your party to at least Level 50 to prepare your roster.
Equip Power Paean, the Magia Charm and Dragon Element Weapons
The Magia Charm is very useful in this battle as it can help restore hearts with Magnificent Trio when set up correctly. Players can also equip the Decoration for Power Paean on it to boost Ratha's attack when charging up.
Additionally, Arkveld will be very weak to the Dragon Element during both of its states so equipping Dragon elemental weapons like the Fiore Nulo Black can unleash higher damage consistently.
Invite Kora as an Ally
Kora makes for a good ally during the fight as she and her partner Monstie deal good damage. She is also able to draw away single target attacks from other allies.
We also recommend finishing her fourth side story as this invites her strong Monstie companion, Golma, to your party.
List of All Characters and Companions
Charge Up Ratha's Attack Stat
A key mechanic to this fight against Arkveld is to charge up Ratha's Attack Stat before or when prompted in the third turn of the Normal State. Use Attack Boosting Items or Weapon Skills to fulfill this.
Otherwise, the Arkveld will deal very high damage to all members of your party.
Unleash Damage During the Dragon Mantle State
Arkveld will have multiple Elemental resistances during the Normal State but will become weak to them during the Dragon Mantle State. Focus on unleashing damage during this state instead of using up stamina early on.
All Monster Weaknesses and Attack Types
Time the Use of the Kinship Skill
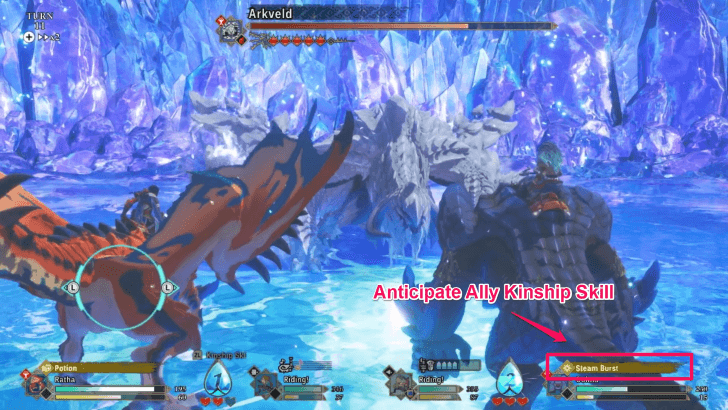
The Kinship Skill is extremely helpful when wanting to skip Arkveld's turn so save it until it uses strong AoE attacks like Chain Crawl or Berserk Blade.
Additionally, anticipate when your Partner will use a kinship skill themselves by checking their action above the health bar to save the use of your own Kinship Skill for another turn.
Use Solar Cry to Fill Kinship Gauge
A powerful skill that can help fill the Kinship Gauge faster is Solar Cry. Equip it onto your Monsties so that you can use the Kinship skill more consistently to interrupt attacks.
How to Fight Arkveld
Fought During the Reunion Main Quest
Arkveld is encountered during the Reunion Main Quest. During the story, the group ventures deeper into Sacrosanctum/Lazlion and they encounter the boss as a Monster protecting the area.
Monster Hunter Stories 3 (MHS 3) Related Guides
Main Mission Bosses
| All Main Mission Bosses | |
|---|---|
| Azuria (Chapter 1) | |
 Honed Glavenus |
 Invasive Yian Garuga Invasive Yian Garuga |
 Dual Feral Velocidromes |
 Feral Gypceros Feral Gypceros |
 Magnamalo |
- | Cataracts (Chapter 2) |
 Feral Great Izuchi Feral Great Izuchi
|
 Invasive Arzuros Invasive Arzuros |
 Feral Somnacanth |
 Feral Aknosom |
 Yama Tsukami |
- |
| Galyad (Chapter 3) | |
 Feral Ajarakan |
 Feral Rakna-Kadaki |
 Rey Dau Rey Dau |
- |
| Seranthis (Chapter 4) | |
 Feral Blangonga |
 Goss Harag Goss Harag |
 Malzeno |
 Arkveld |
 Bound Azure Rathalos |
 Bound Lunagaron |
 Aenshin Aenshin |
|
Invasive Monster Bosses
| All Invasive Monster Bosses | |
|---|---|
| Invasive Yian Garuga |
 Invasive Seregios Invasive Seregios |
 Invasive Plesioth Invasive Plesioth |
Invasive Arzuros |
 Invasive Nerscylla Invasive Nerscylla |
 Invasive Shogun Ceanataur Invasive Shogun Ceanataur |
 Invasive Diablos Invasive Diablos |
 Invasive Odogaron Invasive Odogaron |
 Invasive Khezu Invasive Khezu |
- |
Feral Monster Bosses
| List of All Feral Monsters | |
|---|---|
 Feral Nerscylla Feral Nerscylla |
 Feral Brachydios Feral Brachydios |
 Feral Tobi-Kadachi Feral Tobi-Kadachi |
 Feral Glavenus Feral Glavenus |
 Feral Bishaten Feral Bishaten |
 Feral Espinas Feral Espinas |
 Feral Paolumu Feral Paolumu |
- |
Elder Dragon Bosses
| List of All Elder Dragon Bosses | |
|---|---|
 Namielle |
  |
 Yama Tsukami (Green) Yama Tsukami (Green) |
 Velkhana Velkhana |
| Aenshin |
- |
Exotic Monster Bosses
| List of All Exotic Monster Bosses | |
|---|---|
 Exotic Seregios |
 Exotic Velocidrome Exotic Velocidrome |
Optional Bosses
| List of All Optional Bosses | |
|---|---|
 Espinas Espinas
|
- |
Comment
Author

Monster Hunter Stories 3: Twisted Reflection Walkthrough & Guides Wiki
Arkveld Weaknesses, Patterns, and How to Beat
Rankings
- We could not find the message board you were looking for.
Gaming News

![Death Stranding 2: On The Beach [PC] Review | A Port That Delivers](https://img.game8.co/4447392/15310a0c9aa1b6843bb713b2ea216930.jpeg/show)


Popular Games

Genshin Impact Walkthrough & Guides Wiki
Umamusume: Pretty Derby Walkthrough & Guides Wiki
Crimson Desert Walkthrough & Guides Wiki
Monster Hunter Stories 3: Twisted Reflection Walkthrough & Guides Wiki
Honkai: Star Rail Walkthrough & Guides Wiki
Pokemon Pokopia Walkthrough & Guides Wiki
The Seven Deadly Sins: Origin Walkthrough & Guides Wiki
Wuthering Waves Walkthrough & Guides Wiki
Zenless Zone Zero Walkthrough & Guides Wiki
Arknights: Endfield Walkthrough & Guides Wiki


Recommended Games
Fire Emblem Heroes (FEH) Walkthrough & Guides Wiki
Diablo 4: Vessel of Hatred Walkthrough & Guides Wiki
Cyberpunk 2077: Ultimate Edition Walkthrough & Guides Wiki
Yu-Gi-Oh! Master Duel Walkthrough & Guides Wiki
Super Smash Bros. Ultimate Walkthrough & Guides Wiki
Pokemon Brilliant Diamond and Shining Pearl (BDSP) Walkthrough & Guides Wiki
Elden Ring Shadow of the Erdtree Walkthrough & Guides Wiki
Monster Hunter World Walkthrough & Guides Wiki
The Legend of Zelda: Tears of the Kingdom Walkthrough & Guides Wiki
Persona 3 Reload Walkthrough & Guides Wiki


All rights reserved
©CAPCOM CO., LTD, and CAPCOM CO. logos are trademarks or registered trademarks of CAPCOM. All rights reserved.
The copyrights of videos of games used in our content and other intellectual property rights belong to the provider of the game.
The contents we provide on this site were created personally by members of the Game8 editorial department.
We refuse the right to reuse or repost content taken without our permission such as data or images to other sites.