Feral Tobi-Kadachi Weaknesses, Patterns, and How to Beat
This is a guide to the Feral Tobi-Kadachi Boss Fight in Canalta Timberland in Monster Hunter Stories 3 (MHS3). Learn where to find Feral Tobi-Kadachi, how to beat it, its weaknesses, behaviour and attack pattern, and the best strategy to beat Feral Tobi-Kadachi.
| Variants |
 Tobi-Kadachi |
 Feral Tobi-Kadachi |
|---|
List of Contents
Feral Tobi-Kadachi Boss Weaknesses and Resistances
Feral Tobi-Kadachi Weakness
| - | ↓↓ | ↓ | |||
| ↑↑ | ↑ | ↑ |
Feral Tobi-Kadachi Damage Type Weaknesses
| Body Part | |||
|---|---|---|---|
| Main Body | ◯ | ◯ | ◯ |
| Head | ✕ | ◯ | ✕ |
| Legs | ◯ | ✕ | ✕ |
| Tail | ✕ | ✕ | ◯ |
Status Ailment Resistance and Weaknesses
| ↓↓ | ↓ | ↑ | ↓ | ||||||||
| ↓ | ↑ | ↓↓ | |||||||||
Feral Tobi-Kadachi Pattern and Behaviour
| Jump to a Section |
|---|
|
2. Normal State |
Attack Behavior
| Normal State | |
|---|---|
| Electric Charge |
Feral Tobi-Kadachi has 2 states which are its Normal and Electric Charge.
Normal State
| Turn Count | Move |
|---|---|
| Turn 1 | Speed Attack |
| Turn 2 Will transition to Electric Charge state at turn end after using Kadachi Windmill |
Speed Attack or Kadachi Windmill (AoE Skill) Will use Kadachi Windmill after going back from Electric Charge state |
| Turn 3 Will transition to Electric Charge state at turn end after using Kadachi Windmill |
Kadachi Windmill (AoE Skill) |
In this state, Feral Tobi-Kadachi has its blightstone tail glowing making it inadvisable to hit it. It also uses Speed attacks to initiate head-to-heads so make sure to counter it with a Technical attack. After 2 turns, it will try to use Kadachi Windmill which is a skippable AoE so either take the damage or use disrupting skills or status ailments to skip it.
First, it will switch to Electric Charge state after 2 turns but after going back from it, Feral Tobi-Kadachi will only take 1 turn before it starts to use Kadachi Windmill again.
Electric Charge State
| Turn Count | Move |
|---|---|
| Turn 1 | Airborne Drop (Technical Attack) |
| Turn 2 | Feral Vacuum Blast (AoE Skill) |
| Turn 3 | Airborne Drop (Technical Attack) |
| Turn 4 Will transition to Normal state at turn end |
Feral Vacuum Blast (AoE Skill) |
For the Electric Charge state, it will lose its blightstone tail glow and will begin emitting electric discharge. Attacks in this state will consist of Technical attacks so make sure to counter it with a Power attack.
Every even turn, it will try to use a skippable AoE move that will inflict bleeding to your party so make sure to bolster your defense or use a kinship, trap, status ailment or topple to stop it from using said skill. After 4 turns, it will automatically switch back to the normal state.
Recommended Monsties for Feral Tobi-Kadachi
 Ratha Ratha
|
 Boltreaver Astalos Boltreaver Astalos
|
The best monstie for this fight is Ratha and Boltreaver Astalos. Ratha is your default monstie and you cannot remove it but in this fight it has access to poison and fire skills making it a great choice for it. Boltreaver Astalos can inflict paralysis and has high attack and at this point of the game, this is your best Technical attack type monstie.
List of All Monsties (Monster List)
How to Beat Feral Tobi-Kadachi
| Jump to a Section |
|---|
|
|
Level Up to at Least Level 20
In this fight, Feral Tobi-Kadachi is at level 20. If you can resist thunder attacks, it is enough to fight it at levels 15-20 so that you can survive its attacks then heal it back.
EXP Guide: How to Level Up Fast
Use Fire Weapons and Thunder Resist Armor
Feral Tobi-Kadachi is weak to fire while dealing thunder attacks. Make sure to bring fire monsties, weapons and thunder resist armor such as the Gypceros Armor made from materials dropped by a Gypceros.
Invite Kora or Eleanor as a Battle Ally
Given that Feral Tobi-Kadachi is weak to fire, Kora and Eleanor are your best bet. Choose Kora if you are much lower level than the enemy as she can redirect attacks to herself giving you some turns to apply buffs and heal while Eleanor can deal high single-target fire damage which can end the fight quickly but with much higher risk due to her not having any access to buffs or healing.
Aim to Inflict Poison or Darkness
If you have a monstie that can inflict poison or darkness, try inflicting it on Feral Tobi-Kadachi as it is vulnerable to those status ailments. This will help you deal damage every turn and has a higher chance to evade its attacks when applied.
Use A Hunting Horn With Soothing Song
In this stage of the game, monsters will attack you relentlessly but not for your entire health. Feral Tobi-Kadachi's attack patterns suggests that it will give you one turn to freely counter its attacks providing you time to heal. Use a Hunting Horn, especially Magia Charm, with a Soothing Song skill to replenish your health.
Try to Destroy The Tail
Feral Tobi-Kadachi's blightstone point is its tail. If the fight is taking long, aim to destroy its tail only during its Electric Charge state so that it will not backlash at you when you hit it. Use hammers to deal heavy damage to the tail so that it will use a weaker version of its Feral attack once destroyed.
Feral Tobi-Kadachi Location
Found In Blessing Hill, Canalta Timberland
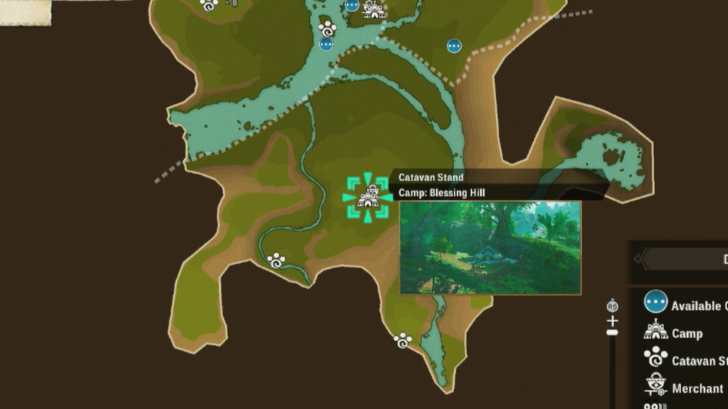
Feral Tobi-Kadachi is an optional boss you can encounter residing in the center of Blessing Hill northeast after you enter the Canalta Timberland region.
Canalta Timberland Map and Exploration Guide
Monster Hunter Stories 3 (MHS 3) Related Guides
Main Mission Bosses
| All Main Mission Bosses | |
|---|---|
| Azuria (Chapter 1) | |
 Honed Glavenus |
 Invasive Yian Garuga Invasive Yian Garuga |
 Dual Feral Velocidromes |
 Feral Gypceros Feral Gypceros |
 Magnamalo |
- | Cataracts (Chapter 2) |
 Feral Great Izuchi Feral Great Izuchi
|
 Invasive Arzuros Invasive Arzuros |
 Feral Somnacanth |
 Feral Aknosom |
 Yama Tsukami |
- |
| Galyad (Chapter 3) | |
 Feral Ajarakan |
 Feral Rakna-Kadaki |
 Rey Dau Rey Dau |
- |
| Seranthis (Chapter 4) | |
 Feral Blangonga |
 Goss Harag Goss Harag |
 Malzeno |
 Arkveld |
 Bound Azure Rathalos |
 Bound Lunagaron |
 Aenshin Aenshin |
|
Invasive Monster Bosses
| All Invasive Monster Bosses | |
|---|---|
| Invasive Yian Garuga |
 Invasive Seregios Invasive Seregios |
 Invasive Plesioth Invasive Plesioth |
Invasive Arzuros |
 Invasive Nerscylla Invasive Nerscylla |
 Invasive Shogun Ceanataur Invasive Shogun Ceanataur |
 Invasive Diablos Invasive Diablos |
 Invasive Odogaron Invasive Odogaron |
 Invasive Khezu Invasive Khezu |
- |
Feral Monster Bosses
| List of All Feral Monsters | |
|---|---|
 Feral Nerscylla Feral Nerscylla |
 Feral Brachydios Feral Brachydios |
| Feral Tobi-Kadachi |
 Feral Glavenus Feral Glavenus |
 Feral Bishaten Feral Bishaten |
 Feral Espinas Feral Espinas |
 Feral Paolumu Feral Paolumu |
- |
Elder Dragon Bosses
| List of All Elder Dragon Bosses | |
|---|---|
 Namielle |
  |
 Yama Tsukami (Green) Yama Tsukami (Green) |
 Velkhana Velkhana |
| Aenshin |
- |
Exotic Monster Bosses
| List of All Exotic Monster Bosses | |
|---|---|
 Exotic Seregios |
 Exotic Velocidrome Exotic Velocidrome |
Optional Bosses
| List of All Optional Bosses | |
|---|---|
 Espinas Espinas
|
- |
Comment
Author

Monster Hunter Stories 3: Twisted Reflection Walkthrough & Guides Wiki
Feral Tobi-Kadachi Weaknesses, Patterns, and How to Beat
Rankings
- We could not find the message board you were looking for.
Gaming News

![Death Stranding 2: On The Beach [PC] Review | A Port That Delivers](https://img.game8.co/4447392/15310a0c9aa1b6843bb713b2ea216930.jpeg/show)


Popular Games

Genshin Impact Walkthrough & Guides Wiki
Umamusume: Pretty Derby Walkthrough & Guides Wiki
Crimson Desert Walkthrough & Guides Wiki
Monster Hunter Stories 3: Twisted Reflection Walkthrough & Guides Wiki
Honkai: Star Rail Walkthrough & Guides Wiki
Pokemon Pokopia Walkthrough & Guides Wiki
The Seven Deadly Sins: Origin Walkthrough & Guides Wiki
Wuthering Waves Walkthrough & Guides Wiki
Zenless Zone Zero Walkthrough & Guides Wiki
Arknights: Endfield Walkthrough & Guides Wiki


Recommended Games
Fire Emblem Heroes (FEH) Walkthrough & Guides Wiki
Diablo 4: Vessel of Hatred Walkthrough & Guides Wiki
Cyberpunk 2077: Ultimate Edition Walkthrough & Guides Wiki
Yu-Gi-Oh! Master Duel Walkthrough & Guides Wiki
Super Smash Bros. Ultimate Walkthrough & Guides Wiki
Pokemon Brilliant Diamond and Shining Pearl (BDSP) Walkthrough & Guides Wiki
Elden Ring Shadow of the Erdtree Walkthrough & Guides Wiki
Monster Hunter World Walkthrough & Guides Wiki
The Legend of Zelda: Tears of the Kingdom Walkthrough & Guides Wiki
Persona 3 Reload Walkthrough & Guides Wiki


All rights reserved
©CAPCOM CO., LTD, and CAPCOM CO. logos are trademarks or registered trademarks of CAPCOM. All rights reserved.
The copyrights of videos of games used in our content and other intellectual property rights belong to the provider of the game.
The contents we provide on this site were created personally by members of the Game8 editorial department.
We refuse the right to reuse or repost content taken without our permission such as data or images to other sites.