This survey will take about 1 minute.
Your answers will help us to improve our website.
Fire Emblem: Three Houses (FE3H)
Chapter 3: Mutiny in the Mist Walkthrough
This is the walkthrough for the third chapter of Fire Emblem: Three Houses (FETH, FE3H). Read on to find out the best way to use your time in the Monastery, how to win in battle, and which dialogue options to choose!
List of Contents
| Previous Chapter | Next Chapter |
|---|---|
| Chapter 2: Familiar Scenery | Chapter 4: The Goddess' Rite of Rebirth |
Chapter 3 - Returning to the Monastery
A New Mission
Upon returning to the monastery, Rhea will task you with another mission. No dialogue options in the following scenes will provide support increases.
Calendar
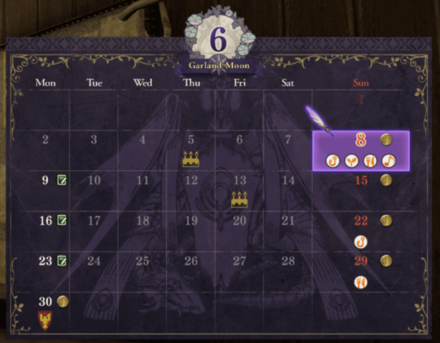
| Date | Event |
|---|---|
| 6/5 | Sylvain's Birthday |
| 6/8 | Golden Fish Blessing of the Land Sweet-Tooth Week Choir Festival |
| 6/9 | Anna's Birthday (DLC) |
| 6/13 | Lorenz's Birthday |
| 6/22 | Edelgard's Birthday Fish of Mystery |
| 6/29 | Inter-House Reception |
| 6/30 | Chapter Mission: Seize Castle Gaspard |
Free Time
Main Quest
| Bolstering Forces |
|---|
| Accept the quest from Jeritza and hire a Battalion. |
Side Quests
| Optional Quests | |
|---|---|
| Lost? Found! | |
| Learning from the Best | |
| Words of Wisdom | |
| Abyss Rumor (DLC) | |
| Roster Retrieval (DLC) | |
Chapter Objectives
| Chapter Objectives | |
|---|---|
| 1 | Talk to Jeritza to accept his quest. Go to the Marketplace and talk to the Guildmaster and hire a Battalion. |
| 2 | Talk to Jeralt and accept the Lost? Found! quest. Find the Wooden Flask around the Knights' Quarters and return it to Jeralt. This unlocks the Lost Items feature. |
| 3 | Head to Manuela's location then accept her quest, Learning from the Best. (consumes activity points). This will let you try Faculty Training. |
| 5 | Go to Mercedes and accept her quest, Words of Wisdom. Talk to the cathedral counselor, and unlock the Advice Box. Questions are random so try to pick out the most favorable choice among all the options available. |
| DLC | Talk to Constance to accept the Roster Retrieval quest. It will be a battle quest that will be available on your next free day. This will unlock the Secret Roster which will allow you to view all student information. |
Optional Supports
| Character | Correct Response |
|---|---|
 Balthus Balthus
|
I have not. |
 Caspar Caspar
|
When you're busy there's no alternative. |
 Constance Constance
|
I don't. |
 Ferdinand Ferdinand
|
I hope no one is hurt. |
 Hapi Hapi
|
You must really hate the church. |
 Ignatz Ignatz
|
Do you like art? |
 Leonie Leonie
|
You really want to bring the money in, huh? |
 Linhardt Linhardt
|
Sounds unhealthy. |
 Lorenz Lorenz
|
I agree. |
 Marianne Marianne
|
I came to see the horses. |
 Seteth Seteth
|
Not at all. |
 Sothis Sothis
|
I should have listened more intently. |
 Sylvain Sylvain
|
I saw him at the training ground. |
 Yuri Yuri
|
What writing on which wall? |
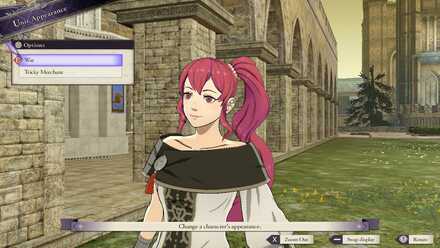
Lost Items
Starting this chapter, you will find lost items scattered around Garreg Mach. These can be returned to their owner, which will reward you with additional Support EXP.
| Item | Location | Owner |
|---|---|---|
| Wooden Flask | Captain's Quarters | Jeralt |
| School of Sorcery Book | Dining Hall | Annette |
| Hand Drawn Map | North of Dining Hall | Leonie |
| White Glove | Officers Academy | Edelgard (Black Eagles Only) |
| Leather Bow Sheath | Reception Hall | Claude (Golden Deers Only) |
| Sketch of a Sigil | Second Floor | Hanneman |
| Elegant Hair Clip | Second Floor | Rhea |
| Dulled Long Sword | Training Grounds | Dimitri (Blue Lions Only) |
| Tattered Overcoat | Training Grounds | Caspar |
| Wooden Button | Training Grounds | Raphael |
For more information about lost items, see the link below.
Lost Items Guide | Lost Items List
Advice Box
The Advice Box is an activity you can participate in during your free time. Giving out the correct advice to the person in trouble will boost their support towards you.
Mission Assistance
You can ask a student outside of your house to help you with battles and missions for the whole month. They will not gain experience for it, but you will be able to build support between them.
Recruit Anna (DLC)
If you have the Expansion Pass, you can now recruit Anna, the merchant. There are no recruitment requirements and she will unlock a new Paralogue that grants additional Gold.
Chapter 3 Mission: The Magdred Ambush
Battle Preparations
The battle for this chapter will introduce the fog of war, preventing you from seeing enemy unit placements. You can prepare in advance by purchasing torches from the Item Shop to illuminate portions of the battlefield.
Chapter 3 Battle: The Magdred Ambush Walkthrough
Chapter 3 - After the Battle
There will be cutscenes discussing Lonato's plot. Below are the dialogue choices you can choose to increase support with several characters.
Black Eagles
| Dialogue Option | Effect |
|---|---|
|
A) That's taking it a bit far. B) Agreed. |
A) No change. B) Increases Edelgard's support. |
Blue Lions
The choices you make will not have any effect on Dimitri's support level.
Golden Deers
The choices you make will not have any effect on Claude's support level.
All Houses
| Dialogue Option | Effect |
|---|---|
|
A) You can count on us. B) We won't let her down. C) Won't that endanger the students? |
A) No change. B) Increases Seteth's support. C) No change. |
Fire Emblem: Three Houses - Related Links
Comment
Author
Chapter 3: Mutiny in the Mist Walkthrough
Please participate in our site
improvement survey
03/2026
improvement survey
03/2026
Would you assist in
improving Game8's site?
improving Game8's site?

×
We are listening to our users' valuable opinions and discussing how to act on them.
The information collected through this survey will be used for the purpose of improving our services. In addition, the information will only be disclosed a part of a statistic in a format that will not allow identification of personal information.
Begin Survey
Not Now
×
Please rate each item regarding Game8.co's Advertisements.
Amount of Ads
Very Dissatisfied
Somewhat Dissatisfied
Fine
Somewhat Satisfied
Highly Satisfied
Placement of Ads
Timing of Ad Display
Ad Loading Speed
Safeness of Ads
Content of Ads
×
Please rate each item regarding Game8.co's Quality of Articles.
Amount of information
Very Dissatisfied
Somewhat Dissatisfied
Fine
Somewhat Satisfied
Highly Satisfied
Frequency of updates
Speed of new information
Accuracy of articles
Understandibility of articles
Readability of sentences
×
Please rate each item regarding Game8.co's Usability of the Site.
Ease of finding information
Very Dissatisfied
Somewhat Dissatisfied
Fine
Somewhat Satisfied
Highly Satisfied
Loading Speed
Use of Color
Font Size
Visibility of Images
Easy to Understand Layout
×
Please rate each item regarding Game8.co's Message Boards, Comments.
Ease of Writing
Very Dissatisfied
Somewhat Dissatisfied
Fine
Somewhat Satisfied
Highly Satisfied
Readability
Ease in Finding Information
Comment Quality
Comment Quantity
Admin Response
×
Please rate each item regarding Game8.co's Site's new design.
Please rate our site's new design
Very Dissatisfied
Somewhat Dissatisfied
Fine
Somewhat Satisfied
Highly Satisfied
Do you think that the website's design change makes the site easier to use?
Has the new design made it easier for you to find information on the site?
Has the new design improved the overall visual appeal of the site?
How would you rate your overall satisfaction with the new design of the site?
×
How likely are you to recommend Game8 to someone you know?
Very Unlikely
0
1
2
3
4
5
6
7
8
9
10
Very Likely
If you have other opinions regarding potential improvement to the website, please share them with us. We would appreciate your honest opinion.
Note: This is a free response section, so you can proceed without entering anything.
Note: Please be sure not to enter any kind of personal information into your response.
Note: Please be sure not to enter any kind of personal information into your response.
×
Thank You
×
Thank you for participating in our survey! Your answers will help us to improve the quality of our website and services.
We hope you continue to make use of Game8.
We hope you continue to make use of Game8.
Close
Rankings
- We could not find the message board you were looking for.
Gaming News


![Monster Hunter Stories 3 Review [First Impressions] | Simply Rejuvenating](https://img.game8.co/4438641/2a31b7702bd70e78ec8efd24661dacda.jpeg/thumb)
Popular Games

Genshin Impact Walkthrough & Guides Wiki
Honkai: Star Rail Walkthrough & Guides Wiki
Umamusume: Pretty Derby Walkthrough & Guides Wiki
Pokemon Pokopia Walkthrough & Guides Wiki
Resident Evil Requiem (RE9) Walkthrough & Guides Wiki
Monster Hunter Wilds Walkthrough & Guides Wiki
Wuthering Waves Walkthrough & Guides Wiki
Arknights: Endfield Walkthrough & Guides Wiki
Pokemon FireRed and LeafGreen (FRLG) Walkthrough & Guides Wiki
Pokemon TCG Pocket (PTCGP) Strategies & Guides Wiki


Recommended Games
Diablo 4: Vessel of Hatred Walkthrough & Guides Wiki
Cyberpunk 2077: Ultimate Edition Walkthrough & Guides Wiki
Fire Emblem Heroes (FEH) Walkthrough & Guides Wiki
Yu-Gi-Oh! Master Duel Walkthrough & Guides Wiki
Super Smash Bros. Ultimate Walkthrough & Guides Wiki
Pokemon Brilliant Diamond and Shining Pearl (BDSP) Walkthrough & Guides Wiki
Elden Ring Shadow of the Erdtree Walkthrough & Guides Wiki
Monster Hunter World Walkthrough & Guides Wiki
The Legend of Zelda: Tears of the Kingdom Walkthrough & Guides Wiki
Persona 3 Reload Walkthrough & Guides Wiki


All rights reserved
©2019 Nintendo / INTELLIGENT SYSTEMS. Co-developed by KOEI TECMO GAMES CO., LTD. Fire Emblem and Nintendo Switch are trademarks of Nintendo. © 2019 Nintendo.
The copyrights of videos of games used in our content and other intellectual property rights belong to the provider of the game.
The contents we provide on this site were created personally by members of the Game8 editorial department.
We refuse the right to reuse or repost content taken without our permission such as data or images to other sites.