This survey will take about 1 minute.
Your answers will help us to improve our website.
Mario & Luigi: Brothership
List of Battle Plugs
★ Mario & Luigi: Brothership out now!
★ How to Unlock and Complete Every Challenge!
★ Pull off strong Bros. Attacks for maximum damage!
★ Best Gear | Best Battle Plugs | Rank-Up Bonuses
★ Power up with Best Battle Plug Combos.
★ Share your Hammer Rally high scores!

Battle Plugs are support items in Mario & Luigi: Brothership that give bonus effects when triggered in combat. Learn more about the Battle Plugs and how to use them and check out a list of all the Battle Plugs and their effects in this guide!
| Battle Plug Guides | |
|---|---|
| Best Battle Plugs to Buy First | Best Battle Plug Combos |
| How to Get More Power Tap Outlets | List of Battle Plugs |
List of Battle Plugs
Offense Battle Plugs
| Battle Plug | Effect | |||
|---|---|---|---|---|
|
|
Get an EXCELLENT rating with a Jump or Hammer attack to also damage nearby targets. | |||
| Charges | 10 | Recharge Turns | 30 | |
|
|
When you get an EXCELLENT rating with a Jump or Hammer attack, an iron ball drops on the target to deal more damage. | |||
| Charges | 10 | Recharge Turns | 30 | |
|
|
Increases the damage you deal with Jump and Hammer attacks by 15%. Also, an EXCELLENT rating can make a target dizzy. | |||
| Charges | 15 | Recharge Turns | 20 | |
|
|
Jump attacks against flying enemies are guarenteed critical hits. | |||
| Charges | 10 | Recharge Turns | 30 | |
|
|
Hammer attacks against spiky enemies are guarenteed critical hits. | |||
| Charges | 10 | Recharge Turns | 30 | |
|
|
Restores 50% of BP used on a Bros. Attack that earns an EXCELLENT rating. | |||
| Charges | 3 | Recharge Turns | 20 | |
|
|
Automatically gives Jump, Hammer, and Bros. attacks an EXCELLENT rating. | |||
| Charges | 5 | Recharge Turns | 20 | |
|
|
Increases the damage you deal with Jump and Hammer attacks by 15%. Also, if you get an EXCELLENT, your target may become burned. | |||
| Charges | 15 | Recharge Turns | 20 | |
|
|
Increases the damage you deal with Jump and Hammer attacks by 15%. Also, if you get an EXCELLENT, your target may become iced. | |||
| Charges | 15 | Recharge Turns | 20 | |
|
|
Grants you one additional Jump or Hammer attack. | |||
| Charges | 10 | Recharge Turns | 30 | |
|
|
Boosts damage dealt by Bros. Attacks by 20% but also increases BP spent by 10%. | |||
| Charges | 5 | Recharge Turns | 30 | |
|
|
Get an EXCELLENT rating with a Jump or Hammer attack to also damage nearby targets. | |||
| Charges | 10 | Recharge Turns | 30 | |
|
|
When you get an EXCELLENT rating with a Jump or Hammer attack, an iron ball drops on the target to deal more damage. | |||
| Charges | 10 | Recharge Turns | 30 | |
|
|
Jump and Hammer attacks against Bowser's army are guaranteed critical hits. | |||
| Charges | 10 | Recharge Turns | 30 | |
|
|
Jump and Hammer attacks against Zok Troops are guaranteed critical hits. | |||
| Charges | 10 | Recharge Turns | 30 | |
|
|
Jump and Hammer attacks against Glohmed enemies are guaranteed critical hits. | |||
| Charges | 10 | Recharge Turns | 30 | |
|
|
When you get an EXCELLENT rating on a Jump or Hammer attack, sometimes turns your target into a Seedle. | |||
| Charges | 10 | Recharge Turns | 20 | |
Defense Battle Plugs
| Battle Plug | Effect | |||
|---|---|---|---|---|
|
|
Holding the button makes counters easier, enabling you to float in midair when you jump and enlarging your hammer for those counters. | |||
| Charges | 10 | Recharge Turns | 20 | |
|
|
Prevents the effects of Trip and Dizzy. | |||
| Charges | 5 | Recharge Turns | 20 | |
|
|
Turns jump counters into ground pounds, and charges up hammer counters to do an extra 30% damage. | |||
| Charges | 10 | Recharge Turns | 20 | |
|
|
When you have at least 2 HP and you take enough damage to become KO'd, preserves you at 1 HP instead. | |||
| Charges | 5 | Recharge Turns | 30 | |
|
|
When you take damage, sometimes triggers an extra Jump or Hammer attack back at the attacker. | |||
| Charges | 3 | Recharge Turns | 30 | |
|
|
Reduces the damage you suffer from enemies to 0. | |||
| Charges | 3 | Recharge Turns | 40 | |
|
|
Prevents the effects of Burn and Ice | |||
| Charges | 5 | Recharge Turns | 20 | |
|
|
Reduces damage received from enemies by 20% | |||
| Charges | 10 | Recharge Turns | 30 | |
|
|
Causes damage to charge you up. Once full, your next attack deals +100% damage. | |||
| Charges | 1 | Recharge Turns | 5 | |
|
|
At the end of his turns, Luigi will sometimes take a bonus attack or search the area for an item. | |||
| Charges | 5 | Recharge Turns | 20 | |
|
|
Prevents the effects of Glohm. | |||
| Charges | 5 | Recharge Turns | 20 | |
Utility Battle Plugs
| Battle Plug | Effect | |||
|---|---|---|---|---|
|
|
When your HP becomes low, will automatically use a Mushroom. | |||
| Charges | 5 | Recharge Turns | 20 | |
|
|
When your BP becomes low, will automatically use a Syrup Jar. | |||
| Charges | 5 | Recharge Turns | 20 | |
|
|
When you gain a status effect, will automatically use a Refreshing Herb. | |||
| Charges | 5 | Recharge Turns | 20 | |
|
|
When one of the brothers is KO'd, automatically uses a 1-Up Mushroom. | |||
| Charges | 3 | Recharge Turns | 20 | |
|
|
Makes it more likely that defeated enemies will drop items. | |||
| Charges | 10 | Recharge Turns | 20 | |
|
|
Items you use return to your inventory. | |||
| Charges | 5 | Recharge Turns | 30 | |
|
|
Causes enemies to drop coins each time you damage them in proportion to damage dealth. | |||
| Charges | 20 | Recharge Turns | 20 | |
|
|
The Auto series of Battle Plugs will automatically select the most efficient recovery item for your current state. | |||
| Charges | 15 | Recharge Turns | 15 | |
|
|
When another equipped plug reaches zero charges, its recharge time is shortened by 50% turns. | |||
| Charges | 5 | Recharge Turns | 20 | |
|
|
When using an item, uses two identical items out of your inventory to give the benefit for both. | |||
| Charges | 5 | Recharge Turns | 30 | |
|
|
The number of charges decreases at the end of every turn. When it reaches zero, HP and BP are 100% restored. | |||
| Charges | 15 | Recharge Turns | 15 | |
|
|
When you are afflicted with Glohm, will automatically use an Ampberry. | |||
| Charges | 5 | Recharge Turns | 20 | |
How to Use Battle Plugs
Set Plugs in the Menu
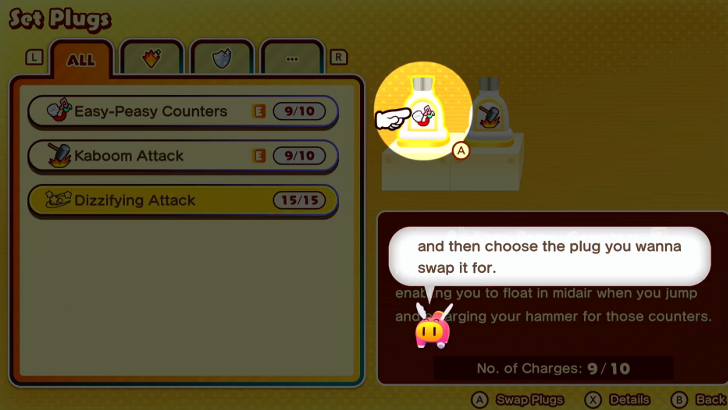
Battle Plugs can be set in the Main Menu before entering combat through the Set Plugs option or during combat through the Battle Plugs command block.
You can only set as many Battle Plugs as you have Power Taps. Continue progressing the Main Story to unlock more Power Taps!
Managing Battle Plugs in Battle is Recommended
Especially in boss fights, it is advisable to take time and assess the current situation to know which Battle Plugs will suit you best. Check your active Battle Plugs and see if they can be adjusted for a major advantage against your opponent.
Ideally, you should switch to Defense or Utility plugs if you're struggling and go full Offense once everything is under your control. You can also try different combinations of each type that suit your play style!
Trigger Their Effects in Combat
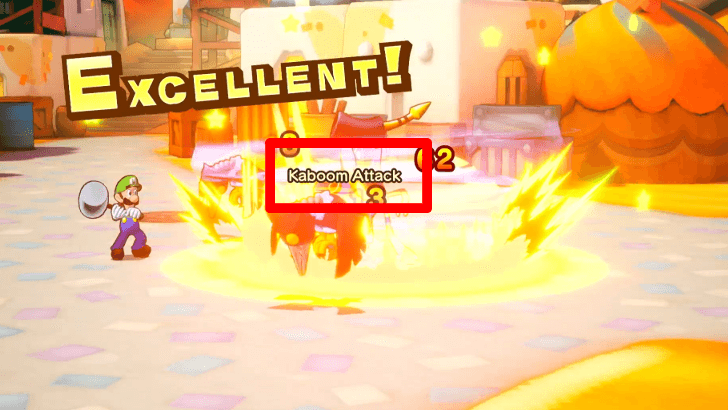
Each Battle Plug has specific triggers that activates their effect. Triggers like landing an EXCELLENT rating on attacks or receiving a status ailment activates the effect of several Battle Plugs.
Recharge by Completing Turns
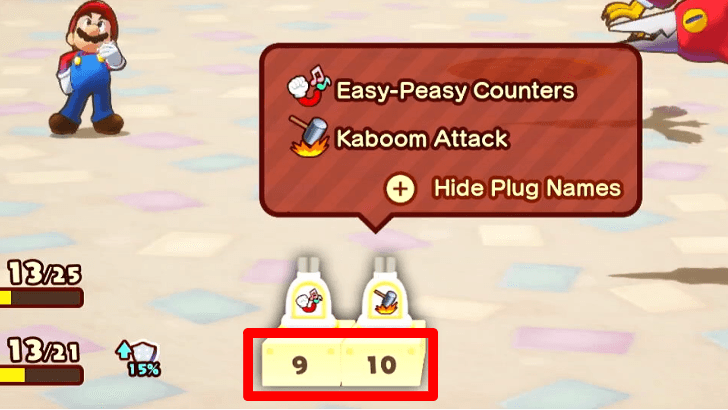
There is a limit on how many times a Battle Plug's effect can be triggered. Once a Battle Plug's Charge reaches zero, it will be unusable for a while and can only be recharged by completing turns in combat with Mario and Luigi.
Don't forget to replace a Battle Plug with a charged one when it's depleted! Replacing Battle Plugs can be done in the Set Plugs menu during or outside of combat.
What are Battle Plugs
Support Combat Items
Battle Plugs are support items that can only be used in combat. They make battles easier with effects like increasing your damage output with follow-up attacks, preventing status ailments, and making it easier to counter.
Created with Lumenade

The rest of the Battle Plugs can only be obtained through crafting using Lumenades. You can get more Lumenade by exploring islands and looking for Spritebulbs.
Unlock More Types as You Create Plugs
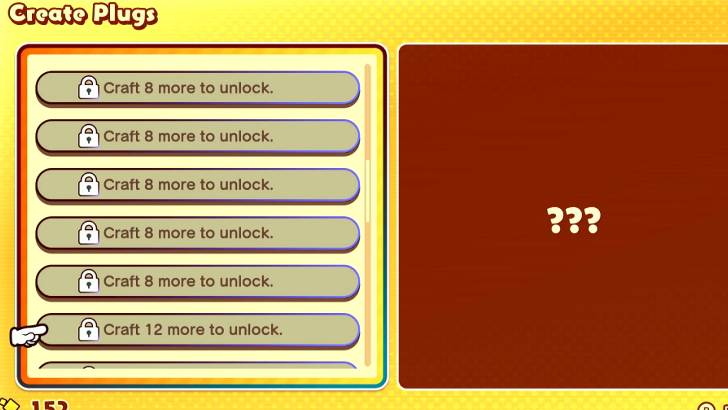
Initially, you'll only be able to create a few types of Battle Plugs. Expand the list to unlock Battle Plugs with better or different effects by crafting more in the Create Plugs menu!
Mario and Luigi: Brothership Related Guides

Mario & Luigi: Brothership Guides and Wiki
| Mario and Luigi: Brothership Guides | |
|---|---|
 Walkthrough Walkthrough |
 Side Quests Side Quests |
 Tips and Tricks Tips and Tricks |
 Islands Islands |
 Bosses Bosses |
 Enemies Enemies |
 Gear Gear |
 Items Items |
 Bros. Attacks Bros. Attacks |
 Battle Plugs Battle Plugs |
 News and Game Info News and Game Info |
|
Comment
2  Anonymous over 1 year
I don't believe there is a way to craft all of them. I got all but two as well with my final luminade count at 20 and no more are available on any island. Dunno.
Author

List of Battle Plugs
Please participate in our site
improvement survey
03/2026
improvement survey
03/2026
Would you assist in
improving Game8's site?
improving Game8's site?

×
We are listening to our users' valuable opinions and discussing how to act on them.
The information collected through this survey will be used for the purpose of improving our services. In addition, the information will only be disclosed a part of a statistic in a format that will not allow identification of personal information.
Begin Survey
Not Now
×
Please rate each item regarding Game8.co's Advertisements.
Amount of Ads
Very Dissatisfied
Somewhat Dissatisfied
Fine
Somewhat Satisfied
Highly Satisfied
Placement of Ads
Timing of Ad Display
Ad Loading Speed
Safeness of Ads
Content of Ads
×
Please rate each item regarding Game8.co's Quality of Articles.
Amount of information
Very Dissatisfied
Somewhat Dissatisfied
Fine
Somewhat Satisfied
Highly Satisfied
Frequency of updates
Speed of new information
Accuracy of articles
Understandibility of articles
Readability of sentences
×
Please rate each item regarding Game8.co's Usability of the Site.
Ease of finding information
Very Dissatisfied
Somewhat Dissatisfied
Fine
Somewhat Satisfied
Highly Satisfied
Loading Speed
Use of Color
Font Size
Visibility of Images
Easy to Understand Layout
×
Please rate each item regarding Game8.co's Message Boards, Comments.
Ease of Writing
Very Dissatisfied
Somewhat Dissatisfied
Fine
Somewhat Satisfied
Highly Satisfied
Readability
Ease in Finding Information
Comment Quality
Comment Quantity
Admin Response
×
Please rate each item regarding Game8.co's Site's new design.
Please rate our site's new design
Very Dissatisfied
Somewhat Dissatisfied
Fine
Somewhat Satisfied
Highly Satisfied
Do you think that the website's design change makes the site easier to use?
Has the new design made it easier for you to find information on the site?
Has the new design improved the overall visual appeal of the site?
How would you rate your overall satisfaction with the new design of the site?
×
How likely are you to recommend Game8 to someone you know?
Very Unlikely
0
1
2
3
4
5
6
7
8
9
10
Very Likely
If you have other opinions regarding potential improvement to the website, please share them with us. We would appreciate your honest opinion.
Note: This is a free response section, so you can proceed without entering anything.
Note: Please be sure not to enter any kind of personal information into your response.
Note: Please be sure not to enter any kind of personal information into your response.
×
Thank You
×
Thank you for participating in our survey! Your answers will help us to improve the quality of our website and services.
We hope you continue to make use of Game8.
We hope you continue to make use of Game8.
Close
Rankings
- We could not find the message board you were looking for.
Gaming News


![Everwind Review [Early Access] | The Shaky First Step to A Very Long Journey](https://img.game8.co/4440226/ab079b1153298a042633dd1ef51e878e.png/thumb)

![Monster Hunter Stories 3 Review [First Impressions] | Simply Rejuvenating](https://img.game8.co/4438641/2a31b7702bd70e78ec8efd24661dacda.jpeg/thumb)
Popular Games

Genshin Impact Walkthrough & Guides Wiki
Honkai: Star Rail Walkthrough & Guides Wiki
Umamusume: Pretty Derby Walkthrough & Guides Wiki
Pokemon Pokopia Walkthrough & Guides Wiki
Resident Evil Requiem (RE9) Walkthrough & Guides Wiki
Monster Hunter Wilds Walkthrough & Guides Wiki
Wuthering Waves Walkthrough & Guides Wiki
Arknights: Endfield Walkthrough & Guides Wiki
Pokemon FireRed and LeafGreen (FRLG) Walkthrough & Guides Wiki
Pokemon TCG Pocket (PTCGP) Strategies & Guides Wiki


Recommended Games
Diablo 4: Vessel of Hatred Walkthrough & Guides Wiki
Fire Emblem Heroes (FEH) Walkthrough & Guides Wiki
Yu-Gi-Oh! Master Duel Walkthrough & Guides Wiki
Super Smash Bros. Ultimate Walkthrough & Guides Wiki
Pokemon Brilliant Diamond and Shining Pearl (BDSP) Walkthrough & Guides Wiki
Elden Ring Shadow of the Erdtree Walkthrough & Guides Wiki
Monster Hunter World Walkthrough & Guides Wiki
The Legend of Zelda: Tears of the Kingdom Walkthrough & Guides Wiki
Persona 3 Reload Walkthrough & Guides Wiki
Cyberpunk 2077: Ultimate Edition Walkthrough & Guides Wiki


All rights reserved
© Nintendo. Games are property of their respective owners.
The copyrights of videos of games used in our content and other intellectual property rights belong to the provider of the game.
The contents we provide on this site were created personally by members of the Game8 editorial department.
We refuse the right to reuse or repost content taken without our permission such as data or images to other sites.
I thought there would be something hidden that I missed but towards the end of the game you're allowed into the main town of Offandon and the final 80 luminade points can be collected there, if you got all the previous ones that should complete all required to craft everything. Also make sure you go to Doctor Vulko's house after you're able to remove the boulder, some are there as well.