Lushgreen Great Lighthouse Island Walkthrough Guide
★ Mario & Luigi: Brothership out now!
★ How to Unlock and Complete Every Challenge!
★ Pull off strong Bros. Attacks for maximum damage!
★ Best Gear | Best Battle Plugs | Rank-Up Bonuses
★ Power up with Best Battle Plug Combos.
★ Share your Hammer Rally high scores!

Lushgreen Great Lighthouse Island is an Island located at Lushgreen Sea in Mario & Luigi: Brothership. See a map of Lushgreen Great Lighthouse Island, its location in Concordia, and how to unlock it.
List of Contents
Lushgreen Great Lighthouse Island Map and Location
Lushgreen Great Lighthouse Island Map
| Icon | How to Use |
|---|---|
 | Show Names This button reveals the Name of every icon currently shown. |
 | Show Pins This button will toggle between showing and hiding all the pins that you have already marked as acquired. |
 | Fullscreen This button will change the map display to fill the screen. |
 | Search Mode Toggle This button will display a search bar which you can use to search for an individual pin by its name. |
 | Icon Mode Toggle In Search Mode, this button will toggle you back to Icon Mode, removing the search bar and displaying the icons again. |
 | All Pins This button is shown along with the Icons on the right when there are over 6 types of pins. Click it for a full selection of all available pin types. |
 | Counter Tracks the number of pins you have of a certain type. The pin type shown is set to the page and currently cannot be changed; however, all pin type counters can be viewed by clicking the checklist icon on the right side. |
| View All Counters This icon is found on the right side of the Counter. When a map has more than one pin type, click this icon to see Counters for all pin types. |
List of All Islands and Islets
Lushgreen Great Lighthouse Island Location

Follows the green dotted line around Lushgreen Sea.
Lushgreen Great Lighthouse Island Grampy Turnip Location
No Grampy Turnip In This Location
| There is no Grampy Turnip in Lushgreen Great Lighthouse Island. |
All 18 Grampy Turnip Locations
Lushgreen Great Lighthouse Island Item Locations
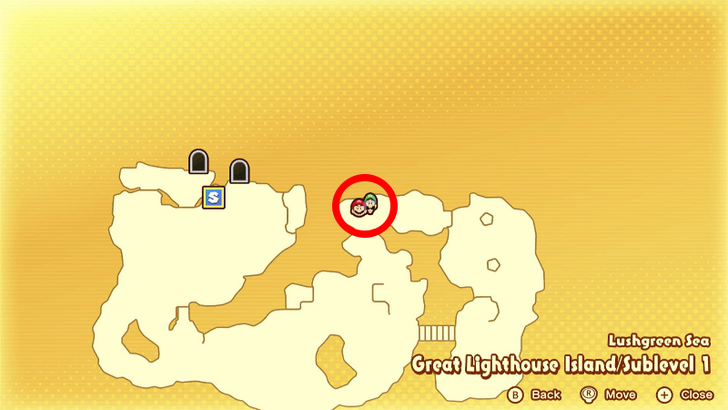
Steady Hammer
| Map Image | Overworld Image |
|---|---|
 |
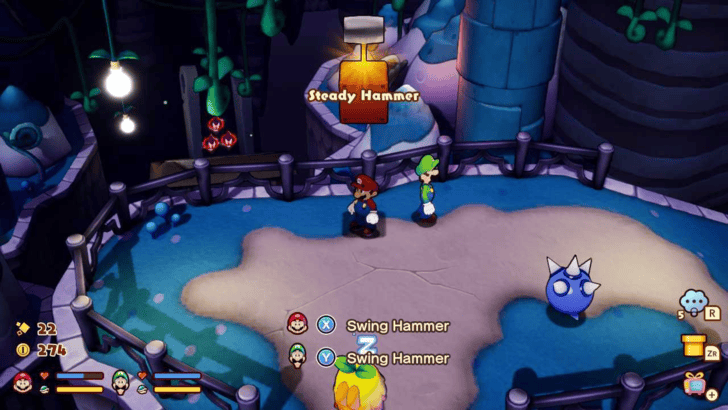 |
There is a question mark block on Sublevel 1 of the island that contains a Steady Hammer when you hit it.
Lushgreen Great Lighthouse Island Walkthrough
| # | Step by Step Objectives |
|---|---|
| 1 |
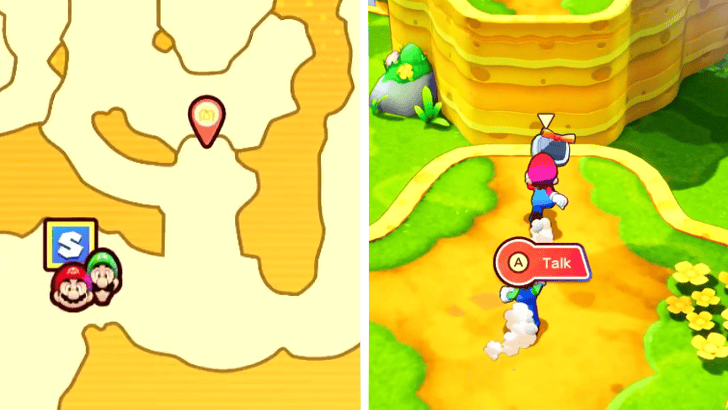 After Connie wanders off, follow her to Florall Island and converse with her. Severed ocean currents will be reconnected afterward, opening a path to the Lushgreen Sea Great Lighthouse, so return to Shipshape Island. Upon your return, Arc will notify you of the newly opened currents and encourage you to make preparations before leaving. |
| 2 |
 Afterward, the brothers will be met with two Toads that propose an upgrade for the ship. After agreeing to their proposal, you may now press the X Button while looking at the Ocean Map to enable Faster Sailing to help reach your destination in mere moments! |
| 3 |
 Another group introduces themselves to Mario and Luigi, and asks them for a chat. Follow them to the southern part of Shipshape Island, and speak with one of them. They will offer help as Advisers who you can speak to, if you would like to have the status of the brothers' Level and Gear checked, or gather information about a newly discovered island. Before heading to a new island, you can always come back to your Advisers on the same spot, to make sure you are fully prepared to face any challenges ahead! |
| 4 |
 After your delightful conversations, sail full speed head toward the Lushgreen Sea Great Lighthouse with the ship's new Faster Sailing mode. Discover the island through your telescope, and fire the Big Cannon once you have made your preparations. |
| 5 |
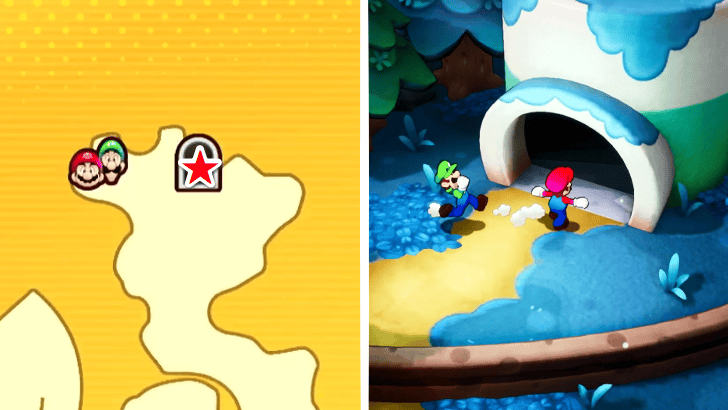 Upon landing on its shores, you may enter the Lighthouse through a small passage on the right side of the island, as the main entrance will be closed. Once inside the main area of Sublevel 1, walk toward the only open door to the south and walk through. |
| 6 |
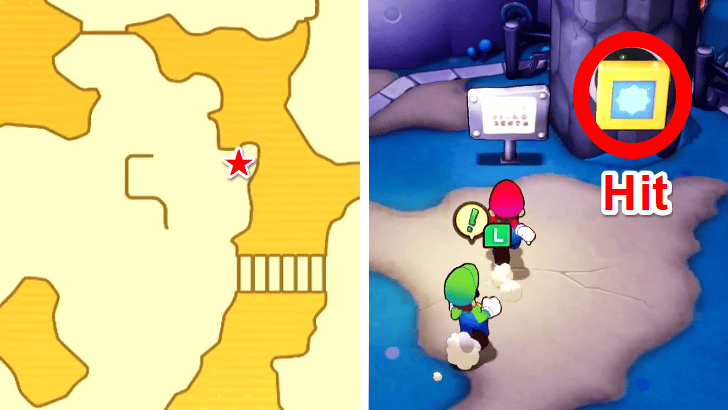 The area will be filled with enemies such as Capnaps and Spikelys, though wade your way through to the eastern part of the room where you can find a Button. Hit it as Mario or Luigi with either the X or Y Button on your controller to raise and activate all of the fans in the area. |
| 7 |
 Using the UFO Spin Bros. Move, you may choose to take an extra optional route to collect all coins, or directly navigate your way toward the platform with the raised staircase through the straightforward route. Once there, hit the M Button as Mario to lower the staircase and allow passage for Connie. |
| 8 |
 Proceed through the new doorway and head down the staircase to your left. This will lead you into Sublevel 2 where the entire group hears a loud growl in the distance. You will be approached by a Concordian named Dewey Fightem who warns you about the monster past the locked gate. It will now be up to the brothers to fell this beast, and relight the lighthouse with Connie. But first, they must unlock the gate by connecting two Power Plugs on the sockets in front of it. |
| * |
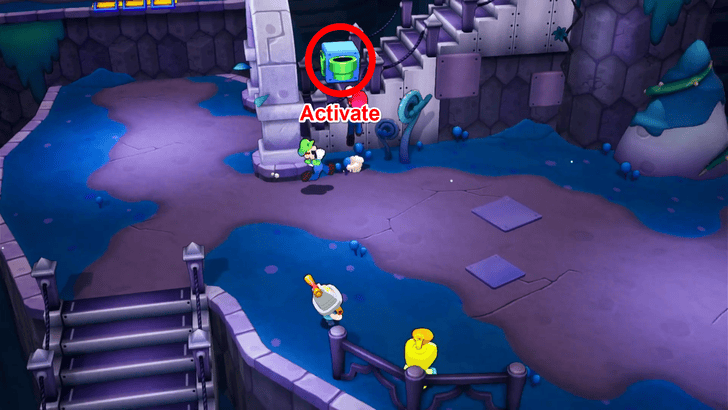 You may activate the green pipe block by the staircase next to the gate in order to erect a Green Pipe that connects Sublevel 2 to the Island's Shores for ease of travel. |
| 9 |
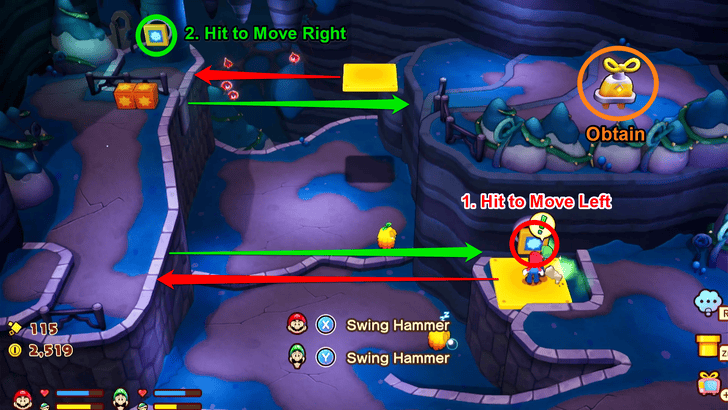 Head to the northern part of the area where you can find the first Power Plug. To reach it, hammer the first button which activates a moving platform that ferry you across a large gap. Repeat the same process on another moving platform, and collect the Power Plug from the other side. |
| 10 |
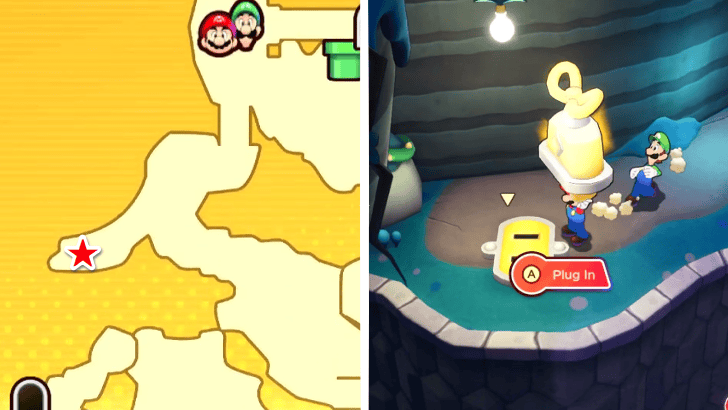 Jump down the small cliff while holding the Power Plug. Although instead of inserting it in one of the sockets in front of the locked main gate, head south of the area and insert it in a socket on the opposite path to a small locked gate, then pass through. |
| 11 |
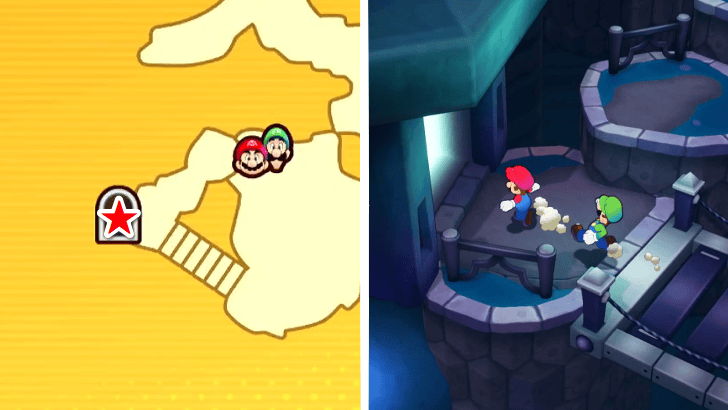 Walk down the staircase, turn left to pass through the archway, and head toward the open doorway past the bridge to enter a new area. |
| 12 |
Walk south of the area until you reach another button with moving platforms. Leave Luigi at the button by pressing the L Button on your controller. Press the Y Button to activate the platforms once, make Mario cross over to the next platform, then have Luigi hammer the button one final time to take Mario all the way toward the other side of the area. Once there, hammer the M Button on the wall as Mario to deploy a staircase for Luigi, and unlock the small gate, then pass through the newly opened route to return into the main area of Sublevel 2. |
| 13 |
You will get a clear path of where the next Power Plug is after crossing the doorway. Interact with the Exclamation Block at the bottom of the platform to open the gate, then leave Luigi at the button once more while Mario crosses the moving platforms. |
| 14 |
On the second portion of the moving platforms, Mario will have to time his jumps alongside Luigi's button activation. Carefully climb all of the moving platforms until you reach the Power Plug and hammer the M Button to deploy a staircase leading back down, and reuniting Mario with Luigi. |
| 15 |
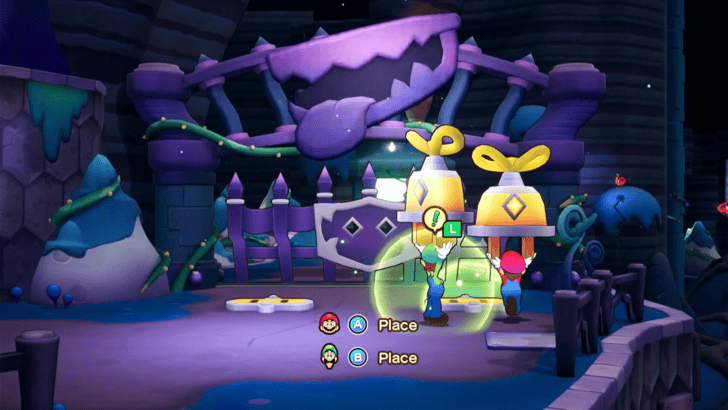 Pick up the second Power Plug from the socket you inserted it in earlier, and make your way toward the locked main gate with both Power Plugs. Insert them in their respective sockets to open the gate and proceed through. Do not forget to use the Save Block and Recovery Block found near the entrance to the final area, as there will be a big fight up ahead. |
| 16 |
 Stepping through the big gates, you will be greeted with the sight of a huge green monster accompanied by the Extension Corps. After a brief conversation, you will be left to battle Gobblick! ★ Battle Tip! Beating Gobblick Gobblick is a boss that can deal the Dizzy Status Ailment. With this in mind, we recommend stocking up on Refreshing Herbs to remove the debuffs in case they are applied. Stay cautious of Gobblick's attacks as they can deal significant damage to you, so take every opportunity to dodge and counterattack. ▶︎ How to Beat Gobblick |
| 17 |
 A cutscene will play after successfully defeating Gobblick. Head to the elevator at the far end of the room afterward to reach the Lighthouse's Top Floor. Head outdoors and watch as Connie relights the first Great Lighthouse on your long journey. As the cutscene concludes, the gang will be transported back to Shipshape Island where Arc notifies them that the ship is now sailing the Color-Full Sea. |
Lushgreen Great Lighthouse Island Puzzles
How to Solve the Fan Puzzle
Hit the Switch and Use UFO Spin
To reach the upper area of the Great Lighthouse Island at Lushgreen Sea, hit the rectangular switch to activate the fans.
Use the UFO Spin Bros. Move to fly towards the fan platforms until you the ledge on the top-left corner of the area.
How to Solve the Plug Puzzle
Place the Plugs on the Sockets

The 2nd sublevel of the island requires you to place two plugs on the sockets to enter the area leading to the boss. The plugs are located at the bottom part of the sublevel.
Bosses in Lushgreen Great Lighthouse Island
Gobblick
| Enemy | Details |
|---|---|
 Gobblick Gobblick
|
First Encounter Level and Location: ・Level 12 ・Lushgreen Sea, Great Lighthouse Island Best Option to Attack With: Either Hammer or Jump Attacks |
Gobblick is the boss that you encounter at the end of the Lushgreen Great Lighthouse Island.
Glohm Gobblick
| Enemy | Details |
|---|---|
 Glohm Gobblick Glohm Gobblick
|
First Encounter Level and Location: ・Level 35 ・Lushgreen Sea, Great Lighthouse Island Best Option to Attack With: Either Hammer or Jump Attacks |
Glohm Gobblick is an optional boss that you can encounter as part of the Glohm Gobblick side quest.
Enemies in Lushgreen Great Lighthouse Island
All Enemies Found in Lushgreen Great Lighthouse Island
| Enemy | Enemy Tips |
|---|---|
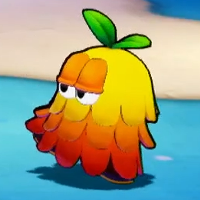 Capnap Capnap
|
Capnap's dash attacks can be tricky, as it often falls asleep mid-dash and may even get pushed back by its own snores. Watch closely and time your jumps carefully. |
 Spikely Spikely
|
Spikely jumps a random number of times before launching its spike attack, so keep an eye on its movements and time your hammer strikes carefully. |
Lushgreen Great Lighthouse Island Shops
Item and Gear Shop
| Map Image | Overworld Image |
|---|---|
 |
 |
The item and gear shop is located northeast of Lushgreen Great Lighthouse.
Items Sold
| Item | Price |
|---|---|
|
|
10 |
|
|
50 |
|
|
20 |
|
|
20 |
|
|
30 |
|
|
5 |
Gear Sold
| Gear | Price |
|---|---|
|
|
160 |
|
|
300 |
|
|
360 |
|
|
160 |
|
|
300 |
|
|
360 |
|
|
120 |
|
|
240 |
|
|
300 |
Mario and Luigi: Brothership Related Guides

List of All Islands and Islets
All Islands
| Lushgreen Sea Islands | |
|---|---|
| Great Lighthouse Island (Lushgreen Sea) | Rumbla Island |
| Twistee Island | Raynforst Island |
| Florall Island | |
| Color-Full Sea Islands | |
| Great Lighthouse Island (Color-Full Sea) | Desolatt Island |
| Merrygo Island | Lottacoins Island |
| Allsand Island | |
| Brrrning Sea Islands | |
| Great Lighthouse Island (Brrrning Sea) | Bulbfish Island |
| Heatfreeze Island | Skorcheen Island |
| Slippenglide Island | |
| Gulchrock Sea Islands | |
| Great Lighthouse Island (Gulchrock Sea) | Offandon Island |
| Wayaway Island | |
| Stormstar Sea Islands | |
| Conductor Island | Jellyfish Island |
| Fortress Zokket | Soli-Tree |
Author
Lushgreen Great Lighthouse Island Walkthrough Guide
improvement survey
03/2026
improving Game8's site?

Your answers will help us to improve our website.
Note: Please be sure not to enter any kind of personal information into your response.

We hope you continue to make use of Game8.
Rankings
- We could not find the message board you were looking for.
Gaming News
Popular Games

Genshin Impact Walkthrough & Guides Wiki

Honkai: Star Rail Walkthrough & Guides Wiki

Umamusume: Pretty Derby Walkthrough & Guides Wiki

Pokemon Pokopia Walkthrough & Guides Wiki

Resident Evil Requiem (RE9) Walkthrough & Guides Wiki

Monster Hunter Wilds Walkthrough & Guides Wiki

Wuthering Waves Walkthrough & Guides Wiki

Arknights: Endfield Walkthrough & Guides Wiki

Pokemon FireRed and LeafGreen (FRLG) Walkthrough & Guides Wiki

Pokemon TCG Pocket (PTCGP) Strategies & Guides Wiki
Recommended Games

Diablo 4: Vessel of Hatred Walkthrough & Guides Wiki

Fire Emblem Heroes (FEH) Walkthrough & Guides Wiki

Yu-Gi-Oh! Master Duel Walkthrough & Guides Wiki

Super Smash Bros. Ultimate Walkthrough & Guides Wiki

Pokemon Brilliant Diamond and Shining Pearl (BDSP) Walkthrough & Guides Wiki

Elden Ring Shadow of the Erdtree Walkthrough & Guides Wiki

Monster Hunter World Walkthrough & Guides Wiki

The Legend of Zelda: Tears of the Kingdom Walkthrough & Guides Wiki

Persona 3 Reload Walkthrough & Guides Wiki

Cyberpunk 2077: Ultimate Edition Walkthrough & Guides Wiki
All rights reserved
© Nintendo. Games are property of their respective owners.
The copyrights of videos of games used in our content and other intellectual property rights belong to the provider of the game.
The contents we provide on this site were created personally by members of the Game8 editorial department.
We refuse the right to reuse or repost content taken without our permission such as data or images to other sites.





![Everwind Review [Early Access] | The Shaky First Step to A Very Long Journey](https://img.game8.co/4440226/ab079b1153298a042633dd1ef51e878e.png/thumb)

![Monster Hunter Stories 3 Review [First Impressions] | Simply Rejuvenating](https://img.game8.co/4438641/2a31b7702bd70e78ec8efd24661dacda.jpeg/thumb)


The map is missing the top floor