Chapter 16: The Great Bridge Coup (Blue Lions) Walkthrough
This is the battle walkthrough for the mission The Great Bridge Coup from Fire Emblem: Three Houses (FETH, FE3H). Read on to find out about map features, what enemies you will encounter, and tips for winning!
List of Contents
| Previous Battle | Story Walkthrough | Next Battle |
|---|---|---|
| Chapter 15: Ambush at Ailell | Chapter 16: The Rose-Colored River |
Chapter 17: To War at Gronder |
Chapter 16 - Map and Overview
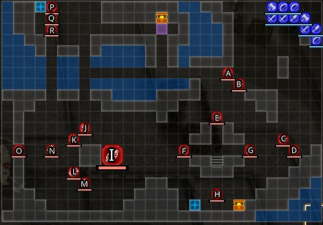
| Victory Conditions | |
|---|---|
| Defeat all enemy commanders. | |
| Defeat Conditions | |
| Your character or Dimitri falls in battle. | |
| # of Player Units | 10 |
| # of Enemies | 18 |
Chapter 16 - Enemies
| Pos | Enemy | Pos | Enemy |
|---|---|---|---|
| A | Imperal Soldier (Fortress Knight) | J | Imperial Soldier (Armored Knight) |
| B | Imperial Soldier (Fortress Knight) | K | Imperial Soldier (Dark Mage) |
| C | Imperial Soldier (Fortress Knight) | L | Imperial Soldier (Dark Mage) |
| D | Imperial Soldier (Fortress Knight) | M | Imperial Soldier (Armored Knight) |
| E | Imperial Soldier (Armored Knight) | N | Ladislava |
| F | Imperial Soldier (Cavalier) | O | Imperial Soldier (Priest) |
| G | Imperial Soldier (Brigand) | P | Imperial Soldier (Paladin) |
| H | Imperial Soldier (Cavalier) | Q | Ferdinand |
| I | Demonic Beast | R | Imperial Soldier (Paladin) |
Ladislava
| Level | HP | Mov. | Class |
|---|---|---|---|
| 33 | 47 | 8 | Wyvern Lord |
| Mt. | Spd | Hit | Crit |
| 52 | 19 | 87 | 23 |
| Range | Prt | Res | Avd |
| 1 | 33 | 12 | 49 |
| Weapon | Dropped Items | ||
| Silver Axe | N/A | ||
| Battalion | |||
| Empire Elite Wyvern Co. | |||
| Level | Endurance | Gambit | Uses |
| 1 | 75 | Assembly | 2 |
Ferdinand
| Level | HP | Mov. | Class |
|---|---|---|---|
| 33 | 54 | 8 | Paladin |
| Mt. | Spd | Hit | Crit |
| 47 | 13 | 113 | 17 |
| Range | Prt | Res | Avd |
| 1 | 28 | 11 | 45 |
| Weapon | Dropped Items | ||
| Silver Lance | N/A | ||
| Battalion | |||
| Aegir Astral Knights | |||
| Level | Endurance | Gambit | Uses |
| 1 | 105 | Assault Troop | 2 |
Acheron
| Level | HP | Mov. | Class |
|---|---|---|---|
| 33 | 42 | 4 | Warlock |
| Mt. | Spd | Hit | Crit |
| 29 | 13 | 93 | 18 |
| Range | Prt | Res | Avd |
| 1-2 | 2 | 27 | 23 |
| Weapon | Dropped Items | ||
| Thunder | N/A | ||
Lorenz
| Level | HP | Mov. | Class |
|---|---|---|---|
| 33 | 56 | 8 | Paladin |
| Mt. | Spd | Hit | Crit |
| 45 | 9 | 111 | 14 |
| Range | Prt | Res | Avd |
| 1 | 29 | 22 | 9 |
| Weapon | Dropped Items | ||
| Silver Lance | N/A | ||
| Battalion | |||
| Gloucester Knights | |||
| Level | Endurance | Gambit | Uses |
| 1 | 105 | Assault Troop | 2 |
Imperial General
Enemy data will be gathered soon.
Ladislava
| Level | HP | Mov. | Class |
|---|---|---|---|
| 34 | 52 | 8 | Wyvern Lord |
| Mt. | Spd | Hit | Crit |
| 58 | 25 | 92 | 28 |
| Range | Prt | Res | Avd |
| 1 | 37 | 17 | 55 |
| Weapon | Dropped Items | ||
| Silver Axe | N/A | ||
| Battalion | |||
| Empire Elite Wyvern Co. | |||
| Level | Endurance | Gambit | Uses |
| 1 | 75 | Assembly | 2 |
Ferdinand
| Level | HP | Mov. | Class |
|---|---|---|---|
| 34 | 60 | 8 | Paladin |
| Mt. | Spd | Hit | Crit |
| 53 | 21 | 128 | 22 |
| Range | Prt | Res | Avd |
| 1 | 29 | 15 | 63 |
| Weapon | Dropped Items | ||
| Silver Lance | N/A | ||
| Battalion | |||
| Aegit Astral Knights | |||
| Level | Endurance | Gambit | Uses |
| 1 | 105 | Assault Troop | 2 |
Acheron
| Level | HP | Mov. | Class |
|---|---|---|---|
| 34 | 47 | 4 | Warlock |
| Mt. | Spd | Hit | Crit |
| 35 | 17 | 98 | 23 |
| Range | Prt | Res | Avd |
| 1-2 | 12 | 28 | 27 |
| Weapon | Dropped Items | ||
| Thunder | N/A | ||
| Level | HP | Mov. | Class |
|---|---|---|---|
| 34 | 47 | 4 | Warlock |
| Mt. | Spd | Hit | Crit |
| 35 | 17 | 98 | 23 |
| Range | Prt | Res | Avd |
| 1-2 | 12 | 28 | 27 |
| Weapon | Dropped Items | ||
| Thunder | N/A | ||
Lorenz
| Level | HP | Mov. | Class |
|---|---|---|---|
| 34 | 61 | 8 | Paladin |
| Mt. | Spd | Hit | Crit |
| 50 | 15 | 127 | 20 |
| Range | Prt | Res | Avd |
| 1 | 31 | 28 | 25 |
| Weapon | Dropped Items | ||
| Silver Lance | N/A | ||
| Battalion | |||
| Gloucester Knights | |||
| Level | Endurance | Gambit | Uses |
| 1 | 105 | Assault Troop | 2 |
Imperial General
| Level | HP | Mov. | Class |
|---|---|---|---|
| 34 | 60 | 8 | Paladin |
| Mt. | Spd | Hit | Crit |
| 51 | 19 | 115 | 22 |
| Range | Prt | Res | Avd |
| 1 | 31 | 15 | 29 |
| Weapon | Dropped Items | ||
| Silver Lance | N/A | ||
| Battalion | |||
| Empire Knights | |||
| Level | Endurance | Gambit | Uses |
| 1 | 60 | Blaze | 1 |
General Replacement
The Imperial General replaces the enemy commander that you have recruited before reaching this chapter.
Chapter 16 - Chests
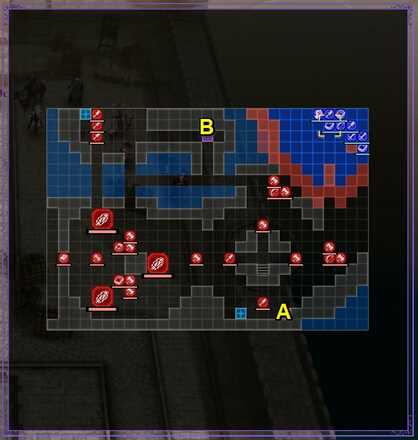
Talisman (A)
A talisman can be obtained from the treasure chest on the lower part of the map.
Critical Ring (B)
A Critical Ring can be found in the treasure chest near the ballista in the upper portion of the map.
Chapter 16 - Map Features
Tiles
| Tiles | Description |
|---|---|
| Rubble | Navigable only by fliers |
| Rampart | Navigable only by fliers |
| Wall | Navigable only by fliers |
| River | Navigable only by fliers |
| Heal Tile+ | 1 Prt, 1 Res, +30% HP each turn for non-fliers |
Capturing Strongholds
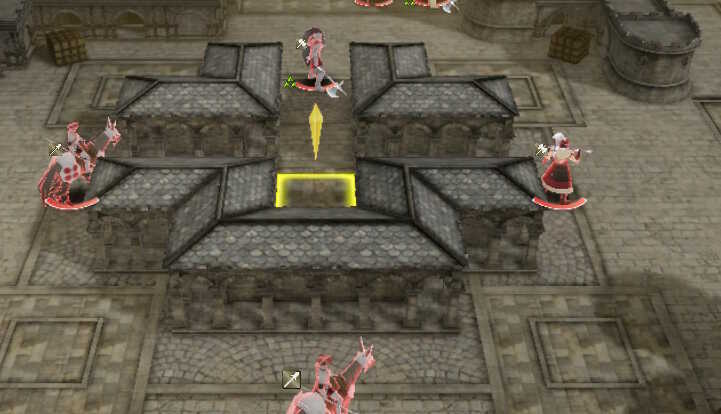
Once you approach the fortress, the cross-shaped building, southwest of your starting location, it will begin spawning archers and cavaliers alternating per turn. The only way to stop this is to defeat the Imperial Soldiers surrounding the fortress.
Enemy Ambush
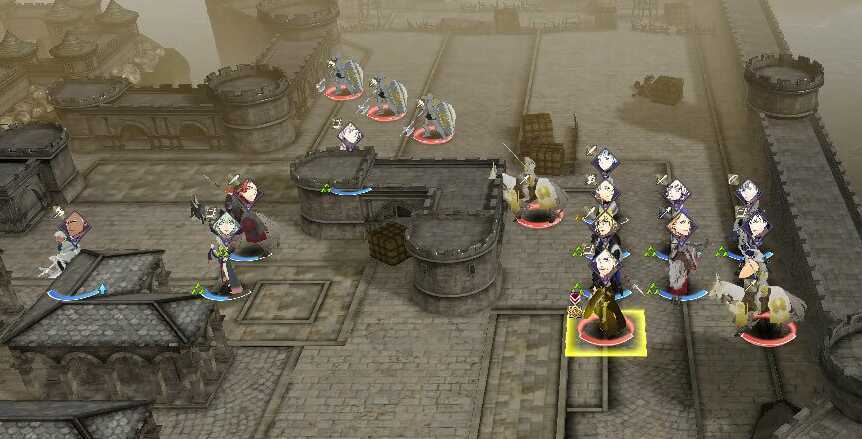
After most of your units approach the fortress, Acheron teleports in from where you just came from, alongside other Alliance Soldiers.
When you start engaging Ferdinand, Lorenz will arrive there as well as his troops.
Chapter 16 - Tips and Tricks
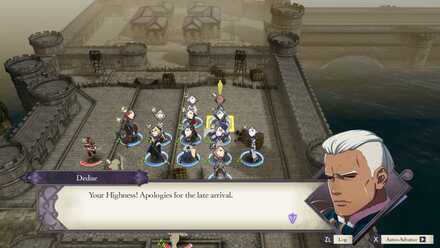
Dedue's Return
Your Highness! Apologies for the late arrival.
If you completed Dedue's paralogue mission back in Chapter 1, Dedue will arrive from your starting position after a few turns and render aid. For information about the said paralogue, see the link below.
Paralogue: War for the Weak Walkthrough
Engaging Ferdinand
Take a sizable force to engage Ferdinand, as he will have reinforcements, Lorenz and two other horsemen.
Ferdinand Chokepoint at the Bridge
Have someone waiting at the bridge south of Ferdinand's position because once Lorenz steps in, he will head down south. You can take him without anyone else if you catch him at the bridge.
Fire Emblem: Three Houses - Related Links
Part 2 - Azure Moon Battle Walkthroughs
Comment
Author
Chapter 16: The Great Bridge Coup (Blue Lions) Walkthrough
improvement survey
03/2026
improving Game8's site?

Your answers will help us to improve our website.
Note: Please be sure not to enter any kind of personal information into your response.

We hope you continue to make use of Game8.
Rankings
- We could not find the message board you were looking for.
Gaming News
Popular Games

Genshin Impact Walkthrough & Guides Wiki

Honkai: Star Rail Walkthrough & Guides Wiki

Umamusume: Pretty Derby Walkthrough & Guides Wiki

Pokemon Pokopia Walkthrough & Guides Wiki

Resident Evil Requiem (RE9) Walkthrough & Guides Wiki

Monster Hunter Wilds Walkthrough & Guides Wiki

Wuthering Waves Walkthrough & Guides Wiki

Arknights: Endfield Walkthrough & Guides Wiki

Pokemon FireRed and LeafGreen (FRLG) Walkthrough & Guides Wiki

Pokemon TCG Pocket (PTCGP) Strategies & Guides Wiki
Recommended Games

Diablo 4: Vessel of Hatred Walkthrough & Guides Wiki

Fire Emblem Heroes (FEH) Walkthrough & Guides Wiki

Yu-Gi-Oh! Master Duel Walkthrough & Guides Wiki

Super Smash Bros. Ultimate Walkthrough & Guides Wiki

Pokemon Brilliant Diamond and Shining Pearl (BDSP) Walkthrough & Guides Wiki

Elden Ring Shadow of the Erdtree Walkthrough & Guides Wiki

Monster Hunter World Walkthrough & Guides Wiki

The Legend of Zelda: Tears of the Kingdom Walkthrough & Guides Wiki

Persona 3 Reload Walkthrough & Guides Wiki

Cyberpunk 2077: Ultimate Edition Walkthrough & Guides Wiki
All rights reserved
©2019 Nintendo / INTELLIGENT SYSTEMS. Co-developed by KOEI TECMO GAMES CO., LTD. Fire Emblem and Nintendo Switch are trademarks of Nintendo. © 2019 Nintendo.
The copyrights of videos of games used in our content and other intellectual property rights belong to the provider of the game.
The contents we provide on this site were created personally by members of the Game8 editorial department.
We refuse the right to reuse or repost content taken without our permission such as data or images to other sites.


![Everwind Review [Early Access] | The Shaky First Step to A Very Long Journey](https://img.game8.co/4440226/ab079b1153298a042633dd1ef51e878e.png/thumb)

![Monster Hunter Stories 3 Review [First Impressions] | Simply Rejuvenating](https://img.game8.co/4438641/2a31b7702bd70e78ec8efd24661dacda.jpeg/thumb)


