Chapter 14: Protecting Garreg Mach (Blue Lions) Walkthrough
This is the battle walkthrough for the mission Protecting Garreg Mach from Chapter 14: The Delusional Prince in Fire Emblem: Three Houses (FETH, FE3H). Read on to find out about map features, what enemies you will encounter, and tips for winning!
List of Contents
| Previous Battle | Story Walkthrough | Next Battle |
|---|---|---|
| Chapter 13: Hunting at Daybreak | Chapter 14: The Delusional Prince | Chapter 15: Ambush at Ailell |
Map and Overview

| Victory Conditions | |
|---|---|
| Rout the Enemy | |
| Defeat Conditions | |
| Your character or Dimitri falls in battle, or either defended location is captured. | |
| # of Player Units | 11 |
| # of Enemies | 31 (Normal) 35 (Hard) |
Enemies

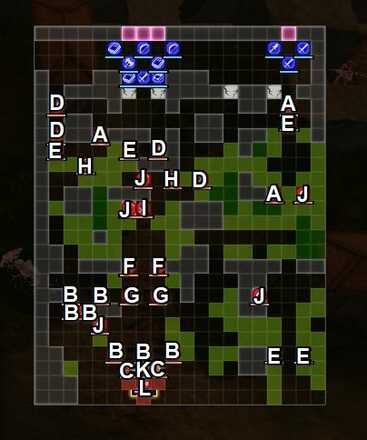
| A | Imperial Soldier (Armored Knight) | B | Imperial Soldier (Fortress Knight) |
|---|---|---|---|
| C | Imperial Soldier (Warrior) | D | Imperial Soldier (Cavalier) |
| E | Imperial Soldier (Pegasus Knight) | F | Imperial Soldier (Paladin) |
| G | Imperial Soldier (Dark Bishop) | H | Imperial Soldier (Mage) |
| I | Imperial Soldier (Mercenary) | J | Imperial Soldier (Archer) |
| K | Imperial Soldier (Warlock) | L | Randolph |
Randolph
| Level | HP | Mov. | Class |
|---|---|---|---|
| 29 | 52 | - | Warrior |
| Mt. | Spd | Hit | Crit |
| 52 | 10 | 83 | 22 |
| Range | Prt | Res | Avd |
| 1 | 21 | 8 | 18 |
| Weapon | Dropped Items | ||
| Silver Axe | N/A | ||
| Battalion | |||
| Empire Raiders | |||
| Level | Endurance | Gambit | Uses |
| 1 | 74 | Absorption | 1 |
Randolph
| Level | HP | Mov. | Class |
|---|---|---|---|
| 30 | 57 | - | Warrior |
| Mt. | Spd | Hit | Crit |
| 57 | 16 | 101 | 26 |
| Range | Prt | Res | Avd |
| 1 | 26 | 13 | 31 |
| Weapon | Dropped Items | ||
| Silver Axe | N/A | ||
| Battalion | |||
| Empire Raiders | |||
| Level | Endurance | Gambit | Uses |
| 1 | 75 | Absorption | 1 |
Enemy Loots

Brave Lance (A) - Hard Only
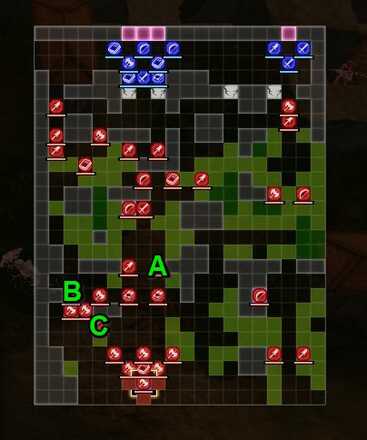
A Brave Lance can be obtained from one of the paladin pair. Make sure to obtain this weapon as Brave equipments are extremely valuable and rare.
Goddess Ring (B) - Hard Only
A Goddess Ring can be obtained from one of the fortress Knight on the lower left side of the map.
Magic Bow (C )
The Archer on the lower left side of the map uses and drops a Blessed Bow upon defeat.
Map Features
Tiles
| Tiles | Description |
|---|---|
| Heal Tile + | + 1 Def, + 1 Res, and +30% HP per turn |
| Ballista | Mt 5, Durability 15, Requires Bow Skill D+ or higher, Range: 3-12 |
Revisited Map
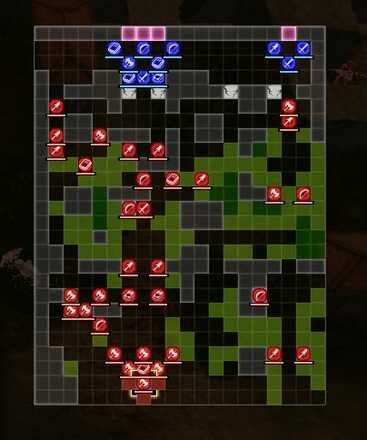
This is exactly the same map as Chapter 12's battle, albeit with fortifications and more narrow pathways, as well as ruined walls. There are ballistae that can be used by your archer units to support from very long ranges. As usual, the enemy commander, Randolph, stands on a Heal Tile +.
Tips and Tricks
Escort Your Ally!

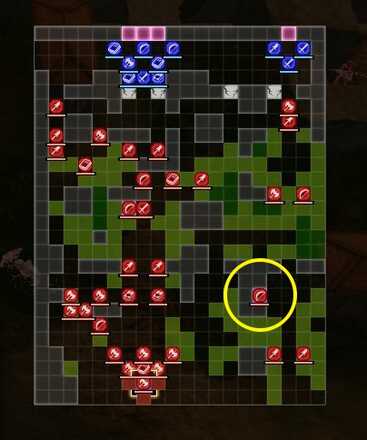
On turn 2, an allied soldier will enter the field through the northeastern stairs, right behind the starting position of your eastern detachment of troops. Leading them to the position highlighted on the map will trigger a trap that lures all of the opponents units into the middle of the town outside the walls and sets it ablaze. Your units will stay in their locations and not have the ground under them turn into fire.
Fire Emblem: Three Houses - Related Links
Part 2 - Azure Moon Battle Walkthroughs
Comment
Author
Chapter 14: Protecting Garreg Mach (Blue Lions) Walkthrough
improvement survey
03/2026
improving Game8's site?

Your answers will help us to improve our website.
Note: Please be sure not to enter any kind of personal information into your response.

We hope you continue to make use of Game8.
Rankings
- We could not find the message board you were looking for.
Gaming News
Popular Games

Genshin Impact Walkthrough & Guides Wiki

Honkai: Star Rail Walkthrough & Guides Wiki

Umamusume: Pretty Derby Walkthrough & Guides Wiki

Pokemon Pokopia Walkthrough & Guides Wiki

Resident Evil Requiem (RE9) Walkthrough & Guides Wiki

Monster Hunter Wilds Walkthrough & Guides Wiki

Wuthering Waves Walkthrough & Guides Wiki

Arknights: Endfield Walkthrough & Guides Wiki

Pokemon FireRed and LeafGreen (FRLG) Walkthrough & Guides Wiki

Pokemon TCG Pocket (PTCGP) Strategies & Guides Wiki
Recommended Games

Diablo 4: Vessel of Hatred Walkthrough & Guides Wiki

Fire Emblem Heroes (FEH) Walkthrough & Guides Wiki

Yu-Gi-Oh! Master Duel Walkthrough & Guides Wiki

Super Smash Bros. Ultimate Walkthrough & Guides Wiki

Pokemon Brilliant Diamond and Shining Pearl (BDSP) Walkthrough & Guides Wiki

Elden Ring Shadow of the Erdtree Walkthrough & Guides Wiki

Monster Hunter World Walkthrough & Guides Wiki

The Legend of Zelda: Tears of the Kingdom Walkthrough & Guides Wiki

Persona 3 Reload Walkthrough & Guides Wiki

Cyberpunk 2077: Ultimate Edition Walkthrough & Guides Wiki
All rights reserved
©2019 Nintendo / INTELLIGENT SYSTEMS. Co-developed by KOEI TECMO GAMES CO., LTD. Fire Emblem and Nintendo Switch are trademarks of Nintendo. © 2019 Nintendo.
The copyrights of videos of games used in our content and other intellectual property rights belong to the provider of the game.
The contents we provide on this site were created personally by members of the Game8 editorial department.
We refuse the right to reuse or repost content taken without our permission such as data or images to other sites.


![Everwind Review [Early Access] | The Shaky First Step to A Very Long Journey](https://img.game8.co/4440226/ab079b1153298a042633dd1ef51e878e.png/thumb)

![Monster Hunter Stories 3 Review [First Impressions] | Simply Rejuvenating](https://img.game8.co/4438641/2a31b7702bd70e78ec8efd24661dacda.jpeg/thumb)


