How to Beat Croco and Rewards

This is a guide for Croco, a Boss in Super Mario RPG Remake. Read on to learn how to catch Croco, how you can beat Croco, its stats, rewards, location, weaknesses, and best party setup!
List of Contents
How to Catch Croco
Approach from Behind to Catch Croco
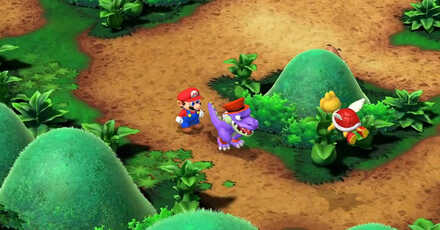
To initiate a fight with Croco, you will need to catch him three (3) times. He can be caught quickly by dashing.
Dashing is fine to use as long as you are not within Croco's field of view where he is facing. If you get seen, he will run away to a different spot.
Ambush Croco
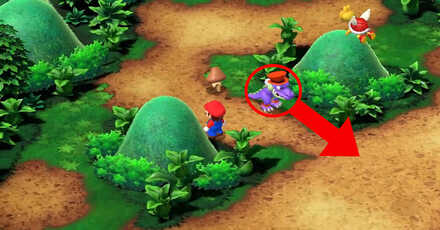
In case you are outside of Croco's field of view, he will be moving around at a predictable pattern, so you should take the time to study it when you are hiding from him.
To make it easier to catch, consider ambushing him the moment he turns around. Make sure to position yourself close to him when he does!
After catching and defeating Croco, he will drop a wallet that can be returned to its owner in the Mushroom Kingdom or kept. What to do with it is up to you, but it is best to return the wallet to earn a Flower Tab, which permanently increases maximum FP.
Should You Give Back the Wallet?
Croco Weaknesses and Recommended Level
Overview
Rewards
| Croco Rewards | ||
|---|---|---|
| Coins | EXP | Item Drops |
| 10 | 16 | Wallet, Rare Frog Coin, Flower Tab |
| Thought Peek Quote | ||
| Gosh, I'm good! | ||
| Croco (Mole Mines) Rewards | ||
|---|---|---|
| Coins | EXP | Item Drops |
| 50 | 30 | Flower Jar, Microbomb |
| Thought Peek Quote | ||
| Ooh! I'm good! | ||
Best Party for Croco
| Best Party (Bandit's Way) |
Best Party (Mole Mines) |
Best Party Setup (Bandit's Way)
| Character | Role |
|---|---|
|
|
・Main attacker ・Uses Fireball to exploit Fire weakness |
|
|
・Serves as a healer ・Heal with Mushrooms and uses Honey Syrup for FP recovery |
Recommended Equipment and Level
| Character/Level | Equipment |
|---|---|
|
Level: 3 |
Weapon:
Armor: Accessory: None |
|
Level: 3 |
Weapon: None Armor: Accessory: None |
Best Party Setup (Mole Mines)
| Character | Role |
|---|---|
|
|
・Main attacker ・Support with Mushrooms and Honey Syrups ・Use normal attacks whenever available |
|
|
・Serves as a healer ・Heals with HP Rain |
|
|
・Main attacker ・Uses special attacks and conserves FP with normal attacks |
Recommended Equipment and Level
| Character/Level | Equipment |
|---|---|
|
Level: 7 |
Weapon:
Armor: Accessory: |
|
Level: 7 |
Weapon:
Armor: Accessory: |
|
Level: 7 |
Weapon:
Armor: Accessory: |
Best Equipment for Each Character
1st Fight Croco Guide and Attack Patterns
| Croco (Bandit's Way) |
|---|
|
|
| Croco (Mole Mines) |
| Jump to 2nd Fight Guide |
Raise Party Level to 3

It is best to raise at least Mario to Level 3 to unlock his special move Fireball, which can be used to exploit Croco's weakness to fire.
You can choose to level even higher, making the fight much easier with the party at Level 4. If the fight proves to be difficulty, you can always choose to grind and level up before the battle!
Buy Armor at the Mushroom Castle
| Equipment | |
|---|---|
| (Mario) | (Mallow) |
| Where to Get | |
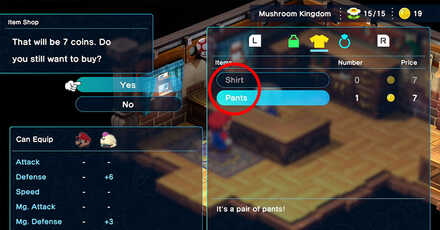
| Buy the above equipment in Mushroom Kingdom shop for 7 Coins each. | |
Before fighting Croco, it is best that you buy armor already for both Mario and Mallow at the Mushroom Kingdom shop to bolster your defenses. Having armor will reduce damage taken by wearer and will make the boss fight easier.
Use Mario's Fireball on Croco
| Special Move | Effect |
|---|---|
| Fireball (Mario) |
・Press the button repeatedly to increase the damage dealt by this move. |
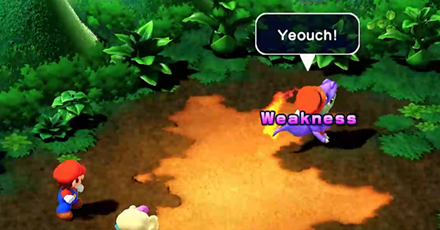
Croco is weak to fire, so Fireball is a good special move to have in dealing with him. Mario learns this move at Level 3.
If the Fireball hits Croco, his tail which catch on fire, preventing him from acting for one turn. Use this move regularly to keep from attacking you (do mind your FP!)
Best Special Moves for Each Character
Have Mallow Defend and Heal
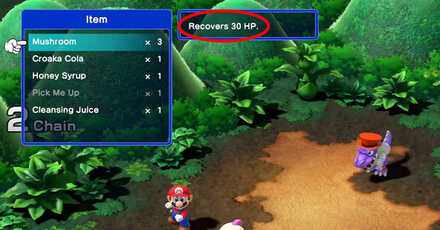
Mallow early game does not have a lot of attack power at this point, so having him on the defense is your best bet.
It is recommended that he supports Mario with recovery items when needed (especially FP recovery to let him continue using Fireball).
2nd Fight Croco Guide and Attack Patterns
| Croco (Bandit's Way) |
|---|
| Jump to 1st Fight Guide |
| Croco (Mole Mines) |
|
|
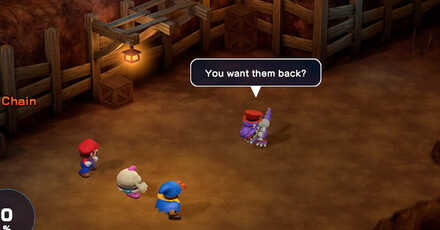
Keep FP High Before Croco Steals Items
| Ways to Increase FP Capacity | ||
|---|---|---|
| Flower Tab | Flower Jar | Flower Box |
After dealing enough damage to Croco, he will steal items from you, rendering you unable to use any means of support of recovery items.
Because of this, it is best to recover as much HP and FP as you can early on. If you run out of HP recovery items, you will need to make sure you have enough FP to use Mallow's HP Rain when needed.
To increase your FP capacity, make sure to collect Flowers and other consumables such as Flower Tabs, Flower Jars, and Flower Boxes that you find along the way!
Utilize Triple Moves to Deplete His Health

You can use a Triple Moves to quickly lower his health once the Action Gauge on your bottom-left is at 100%. Access your Triple Move Star Riders during any active member's.
It may not instantly defeat him, but he will be a lot easier to finish off afterwards.
How to Fill the Action Gauge Fast
Use Normal Attacks and Keep FP for Recovery
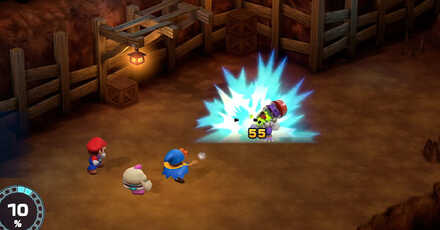
Croco in this fight is still weak to Fire, but this time he has high magic defense, reducing damage from incoming special attacks.
In this case, it is best to use normal attacks and reserve your FP and special moves for healing when needed.
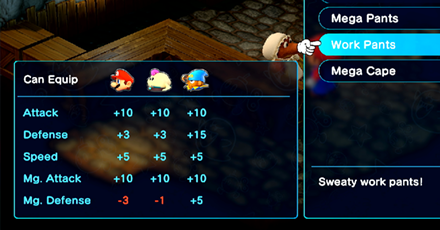
Increase Attack Power with Work Pants
| Equipment | Where to Get |
|---|---|
| (Everyone) | Buy in Moleville shop for 22 coins. |
The Work Pants is a good all-around armor piece that can be purchased from the Moleville shop for only 22 coins (3 for the entire party for 66 coins total), and it is recommended for boosting a member's attack and speed. Geno will benefit the most from this armor piece since it guarantees all positives on his stats.
Do note that it will have lower defense stats compared to other armor, so feel free to grab the Mega-variant armor pieces for a more comfy fight. If you have spent time levelling your party and timing your Action Command blocks, you can consider having everyone equip Work Pants.
Croco Attacks
Croco Special Attacks (Bandit's Way)
| Attack | Attack Type/Effect |
|---|---|
| Weird Mushroom | Additional Effect: Heals the user |
Croco Special Attacks (Mole Mines)
| Attack | Attack Type/Effect |
|---|---|
| Monster Toss |
Blockable?: Yes Additional Effect: N/A |
Super Mario RPG Remake Related Guides

All Bosses
| 1st Star Piece Bosses | ||
|---|---|---|
| Bowser | Hammer Bros. | Croco (1st Fight) |
| Claymorton | - | - |
| 2nd Star Piece Bosses | ||
| Belome (1st Fight) |
Bowyer | - |
| 3rd Star Piece Bosses | ||
| Croco (2nd Fight) |
Punchinello | - |
| 4th Star Piece Bosses | ||
| Booster | Knife Guy and Grate Guy | Bundt and Raspberry |
| 5th Star Piece Bosses | ||
| King Calamari | Johnny | - |
| 6th Star Piece Bosses | ||
| Speardovich | Belome (2nd Fight) |
Megasmilax |
| Birdo | Dodo | Valentina |
| Czar Dragon | Zombone | Axem Rangers | 7th Star Piece Bosses |
| Wizakoopa | Boomer | Exor |
| Count Down and Ding-a-Ling | Cloaker and Domino | Clerk |
| Manager | Director | Gunyolk and Factory Chief |
| Smithy (Final Boss) |
- | - |
Non-Story Bosses
| Non-Story Bosses | ||
|---|---|---|
| Jinx | Jagger | Culex |
Post-Game Rematch Bosses
| Post-Game Rematch Bosses | ||
|---|---|---|
| Mario-Style Jinx | Scratchy-Throat Belome | Leveled-Up Punchinello |
| Engine 023 Booster | Extra Fancy Bundt & Raspberry |
Duel-Ready Johnny |
| Culex 3D | - | - |
Comment
Author
How to Beat Croco and Rewards
improvement survey
03/2026
improving Game8's site?

Your answers will help us to improve our website.
Note: Please be sure not to enter any kind of personal information into your response.

We hope you continue to make use of Game8.
Rankings
- We could not find the message board you were looking for.
Gaming News
Popular Games

Genshin Impact Walkthrough & Guides Wiki

Honkai: Star Rail Walkthrough & Guides Wiki

Umamusume: Pretty Derby Walkthrough & Guides Wiki

Pokemon Pokopia Walkthrough & Guides Wiki

Resident Evil Requiem (RE9) Walkthrough & Guides Wiki

Monster Hunter Wilds Walkthrough & Guides Wiki

Wuthering Waves Walkthrough & Guides Wiki

Arknights: Endfield Walkthrough & Guides Wiki

Pokemon FireRed and LeafGreen (FRLG) Walkthrough & Guides Wiki

Pokemon TCG Pocket (PTCGP) Strategies & Guides Wiki
Recommended Games

Fire Emblem Heroes (FEH) Walkthrough & Guides Wiki

Diablo 4: Vessel of Hatred Walkthrough & Guides Wiki

Yu-Gi-Oh! Master Duel Walkthrough & Guides Wiki

Super Smash Bros. Ultimate Walkthrough & Guides Wiki

Pokemon Brilliant Diamond and Shining Pearl (BDSP) Walkthrough & Guides Wiki

Elden Ring Shadow of the Erdtree Walkthrough & Guides Wiki

Monster Hunter World Walkthrough & Guides Wiki

The Legend of Zelda: Tears of the Kingdom Walkthrough & Guides Wiki

Persona 3 Reload Walkthrough & Guides Wiki

Cyberpunk 2077: Ultimate Edition Walkthrough & Guides Wiki
All rights reserved
© Nintendo/SQUARE ENIX Characters: © Nintendo, © SQUARE ENIX
The copyrights of videos of games used in our content and other intellectual property rights belong to the provider of the game.
The contents we provide on this site were created personally by members of the Game8 editorial department.
We refuse the right to reuse or repost content taken without our permission such as data or images to other sites.


![Slay the Spire 2 Review [Early Access] | Still the Deckbuilder to Beat](https://img.game8.co/4433115/44e19e1fb0b4755466b9e516ec7ffb1e.png/thumb)

![Resident Evil Village Review [Switch 2] | Almost Flawless Port](https://img.game8.co/4432790/e1859f64830960ce4248d898f8cd38d9.jpeg/thumb)


