This survey will take about 1 minute.
Your answers will help us to improve our website.
Star Wars Outlaws
Jet Kordo's Legacy Walkthrough

Jet Kordo's Legacy is a Side Quest under Outlaw Legend that requires you to locate 6 vaults in Toshara, Kijimi, Tatooine, and Akiva in Star Wars Outlaws. Find out all of Jet Kordo's vault locations, and Jet Kordo's Legacy rewards here!
| Jet Kordo Related Articles | |
|---|---|
| All Jet's Journals Locations | Jet Kordo's Legacy Walkthrough |
List of Contents
Jet Kordo's Legacy Toshara Vault Location
| Toshara Vaul Locations | |
|---|---|
| Jet Kordo's Vault | Secret Room |
Jet Kordo's Vault in Toshara Location
| This is the first vault you need to locate before finding the other vaults in Kijimi, Tatooine, and Akiva! |
| 1 | Isolate Frequency Near Typhon's Rock |
|---|---|
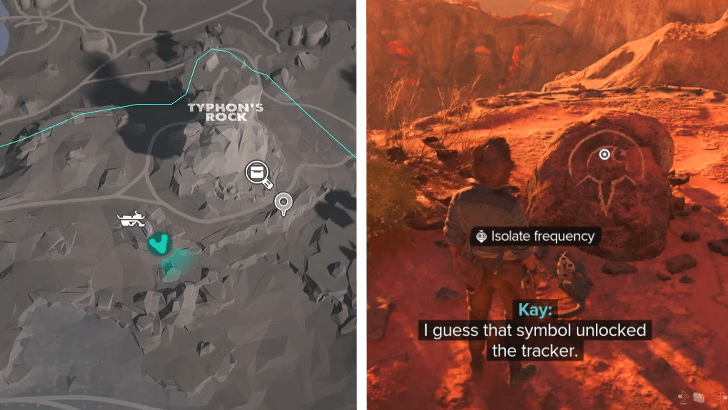 After starting Jet Kordo's Legacy by interacting with the Holotracker in the Trailblazer, go to the location shown above, near Typhon's Rock in Toshara. Then, interact with a rock that has a symbol to isolate the Holotracker's frequency. |
|
| 2 | Insert the Holodisc Nearby |
After isolating the frequency, insert the Holodisc inside a cave as shown above. Doing this allows you to locate the Jet Kordo's vault in Toshara. |
|
| 3 | Access the Vault in Toshara |
Climb up the ladder in front of you. Next, override the lock inside the room to access the vault. |
|
| 4 | Investigate Jet Kordo's Vault in Toshara |
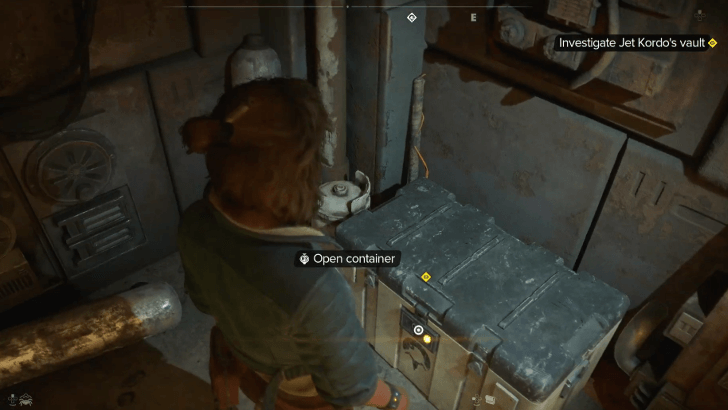 Open the container inside the vault to get the Scoundrel Belt and Jet Kordo's Legacy Part 2. |
▲ Return to All Toshara Vaults ▲
Secret Room Inside Jet Kordo's Vault
| The secret room can only be accessed after finding all the vaults in Toshara, Kijimi, Tatooine, and Akiva! |
| 1 | Pick Up the Tinkered Holodisc |
|---|---|
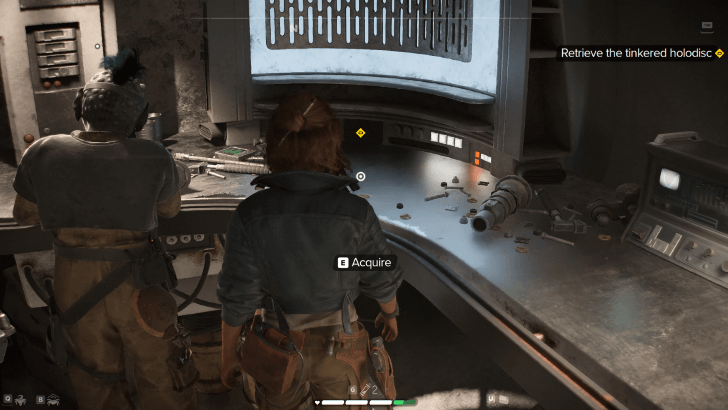 After accessing all of Jet Kordo's vaults and opening all the containers inside them, return to your ship, the Trailblazer to get the Tinkered Holodisc. |
|
| 2 | Return to the Toshara Vault |
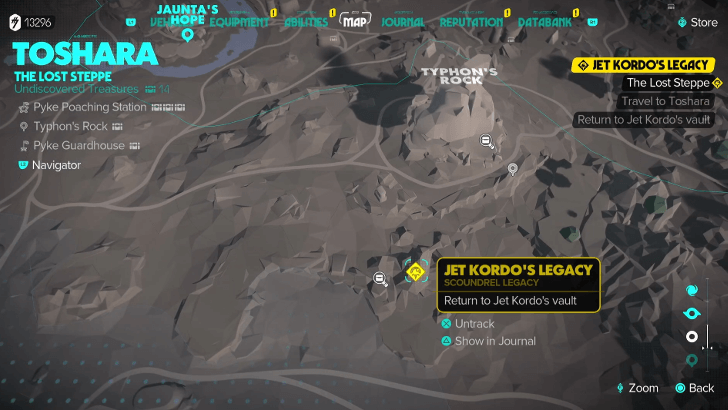 Once you have the Tinkered Holodisc, return to Jet Kordo's vault in Toshara, which is already marked in-game. ▲ Toshara Vault Location |
|
| 3 | Inspect the Secret Room |
Once you are inside the vault, open the door nearby and then open the container inside the secret room to get Cocktail Umbrella and Jet Kordo's Legacy Part 8. Opening the container will also end the side quest. |
▲ Return to All Toshara Vaults ▲
Jet Kordo's Legacy Kijimi Vault Location
Sheltered Vault Location
| 1 | Talk to a Mechanic in Kijimiko Square |
|---|---|
 Teleport to Kijimi using the Fast Travel Point in Kijimiko Square to receive an Intel Chain called Sheltered Vault from a Mechanic, who is located at the waypoint above. |
|
| 2 | Go to Sabacc Table in the Thieves District |
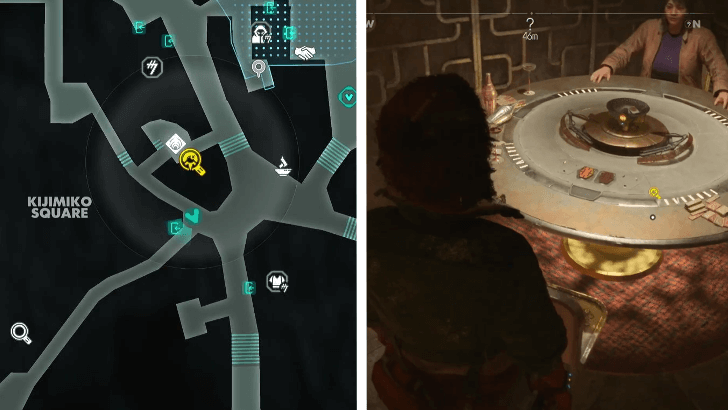 Go to the location of the player above. Then, talk to the NPCs playing at the Sabacc table. You need to beat the gamblers in a game of Kessel Sabacc to get the Gambled Holodisc. |
|
| 3 | Isolate Frequency Near Duradan Soup |
 Go to the location of the player shown above, near Duradan Soup. Then, interact with a rock that has a symbol to isolate the Holotracker's frequency. |
|
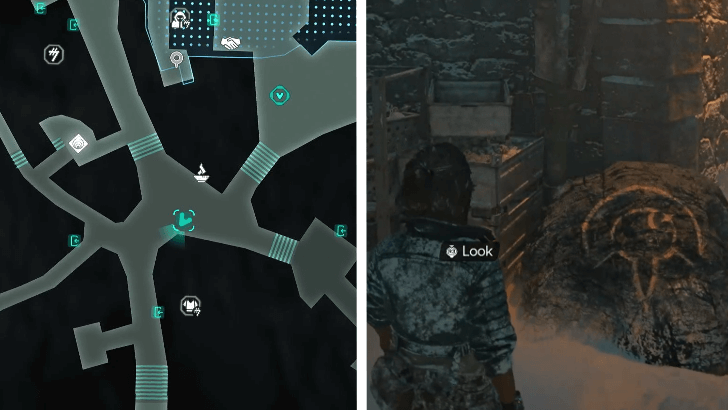
| 4 | Insert the Holodisc Near the Thieves' Quarter |
After isolating the frequency of the Holotracker, go to the player's location as shown in the video above. Then, insert the Holodisc to gain access to the vault in Kijimi. |
|
| 5 | Access the Sheltered Vault in Kijimi |
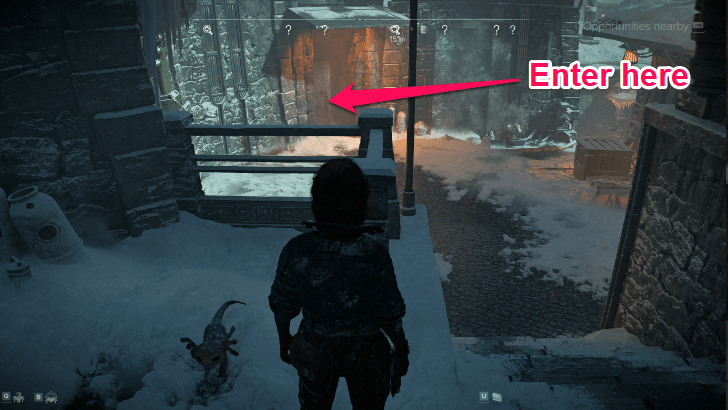 To finally access the vault in Kijimi, go through the door shown above. Inside the vault, the game will highlight a container. Open the container to obtain the Shift Token called Direct Transaction and Jet Kordo's Legacy Part 6. |
Jet Kordo's Legacy Tatooine Vault Location
| Tatooine Vault Locations | |
|---|---|
| Buried Vault | Perched Vault |
Buried Vault Location
| 1 | Talk to an Engineer in Wayfar |
|---|---|
 Use your Speeder or fast travel to Wayfar and then locate the Engineer shown above. You can use your Hutt Contract if you have a good reputation with the Hutts to obtain the Intel Chain called Buried Vault. If you do not have a good reputation with the Hutt Cartel, you need to pay the Engineer 50 Credits. Do note that you need to complete the main quest, The Heavy first before the mechanic actually appears in Wayfar. If the Mechanic is not in your game try fast travelling at a different planet and then return to Wayfar. |
|
| 2 | Get the Treasure Hunter's Holodisc |
 Go to the location of the player above to pick up the Treasure Hunter's Holodisc. Unfortunately, you will have to use your Speeder to reach the area since there are no Fast Travel Points nearby. |
|
| 3 | Isolate Frequency Near Mos Algo |
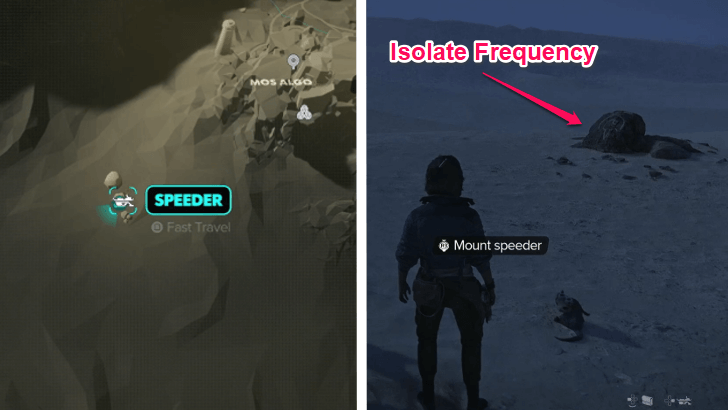 Go to the location of the player shown above, near Mos Algo. Then, interact with a rock that has a symbol to isolate the Holotracker's frequency. |
|
| 4 | Insert the Holodisc to Enter the Buried Vault |
Go to the player's exact location shown in the video above. Then, insert the Holodisc to progress the Intel Chain. |
|
| 5 | Access the Buried Vault in Tatooine |
 Use the Ion Module on your blaster to activate the Power Cell which will open a vent nearby. Enter through the vent to finally gain access to the vault. Open the container inside the vault to get a Scoundrel Jacket, Jet Kordo's Legacy Part 5, and an X-FP-C28-Ship Computer. After opening the container, an Intel Chain called Perched Vault will be unlocked. The Intel Chain is required to access the Perched Vault in Tatooine. |
▲ Return to All Tatooine Vaults ▲
Perched Vault Location
| 1 | Talk to a Spacer in Bestine |
|---|---|
 To find the second vault in Tatooine, go to Bestine, a territory on the Galactic Empire in Tatooine, in order to talk to a Spacer located at the waypoint above! |
|
| 2 | Get the Damaged Holodisc |
 Next, go the player's location, specifically in Garrick Ranch, in order to get the Damaged Holodisc inside the house highlighted above. Do note that you need a Slicing Kit to open the door. |
|
| 3 | Isolate Frequency at South Jundland Wastes |
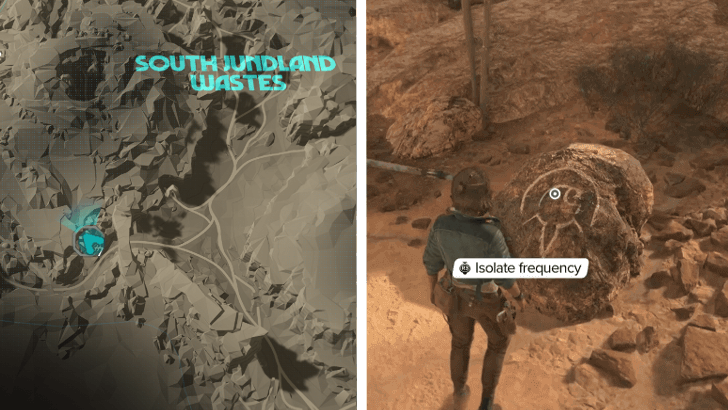 Go to the waypoint shown above, at South Jundland Wastes. Then, interact with a rock that has a symbol, in front of a trader named Tretet Zadiket, to isolate the Holotracker's frequency. |
|
| 4 | Insert the Holodisc to Enter the Perched Vault |
After isolating the frequency, proceed to the Perched Vault's location as shown in the video above. Insert the Holodisc near the Perched Vault's door to access it. |
|
| 5 | Access the Perched Vault |
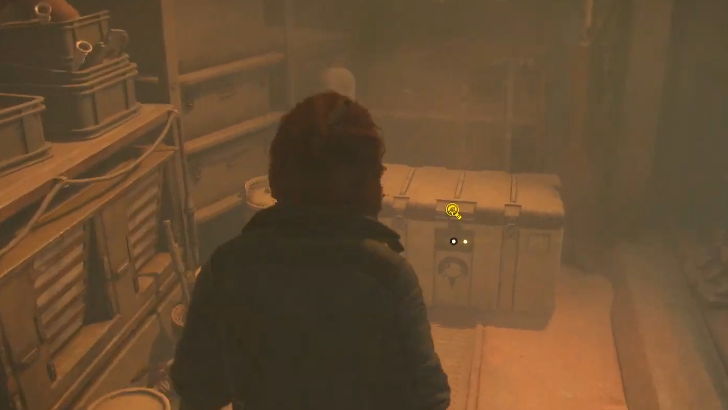 Open the container inside the Perched Vault to get a Sandcrawler Paint Job and Jet Kordo's Legacy Part 7. |
▲ Return to All Tatooine Vaults ▲
Jet Kordo's Legacy Akiva Vault Location
| Akiva Vault Locations | |
|---|---|
| Overgrown Vault | Forgotten Vault |
Overgrown Vault Location
| 1 | Buy the Mysterious Holodisc from a Merchant |
|---|---|
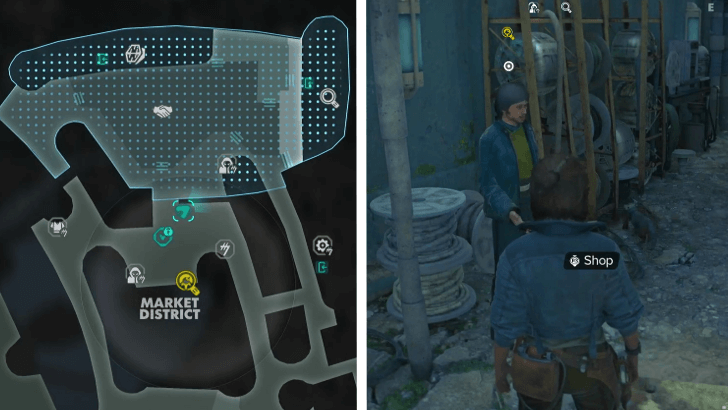 Go to Myrra in Akiva then fast travel or go to the Market District. Talk to the Scrap Dealer nearby and then buy the Mysterious Holodisc from them. It is possible that the dealer in your game looks different compared to the image above. |
|
| 2 | Isolate Frequency at Delma Water Tower |
Go to the location shown in the video above, at Delma Water Tower. Then, interact with a rock that has a symbol to isolate the Holotracker's frequency. |
|
| 3 | Insert the Holodisc Nearby |
Go back to the tree trunk you used to cross in the previous step. After that, follow the video above until you see a prompt to insert the Holodisc on a stone wall near the vault's floor hatch. |
|
| 4 | Access the Overgrown Vault in Akiva |
 After inserting the Holodisc, the vault's floor hatch will then open. Once you gain access to the vault, open the container inside to get a Blaster Recirculator and Jet Kordo's Legacy Part 4. Finally, interact with the marked Datapad inside the vault to obtain the Intel needed to access the Forgotten Vault in Akiva. |
▲ Return to All Akiva Vaults ▲
Forgotten Vault Location
| 1 | Listen to a Hired Gun at Satrap's Promenade |
|---|---|
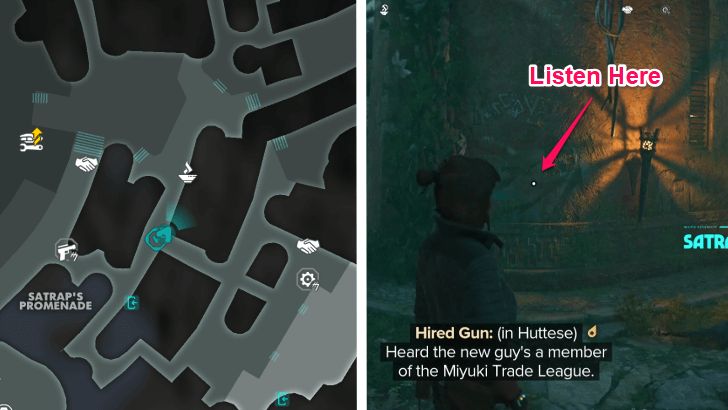 Go to Myrra in Akiva using the Fast Travel Point near Satrap's Promenade. Then listen to a Hired Gun NPC nearby. Do note that to gain access to the second vault in Akiva, your Speeder should have the Hydrorepulsor upgrade which can be obtained after completing the expert quest, The Scavenger. |
|
| 2 | Get the Stolen Holodisc |
Use the Fast Travel Point, if you unlocked it already, inside the Hutt Poaching Outpost in Akiva. Go to the location marked in-game to find the Hutt smuggler with a Holodisc. Steal the Holodisc from the marked NPC nearby using Nix. |
|
| 3 | Go to an Island that is West of Witch's Finger |
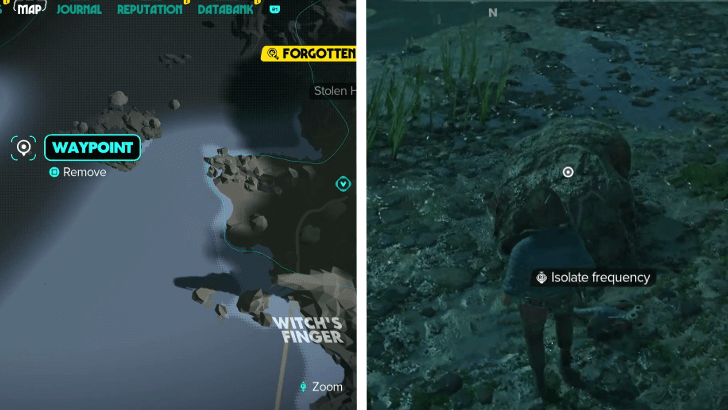 Go to the waypoint shown above, an unnamed island to the west of Witch's Finger. Then, interact with a rock that has a symbol to isolate the Holotracker's frequency. |
|
| 4 | Insert the Holodisc to Enter the Forgotten Vault |
Open your map to see the marked area in-game. Then, go to Speeder's location shown above. Insert the Holodisc near the vault's door for it to open. |
|
| 5 | Disable the Turret Inside the Forgotten Vault |
Once you are inside the Forgotten Vault, open the marked container to trigger the turret. Then, disable the active turret using Nix. Finally, open the container to get the Scoundrel Pants and also Jet Kordo's Legacy Part 3. |
▲ Return to All Akiva Vaults ▲
Jet Kordo's Legacy Unlock Condition
Start the Hyperspace Quest
| How to Unlock | ・Talk to ND-5 at the start of Hyperspace (Main Quest) ・In your ship, interact with a Holotracker on a bench. |
|---|
Jet Kordo's Legacy is a Side Quest that will be available in your Journal and Map after unlocking the main quest, Hyperspace. Simply interact with a Holotracker near the blaster's workbench in the Trailblazer.
All Jet Kordo's Legacy Rewards
Obtain the Scoundrel Gear Set
| Chest Gear | Waist Gear | Legs Gear |
|---|---|---|
 Scoundrel Jacket |
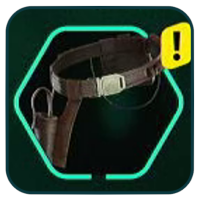 Scoundrel Belt |
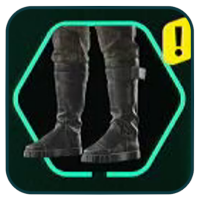 Scoundrel Pants |
The main reward of Jet Kordo's Legacy is the Scoundrel Gear Set which you obtain separately from the containers inside Jet Kordo's vaults.
Other Rewards
| Rewards | ・Jet Kordo's Legacy 1-8 (Collectibles) ・Direct Transaction (Shift Token) ・X-FP-C28 Ship Computer ・Sandcrawler Paint Job ・Blaster Recirculator ・Cocktail Umbrella |
|---|
Star Wars Outlaws Related Guides

All Side Quest
| All Side Quests | |
|---|---|
| Jabba's Gambit (Season Pass) |
Shadows of Deceit |
| High-Stakes Showdown | Jet Kordo's Legacy |
Comment
3  Anonymous over 1 year
For me the engineer occurred after finishing the Perched Vault on Tatooine.
Author

Jet Kordo's Legacy Walkthrough
Please participate in our site
improvement survey
03/2026
improvement survey
03/2026
Would you assist in
improving Game8's site?
improving Game8's site?

×
We are listening to our users' valuable opinions and discussing how to act on them.
The information collected through this survey will be used for the purpose of improving our services. In addition, the information will only be disclosed a part of a statistic in a format that will not allow identification of personal information.
Begin Survey
Not Now
×
Please rate each item regarding Game8.co's Advertisements.
Amount of Ads
Very Dissatisfied
Somewhat Dissatisfied
Fine
Somewhat Satisfied
Highly Satisfied
Placement of Ads
Timing of Ad Display
Ad Loading Speed
Safeness of Ads
Content of Ads
×
Please rate each item regarding Game8.co's Quality of Articles.
Amount of information
Very Dissatisfied
Somewhat Dissatisfied
Fine
Somewhat Satisfied
Highly Satisfied
Frequency of updates
Speed of new information
Accuracy of articles
Understandibility of articles
Readability of sentences
×
Please rate each item regarding Game8.co's Usability of the Site.
Ease of finding information
Very Dissatisfied
Somewhat Dissatisfied
Fine
Somewhat Satisfied
Highly Satisfied
Loading Speed
Use of Color
Font Size
Visibility of Images
Easy to Understand Layout
×
Please rate each item regarding Game8.co's Message Boards, Comments.
Ease of Writing
Very Dissatisfied
Somewhat Dissatisfied
Fine
Somewhat Satisfied
Highly Satisfied
Readability
Ease in Finding Information
Comment Quality
Comment Quantity
Admin Response
×
Please rate each item regarding Game8.co's Site's new design.
Please rate our site's new design
Very Dissatisfied
Somewhat Dissatisfied
Fine
Somewhat Satisfied
Highly Satisfied
Do you think that the website's design change makes the site easier to use?
Has the new design made it easier for you to find information on the site?
Has the new design improved the overall visual appeal of the site?
How would you rate your overall satisfaction with the new design of the site?
×
How likely are you to recommend Game8 to someone you know?
Very Unlikely
0
1
2
3
4
5
6
7
8
9
10
Very Likely
If you have other opinions regarding potential improvement to the website, please share them with us. We would appreciate your honest opinion.
Note: This is a free response section, so you can proceed without entering anything.
Note: Please be sure not to enter any kind of personal information into your response.
Note: Please be sure not to enter any kind of personal information into your response.
×
Thank You
×
Thank you for participating in our survey! Your answers will help us to improve the quality of our website and services.
We hope you continue to make use of Game8.
We hope you continue to make use of Game8.
Close
Rankings
- We could not find the message board you were looking for.
Gaming News


![Monster Hunter Stories 3 Review [First Impressions] | Simply Rejuvenating](https://img.game8.co/4438641/2a31b7702bd70e78ec8efd24661dacda.jpeg/thumb)
Popular Games

Genshin Impact Walkthrough & Guides Wiki
Honkai: Star Rail Walkthrough & Guides Wiki
Umamusume: Pretty Derby Walkthrough & Guides Wiki
Pokemon Pokopia Walkthrough & Guides Wiki
Resident Evil Requiem (RE9) Walkthrough & Guides Wiki
Monster Hunter Wilds Walkthrough & Guides Wiki
Wuthering Waves Walkthrough & Guides Wiki
Arknights: Endfield Walkthrough & Guides Wiki
Pokemon FireRed and LeafGreen (FRLG) Walkthrough & Guides Wiki
Pokemon TCG Pocket (PTCGP) Strategies & Guides Wiki


Recommended Games
Diablo 4: Vessel of Hatred Walkthrough & Guides Wiki
Cyberpunk 2077: Ultimate Edition Walkthrough & Guides Wiki
Fire Emblem Heroes (FEH) Walkthrough & Guides Wiki
Yu-Gi-Oh! Master Duel Walkthrough & Guides Wiki
Super Smash Bros. Ultimate Walkthrough & Guides Wiki
Pokemon Brilliant Diamond and Shining Pearl (BDSP) Walkthrough & Guides Wiki
Elden Ring Shadow of the Erdtree Walkthrough & Guides Wiki
Monster Hunter World Walkthrough & Guides Wiki
The Legend of Zelda: Tears of the Kingdom Walkthrough & Guides Wiki
Persona 3 Reload Walkthrough & Guides Wiki


All rights reserved
STAR WARS © & TM 2024 Lucasfilm Ltd. All Rights Reserved. Developed by Ubisoft. Ubisoft TM & © 2024 Ubisoft Entertainment. All Rights Reserved.
The copyrights of videos of games used in our content and other intellectual property rights belong to the provider of the game.
The contents we provide on this site were created personally by members of the Game8 editorial department.
We refuse the right to reuse or repost content taken without our permission such as data or images to other sites.
Don't know if it was glitch or what but on Kijimi I could only view the map in tunnel where you can use the speeder, and after going to the location the map indicated I was never able to use the frequency to track down the location. Had to use the guide to find it. It would never let me access the holodisc map anywhere else.