This survey will take about 1 minute.
Your answers will help us to improve our website.
FF7 Remake
Fort Condor Guide: How to Beat Hard Mode

This guide covers everything you need to know about how to play FF7R Intergrade's Fort Condor minigame. Here you can learn the rules of Fort Condor, tips for beating Chadley and Hard Mode, and see the best loadouts for all to help you get the Game, Set, Master and Condor Queen trophies.
Intergrade and INTERmission DLC Walkthrough
| Fort Condor Guides | |
|---|---|
| Fort Condor Guide | How to Farm Condor Coins |
| How to Get All Units | How to Get All Boards |
List of Contents
Fort Condor Rules and How to Play
A Minigame featured on FF7 Remake INTERmission
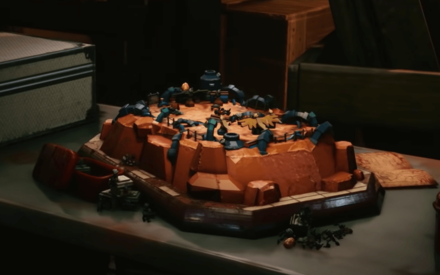
Fort Condor is a new minigame featured in FF7R Intergrade. In the original Final Fantasy 7, Fort Condor was a minigame in which the player would select their units and watch them go to battle. FF7R Intergrade's version of the minigame is now a board game where you are able to use both units and maria, where the objective is to win by either taking out the opponent's tower, or by dealing more damage by the time the game ends.
ATB System
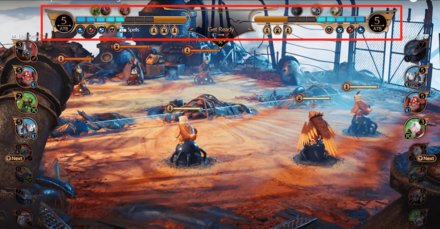
When playing Fort Condor, both the player's and opponent's ATB Gauge will appear at the top of the screen. Similar to the main combat system of FF7R Intergrade, the ATB Gauge is used to perform commands such as summoning units to the field or casting spells. Other than a few exceptions, units will move around automatically, battle with whatever enemy units they encounter, and deal damage to the enemy side.
Pay close attention to both your ATB Gauge and your opponent's to know when and how to strike.
Selecting Units
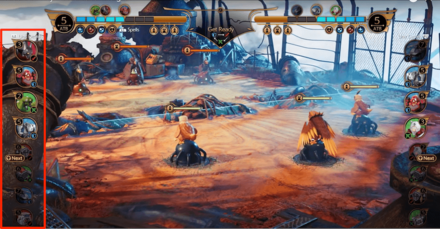
In the Fort Condor minigame, there is an ATB cost to summon units. More powerful units have a higher ATB cost, so the player is constantly choosing between using fewer high-value units, or many low-value units.
Materia
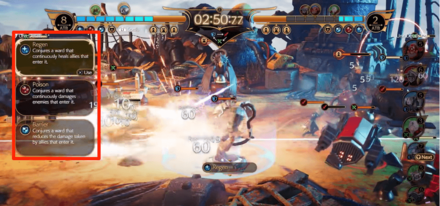
Each board has a set of Materia, which can be used once per battle. These spells can be either offensive or defensive, and are best saved for critical moments to help turn the tides of battle!
List of Materia
| Spell | Description |
|---|---|
| Flies straight ahead and deals damage upon landing. | |
| Heals allies within a certain area. | |
| Flies straight ahead and deals damage some time after landing. | |
| Draws units inward while dealing damage. | |
| Descends upon a location, dealing damage. | |
| Increases the HP of units on the board. | |
| Conjures a ward that reduces the damage taken by allies that enter it. | |
| Conjures a ward that increases the movement and attack speed of allies that enter it. | |
| Conjures a ward that continuously heals allies that enter it. | |
| Conjures a ward that continuously damages enemies that enter it. | |
| Conjures a ward that decreases the movement and attack speed of enemies that enter it. | |
| Conjures a ward that stops time for enemies that enter it. |
Unit Types and Weaknesses
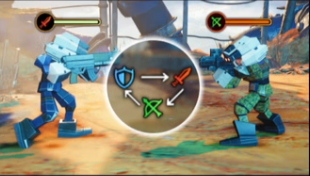
There are three roles which a unit can be: vanguard, ranged, or defense. Each of these roles will be effective against another one, so keeping track of which enemy units are active is important. Knowing which units are in an opponent's loadout and adjusting accordingly will help ensure a smoother victory!
| The type triangle is always displayed on the loadouts screen, as well as in battle, so you don't need to worry about forgetting. |
Time Limit
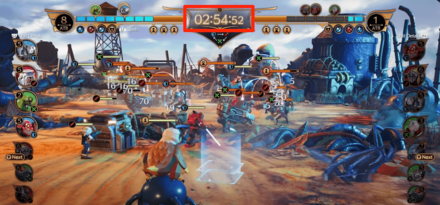
Your battles in Fort Condor are timed! Become familiar with each of the mechanics of this minigame to clear the objective within the time limit. Use your ATB Gauge efficiently, as it takes time to charge up!
Tips for Winning at Fort Condor
Gather more units and strengthen your loadout
In order to beat more powerful opponents, you first need to get better units. Units can be received from opponents as a reward after beating them in Fort Condor, or purchased for Condor Coins from Old Snapper. If you want to be the top Fort Condor player, you'll need to beat opponents and start gathering units and Condor Coins!
Edit your loadout to include more advantageous units
At the start of a battle, you'll be able to see your opponent's loadout, giving you a chance to edit your own loadout to include more advantageous units. In many cases, opponents will only include units of one or two types, so include only units that will be effective against them to ensure an easy victory.
Make sure you are not only using high cost units

More powerful units will have higher ATB costs, and if your loadout only has high costs units, you will be unable to quickly deploy a low cost unit to save you in a pinch. While it does also depend on the opponent's loadout, it's generally a good idea to have a mix of both higher and lower cost units.
Be sure to understand your units' special characteristics
Each unit has special properties, such as attacking from the air, or being quick but fragile, etc. You can view the characteristics of your units when editing your loadout, so pick your units wisely, being mindful of what type of units your opponent intends to use.
Make use of the different boards
Along with editing your loadout, you also have the option to select the board for a game, which determines things such as your starting ATB, as well as the Materia spells at your disposal. Materia in particular will have a large effect, since it can grant use to powerful attacks and support, and using these spells at the end of battle can help you secure a victory. Note that spells can only be used once per battle, so the timing of when to use them is crucial!
List of Boards
| Board Name How to Obtain |
Details |
|---|---|
| Starter Board Obtained from Polk in Avalanche HQ. |
Total Units: 6 Materia: Fire, Cure Max ATB: 8 Starting ATB: 4 Speed: 1 Headquarters: HP 600/ATK 80 Outposts: HP 500/ATK 80 |
| Sorcerer Board I Received for completing the Fort Condor tutorial with Polk. |
Total Units: 6 Materia: Blizzard, Aero Max ATB: 6 Starting ATB: 3 Speed: 1 Headquarters: HP 600/ATK 80 Outposts: HP 500/ATK 80 |
| Sorcerer Board II Purchase from Old Snapper after defeating Rank 1 opponents. Can also be obtained for free if you defeat Johnny after Kyrie and Shinra Middle Manager. Price: 2 Condor Coins |
Total Units: 5 Materia: Fire, Blizzard, Thunder Max ATB: 9 Starting ATB: 4 Speed: 1 Headquarters: HP 600/ATK 120 Outposts: HP 400/ATK 140 |
| Battalion Board I Purchase from Old Snapper after defeating Rank 1 opponents. Can also be obtained for free if you defeat Kyrie after Shinra Middle Manager and Johnny. Price: 2 Condor Coins |
Total Units: 7 Materia: Thunder, HP Up Max ATB: 8 Starting ATB: 2 Speed: 1 Headquarters: HP 750/ATK 80 Outposts: HP 625/ATK 80 |
| Battalion Board II Purchase from Old Snapper after defeating all Rank 2 Opponents. Can also be obtained by defeating Roche after Jessie. Price: 3 Condor Coins |
Total Units: 7 Materia: Cure, Barrier, Haste, HP Up Max ATB: 8 Starting ATB: 6 Speed: 1 Headquarters: HP 900/ATK 100 Outposts: HP 750/ATK 100 |
| Battalion Board III Received after defeating Wedge (Rank 3). |
Total Units: 8 Materia: Regen, Poison, Barrier, HP Up Max ATB: 8 Starting ATB: 5 Speed: 2 Headquarters: HP 900/ATK 140 Outposts: HP 750/ATK 140 |
| Assassin Board I Purchase from Old Snapper after defeating Rank 1 opponents. Can also be obtained for free if you defeat Shinra Middle Manager after Kyrie and Johnny. Price: 2 Condor Coins |
Total Units: 6 Materia: Fire, Haste Max ATB: 7 Starting ATB: 3 Speed: 2 Headquarters: HP 600/ATK 100 Outposts: HP 500/ATK 100 |
| Assassin Board II Purchase from Old Snapper after defeating all Rank 2 Opponents. Can also be obtained by defeating Jessie after Roche. Price: 3 Condor Coins |
Total Units: 5 Materia: Blizzard, Aero, Aero, Slow Max ATB: 9 Starting ATB: 5 Speed: 2 Headquarters: HP 600/ATK 120 Outposts: HP 500/ATK 120 |
| Assassin Board III Found in a chest while chasing Zhijie. |
Total Units: 8 Materia: None Max ATB: 10 Starting ATB: 10 Speed: 3 Headquarters: HP 840/ATK 140 Outposts: HP 700/ATK 140 |
| Grandmaster Board Purchase from Old Snapper (After defeating Chadley). Price: 5 Condor Coins |
Total Units: 5 Materia: Thunder, Aero, Stop, HP Up Max ATB: 5 Starting ATB: 5 Speed: 3 Headquarters: HP 900/ATK 140 Outposts: HP 750/ATK 140 |
How to Get All Fort Condor Boards | Best Fort Condor Board
How to Beat Fort Condor on Hard Mode
|
└Place Guard Dogs on the front line after advancing |
Victory only comes from taking out the Headquarters
Unlike Normal and Easy mode, where you could win by taking out more outposts before time ran out, you have to take out the opponent's Headquarters in order to win on Hard Mode. Winning by stalling out the opponent will not work here, so focus on beating them through sheer firepower.
Best Loadout for Hard Mode
| Board | |
|---|---|
| Grandmaster Board | |
 Armored Shock Trooper Armored Shock Trooper
|
 Guard Dog Guard Dog
|
 Blast-Ray Blast-Ray
|
 Sentry Ray Sentry Ray
|
 Shock Trooper Shock Trooper
|
- |
Using this loadout, you should be able to reliably take nearly out all opponents on Hard Mode. As the Guard Dog is low cost and will go straight for the tower, you can lay it on the front line of battle to help win quicker. Units like Armored Shock Trooper and Blast-Ray will act as tanks for slowing down the enemy.
| Other units can be swapped out for Sentry Ray and Shock Trooper as deemed fit, but low cost units with good attack support are best here. |
Fort Condor Video Strategy Guide
Note: The following videos have the language set to Japanese, although the strategy for each opponent should be the same.
| Normal Mode | Hard Mode |
Normal Mode
How to Beat Jessie (Rank 2)
| Loadout We Used | |
|---|---|
| Assassin Board I | |
 Elite Security Officer Elite Security Officer
|
 Helitrooper Helitrooper
|
|
Shock Trooper
|
 Grenadier Grenadier
|
 Elite Grenadier Elite Grenadier
|
Blast-Ray
|
How to Beat Roche (Rank 2)
| Loadout We Used | |
|---|---|
| Assassin Board I | |
 Riot Trooper Riot Trooper
|
 Elite Riot Trooper Elite Riot Trooper
|
|
Shock Trooper
|
Elite Security Officer
|
|
Elite Grenadier
|
Blast-Ray
|
How to Beat Wedge (Rank 3)
| Loadout We Used | |
|---|---|
| Battalion Board II | |
|
Riot Trooper
|
Elite Riot Trooper
|
|
Helitrooper
|
 Elite Helitrooper Elite Helitrooper
|
|
Shock Trooper
|
 Grenadier Barracks Grenadier Barracks
|
|
Grenadier
|
- |
How to Beat Chadley (Rank 4)
| Loadout We Used | |
|---|---|
| Battalion Board II | |
|
Armored Shock Trooper
|
Elite Riot Trooper
|
|
Helitrooper
|
Elite Helitrooper
|
|
Shock Trooper
|
Grenadier Barracks
|
|
Grenadier
|
- |
Protecting the Armored Shock Trooper is the key
From the start, Chadley will send units to the left route, so place the Armored Shock Trooper on this route, and make use of both Barrier and Cure to raise the defense of it and other units that follow. As your ATB fills, continue throwing units to the left side, and you will be able to obtain a swift victory.
Very few units will be sent to the right side, and when one appears, simply deploy a ranged unit over there to stop it in its tracks.
| For the most part, you only need to worry about the left side, so throw your tough units over there. Powerful units will continue to appear even after arriving at the tower, so if you don't time your summons and spells right, you could see a sudden comeback from Chadley. |
Hard Mode
How to Beat Shinra Middle Manager (Rank 5)
| Loadout We Used | |
|---|---|
| Grandmaster Board | |
|
Armored Shock Trooper
|
Guard Dog
|
|
Helitrooper
|
Sentry Ray
|
|
Shock Trooper
|
- |
How to Beat Johnny (Rank 5)
| Loadout We Used | |
|---|---|
| Grandmaster Board | |
|
Armored Shock Trooper
|
Guard Dog
|
|
Blast-Ray
|
Sentry Ray
|
|
Shock Trooper
|
- |
How to Beat Kyrie (Rank 5)
| Loadout We Used | |
|---|---|
| Grandmaster Board | |
|
Armored Shock Trooper
|
Guard Dog
|
|
Blast-Ray
|
Sentry Ray
|
|
Shock Trooper
|
- |
How to Beat Jessie (Rank 5)
| Loadout We Used | |
|---|---|
| Battalion Board II | |
 Helicopter Helicopter
|
Elite Riot Trooper
|
|
Helitrooper
|
Elite Helitrooper
|
|
Shock Trooper
|
Grenadier Barracks
|
|
Grenadier
|
- |
How to Beat Roche (Rank 5)
| Loadout We Used | |
|---|---|
| Grandmaster Board | |
|
Armored Shock Trooper
|
Guard Dog
|
|
Blast-Ray
|
Sentry Ray
|
|
Shock Trooper
|
- |
How to Beat Wedge (Rank 5)
| Loadout We Used | |
|---|---|
| Grandmaster Board | |
|
Armored Shock Trooper
|
Guard Dog
|
|
Blast-Ray
|
Sentry Ray
|
|
Shock Trooper
|
- |
How to Beat Chadley (Rank 5)
| Loadout We Used | |
|---|---|
| Grandmaster Board | |
|
Armored Shock Trooper
|
Guard Dog
|
|
Blast-Ray
|
Sentry Ray
|
|
Shock Trooper
|
- |
| How to Beat Chadley (Hard) |
|---|
|
└Do your best to make sure these three units are always active |
Keep the points listed above in mind while battling Chadley. Leave taking out the tower to the Guard Dogs, and use Armored Shock Troopers and Blast-Rays to distract the enemy units deployed.
If you have ATB to spare, spawning other low cost units for support is okay too, but at the very least, always prioritize getting out these three main units.
List of Fort Condor Opponents and Rewards
Obtain rewards for each opponent
Certain NPCs can be battled against in Fort Condor, and by winning against them, you will receive a specific prize (units or Condor Coins). NPCs that can be battled against will have a Fort Condor icon above their head, and the number that appears expresses how strong that NPC is.
| NPC (Level) | Reward |
|---|---|
| Shinra Middle Manager (Rank 1) |
Elite Grenadier (Ranged) Condor Coin ×2 |
| Johnny (Rank 1) |
Elite Riot Trooper (Defense) Condor Coin ×2 |
| Kyrie (Rank 1) |
Elite Security Officer (Vanguard) Condor Coin ×2 |
| Jessie (Rank 2) |
Grenadier Barracks (Ranged) Condor Coin ×3 |
| Roche (Rank 2) |
Elite Helitrooper (Vanguard) Condor Coin ×3 |
| Wedge (Rank 3) |
Armored Shock Trooper (Defense) Condor Coin ×3 |
| Chadley (Rank 4) |
10,000 Gil AP Up Materia Condor Coin ×4 |
Note: By defeating all of the available NPCs, NPCs of the next rank will appear
How to Unlock the Game, Set, Master Trophy
 |
Game, Set, Master |
|---|---|
| Become the Fort Condor grandmaster. |
Beating all opponents from Rank 1 to Rank 4 on either easy or normal will earn you the Game, Set, Master Trophy. For help with beating all opponents, see our load outs and video strategy guides for each opponent in the section below!
How to Unlock the Condor Queen Trophy
 |
Condor Queen |
|---|---|
| Become the Fort Condor grandmaster on Hard difficulty. |
Beating all Rank 5 opponents on Hard difficulty will earn you the Condor Queen Trophy. In order to play on Hard mode, you will first need to complete both the game and DLC.
For help with beating all opponents, see our load outs and video strategy guides for each opponent in the section below!
How to Unlock Fort Condor

Fort Condor is unlocked after arriving at Avalanche's HQ in Slums Sector 7 and speaking with Polk. Polk will give you a starter set, and from there, the tutorial will begin.
| If you forget the rules of Fort Condor, you can view them anytime in the game by checking from the manual, so if you just want to try it out without reading too much through the tutorial, you can always revisit the in-game info. |
FF7 Remake Intergrade Related Links
Intergrade and INTERmission Guide
Intergrade Story Walkthrough
| Chapter 1 | Chapter 2 |
|---|---|
 Chapter 1: Wutai's Finest Chapter 1: Wutai's Finest
|
 Chapter 2: Covert Ops Chapter 2: Covert Ops
|
Intergrade Boss Fights
| Chapter 1 | Levrikon Gigantipede Ramuh |
|---|---|
| Chapter 2 | Scarlet & The Crimson Mare Projector Nero the Sable |
| Shinra Combat Simulator | vs. Shinra's Dark Secrets vs. Midgarian Monsters Weiss the Immaculate Pride and Joy Mk 0.5 (Top Secrets) |
Intergrade Side Content
 Happy Turtle Flyers Happy Turtle Flyers
|
 Shinra Box Buster Shinra Box Buster
|
Fort Condor Minigame
 Fort Condor Guide Fort Condor Guide
|
Condor Coin Farming |
| Fort Condor Units | |
| Fort Condor Boards |
Intergrade Guides
Author

Fort Condor Guide: How to Beat Hard Mode
Please participate in our site
improvement survey
03/2026
improvement survey
03/2026
Would you assist in
improving Game8's site?
improving Game8's site?

×
We are listening to our users' valuable opinions and discussing how to act on them.
The information collected through this survey will be used for the purpose of improving our services. In addition, the information will only be disclosed a part of a statistic in a format that will not allow identification of personal information.
Begin Survey
Not Now
×
Please rate each item regarding Game8.co's Advertisements.
Amount of Ads
Very Dissatisfied
Somewhat Dissatisfied
Fine
Somewhat Satisfied
Highly Satisfied
Placement of Ads
Timing of Ad Display
Ad Loading Speed
Safeness of Ads
Content of Ads
×
Please rate each item regarding Game8.co's Quality of Articles.
Amount of information
Very Dissatisfied
Somewhat Dissatisfied
Fine
Somewhat Satisfied
Highly Satisfied
Frequency of updates
Speed of new information
Accuracy of articles
Understandibility of articles
Readability of sentences
×
Please rate each item regarding Game8.co's Usability of the Site.
Ease of finding information
Very Dissatisfied
Somewhat Dissatisfied
Fine
Somewhat Satisfied
Highly Satisfied
Loading Speed
Use of Color
Font Size
Visibility of Images
Easy to Understand Layout
×
Please rate each item regarding Game8.co's Message Boards, Comments.
Ease of Writing
Very Dissatisfied
Somewhat Dissatisfied
Fine
Somewhat Satisfied
Highly Satisfied
Readability
Ease in Finding Information
Comment Quality
Comment Quantity
Admin Response
×
Please rate each item regarding Game8.co's Site's new design.
Please rate our site's new design
Very Dissatisfied
Somewhat Dissatisfied
Fine
Somewhat Satisfied
Highly Satisfied
Do you think that the website's design change makes the site easier to use?
Has the new design made it easier for you to find information on the site?
Has the new design improved the overall visual appeal of the site?
How would you rate your overall satisfaction with the new design of the site?
×
How likely are you to recommend Game8 to someone you know?
Very Unlikely
0
1
2
3
4
5
6
7
8
9
10
Very Likely
If you have other opinions regarding potential improvement to the website, please share them with us. We would appreciate your honest opinion.
Note: This is a free response section, so you can proceed without entering anything.
Note: Please be sure not to enter any kind of personal information into your response.
Note: Please be sure not to enter any kind of personal information into your response.
×
Thank You
×
Thank you for participating in our survey! Your answers will help us to improve the quality of our website and services.
We hope you continue to make use of Game8.
We hope you continue to make use of Game8.
Close
Rankings
- We could not find the message board you were looking for.
Gaming News


![Monster Hunter Stories 3 Review [First Impressions] | Simply Rejuvenating](https://img.game8.co/4438641/2a31b7702bd70e78ec8efd24661dacda.jpeg/thumb)
Popular Games

Genshin Impact Walkthrough & Guides Wiki
Honkai: Star Rail Walkthrough & Guides Wiki
Umamusume: Pretty Derby Walkthrough & Guides Wiki
Pokemon Pokopia Walkthrough & Guides Wiki
Resident Evil Requiem (RE9) Walkthrough & Guides Wiki
Monster Hunter Wilds Walkthrough & Guides Wiki
Wuthering Waves Walkthrough & Guides Wiki
Arknights: Endfield Walkthrough & Guides Wiki
Pokemon FireRed and LeafGreen (FRLG) Walkthrough & Guides Wiki
Pokemon TCG Pocket (PTCGP) Strategies & Guides Wiki


Recommended Games
Diablo 4: Vessel of Hatred Walkthrough & Guides Wiki
Cyberpunk 2077: Ultimate Edition Walkthrough & Guides Wiki
Fire Emblem Heroes (FEH) Walkthrough & Guides Wiki
Yu-Gi-Oh! Master Duel Walkthrough & Guides Wiki
Super Smash Bros. Ultimate Walkthrough & Guides Wiki
Pokemon Brilliant Diamond and Shining Pearl (BDSP) Walkthrough & Guides Wiki
Elden Ring Shadow of the Erdtree Walkthrough & Guides Wiki
Monster Hunter World Walkthrough & Guides Wiki
The Legend of Zelda: Tears of the Kingdom Walkthrough & Guides Wiki
Persona 3 Reload Walkthrough & Guides Wiki


All rights reserved
© SQUARE ENIX CO., LTD. All Rights Reserved.
CHARACTER DESIGN:TETSUYA NOMURA/ROBERTO FERRARI
The copyrights of videos of games used in our content and other intellectual property rights belong to the provider of the game.
The contents we provide on this site were created personally by members of the Game8 editorial department.
We refuse the right to reuse or repost content taken without our permission such as data or images to other sites.
Rarely spawns on the left my ass