Ashen Wolves Chapter 1: The Fourth House Walkthrough
This is the walkthrough for the 1st chapter of the side story DLC in Fire Emblem: Three Houses (FETH, FE3H). Read on to see what you can do in Abyss, as well as all battle info, map features, enemy data, and a strategy guide for the battle, A Skirmish in Abyss.
List of Contents
| Previous Chapter | Next Chapter |
|---|---|
| - | Chapter 2: What Lies Beneath |
Side Story Notes
The side story works differently from the main game. Here are some points to take note of before starting.
| New Save File | Your progress in the side story is separate from the main game, although you will be able to unlock features in the main game as you progress in the side story. |
|---|---|
| Skill Levels Do Not Scale | In the side story, characters may gain EXP and level up, but weapon skill level does not increase. |
| No Support Levels | The dialogue options you choose will not affect your relationship with other units. |
| No Events | You will not have a calendar where events take place. Events such as birthdays will not be recognized and celebrated. |
| Limited Resources | It is also worth noting that there is a limited amount of resources, so always check your weapon durability. When you explore, only the Sword of the Creator is repaired. Ores are obtained through winning battles and dealing armor breaks. |
| No Certification Exams | In this story, you can change classes but you cannot take certification exams to get a new one. |
Chapter 1 - The Fourth House
Choose Your Form
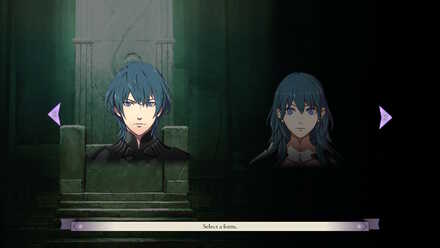
FIrst, select your form, or gender. This does not affect anything in the story, however this cannot be changed.
Enter Your Name
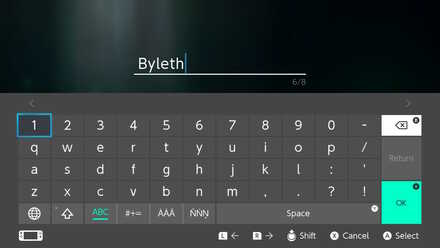
Choose what the characters will call you. This cannot be changed.
No Birthday Input
Unlike in the main game, birthdays do not have an effect in the side story so it is not needed.
Chapter 1 Mission: A Skirmish in Abyss
For the first battle, you will be going up against the Ashen Wolves house.
Map and Overview
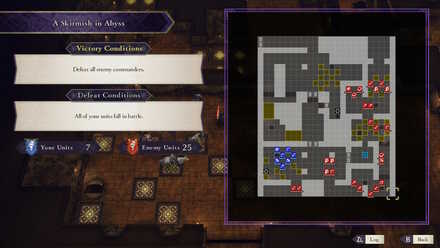
| Victory Conditions | |
|---|---|
| Defeat all enemy commanders. | |
| Defeat Conditions | |
| All of your units fall in battle. | |
| # of Player Units | 7 |
| # of Enemies | 25 + 1 + 2 |
Units are Fixed!
For this battle, the units joining will be fixed.
| Blue Lions | Black Eagles | Golden Deers |
|---|---|---|
| Dimitri, Ashe | Edelgard, Lindhart | Claude, Hilda |
| Byleth (You) | ||
Enemies
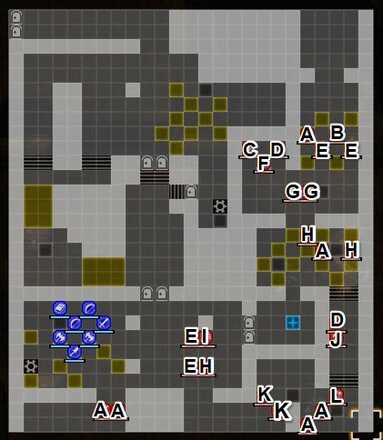
| Phase 1 | |||
|---|---|---|---|
| A | Rogue (Assassin) | B | Yuri |
| C | Rogue (Bishop) | D | Rogue (Warlock) |
| E | Rogue (Grappler) | F | Constance |
| G | Rogue (Pegasus Knight) | H | Rogue (Sniper) |
| I | Balthus | J | Rogue (Fortress Knight) |
| K | Rogue (Paladin) | L | Hapi |
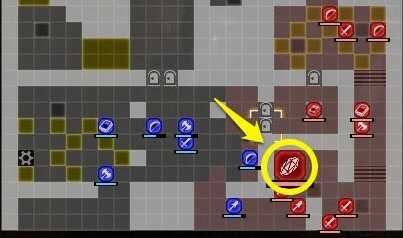
| Phase 2 |
|---|
| Giant Crawler |
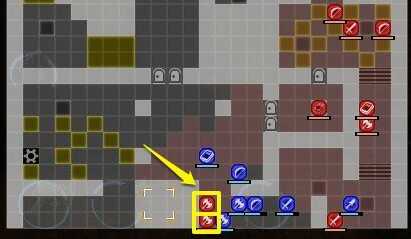
| Phase 3 |
|---|
| Rogue (Warrior) - 2 |
Enemy Stats
Yuri
| Level | HP | Mov. | Class |
|---|---|---|---|
| 24 | 39 | 6 | Trickster |
| Mt. | Spd | Hit | Crit |
| 35 | 27 | 116 | 19 |
| Range | Prt | Res | Avd |
| 1 | 16 | 17 | 43 |
| Weapon | Dropped Items | ||
| Silver Sword, Fetters of Dromi | N/A | ||
| Battalion | |||
| Knights of Seiros | |||
| Level | Endurance | Gambit | Uses |
| 1 | 60 | Blaze | 1 |
Constance
| Level | HP | Mov. | Class |
|---|---|---|---|
| 24 | 36 | 7 | Dark Flier |
| Mt. | Spd | Hit | Crit |
| 41 | 9 | 88 | 35 |
| Range | Prt | Res | Avd |
| 1-2 | 10 | 20 | 19 |
| Weapon | Dropped Items | ||
| Fimbulvetr | N/A | ||
| Battalion | |||
| Seiros Pegasus Co. | |||
| Level | Endurance | Gambit | Uses |
| 1-2 | 60 | Assembly | 2 |
Balthus
| Level | HP | Mov. | Class |
|---|---|---|---|
| 24 | 56 | 6 | War Monk |
| Mt. | Spd | Hit | Crit |
| 39 | 8 | 115 | 20 |
| Range | Prt | Res | Avd |
| 1 | 22 | 12 | 21 |
| Weapon | Dropped Items | ||
| Vajra-Mushti | N/A | ||
| Battalion | |||
| Seiros Mercenaries | |||
| Level | Endurance | Gambit | Uses |
| 1 | 30 | Onslaught | 2 |
Hapi
| Level | HP | Mov. | Class |
|---|---|---|---|
| 24 | 41 | - | Valkyrie |
| Mt. | Spd | Hit | Crit |
| 36 | 3 | 102 | 17 |
| Range | Prt | Res | Avd |
| 1-3 | 10 | 26 | 10 |
| Weapon | Dropped Items | ||
| Banshee | N/A | ||
| Battalion | |||
| Seiros Magic Corps | |||
| Level | Endurance | Gambit | Uses |
| 1-3 | 30 | Group Flames | 1 |
Enemy data will be gathered soon.
Save the Door Key For Later
You can pick up a Door Key from an enemy, but the only locked door is far in the map, and you will be able to finish the battle before you get there. Save the key for a later battle.
Chests
There are no chests in this battle.
Map Features
Terrain Types
| Tiles | Description |
|---|---|
| Wall | Cannot be crossed |
| Pillar | Cannot be crossed |
| Cavity | Navigable by fliers only |
| Stairs | Difficult for cavalry to traverse |
| Cover | +2 Def for non-fliers |
| Avo Floor | +40% Avo for non-fliers |
| Wardwood | +2 Res for non-fliers |
| Heal Tile+ | +30% HP each turn, +1 Def and +1 Res for non-fliers |
| Door | Impassable when locked, requires Door Key |
| Lever | Controls traps, weapons, and contraptions |
| Abyss Gate | Impassable when locked, requires a key |
Levers and Abyss Gates
New interactable tile types are introduced in this battle. However, levers can only be used by the Ashen Wolves. They will not use them on this battle, however. There is also no need to get through Abyss Gates in this battle.
Tips and Tricks
Use stat-boosting tiles
Since you are facing enemies of new classes, it is best to go forward in groups. Luckily, the buff tiles are adjacent in certain areas of the map, so you can easily position your units to ready attacks.
Wach out for Hapi!
Be careful of Hapi once your get into her range. She will summon a beast called a Giant Crawler. She will then run off to the lone Heal Tile+ inside a room. Once in her range, she will pick your units off, moving around the Heal Tile+, while she is safe surrounded by walls. Use Claude and Ashe to attack her from the other side.
After the Battle
There will be no playthrough after the battle. Proceed to the next chapter!
Fire Emblem: Three Houses - Related Links
 DLC - Cindered Shadows Walkthrough |
||
| DLC - Cindered Shadows | ||
|---|---|---|
| Chapter 1: The Fourth House | Chapter 2: What Lies Beneath | Chapter 3: The Rite of Rising |
| Chapter 4: Danger in the Dark | Chapter 5: Betrayal | Chapter 6: Return to Me |
| Chapter 7: Wolf Pack | ||
Comment
Author
Ashen Wolves Chapter 1: The Fourth House Walkthrough
improvement survey
03/2026
improving Game8's site?

Your answers will help us to improve our website.
Note: Please be sure not to enter any kind of personal information into your response.

We hope you continue to make use of Game8.
Rankings
- We could not find the message board you were looking for.
Gaming News
Popular Games

Genshin Impact Walkthrough & Guides Wiki

Honkai: Star Rail Walkthrough & Guides Wiki

Umamusume: Pretty Derby Walkthrough & Guides Wiki

Pokemon Pokopia Walkthrough & Guides Wiki

Resident Evil Requiem (RE9) Walkthrough & Guides Wiki

Monster Hunter Wilds Walkthrough & Guides Wiki

Wuthering Waves Walkthrough & Guides Wiki

Arknights: Endfield Walkthrough & Guides Wiki

Pokemon FireRed and LeafGreen (FRLG) Walkthrough & Guides Wiki

Pokemon TCG Pocket (PTCGP) Strategies & Guides Wiki
Recommended Games

Diablo 4: Vessel of Hatred Walkthrough & Guides Wiki

Cyberpunk 2077: Ultimate Edition Walkthrough & Guides Wiki

Fire Emblem Heroes (FEH) Walkthrough & Guides Wiki

Yu-Gi-Oh! Master Duel Walkthrough & Guides Wiki

Super Smash Bros. Ultimate Walkthrough & Guides Wiki

Pokemon Brilliant Diamond and Shining Pearl (BDSP) Walkthrough & Guides Wiki

Elden Ring Shadow of the Erdtree Walkthrough & Guides Wiki

Monster Hunter World Walkthrough & Guides Wiki

The Legend of Zelda: Tears of the Kingdom Walkthrough & Guides Wiki

Persona 3 Reload Walkthrough & Guides Wiki
All rights reserved
©2019 Nintendo / INTELLIGENT SYSTEMS. Co-developed by KOEI TECMO GAMES CO., LTD. Fire Emblem and Nintendo Switch are trademarks of Nintendo. © 2019 Nintendo.
The copyrights of videos of games used in our content and other intellectual property rights belong to the provider of the game.
The contents we provide on this site were created personally by members of the Game8 editorial department.
We refuse the right to reuse or repost content taken without our permission such as data or images to other sites.


![Monster Hunter Stories 3 Review [First Impressions] | Simply Rejuvenating](https://img.game8.co/4438641/2a31b7702bd70e78ec8efd24661dacda.jpeg/thumb)


