Ashen Wolves Chapter 3: The Rite of Rising Walkthrough

This is the walkthrough for the 3rd chapter of the side story DLC in Fire Emblem: Three Houses (FETH, FE3H). Read on to see what you can do in Abyss, as well as all battle info, map features, enemy data, and a strategy guide for the battle, Search for the Chalice.
List of Contents
| Previous Chapter | Next Chapter |
|---|---|
| Chapter 2: What Lies Beneath | Chapter 4: Danger in the Dark |
Chapter 3 - The Rite of Rising
Exploring Abyss
Chapter Objectives
There is no specific objective for this chapter. You are free to wander around Abyss and talk to inhabitants and browse shops.
Chapter 3 Mission: Search for the Chalice

For this battle, you will be facing stronger opponents. Study their abilities and strategize how you will go about the battle.
Map and Overview
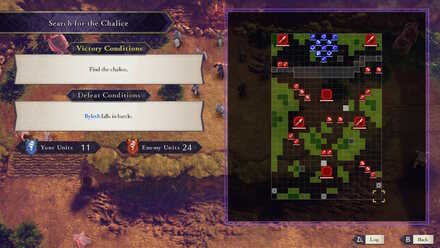
| Victory Conditions | |
|---|---|
| Find the chalice. | |
| Defeat Conditions | |
| Player falls in battle. | |
| # of Player Units | 11 |
| # of Enemies | 24 + 2 + 3 + 3 + 6 |
Enemies
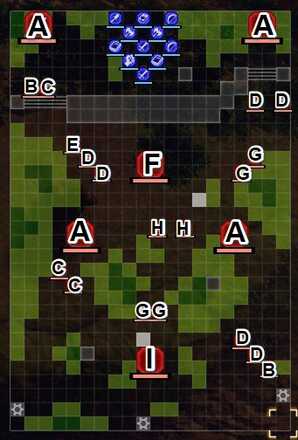
| Phase 1 | |||
|---|---|---|---|
| A | Golem | B | Phantom Soldier (Sniper) |
| C | Phantom Soldier (Assassin) | D | Phantom Soldier (Warrior) |
| E | Phantom Soldier (Dark Bishop) | F | Marcelle (Altered Golem) |
| G | Phantom Soldier (Paladin) | H | Phantom Soldier (Fortress Knight) |
| I | Simone (Altered Golem) | - | - |
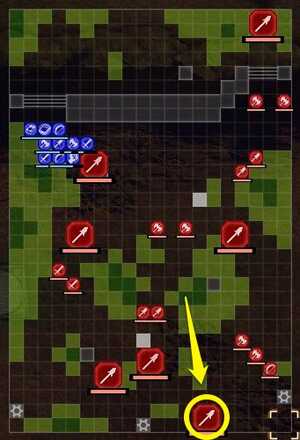 |
 |
These spawn one by one when you are approaching the left magic seal (lever).
| Phase 2 | |||
|---|---|---|---|
| Golem - 3 | |||
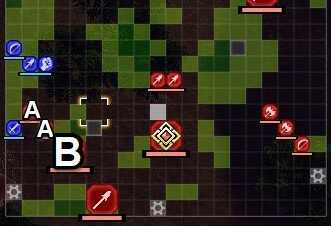
| Phase 3 | |||
|---|---|---|---|
| A | Phantom Soldier (Warrior) | B | Golem |
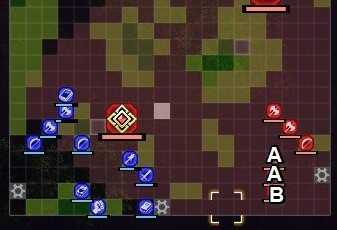
These enemies spawn when you activate the middle lever.
| Phase 4 | |||
|---|---|---|---|
| A | Phantom Soldier (Fortress Knight) | B | Phantom Soldier (Paladin) |

These enemies spawn when you are near the right lever.
| Phase 5 | |||
|---|---|---|---|
| A | Phantom Soldier (Assassin) | B | Phantom Soldier (Fortress Knight) |
| C | Phantom Soldier (Sniper) | - | - |
Enemy Stats
Marcelle
| Level | HP | Mov. | Class |
|---|---|---|---|
| 28 | 45 | 4 | Altered Golem |
| Mt. | Spd | Hit | Crit |
| 40 | 7 | 113 | 18 |
| Range | Prt | Res | Avd |
| 1-3 | 27 | 16 | 17 |
| Weapon | Dropped Items | ||
| Lance of Light+ | Spellbreak Key | ||
Simone
| Level | HP | Mov. | Class |
|---|---|---|---|
| 28 | 49 | 4 | Altered Golem |
| Mt. | Spd | Hit | Crit |
| 39 | 9 | 112 | 17 |
| Range | Prt | Res | Avd |
| 1-3 | 25 | 17 | 19 |
| Weapon | Dropped Items | ||
| Lance of Light+ | N/A | ||
Enemy data will be gathered soon.
Loot
Aside from the usual loot, you can get a Spellbreak Key from Marcelle early on and use it to activate the magic seals at the end of the map. This item is crucial to completing the level, so give it to someone who has a high Mov like Yuri, Claude, or Constance.
Chests
There are no chests in this battle.
Map Features
Terrain Types
| Tiles | Description |
|---|---|
| Altar | Cannot be crossed |
| Cliff | Navigable by fliers only |
| Rock | Navigable by fliers only |
| Stairs | Difficult for cavalry to traverse |
| Wasteland | Difficult for cavalry to traverse |
| Forest | +30% Avo and 1 Def for non-fliers |
| Thicket | +40% Avo and 2 Def for non-fliers |
| Heal Tile+ | +30% HP each turn, +1 Def and +1 Res for non-fliers |
| Magic Seal | Requires the Spellbreak Key to activate |
Magic Seals
Magic seals are at the end of the map, and the Spellbreak Key can be used to activate it. Be wary of the debuffs that come along with them whenever you activate the wrong ones.
Tips and Tricks
Get the Spellbreak Key From Marcelle
The first thing you should prioritize in this battle is getting the Spellbreak Key from Marcelle. The goal is not to rout the enemies, but to activate the correct magic seal or lever with the key.
Give the key to any Wyvern Riders because they have high Mov. You can also give it to Yuri. If you advance one of your Wyvern Riders, then swap their positions with Yuri, he can easily reach the end of the map.
Correct Lever is at Left-Hand Corner
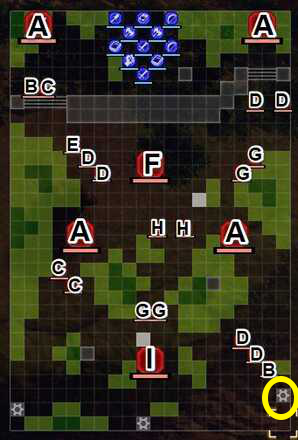
The correct lever is always at the left corner, if your units need to go up on the map. If you press the wrong lever, reinforcements will spawn. Once you open it, the chapter will end.
If you press the wrong lever, you can use Divine Pulse to rewind to previous turns.
Use Gambit and Magic Attacks
Defeating golems is not a breeze because of their high armor and defense abilities, but you can use gambit and magic to first take out their armor and take their attention away from weaker units.
You will also be able to get Ores from it. Then, you can then use your physical attackers to finish them off.
Watch Out for Nullifying abilities
The two altered golems, Marcelle and Simone, have magic-nullifying abilities when you break their armor. It is also impossible to land critical hits on them. Once you break their armor, keep picking them off from a range.
Stick Together and Traverse One Side
We do not recommend splitting off into smaller groups as the enemies will outnumber you. Go in a single group and stay on one side, preferably the left side, as to not have the farther enemies go after you and outnumber you.
Wait Forests and Thickets
Greenery is well-spread throughout the map. Keep your units to one side and inside forests and thickets for defense.
Be Ready for Traps
When you activate a wrong lever, your team will get a movement debuff, but the one who pulls the lever gets a buff. More enemies will spawn within the next lever's range. The smaller units are not exactly a threat, but you should watch out for the golems.
Use Lindhart's Restore magic to remove the debuffs within range in one turn.
Chapter 3 - After the Battle
The chapter ends after the battle, so you are free to proceed to the next one.
Fire Emblem: Three Houses - Related Links
 DLC - Cindered Shadows Walkthrough |
||
| DLC - Cindered Shadows | ||
|---|---|---|
| Chapter 1: The Fourth House | Chapter 2: What Lies Beneath | Chapter 3: The Rite of Rising |
| Chapter 4: Danger in the Dark | Chapter 5: Betrayal | Chapter 6: Return to Me |
| Chapter 7: Wolf Pack | ||
Comment
Author
Ashen Wolves Chapter 3: The Rite of Rising Walkthrough
improvement survey
03/2026
improving Game8's site?

Your answers will help us to improve our website.
Note: Please be sure not to enter any kind of personal information into your response.

We hope you continue to make use of Game8.
Rankings
- We could not find the message board you were looking for.
Gaming News
Popular Games

Genshin Impact Walkthrough & Guides Wiki

Honkai: Star Rail Walkthrough & Guides Wiki

Umamusume: Pretty Derby Walkthrough & Guides Wiki

Pokemon Pokopia Walkthrough & Guides Wiki

Resident Evil Requiem (RE9) Walkthrough & Guides Wiki

Monster Hunter Wilds Walkthrough & Guides Wiki

Wuthering Waves Walkthrough & Guides Wiki

Arknights: Endfield Walkthrough & Guides Wiki

Pokemon FireRed and LeafGreen (FRLG) Walkthrough & Guides Wiki

Pokemon TCG Pocket (PTCGP) Strategies & Guides Wiki
Recommended Games

Diablo 4: Vessel of Hatred Walkthrough & Guides Wiki

Cyberpunk 2077: Ultimate Edition Walkthrough & Guides Wiki

Fire Emblem Heroes (FEH) Walkthrough & Guides Wiki

Yu-Gi-Oh! Master Duel Walkthrough & Guides Wiki

Super Smash Bros. Ultimate Walkthrough & Guides Wiki

Pokemon Brilliant Diamond and Shining Pearl (BDSP) Walkthrough & Guides Wiki

Elden Ring Shadow of the Erdtree Walkthrough & Guides Wiki

Monster Hunter World Walkthrough & Guides Wiki

The Legend of Zelda: Tears of the Kingdom Walkthrough & Guides Wiki

Persona 3 Reload Walkthrough & Guides Wiki
All rights reserved
©2019 Nintendo / INTELLIGENT SYSTEMS. Co-developed by KOEI TECMO GAMES CO., LTD. Fire Emblem and Nintendo Switch are trademarks of Nintendo. © 2019 Nintendo.
The copyrights of videos of games used in our content and other intellectual property rights belong to the provider of the game.
The contents we provide on this site were created personally by members of the Game8 editorial department.
We refuse the right to reuse or repost content taken without our permission such as data or images to other sites.


![Monster Hunter Stories 3 Review [First Impressions] | Simply Rejuvenating](https://img.game8.co/4438641/2a31b7702bd70e78ec8efd24661dacda.jpeg/thumb)


