Chapter 14: Capturing Derdriu (Black Eagles) Walkthrough
This is a battle walkthrough for the mission Capturing Derdriu from Fire Emblem: Three Houses (FETH, FE3H). Read on to find out about map features, what enemies you will encounter, and tips for winning!
List of Contents
| Previous Battle | Story Walkthrough | Next Battle |
|---|---|---|
| Chapter 13: The Great Bridge Coup |
Chapter 14: The Master Tactician |
Chapter 15: Protecting Garreg Mach |
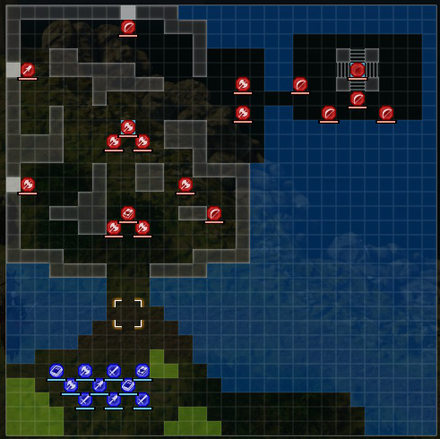
Chapter 14 (Black Eagles) - Map and Overview

| Victory Conditions | |
|---|---|
| Defeat the enemy commander. | |
| Defeat Conditions | |
| Your character or Edelgard falls in battle. | |
| # of Player Units | 10 |
| # of Enemies | 18 |

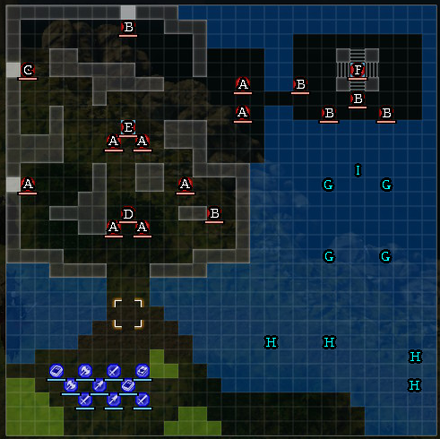
| Pos | Enemy | Pos | Enemy |
|---|---|---|---|
| A | Alliance Soldier (Warrior) | F | Claude |
| B | Alliance Soldier (Sniper) | G | Almyran Soldier (Wyvern Lord) |
| C | Alliance Soldier (Paladin) | H | Almyran Soldier (Bow Knight) |
| D | Lysithea | I | Nader |
| E | Hilda |
Lysithea
| Level | HP | Mov. | Class |
|---|---|---|---|
| 30 | 32 | 5 | Gremory |
| Mt. | Spd | Hit | Crit |
| 65 | 3 | 121 | 30 |
| Range | Prt | Res | Avd |
| 1-2 | 13 | 31 | 31 |
| Weapon | Dropped Items | ||
| Hades Ω | N/A | ||
| Battalion | |||
| Ordelia Sorcery Co. | |||
| Level | Endurance | Gambit | Uses |
| 1-2 | 75 | Resonant Lightning | 1 |
Hilda
| Level | HP | Mov. | Class |
|---|---|---|---|
| 30 | 57 | 5 | Warrior |
| Mt. | Spd | Hit | Crit |
| 66 | 14 | 143 | 47 |
| Range | Prt | Res | Avd |
| 1 | 26 | 9 | 22 |
| Weapon | Dropped Items | ||
| Freikugel | N/A | ||
| Battalion | |||
| Goneril Valkyries | |||
| Level | Endurance | Gambit | Uses |
| 1 | 105 | Assault Troop | 2 |
Nader
| Level | HP | Mov. | Class |
|---|---|---|---|
| 30 | 48 | 8 | Wyvern Lord |
| Mt. | Spd | Hit | Crit |
| 56 | 19 | 86 | 15 |
| Range | Prt | Res | Avd |
| 1 | 32 | 12 | 51 |
| Weapon | Dropped Items | ||
| Brave Axe | Aurora Shield | ||
| Battalion | |||
| Almyra Wyvern Co. | |||
| Level | Endurance | Gambit | Uses |
| 1 | 75 | Assault Troop | 2 |
Claude
| Level | HP | Mov. | Class |
|---|---|---|---|
| 31 | 40 | - | Wyvern Master |
| Mt. | Spd | Hit | Crit |
| 55 | 14 | 112 | 40 |
| Range | Prt | Res | Avd |
| 2-3 | 21 | 15 | 41 |
| Weapon | Dropped Items | ||
| Failnaught | N/A | ||
| Battalion | |||
| Immortal Corps | |||
| Level | Endurance | Gambit | Uses |
| 2-3 | 120 | Ashes and Dust | 2 |
Lysithea
Enemy data will be gathered soon.
Hilda
Enemy data will be gathered soon.
Nader
Enemy data will be gathered soon.
Claude
Enemy data will be gathered soon.
Loot

| Pos | Loot Dropped |
|---|---|
| 1 | Lampos Shield |
Chapter 14 (Black Eagles) - Chests
There are no chests in this map.
Chapter 14 (Black Eagles) - Map Features
Tiles
| Tiles | Description |
|---|---|
| Wasteland | Difficult for cavalry to traverse |
| Forest | 1 Prt, +30% Avo, except for fliers |
| Rampart | Navigable only by fliers |
| House | Navigable only by fliers |
| Sea | Navigable only by fliers |
| Heal Tile+ | 1 Prt, 1 Res, +30% HP each turn for non-fliers |
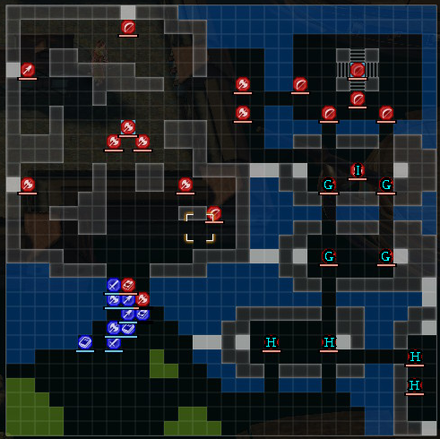
Almyran Ships at Turn 2

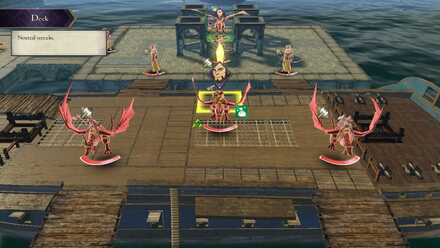
At turn 2, Nader, four Almyran Wyvern Lords and four Almyran Bow Knights will show up in ships, changing the landscape of the map.
Chapter 14 (Black Eagles) - Tips and Tricks
Eliminate Nader to Stop Almyran Units Entering

Additional Almyran units will spawn into the map as long as Nader lives. Killing him will stop the outpour of Almyran soldiers.
It Is Possible To Recruit Lysithea
Upon defeating Lysithea, it is possible to spare her and recruit her rather than kill her. She will then join your army next battle. Since she is arguably the best mage in the game, we highly recommend doing so.
Fire Emblem: Three Houses - Related Links
Part 2 - Crimson Flower Battle Walkthroughs
 |
||
| Part 2 - Azure Moon | ||
|---|---|---|
| Chapter 13: The Great Bridge Coup | Chapter 14: Capturing Derdriu | Chapter 15: Protecting Garreg Mach |
| Chapter 16: The Siege of Arianrhod | Chapter 17: Combat at Tailtean Plains | Chapter 18: The Fight for Fhirdiad |
Comment
Author
Chapter 14: Capturing Derdriu (Black Eagles) Walkthrough
improvement survey
04/2026
improving Game8's site?

Your answers will help us to improve our website.
Note: Please be sure not to enter any kind of personal information into your response.

We hope you continue to make use of Game8.
Rankings
- We could not find the message board you were looking for.
Gaming News
Popular Games

Genshin Impact Walkthrough & Guides Wiki

Crimson Desert Walkthrough & Guides Wiki

Umamusume: Pretty Derby Walkthrough & Guides Wiki

Honkai: Star Rail Walkthrough & Guides Wiki

Monster Hunter Stories 3: Twisted Reflection Walkthrough & Guides Wiki

Wuthering Waves Walkthrough & Guides Wiki

The Seven Deadly Sins: Origin Walkthrough & Guides Wiki

Pokemon TCG Pocket (PTCGP) Strategies & Guides Wiki

Pokemon Pokopia Walkthrough & Guides Wiki

Zenless Zone Zero Walkthrough & Guides Wiki
Recommended Games

Fire Emblem Heroes (FEH) Walkthrough & Guides Wiki

Pokemon Brilliant Diamond and Shining Pearl (BDSP) Walkthrough & Guides Wiki

Super Smash Bros. Ultimate Walkthrough & Guides Wiki

Diablo 4: Vessel of Hatred Walkthrough & Guides Wiki

Cyberpunk 2077: Ultimate Edition Walkthrough & Guides Wiki

Yu-Gi-Oh! Master Duel Walkthrough & Guides Wiki

Elden Ring Shadow of the Erdtree Walkthrough & Guides Wiki

Monster Hunter World Walkthrough & Guides Wiki

The Legend of Zelda: Tears of the Kingdom Walkthrough & Guides Wiki

Persona 3 Reload Walkthrough & Guides Wiki
All rights reserved
©2019 Nintendo / INTELLIGENT SYSTEMS. Co-developed by KOEI TECMO GAMES CO., LTD. Fire Emblem and Nintendo Switch are trademarks of Nintendo. © 2019 Nintendo.
The copyrights of videos of games used in our content and other intellectual property rights belong to the provider of the game.
The contents we provide on this site were created personally by members of the Game8 editorial department.
We refuse the right to reuse or repost content taken without our permission such as data or images to other sites.


![Forza Horizon 6 Review [Preview] | Beautiful Roads With a Whole Lot of Oversteer](https://img.game8.co/4460981/a7254c24945c43fbdf6ad9bea52b5ce9.png/thumb)
![Borderlands Mobile Review [Playtest] | The Same Borderlands Made Easy](https://img.game8.co/4465500/aac0c880a39ec5cd46073e49d18f3ed5.png/thumb)


