Chapter 16: The Siege of Arianrhod (Black Eagles) Walkthrough
This is a battle walkthrough for the mission The Siege or Arianrhod from Fire Emblem: Three Houses (FETH, FE3H). Read on to find out about map features, what enemies you will encounter, and tips for winning!
List of Contents
| Previous Battle | Story Walkthrough | Next Battle |
|---|---|---|
| Chapter 15: Protecting Garreg Mach | Chapter 16: Lady of Deceit | Chapter 17: Combat at Tailtean Plains |
Chapter 16 (Black Eagles) - Map and Overview
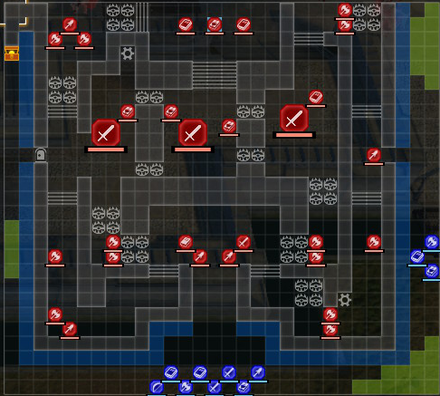
| Victory Conditions | |
|---|---|
| Defeat all enemy commanders. | |
| Defeat Conditions | |
| Your character or Edelgard falls in battle. | |
| # of Player Units | 11 |
| # of Enemies | 30 |
Chapter 16 (Black Eagles) - Enemies
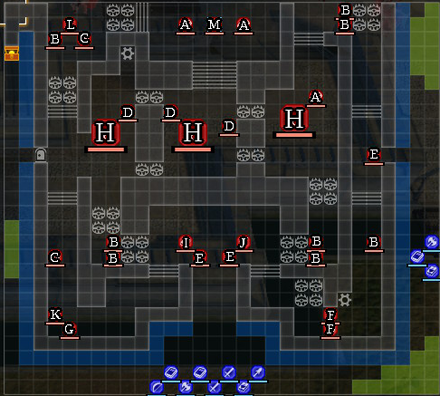
| Pos | Enemy | Pos | Enemy |
|---|---|---|---|
| A | Kingdom Soldier (Warlock) | H | Titanus |
| B | Kingdom Soldier (Fortress Knight) | I | Rodrigue |
| C | Kingdom Soldier (Warrior) | J | Felix |
| D | Kingdom Soldier (Dark Bishop) | K | Gwendal |
| E | Kingdom Soldier (Paladin) | L | Ingrid |
| F | Kingdom Soldier (Great Knight) | M | Cornelia |
| G | Kingdom Soldier (Pegasus Knight) |
Cornelia
| Level | HP | Mov. | Class |
|---|---|---|---|
| 35 | 46 | - | Gremory |
| Mt. | Spd | Hit | Crit |
| 52 | 10 | 113 | 38 |
| Range | Prt | Res | Avd |
| 1-3 | 20 | 43 | 10 |
| Weapon | Dropped Items | ||
| Death Γ | N/A | ||
| Battalion | |||
| Blue Lion Magic Corps | |||
| Level | Endurance | Gambit | Uses |
| 1-3 | 105 | Resonant Ice | 1 |
Ingrid
| Level | HP | Mov. | Class |
|---|---|---|---|
| 35 | 49 | 8 | Falcon Knight |
| Mt. | Spd | Hit | Crit |
| 53 | 30 | 129 | 27 |
| Range | Prt | Res | Avd |
| 1 | 27 | 38 | 65 |
| Weapon | Dropped Items | ||
| Luin | N/A | ||
| Battalion | |||
| Galatea Pegasus Co. | |||
| Level | Endurance | Gambit | Uses |
| 1 | 105 | Lure | 2 |
Gwendal
| Level | HP | Mov. | Class |
|---|---|---|---|
| 35 | 63 | 7 | Great Knight |
| Mt. | Spd | Hit | Crit |
| 46 | 0 | 116 | 14 |
| Range | Prt | Res | Avd |
| 1 | 37 | 10 | 10 |
| Weapon | Dropped Items | ||
| Brave Axe | N/A | ||
| Battalion | |||
| Rowe Knights | |||
| Level | Endurance | Gambit | Uses |
| 1 | 75 | Linked Horses | 1 |
Felix
| Level | HP | Mov. | Class |
|---|---|---|---|
| 35 | 51 | 5 | Swordmaster |
| Mt. | Spd | Hit | Crit |
| 57 | 28 | 121 | 47 |
| Range | Prt | Res | Avd |
| 1 | 32 | 11 | 48 |
| Weapon | Dropped Items | ||
| Sword of Zoltan | N/A | ||
| Battalion | |||
| Fraldarius Soldiers | |||
| Level | Endurance | Gambit | Uses |
| 1 | 105 | Onslaught | 2 |
Rodrigue
| Level | HP | Mov. | Class |
|---|---|---|---|
| 35 | 49 | 7 | Holy Knight |
| Mt. | Spd | Hit | Crit |
| 38 | 11 | 114 | 54 |
| Range | Prt | Res | Avd |
| 1-2 | 20 | 28 | 31 |
| Weapon | Dropped Items | ||
| Aura | N/A | ||
| Battalion | |||
| Fraldarius Soldiers | |||
| Level | Endurance | Gambit | Uses |
| 1-2 | 105 | Onslaught | 2 |
Cornelia
Enemy data will be gathered soon.
Ingrid
Enemy data will be gathered soon.
Gwendal
Enemy data will be gathered soon.
Felix
Enemy data will be gathered soon.
Rodrigue
Enemy data will be gathered soon.
Loot
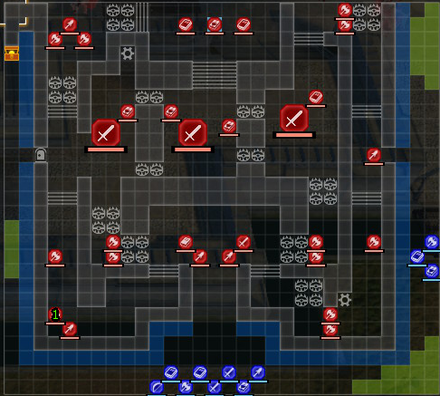
| Location | Loot Dropped |
|---|---|
| 1 | Brave Axe |
Brave Axe
An axe that attacks twice. Definitely worth getting, although it's not like you have a choice, as Gwendal is a required foe to defeat.
Chapter 16 (Black Eagles) - Chests
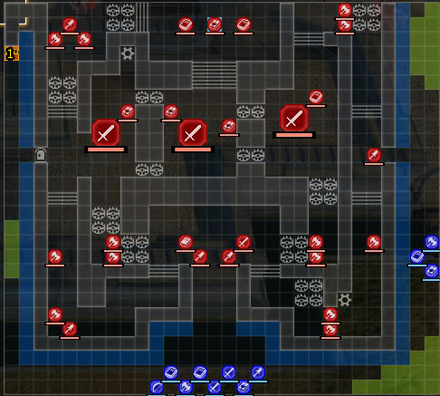
There is only one chest, containing a Speedwing.
| Location | Chest Contents |
|---|---|
| 1 | Speedwing |
Speedwing
Increases a character's speed by 2. Due to the distance of this, as the only way to get it without a door key is to travel along the outer wall alone, it's not really worth it. Leaving a lone unit also has the danger of Ingrid flying out to them, so it's dangerous as well as out of the way.
Chapter 16 (Black Eagles) - Map Features
Tiles
| Tiles | Description |
|---|---|
| Rampart | Navigable only by fliers |
| House | Navigable only by fliers |
| River | Navigable only by fliers |
| Heal Tile+ | 1 Prt, 1 Res, +30% HP each turn for non-fliers |
Floor Traps
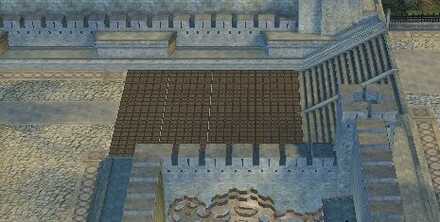
These traps will hinder your unit's movements and damage them every turn. Activating these two levers will disable the traps.
Chapter 16 (Black Eagles) - Tips and Tricks
Disabling the Levers
For the closer lever, it's easy to reach using your units that start in the east. For the other lever, make sure you have a flier in your main force so they can disable the lever while on the top of the western wall without going through the Titanus.
Defeat Felix with Magic or Ranged
Felix is deadly if you have him as a unit, but just as deadly as an opponent. He can and will kill your units in one hit, so be sure to engage him with magic and ranged attacks, because a counter attack will be deadly.
Bring Armorslayers, Hammers, and other Anti-Armor Weapons
This map is populated by Fortress Knights and Great Knights, so these weapons will come in handy to instantly defeat these enemies.
Travel Along the Western Side of the Wall
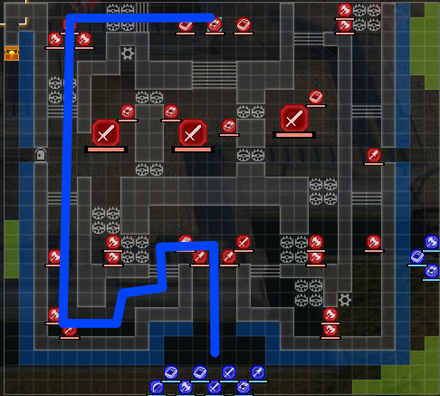
You must defeat all five commanders before the mission completes: Rodrigue, Felix, Gwendal, Ingrid, and Cornelia. You can defeat all of them without splitting up by following the path above. This also avoids most of the traps, except for two.
Fire Emblem: Three Houses - Related Links
Part 2 - Crimson Flower Battle Walkthroughs
 |
||
| Part 2 - Azure Moon | ||
|---|---|---|
| Chapter 13: The Great Bridge Coup | Chapter 14: Capturing Derdriu | Chapter 15: Protecting Garreg Mach |
| Chapter 16: The Siege of Arianrhod | Chapter 17: Combat at Tailtean Plains | Chapter 18: The Fight for Fhirdiad |
Comment
Author
Chapter 16: The Siege of Arianrhod (Black Eagles) Walkthrough
improvement survey
04/2026
improving Game8's site?

Your answers will help us to improve our website.
Note: Please be sure not to enter any kind of personal information into your response.

We hope you continue to make use of Game8.
Rankings
- We could not find the message board you were looking for.
Gaming News
Popular Games

Genshin Impact Walkthrough & Guides Wiki

Crimson Desert Walkthrough & Guides Wiki

Umamusume: Pretty Derby Walkthrough & Guides Wiki

Honkai: Star Rail Walkthrough & Guides Wiki

Monster Hunter Stories 3: Twisted Reflection Walkthrough & Guides Wiki

Wuthering Waves Walkthrough & Guides Wiki

The Seven Deadly Sins: Origin Walkthrough & Guides Wiki

Pokemon TCG Pocket (PTCGP) Strategies & Guides Wiki

Pokemon Pokopia Walkthrough & Guides Wiki

Zenless Zone Zero Walkthrough & Guides Wiki
Recommended Games

Fire Emblem Heroes (FEH) Walkthrough & Guides Wiki

Pokemon Brilliant Diamond and Shining Pearl (BDSP) Walkthrough & Guides Wiki

Super Smash Bros. Ultimate Walkthrough & Guides Wiki

Diablo 4: Vessel of Hatred Walkthrough & Guides Wiki

Cyberpunk 2077: Ultimate Edition Walkthrough & Guides Wiki

Yu-Gi-Oh! Master Duel Walkthrough & Guides Wiki

Elden Ring Shadow of the Erdtree Walkthrough & Guides Wiki

Monster Hunter World Walkthrough & Guides Wiki

The Legend of Zelda: Tears of the Kingdom Walkthrough & Guides Wiki

Persona 3 Reload Walkthrough & Guides Wiki
All rights reserved
©2019 Nintendo / INTELLIGENT SYSTEMS. Co-developed by KOEI TECMO GAMES CO., LTD. Fire Emblem and Nintendo Switch are trademarks of Nintendo. © 2019 Nintendo.
The copyrights of videos of games used in our content and other intellectual property rights belong to the provider of the game.
The contents we provide on this site were created personally by members of the Game8 editorial department.
We refuse the right to reuse or repost content taken without our permission such as data or images to other sites.


![Forza Horizon 6 Review [Preview] | Beautiful Roads With a Whole Lot of Oversteer](https://img.game8.co/4460981/a7254c24945c43fbdf6ad9bea52b5ce9.png/thumb)
![Borderlands Mobile Review [Playtest] | The Same Borderlands Made Easy](https://img.game8.co/4465500/aac0c880a39ec5cd46073e49d18f3ed5.png/thumb)


