Chapter 22: Clash at the Imperial Capital (Blue Lions) Walkthrough
This is the battle walkthrough for the mission Clash at the Imperial Capital from Fire Emblem: Three Houses (FETH, FE3H). Read on to find out about map features, what enemies you will encounter, and tips for winning!
List of Contents
| Previous Battle | Story Walkthrough | Next Battle |
|---|---|---|
| Chapter 21: Assault on Enbarr | Chapter 22: Oath of the Dagger | None |
Chapter 22 (Blue Lions) - Overview
| Victory Conditions | |
|---|---|
| Defeat the enemy commander | |
| Defeat Conditions | |
| Your character or Dimitri falls in battle. | |
| # of Player Units | 12 |
| # of Enemies | 48 - Normal 52 - Hard |
Chapter 22 (Blue Lions) - Enemies

| A | Imperial Soldier (Assassin) | B | Mysterious Soldier Soldier (Warlock) |
|---|---|---|---|
| C | Mysterious Soldier (Dark Bishop) | D | Imperial Soldier (Mortal Savant) |
| E | Imperial Soldier (Gremory) | F | Imperial Soldier (Bishop) |
| G | Imperial Soldier (War Master) | H | Imperial Soldier (Grappler) |
| I | Imperial Soldier (Sniper) | J | Demonic Beast |
| K | Myson | L | Hegemon Edelgard |
Hegemon Edelgard
| Level | HP | Mov. | Class |
|---|---|---|---|
| 44 | 54(x4) | - | Hegemon Husk |
| Mt. | Spd | Hit | Crit |
| 31 | 16 | 65 | 15 |
| Range | Prt | Res | Avd |
| 1-27 | 15 | 12 | 16 |
| Weapon | Dropped Items | ||
| Crest of Flames Power | N/A | ||
Myson
| Level | HP | Mov. | Class |
|---|---|---|---|
| 43 | 47 | - | Warlock |
| Mt. | Spd | Hit | Crit |
| 42 | 0 | 112 | 12 |
| Range | Prt | Res | Avd |
| 3-11 | 16 | 41 | 10 |
| Weapon | Dropped Items | ||
| Bohr X | Hexlock Shield | ||
| Battalion | |||
| Dark Magic Corps | |||
| Level | Endurance | Gambit | Uses |
| 3-11 | 75 | Resonant Lightning | 1 |
Hegemon Edelgard
| Level | HP | Mov. | Class |
|---|---|---|---|
| 45 | 75*4 | - | Hegemun Husk |
| Mt. | Spd | Hit | Crit |
| 38 | 23 | 77 | 22 |
| Range | Prt | Res | Avd |
| 1-30 | 21 | 18 | 23 |
| Weapon | Dropped Items | ||
| Crest of Flames Power | N/A | ||
Myson
| Level | HP | Mov. | Class |
|---|---|---|---|
| 44 | 54 | Warlock | |
| Mt. | Spd | Hit | Crit |
| 49 | 6 | 119 | 19 |
| Range | Prt | Res | Avd |
| 3-11 | 16 | 42 | 16 |
| Weapon | Dropped Items | ||
| Bohr | N/A | ||
| Battalion | |||
| Dark Magic Corps | |||
| Level | Endurance | Gambit | Uses |
| 3-11 | 75 | Resonant Lightning | 1 |
Chapter 22 (Blue Lions) - Chests
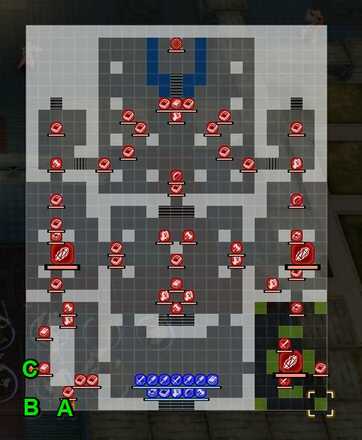
Talisman - A
The southern chest marked as A on the image above contains a Talisman.
Elixir - B
The southern chest marked as B on the image above contains a Elixir. The only worth it item in this bunch at this stage of the game.
Energy Drop - C
The southern chest marked as C on the image above contains a Talisman.
There are no lootable keys in this battle so bring your own keys or a unit with the lockpick ability to open the said chests.
Chapter 22 (Blue Lions) - Map Features
Tiles
| Tiles | Description |
|---|---|
| Thicket | 20% Avo, 1 Prt to all non-fliers |
| Wall | Cannot be crossed |
| Pillar | Cannot be crossed |
| Stairs | Difficult for cavalry to travers |
| Channel | Difficult for cavalry to travers |
| Throne | 40% Avo, 5 Def and Res, and recovers 30% HP per turn. |
Magic Heavy Composition
As shown in the enemy classes above, most units in this stage consists of magic user so fortress knights (sorry Dedue) will have a rough time in this battle.
Myson
Myson's spell has a high range and the power to instantly reduce its target's HP to 1. This disregards Resistance as well, so once a unit is hit, they become incredibly vulnerable to a follow-up attack.
- Attack Myson and kill him as soon as you're in range (take note that he is between rooms that each have a few enemies and a demonic beast)
- Send units with high Avo against him to dodge the attacks.
- Avoid the eastern corridor altogether by going through the western corridor. His range extends to the bottom right quarter of the main hall.
Chapter 22 (Blue Lions) - Tips and Tricks
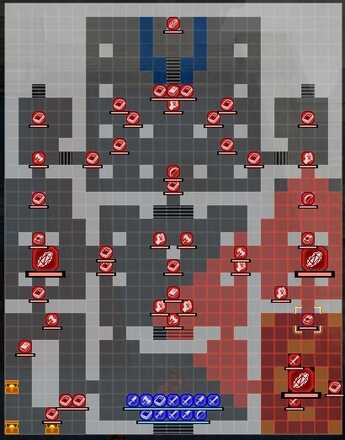
Edelgard's Long Range
Edelgard has a long ranged attack that can reach most of the map. She will do it twice at the start of each phase, to two different people. It starts with the stats of 0 Mt and 0 Hit, but increases each turn. This means that it can reach massive damage on the chance that it hits. While it is easily avoided, do not take too long as any hit can cause death if attacked again. The range is even longer in Hard and Maddening mode.
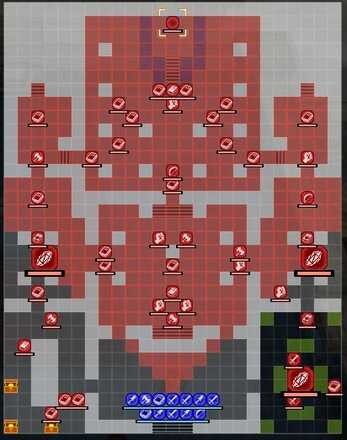
Assassinating Myson
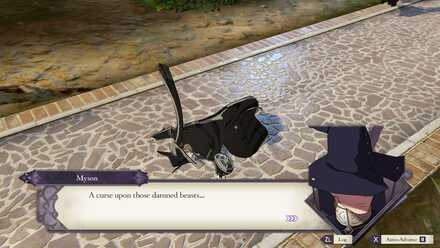
One of the best ways to make the battle easier is by defeating Myson on the 1st turn. This can be done by warping a high damage unit directly to Myson and attacking him. Do not be afraid against retaliation since the enemies surrounding Myson arre mostly mysterious soldiers that will retreat upon his death.
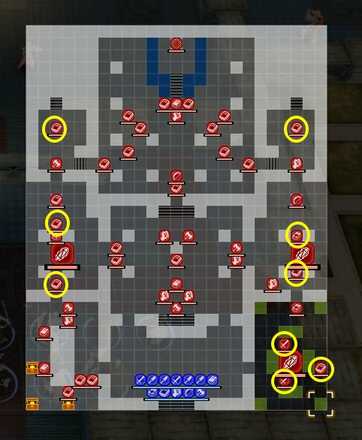
The Mysterious Mages
The battlefield is littered with several mysterious soldiers so taking out Myson will greatly shift the battle to your favor.
The units marked above are mysterious mages, while all others are imperial soldiers. Upon defeating Myson, all the other mysterious mages will withdraw. This will clear out a good number of units in the western corridor.
Bring a High Res Roster
Most of the units here are capable of using magic, save for a few. Make sure your army can hold their own against magic users, so do not rely too heavily on Fortress Knights, bring Pegasus Knights, etc.
Bring Pure Waters
Stay hydrated folks!
Pure Waters increase your unit's Res temporarily. This is an effective strategy to use in this battle due to the sheer amount of magic users on the enemy team.
Maximize Your Item/Equipment Use
This is the last level, so do not be afraid to use all your items and your Hero Relics. Bring out all the big guns and unleash hell.
Fire Emblem: Three Houses - Related Links
Part 2 - Azure Moon Battle Walkthroughs
 |
||
| Part 2 - Azure Moon | ||
|---|---|---|
| Chapter 13: Hunting at Daybreak | Chapter 14: Protecting Garreg Mach | Chapter 15: Ambush at Ailell |
| Chapter 16: The Great Bridge Coup | Chapter 17: To War at Gronder | Chapter 18: Reclaiming the Capital |
| Chapter 19: Saving Derdriu | Chapter 20: Taking Fort Merceus | Chapter 21: Assault on Enbarr |
| Chapter 22: Clash at the Imperial Capital | ||
Comment
Author
Chapter 22: Clash at the Imperial Capital (Blue Lions) Walkthrough
improvement survey
03/2026
improving Game8's site?

Your answers will help us to improve our website.
Note: Please be sure not to enter any kind of personal information into your response.

We hope you continue to make use of Game8.
Rankings
- We could not find the message board you were looking for.
Gaming News
Popular Games

Genshin Impact Walkthrough & Guides Wiki

Honkai: Star Rail Walkthrough & Guides Wiki

Umamusume: Pretty Derby Walkthrough & Guides Wiki

Pokemon Pokopia Walkthrough & Guides Wiki

Resident Evil Requiem (RE9) Walkthrough & Guides Wiki

Monster Hunter Wilds Walkthrough & Guides Wiki

Wuthering Waves Walkthrough & Guides Wiki

Arknights: Endfield Walkthrough & Guides Wiki

Pokemon FireRed and LeafGreen (FRLG) Walkthrough & Guides Wiki

Pokemon TCG Pocket (PTCGP) Strategies & Guides Wiki
Recommended Games

Diablo 4: Vessel of Hatred Walkthrough & Guides Wiki

Fire Emblem Heroes (FEH) Walkthrough & Guides Wiki

Yu-Gi-Oh! Master Duel Walkthrough & Guides Wiki

Super Smash Bros. Ultimate Walkthrough & Guides Wiki

Pokemon Brilliant Diamond and Shining Pearl (BDSP) Walkthrough & Guides Wiki

Elden Ring Shadow of the Erdtree Walkthrough & Guides Wiki

Monster Hunter World Walkthrough & Guides Wiki

The Legend of Zelda: Tears of the Kingdom Walkthrough & Guides Wiki

Persona 3 Reload Walkthrough & Guides Wiki

Cyberpunk 2077: Ultimate Edition Walkthrough & Guides Wiki
All rights reserved
©2019 Nintendo / INTELLIGENT SYSTEMS. Co-developed by KOEI TECMO GAMES CO., LTD. Fire Emblem and Nintendo Switch are trademarks of Nintendo. © 2019 Nintendo.
The copyrights of videos of games used in our content and other intellectual property rights belong to the provider of the game.
The contents we provide on this site were created personally by members of the Game8 editorial department.
We refuse the right to reuse or repost content taken without our permission such as data or images to other sites.


![Everwind Review [Early Access] | The Shaky First Step to A Very Long Journey](https://img.game8.co/4440226/ab079b1153298a042633dd1ef51e878e.png/thumb)

![Monster Hunter Stories 3 Review [First Impressions] | Simply Rejuvenating](https://img.game8.co/4438641/2a31b7702bd70e78ec8efd24661dacda.jpeg/thumb)


