Chapter 18: Reclaiming the Capital (Blue Lions) Walkthrough
This is the battle walkthrough for the mission Reclaiming the Capital from Fire Emblem: Three Houses (FETH, FE3H). Read on to find out about map features, what enemies you will encounter, and tips for winning!
List of Contents
| Previous Battle | Story Walkthrough | Next Battle |
|---|---|---|
| Chapter 17: To War at Gronder | Chapter 18: The King's Triumphant Return |
Chapter 19: Saving Derdriu |
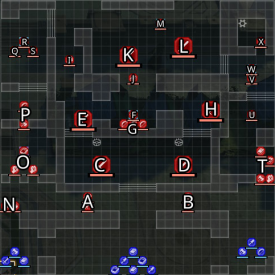
Chapter 18 (Blue Lions) - Map and Overview
| Victory Conditions | |
|---|---|
| Defeat the enemy commander. | |
| Defeat Conditions | |
| Your character or Dimitri falls in battle. | |
| # of Player Units | 12 |
| # of Enemies | 22 |
Chapter 18 (Blue Lions) - Enemies
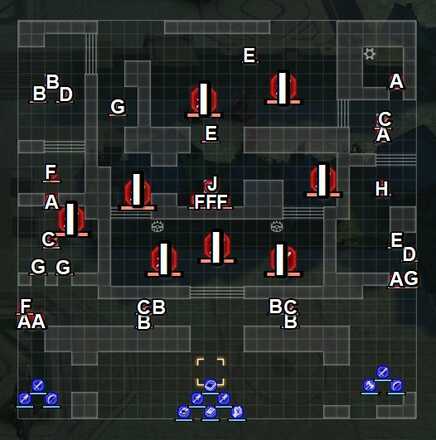
| A | Kingdom Soldier (Fortress Knight) | B | Kingdom Soldier (Swordmaster) |
|---|---|---|---|
| C | Kingdom Soldier (Warlock) | D | Kingdom Soldier (Dark Bishop) |
| E | Kingdom Soldier (Bishop) | F | Kingdom Soldier (Sniper) |
| G | Kingdom Soldier (Grappler) | H | Titanus |
| I | Cornelia | - | - |
Cornelia
| Level | HP | Mov. | Class |
|---|---|---|---|
| 37 | 48 | - | Gremory |
| Mt. | Spd | Hit | Crit |
| 54 | 10 | 108 | 39 |
| Range | Prt | Res | Avd |
| 1-3 | 22 | 44 | 8 |
| Weapon | Dropped Items | ||
| Death Γ | N/A | ||
| Battalion | |||
| Blue Lion Magic Corps | |||
| Level | Endurance | Gambit | Uses |
| 1-3 | 105 | Resonant Ice | 1 |
Cornelia
| Level | HP | Mov. | Class |
|---|---|---|---|
| 38 | 54 | - | Gremory |
| Mt. | Spd | Hit | Crit |
| 60 | 17 | 113 | 44 |
| Range | Prt | Res | Avd |
| 1-3 | 28 | 44 | 15 |
| Weapon | Dropped Items | ||
| Death | N/A | ||
| Battalion | |||
| Blue Lion Magic Corps | |||
| Level | Endurance | Gambit | Uses |
| 1-3 | 105 | Resonant Ice | 1 |
Loot
Wo Dao A
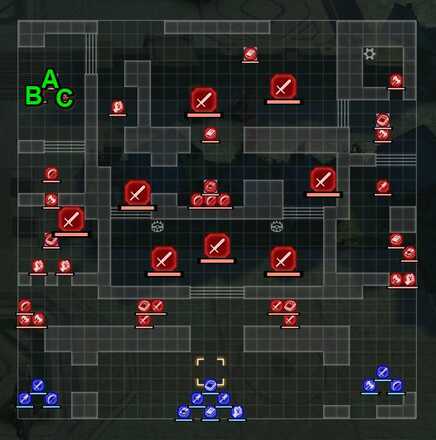
A Wo Dao is carried by the swordsman that stands on the left side of the soldier that stands on the heal tile on the northwest side of the map.
Elixir B
An Elixir is carried by the swordsman that stands on the right side of the soldier that stands on the heal tile on the northwest side of the map.
Brave Sword C
A Wo Dao is carried by the swordsman that stands the heal tile at the northwest side of the map.
Tathlum Bow
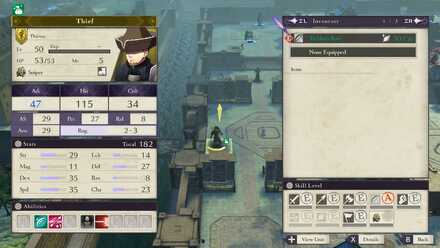
A Tathlum Bow can be looted from the Thief that appears on the west side of the map. Prepare a unit that will intercept him or he will flee the battle.
Chapter 18 (Blue Lions) - Chests
There are no chests in this level.
Chapter 18 (Blue Lions) - Map Features
Tiles
| Tiles | Description |
|---|---|
| Edifice | Navigable only by fliers |
| Rampart | Navigable only by fliers |
| Stairs | Difficult for cavalry to traverse |
| Heal Tile+ | 1 Prt, 1 Res, +30% HP each turn for non-fliers |
Viskam
A sentry like enemy that has extreme range. Make sure to prioritze activating the lever on the upper right most side of the map to disable it.
Chapter 18 (Blue Lions) - Tips and Tricks
Have Few Units Charge the Right Flank
It is imperative that you pull the lever at the upper right side of the map. This disables the Viskam allowing your units to march easier later on.
Defeat the 1st Titanus on the Left Side
Make sure to defeat the titanus on the left side of the map. More on this later.
Bring a High Magic Stat Unit
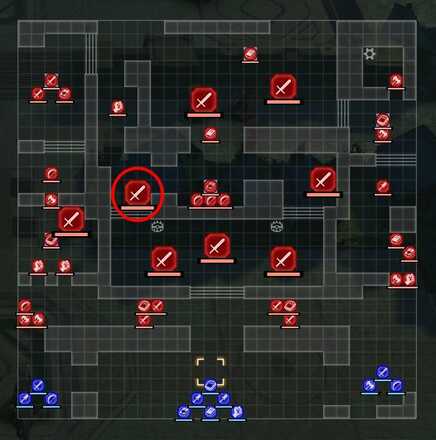
Doing so will allow you to poke the said Titanus on the area shown on the image above.
Intercept the Thief!
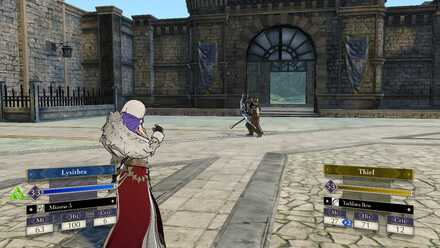
Leave a unit near the Fire Orb before maching to the left side of the map. This will allow you to block the thief carrying the Tathlum Bow.
Sneak In Through The Left Flank
Now that the Titanus that blocks the way is gone. You can now march in easily to the left side while avoiding the rest of the Titanus. Making the battle against Cornelia easier to reach.
Fire Emblem: Three Houses - Related Links
Part 2 - Azure Moon Battle Walkthroughs
Comment
Author
Chapter 18: Reclaiming the Capital (Blue Lions) Walkthrough
improvement survey
03/2026
improving Game8's site?

Your answers will help us to improve our website.
Note: Please be sure not to enter any kind of personal information into your response.

We hope you continue to make use of Game8.
Rankings
- We could not find the message board you were looking for.
Gaming News
Popular Games

Genshin Impact Walkthrough & Guides Wiki

Honkai: Star Rail Walkthrough & Guides Wiki

Umamusume: Pretty Derby Walkthrough & Guides Wiki

Pokemon Pokopia Walkthrough & Guides Wiki

Resident Evil Requiem (RE9) Walkthrough & Guides Wiki

Monster Hunter Wilds Walkthrough & Guides Wiki

Wuthering Waves Walkthrough & Guides Wiki

Arknights: Endfield Walkthrough & Guides Wiki

Pokemon FireRed and LeafGreen (FRLG) Walkthrough & Guides Wiki

Pokemon TCG Pocket (PTCGP) Strategies & Guides Wiki
Recommended Games

Diablo 4: Vessel of Hatred Walkthrough & Guides Wiki

Cyberpunk 2077: Ultimate Edition Walkthrough & Guides Wiki

Fire Emblem Heroes (FEH) Walkthrough & Guides Wiki

Yu-Gi-Oh! Master Duel Walkthrough & Guides Wiki

Super Smash Bros. Ultimate Walkthrough & Guides Wiki

Pokemon Brilliant Diamond and Shining Pearl (BDSP) Walkthrough & Guides Wiki

Elden Ring Shadow of the Erdtree Walkthrough & Guides Wiki

Monster Hunter World Walkthrough & Guides Wiki

The Legend of Zelda: Tears of the Kingdom Walkthrough & Guides Wiki

Persona 3 Reload Walkthrough & Guides Wiki
All rights reserved
©2019 Nintendo / INTELLIGENT SYSTEMS. Co-developed by KOEI TECMO GAMES CO., LTD. Fire Emblem and Nintendo Switch are trademarks of Nintendo. © 2019 Nintendo.
The copyrights of videos of games used in our content and other intellectual property rights belong to the provider of the game.
The contents we provide on this site were created personally by members of the Game8 editorial department.
We refuse the right to reuse or repost content taken without our permission such as data or images to other sites.


![Monster Hunter Stories 3 Review [First Impressions] | Simply Rejuvenating](https://img.game8.co/4438641/2a31b7702bd70e78ec8efd24661dacda.jpeg/thumb)


