Chapter 15: Ambush at Ailell (Blue Lions) Walkthrough
This is the battle walkthrough for the mission Ambush at Ailell from Chapter 15: Valley of Torment in Fire Emblem: Three Houses (FETH, FE3H). Read on to find out about map features, what enemies you will encounter, and tips for winning!
List of Contents
| Previous Battle | Story Walkthrough | Next Battle |
|---|---|---|
| Chapter 14: Protecting Garreg Mach | Chapter 15: Valley of Torment | Chapter 16: The Great Bridge Coup |
Map and Overview
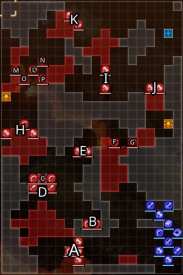
| Victory Conditions | |
|---|---|
| Defeat the enemy commander. | |
| Defeat Conditions | |
| Your character or Dimitri falls in battle. Your character, Dimitri, or Rodrigue falls in battle. |
|
| # of Player Units | 10 |
| # of Enemies | 29 - Normal 31 - Hard |
Enemies
Enemy Placement
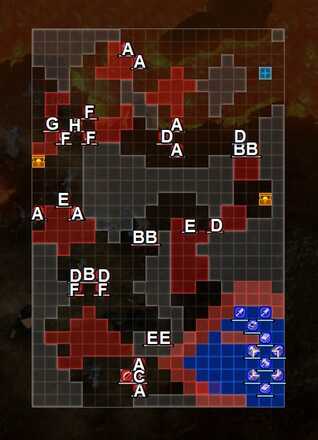
| A | Kingdom Soldier (Armored Knight) | B | Kingdom Soldier (Fortress Knight) |
|---|---|---|---|
| C | Kingdom Soldier (Great Knight) | D | Kingdom Soldier (Archer) |
| E | Kingdom Soldier (Sniper) | F | Kingdom Soldier (Paladin) |
| G | Kingdom Soldier (Bishop) | H | Gwendal |
Gwendal
| Level | HP | Mov. | Class |
|---|---|---|---|
| 31 | 60 | 7 | Great Knight |
| Mt. | Spd | Hit | Crit |
| 47 | 0 | 121 | 13 |
| Range | Prt | Res | Avd |
| 1 | 37 | 10 | 8 |
| Weapon | Dropped Items | ||
| Silver Axe | N/A | ||
| Battalion | |||
| Rowe Knights | |||
| Level | Endurance | Gambit | Uses |
| 1 | 75 | Linked Horses | 1 |
| Level | HP | Mov. | Class |
|---|---|---|---|
| 31 | 60 | 7 | Great Knight |
| Mt. | Spd | Hit | Crit |
| 47 | 0 | 121 | 12 |
| Range | Prt | Res | Avd |
| 1 | 37 | 10 | 8 |
| Weapon | Dropped Items | ||
| Silver Axe | N/A | ||
| Battalion | |||
| Rowe Knights | |||
| Level | Endurance | Gambit | Uses |
| 1 | 75 | Linked Horses | 1 |
Gwendal
| Level | HP | Mov. | Class |
|---|---|---|---|
| 32 | 65 | 7 | Great Knight |
| Mt. | Spd | Hit | Crit |
| 52 | 1 | 126 | 18 |
| Range | Prt | Res | Avd |
| 1 | 38 | 10 | 9 |
| Weapon | Dropped Items | ||
| Silver Axe | N/A | ||
| Battalion | |||
| Rowe Knights | |||
| Level | Endurance | Gambit | Uses |
| 1 | 75 | Linked Horses | 1 |
Loot
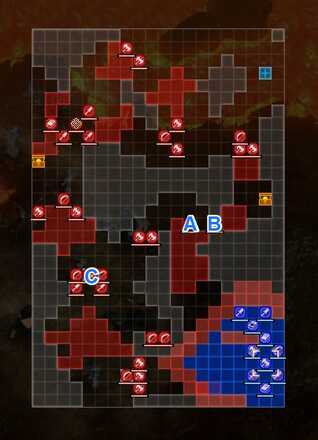
Chest Key - A
This is the lone chest key in this battle. You will need to whip out your own key to open both chests in this battle or use a unit with the lockpick skill.
Killer Bow - B
A Killer Bow can be obtained from the sniper marked as B on the image above. Killer Bows have high critical rate which can be good for units like ashe who has a good dexterity growth rate.
Concoction - C
Nothing special. A restorative can be obtained from the Fortress Knight standing on the Heal Tile on the mid left area of the map.
Chests
Bolt Axe - A
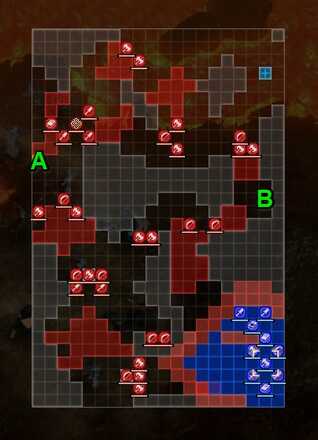
The eastern side of the map contains a Bolt Axe. The Bolt Axe is an axe weapon that deals magic damage. This is great for units that has a high magic stat but also excels in the axe like Annette.
Silver Shield - B
The western chest contains a Silver Shield.
Map Features
Tiles
| Tiles | Description |
|---|---|
| Heal Tile + | + 1 Def, + 1 Res, and +30% HP per turn |
| Crater | -20% movement, -1 Res, and -20% HP per turn. |
Reinforcements
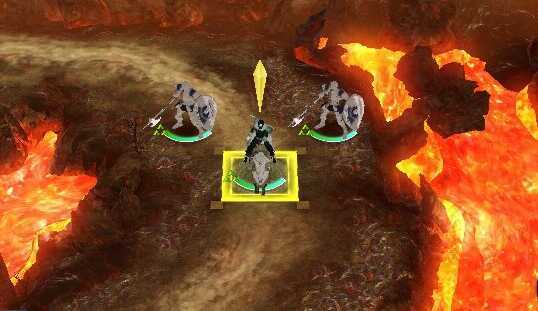
Rodrigue will appear as an allied reinforcement on the north easternmost side of the map but will probably be more of a hindrance than an aid. Make sure you rush to their side to prevent their deaths.
Tips and Tricks
Lure Enemies to Fire Pits
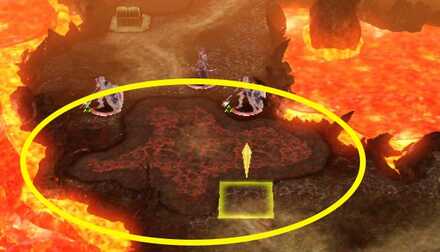
You can hold your units at the other side of a crater and entice your opponents to come to you, leaving them stuck on the fire pits.
Use Flying Units
Fliers are not affected by the wastelands or the craters, so they are an ideal choice in this map.
Counter Armored Enemies with Magic
The majority of your opponents are in heavy armor, so bring your magic users to make short work of them.
Fire Emblem: Three Houses - Related Links
Part 2 - Azure Moon Battle Walkthroughs
Comment
Author
Chapter 15: Ambush at Ailell (Blue Lions) Walkthrough
improvement survey
03/2026
improving Game8's site?

Your answers will help us to improve our website.
Note: Please be sure not to enter any kind of personal information into your response.

We hope you continue to make use of Game8.
Rankings
- We could not find the message board you were looking for.
Gaming News
Popular Games

Genshin Impact Walkthrough & Guides Wiki

Honkai: Star Rail Walkthrough & Guides Wiki

Umamusume: Pretty Derby Walkthrough & Guides Wiki

Pokemon Pokopia Walkthrough & Guides Wiki

Resident Evil Requiem (RE9) Walkthrough & Guides Wiki

Monster Hunter Wilds Walkthrough & Guides Wiki

Wuthering Waves Walkthrough & Guides Wiki

Arknights: Endfield Walkthrough & Guides Wiki

Pokemon FireRed and LeafGreen (FRLG) Walkthrough & Guides Wiki

Pokemon TCG Pocket (PTCGP) Strategies & Guides Wiki
Recommended Games

Diablo 4: Vessel of Hatred Walkthrough & Guides Wiki

Fire Emblem Heroes (FEH) Walkthrough & Guides Wiki

Yu-Gi-Oh! Master Duel Walkthrough & Guides Wiki

Super Smash Bros. Ultimate Walkthrough & Guides Wiki

Pokemon Brilliant Diamond and Shining Pearl (BDSP) Walkthrough & Guides Wiki

Elden Ring Shadow of the Erdtree Walkthrough & Guides Wiki

Monster Hunter World Walkthrough & Guides Wiki

The Legend of Zelda: Tears of the Kingdom Walkthrough & Guides Wiki

Persona 3 Reload Walkthrough & Guides Wiki

Cyberpunk 2077: Ultimate Edition Walkthrough & Guides Wiki
All rights reserved
©2019 Nintendo / INTELLIGENT SYSTEMS. Co-developed by KOEI TECMO GAMES CO., LTD. Fire Emblem and Nintendo Switch are trademarks of Nintendo. © 2019 Nintendo.
The copyrights of videos of games used in our content and other intellectual property rights belong to the provider of the game.
The contents we provide on this site were created personally by members of the Game8 editorial department.
We refuse the right to reuse or repost content taken without our permission such as data or images to other sites.


![Everwind Review [Early Access] | The Shaky First Step to A Very Long Journey](https://img.game8.co/4440226/ab079b1153298a042633dd1ef51e878e.png/thumb)

![Monster Hunter Stories 3 Review [First Impressions] | Simply Rejuvenating](https://img.game8.co/4438641/2a31b7702bd70e78ec8efd24661dacda.jpeg/thumb)


