Chapter 2: Practice Battle Walkthrough
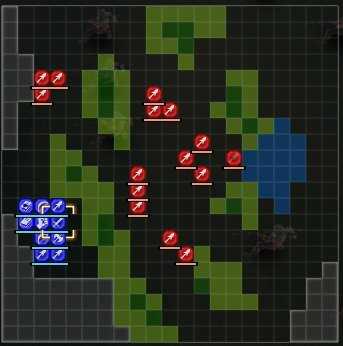
This is the battle walkthrough for the Auxiliary Practice Battle from Fire Emblem: Three Houses (FETH, FE3H). Read on to find out about map features, what enemies you will encounter, and tips for winning!
List of Contents
| Previous Battle | Story Walkthrough | Next Battle |
|---|---|---|
| Chapter 1: Rivalry of the Houses | Chapter 2: Familiar Scenery | Chapter 2 Battle: Red Canyon Dominance |
Practice Battle - Map and Overview

| Victory Conditions | |
|---|---|
| Rout the enemy. | |
| Defeat Conditions | |
| All of your units fall in battle. | |
| # of Player Units | 10 |
| # of Enemies | 15 |
Practice Battle - Enemies

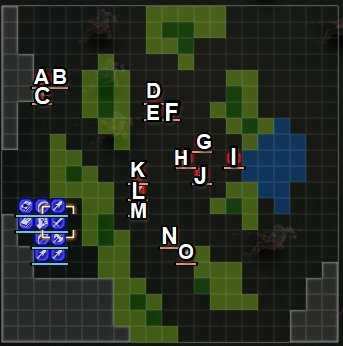
As a practice battle, your enemies will be the Knights of Seiros. All of them are Lv 3 and Lv 5 Church Soldiers with Iron Lances.
| Pos | Enemy | Pos | Enemy |
|---|---|---|---|
| A | Church Soldier A | I | Church Soldier I |
| B | Church Soldier B | J | Church Soldier J |
| C | Church Soldier C | K | Church Soldier K |
| D | Church Soldier D | L | Church Soldier L |
| E | Church Soldier E | M | Church Soldier M |
| F | Church Soldier F | N | Church Soldier N |
| G | Church Soldier G | O | Church Soldier O |
| H | Church Soldier H |
Enemy Stats
Church Soldier I
| Level | HP | Mov. | Class |
|---|---|---|---|
| 5 | 26 | 4 | Soldier |
| Mt. | Spd | Hit | Crit |
| 14 | 2 | 87 | 5 |
| Range | Prt | Res | Avd |
| 1 | 5 | 3 | 2 |
| Weapon | Dropped Items | ||
| Iron Lance | Bullion | ||
Practice Battle - Map Features
The battleground is an isle surrounded by different terrain types, with patches of forests and thickets which can be used to your advantage.
Terrain Types
| Tiles | Description |
|---|---|
| Forest | + 1 Prt, +30% Avo, except for fliers |
| Thicket | + 2 Prt, +40% Avo, except for fliers |
| Cliff | Navigable only by fliers |
| Pond | Navigable only by fliers |
Practice Battle - Tips and Tricks
Keep Archers in the Back
Your enemies only have Iron Lances; keep your archers at the back to protect them while they deal damage.
Focus Groups Individually
Move together and focus on one enemy group at a time.
Use the Forest
Group your units in forest terrains as a defense, and take out the enemies one by one as they approach you.
Smash That Gambit Button
Gambits are your best friend. Keep using them to gain gambit boosts and rattle enemies.
Fire Emblem: Three Houses - Related Links
Part 1 - White Clouds Battle Walkthroughs
Comment
Author
Chapter 2: Practice Battle Walkthrough
improvement survey
03/2026
improving Game8's site?

Your answers will help us to improve our website.
Note: Please be sure not to enter any kind of personal information into your response.

We hope you continue to make use of Game8.
Rankings
- We could not find the message board you were looking for.
Gaming News
Popular Games

Genshin Impact Walkthrough & Guides Wiki

Honkai: Star Rail Walkthrough & Guides Wiki

Umamusume: Pretty Derby Walkthrough & Guides Wiki

Pokemon Pokopia Walkthrough & Guides Wiki

Resident Evil Requiem (RE9) Walkthrough & Guides Wiki

Monster Hunter Wilds Walkthrough & Guides Wiki

Wuthering Waves Walkthrough & Guides Wiki

Arknights: Endfield Walkthrough & Guides Wiki

Pokemon FireRed and LeafGreen (FRLG) Walkthrough & Guides Wiki

Pokemon TCG Pocket (PTCGP) Strategies & Guides Wiki
Recommended Games

Diablo 4: Vessel of Hatred Walkthrough & Guides Wiki

Fire Emblem Heroes (FEH) Walkthrough & Guides Wiki

Yu-Gi-Oh! Master Duel Walkthrough & Guides Wiki

Super Smash Bros. Ultimate Walkthrough & Guides Wiki

Pokemon Brilliant Diamond and Shining Pearl (BDSP) Walkthrough & Guides Wiki

Elden Ring Shadow of the Erdtree Walkthrough & Guides Wiki

Monster Hunter World Walkthrough & Guides Wiki

The Legend of Zelda: Tears of the Kingdom Walkthrough & Guides Wiki

Persona 3 Reload Walkthrough & Guides Wiki

Cyberpunk 2077: Ultimate Edition Walkthrough & Guides Wiki
All rights reserved
©2019 Nintendo / INTELLIGENT SYSTEMS. Co-developed by KOEI TECMO GAMES CO., LTD. Fire Emblem and Nintendo Switch are trademarks of Nintendo. © 2019 Nintendo.
The copyrights of videos of games used in our content and other intellectual property rights belong to the provider of the game.
The contents we provide on this site were created personally by members of the Game8 editorial department.
We refuse the right to reuse or repost content taken without our permission such as data or images to other sites.


![Everwind Review [Early Access] | The Shaky First Step to A Very Long Journey](https://img.game8.co/4440226/ab079b1153298a042633dd1ef51e878e.png/thumb)

![Monster Hunter Stories 3 Review [First Impressions] | Simply Rejuvenating](https://img.game8.co/4438641/2a31b7702bd70e78ec8efd24661dacda.jpeg/thumb)


