Final Puzzle Solution and All Steps
★ The Final Puzzle Solution
☆ Roulette Wheel Solution
★ Antique Coins | Mr. Raccoons | Files
☆ Speedrun Guide | Insanity Difficulty Guide
★ Post Game | Infinite Ammo | CP Farming
☆ List of Jump Scares | Points of No Return
This is a complete Resident Evil Requiem (RE9) Final Puzzle walkthrough with every step explained, from finding Marie’s Doll and the Severed Hand to solving the Lead Researcher’s Office sun puzzle and unlocking rewards.
List of Contents
Resident Evil Requiem (RE9) Final Puzzle Solution

The Final Puzzle solution is Marie's Doll and Emily are the sweet pair that have to hear the voice. Getting Marie's Doll involves a series of steps that starts in the Processing room of the Care Center's Basement.
All Final Puzzle Steps
Click to jump to a step's walkthrough.
- Fill the Processing Pool with bodies. This triggers more zombies to appear in the grinder.
- Let the Grinder kill all the zombies in the Processing sequence. This is a requirement for Marie's Doll to spawn.
- Find The Girl's Severed Hand. The Severed Hand is used to activate the puzzle.
- Analyze the Hand with the Laser Microscope. This is another requirement for Marie's Doll to spawn.
- Flush the toilet in the Care Center 8 Times. This is the final requirement for Marie's Doll to spawn.
- Reach the Care Center Facility Level. Just to progress the story and reach the area Marie's Doll spawns.
- Obtain Marie's Doll from Collection and Testing. Marie's Doll is the item needed for the solution.
- Complete the Game Once. After putting Marie's Doll in the item box, you need to finish the game once to get back to the Care Center section.
- Re-analyze the Severed Hand on a New Playthrough. This triggers the puzzle in the Lead Researcher's Office.
- Decode the Severed Hand's Blood Analysis Sequence. Decoding the sequence gives you the code for the Lead Researcher's Office sun puzzle.
- Use the Alternate Code in the Lead Researcher's Office. Inputting the code while holding Marie's Doll and Emily is the solution to the puzzle.
Step 1: Fill the Processing Pool with Bodies
Upon arriving at the Processing area, you'll notice bodies getting dropped into the large pool at the center. Before you do anything, you'll have to wait in this room for 15 real world minutes to get enough bodies to drop into the processing pool.
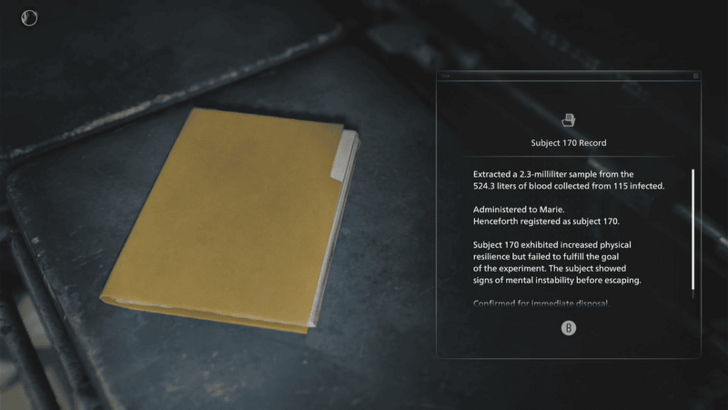
In the Collection & Testing room, near where you pick up Marie's Doll, you'll find a document Subject 170 Record, which details how Subject 170 (a.k.a Marie) needed to be administered a sample from liters of blood collected from 115 infected. This could possibly explain why you're needed to wait so long in Processing for bodies to fall into the grinder, because you need to get 115 infected bodies as well.
Step 2: Let the Grinder Kill All the Zombies in the Processing Sequence
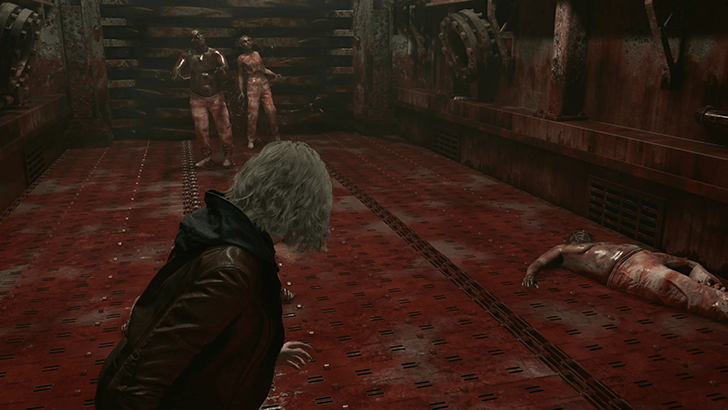
After waiting 15 minutes, progress the level until you're made to drain this pool and drop down onto the conveyor belt of Processing's large grinder. It'll be a holdout sequence where you have to avoid getting chopped up by the grinder while zombies reanimate around you.
During this segment, do not kill any of the zombies yourself. Make sure every zombie that reanimates gets killed by the Grinder. Wait for all zombies to get killed in order to complete the segment.
Note: You have to get all of the reanimated zombies killed by the Grinder, otherwise, the doll won't appear later on. Make sure none are left standing before the sequence ends.
Step 3: Find The Girl's Severed Hand
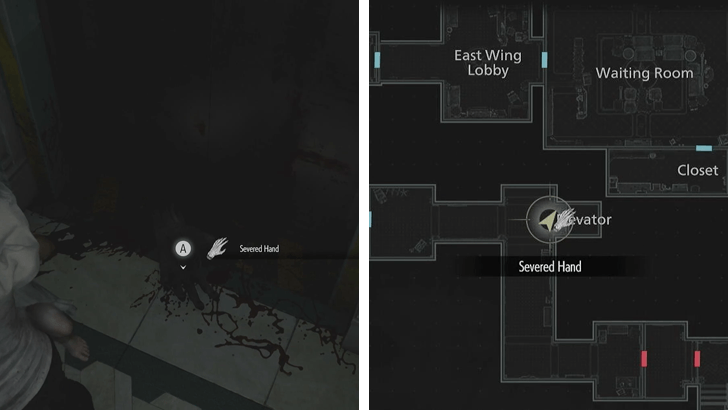
After the Grinder segment, getting the doll will be put on hold in favor of knowing more about the rest of the Final Puzzle; that is, knowing what the challenge refers to as the voice that the "sweet pair" needs to hear.
To do this, progress through the main story until you rescue Emily from the Care Center Basement. During the elevator sequence at the end, the Shadow Ghost will get its arm severed. This Severed Hand is the key to knowing more about the voice, so pick it up (it'll be in front of the Elevator) after you pick up Emily.
Once it's in your inventory, make a quick stop at the Guard Office in order to put Emily down since you'll need to go to the Blood Lab next. If you bring Emily, you won't be able to fight any of the zombies on the way to the lab.
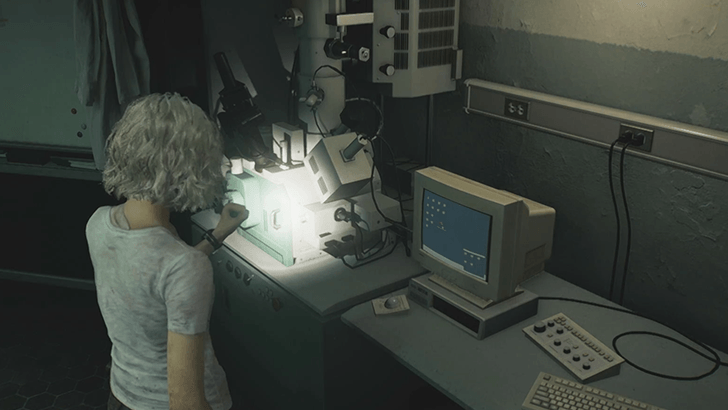
Step 4: Use the Laser Microscope to Analyze the Hand
After making sure Emily is safe, take the Severed Hand to the Blood Lab in Care Center 1F. Deposit it into the nearby laser microscope to analyze its blood. To solve it, press the central black square, then press the black squares on the extreme left and right of the 3D model.
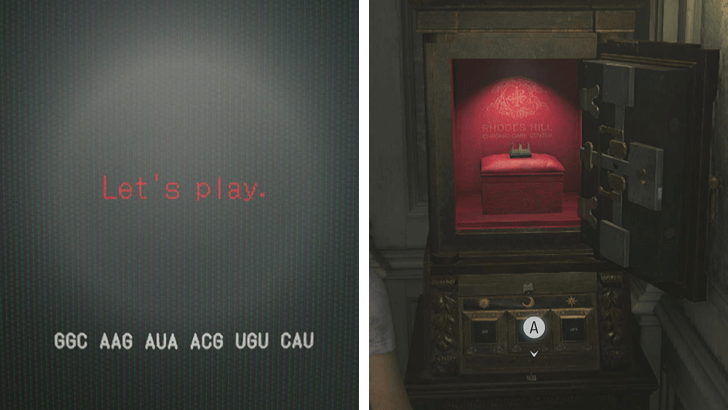
Once solved, you'll be met with a black screen that says "Let's play. GGC-AAG-AUA-ACG-UGU-CAU". This is the same parting line that The Girl says before she gets her arm severed by the elevator, indicating that it's somewhat related to the voice that the sweet pair needs to hear.
After triggering this "Let's Play" screen, something changes on the map. If you backtrack to the Lead Researcher's Office, you'll notice that its sun puzzle is interactable again even after it was solved.
We can surmise that the code GGC-AAG-AUA-ACG-UGU-CAU could perhaps have something to do with the Moon puzzle symbols of the Sun, Moon, and Star. All we need to do is figure out how G, U, C, and A relate to the Sun, Moon, and Star symbols, in order to solve the voice part of the puzzle.
(Optional) Check the Laser Microscope for the "G" Clue
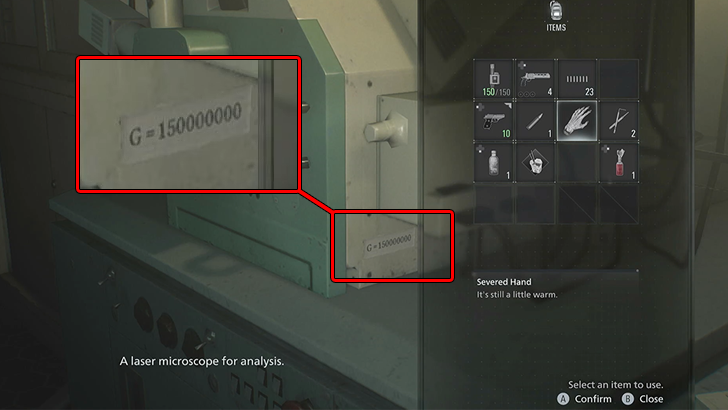
The easiest clue to find will be for the letter G. Simply interact with the laser microcope in the Blood Lab that you used to analyze the Severed Hand and you should be able to see a taped piece of paper on the side of the microscope that says "G = 150000000."
To make sense of it, keep in mind that all letter clues we'll be finding pertain to the distance between the Earth and other celestial bodies. In this case, 150,000,000 km is the approximate distance between Earth and the Sun, which means G = Sun.
Step 5: Flush the Toilet in the Care Center 8 Times
After analyzing the hand and getting the clue for the letter G, head over to the interactable Toilet in the Care Center 1F - Restroom. Flush it 8 times before proceeding with the story.
Flush toilet 8 times clue in Investigation Report
| Investigation Report | Toilet Clue |
|---|---|
 |
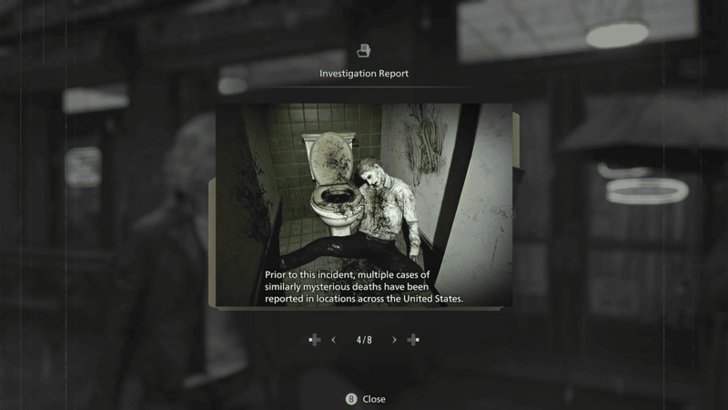 |
The clue for this step is actually found in the first file of the game, the Investigation Report that is found automatically in your inventory. You can examine it to see this photo of a zombie next to a toilet, where the number 8 is written on blood in the wall.
Step 6: Reach the Care Center Courtyard - Facility Level
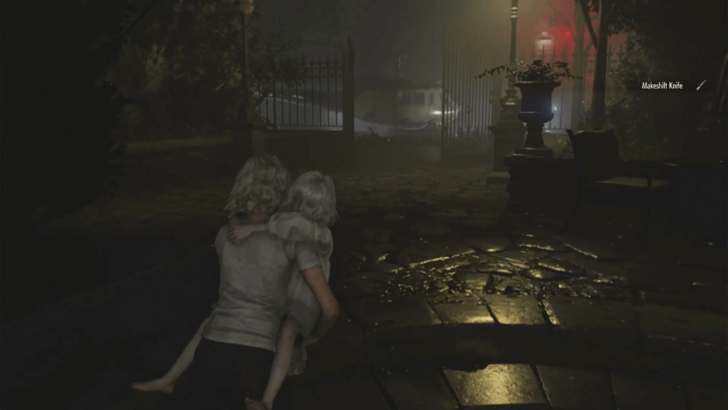
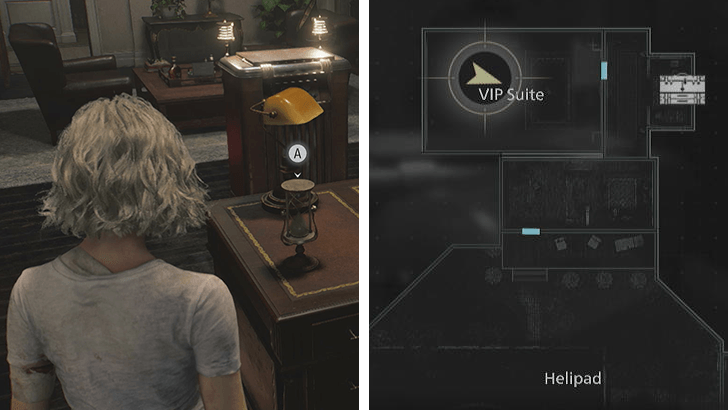
With the opening steps done, it's time to actually get Marie's Doll from the underground facility. Once you're ready, take Emily to the Care Center Courtyard in order to trigger the meeting between them and the helicopter pilot, Harry. During the exchange, he'll ask Grace to retrieve the helicopter's keys so that he could fly them out to safety.
After the cutscene, head into the VIP Suite in the Care Center Courtyard - Surface Level, and solve the puzzle inside to get the room to start going down to the secret facility level of the Care Center.
Care Center Courtyard Walkthrough
(Optional) Check the VIP Suite Hourglass for the "U" Clue
The next clue you'll find for the voice will be the letter U clue inside the same VIP Suite you're currently in. On the large desk, you'll find an Hourglass that has no apparent use aside from the fact that it can be picked up and stored.
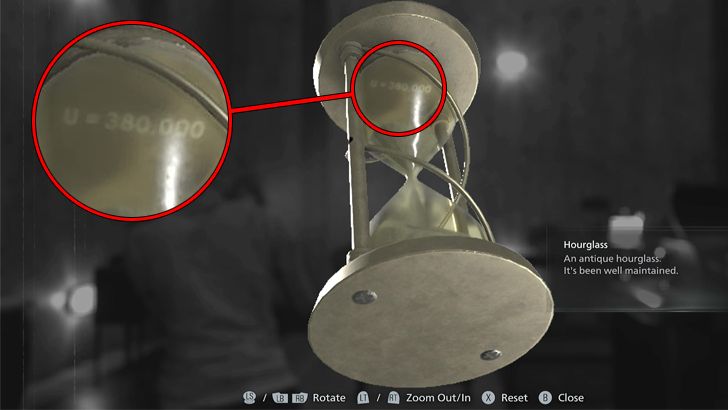
What you have to do is examine it and remove the screws on either side of it to get rid of its base. Then, turn the now freed hourglass upside down so that sand starts falling down into its other head. Once enough sand has drained, tilt the hourglass slightly and you'll see a clue that says "U = 380,000."
Coincidentally, the distance between the Earth and Moon is estimated to be around 380,000 km, which means that U = Moon.
(Optional) Check Grace's Blood Analysis for the "C" Clue
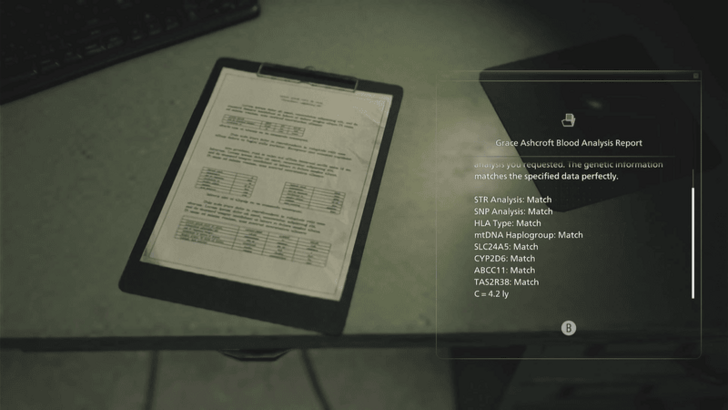
The third clue can be found in the Private Lab at the Care Center Courtyard - Facility Level. In this room, look for a file titled Grace Ashcroft Blood Analysis Report (should be on a desk next to a computer monitor). Pick it up and read it. At the end of the report, you'll see a clue for the letter C where it says "C = 4.2 ly."
Make sure to grab the file since this will be on the way to Collection and Testing where the main story forcibly progresses you through the level.
Step 7: Obtain the Doll from Collection and Testing
After triggering the cutscene with Victor Gideon, you'll be made to go through Collection and Testing before you can escape the facility. It is in this large room where you'll find Marie's doll.
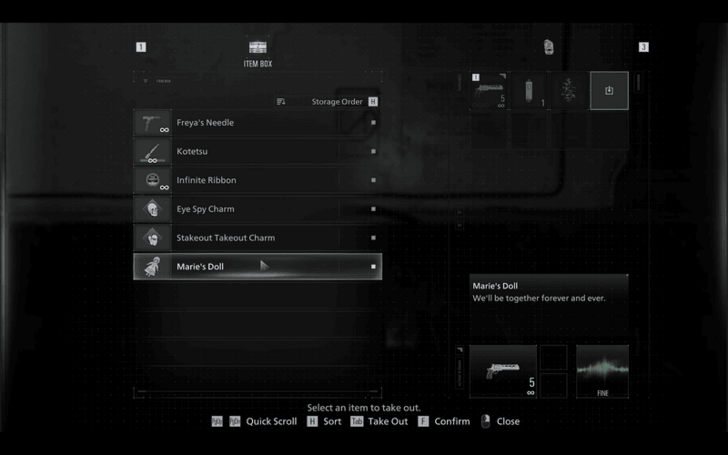
If you did all the steps correctly, Marie's doll should appear at the bottom of the stairs in Collection and Testing. Pick it up and store it in your inventory before proceeding.
Once you're able, make sure to deposit Marie's Doll into Grace's Item Box since we'll be taking this key item and carrying it over into a fresh playthrough.
Step 8: Complete the Game Once
Now comes the tricky part. Since Emily and Marie's doll need to be taken back to the sun puzzle (impossible at this point in the main story), the Final Puzzle can only be completed after finishing your current save and carrying your stuff over to a fresh playthrough.
Make sure the doll is stored in Grace's item box before proceeding to complete your first playthrough of RE: Requiem.
(Optional) Solve the Doll Head Puzzle for the "A" Clue
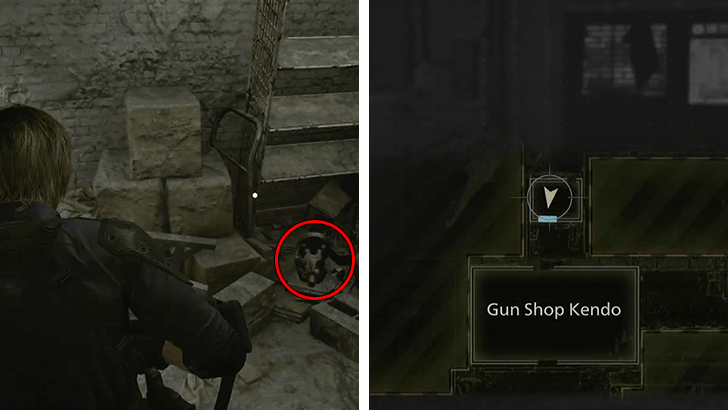
For completionists, the clue for the final letter, A, can be found in Raccoon City Center once you reach it as Leon. As you exit the R.P.D. north, you'll come across the ruins of Gun Shop Kendo. Head inside the small building north of it to find a headless doll whose head appears at the nearby Basketball Court.
Now, you won't be able to directly interact with the head, but you can push it by bumping Leon into it. Using this clunky method, kick the head over to one of the collapsed basketball rings and push it through the hoop. If done correctly, a sound cue should play allowing you to inspect the hoop.
On inspection, you'll see the message "There's no time for playing around". Once you read this, head back to the headless doll in Gun Shop Kendo to see that you can now interact with it (unlike before). Inspect it to get the message "Just ignore A". This means, you can safely ignore A from the RNA sequence we got from the severed hand.
Step 9: Re-Analyze the Severed Hand on a New Playthrough
Once you're able to start a new playthrough after beating the game, make your way back to the point in the story where you've rescued Emily from the Care Center Basement.
From there, retrieve the Severed Hand again and perform a blood analysis of it at the Blood Lab's laser microscope. This step is done to unlock the sun puzzle again for use.
Step 10: Decode the Severed Hand's Blood Analysis Sequence
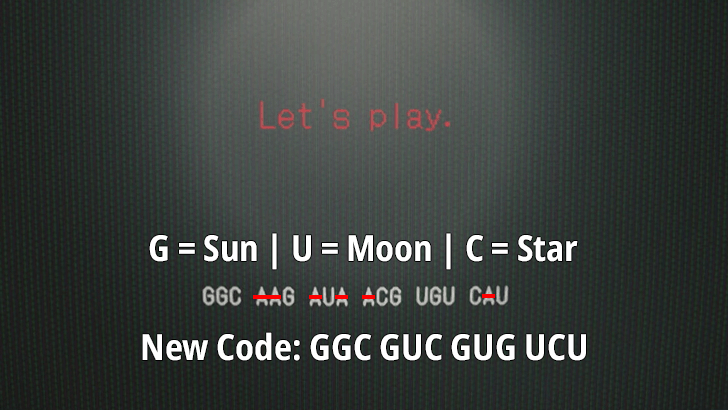
After triggering the sun puzzle reset, use the letter clues you've accumulated to decipher the Severed Hand's blood analysis code, GGC-AAG-AUA-ACG-UGU-CAU. First, remove the letter A. This leaves us with, GGC-GUC-GUG-UCU. Then, we translate each letter into its corresponding symbol:
| Code | Meaning |
|---|---|
| GGC | Sun, Sun, Star |
| GUC | Sun, Moon, Star |
| GUG | Sun, Moon, Sun |
| UCU | Moon, Star, Moon |
Step 11: Use the Alternate Code in the Lead Researcher's Office
Unmute the video to hear the baby's laugh. |
|
| Code | Sun, Sun, Star > Sun, Moon, Star > Sun, Moon, Sun > Moon, Star, Moon |
|---|---|
With the code figured out, backtrack to the Lead Researcher's Office in Care Center 2F. Make sure you meet the following conditions before interacting with the puzzle:
- Ensure that you've analzyed the Severed Hand and gotten the Let's Play screen to pop up.
- Make sure Grace is carrying Emily when you reach the Sun Puzzle.
- Make sure you have Marie's Doll in your inventory. Don't leave it in the item box.
Once all 3 conditions are met, input the codes in this order: Sun, Sun, Star > Sun, Moon, Star > Sun, Moon, Sun > Moon, Star, Moon. If done correctly, you should hear the sound of a baby laughing.
This completes the Final Puzzle challenge since you've now reunited the sweet pair and gotten them to hear the voice.
Final Puzzle Requirements and Items Needed
| Requirement | How to Get |
|---|---|
| Marie's Doll | 1. Wait 15 minutes in the Processing room of the Care Center Basement. 2. During the grinder sequence, let the grinder kill ALL of the zombies. 3. Flush the toilet in the Care Center Restroom 1F a total of 8 times. 4. Obtain Marie's Doll from the Control and Testing room in the Care Center Courtyard, Facility level. |
| Severed Hand | Obtain the Severed Hand after rescuing Emily from the Care Center Basement. The Severed Hand unlocks the Sun Puzzle by analyzing it on both playthroughs. |
| Emily | On your second playthrough, bring Emily and Marie's Doll to the Sun Puzzle. Enter the code: Sun, Sun, Star > Sun, Moon, Star > Sun, Moon, Sun > Moon, Star, Moon to complete this puzzle. |
Tips for Completing the Final Puzzle
Important Tips
- Completing this puzzle requires two playthroughs and spans the length of the entire game, so make sure to follow the instructions to the dot so as not to make any mistakes.
- You need to let the grinder kill all the zombies in order for Marie’s Doll to spawn. Do not kill any zombie with Grace's weapons.
- Don't forget to store Marie's Doll in your item box on your first playthrough.
- You can put Emily down in the Guard Office while you clear your path of zombies first.
- Analyze the Severed Hand on both playthroughs.
- When solving the Sun Puzzle, make sure you're carrying Emily and that you have Marie's Doll in your inventory, not the item box.
Final Puzzle FAQ
| FAQ | Answer |
|---|---|
| How do I start the Final Puzzle in RE9? | The first step happens when you first reach the Processing Room in the Care Center Basement for the first time. |
| Do I need to replay the game to complete it? | Completing this puzzle requires finishing the game once. |
The Final Puzzle Challenge Rewards
20,000 Completion Points
Solving the Final Puzzle will net you a cool 20,000 Completion Points (CP). This is one of the few challenges that reward you with this much CP when completed. Farming CP can be used to unlock special content such as additional weapons and even cheat modes like Infinite Ammo.
This much CP can help with speedrunning the game, and well as playing on Insanity Difficulty.
Resident Evil Requiem Related Guides
Comment
I’m so tired of doing this puzzle on Insanity mode 😂 I had to wait 20 minutes for the zombie fall into the pool just to get a “torrent” of blood, and finally.. I got Marie’s Doll!!!~
Author

Final Puzzle Solution and All Steps
Premium Articles
Rankings
- We could not find the message board you were looking for.
Gaming News

![Star Savior Review [First Impressions] | Engaging, Entertaining, and Expensive](https://img.game8.co/4447603/8f500e9bf666bdb8adb1af478e9dfdbd.png/show)


Popular Games

Genshin Impact Walkthrough & Guides Wiki
Umamusume: Pretty Derby Walkthrough & Guides Wiki
Crimson Desert Walkthrough & Guides Wiki
Monster Hunter Stories 3: Twisted Reflection Walkthrough & Guides Wiki
Honkai: Star Rail Walkthrough & Guides Wiki
Pokemon Pokopia Walkthrough & Guides Wiki
The Seven Deadly Sins: Origin Walkthrough & Guides Wiki
Wuthering Waves Walkthrough & Guides Wiki
Zenless Zone Zero Walkthrough & Guides Wiki
Arknights: Endfield Walkthrough & Guides Wiki


Recommended Games
Fire Emblem Heroes (FEH) Walkthrough & Guides Wiki
Diablo 4: Vessel of Hatred Walkthrough & Guides Wiki
Cyberpunk 2077: Ultimate Edition Walkthrough & Guides Wiki
Yu-Gi-Oh! Master Duel Walkthrough & Guides Wiki
Super Smash Bros. Ultimate Walkthrough & Guides Wiki
Pokemon Brilliant Diamond and Shining Pearl (BDSP) Walkthrough & Guides Wiki
Elden Ring Shadow of the Erdtree Walkthrough & Guides Wiki
Monster Hunter World Walkthrough & Guides Wiki
The Legend of Zelda: Tears of the Kingdom Walkthrough & Guides Wiki
Persona 3 Reload Walkthrough & Guides Wiki


All rights reserved
©CAPCOM U.S.A., INC. ALL RIGHTS RESERVED.
The copyrights of videos of games used in our content and other intellectual property rights belong to the provider of the game.
The contents we provide on this site were created personally by members of the Game8 editorial department.
We refuse the right to reuse or repost content taken without our permission such as data or images to other sites.
I do not know why every guide copies from each other saying Emily and the doll are the sweet pair. You run around with two girls, one is protecting the other. The two hear a voice. You have a doll. In a horror game. And you hear a giggle. Grace and Emily are the sweet pair that hear the voice of the doll. The doll being a part of the sweet pair makes no sense. Grace is there. Marie is not there. If the doll is part of the pair, who giggles? The pair are Grace and Emily, the doll giggles.