Rayman in the Phantom Show All Memory Locations Guide
Memories are a special collectible in Rayman in the Phantom Show, the 3rd DLC for Mario + Rabbids Sparks of Hope. The guide below shows a list of all memories in the DLC as well as a walkthrough on how to get them.
| All Memory Guides | ||
|---|---|---|
| Sparks of Hope Memories | The Last Spark Hunter Memories | Rayman in the Phantom Show Memories |
List of Contents
List of All Memories in Rayman in the Phantom Show
| Memory | Where to find |
|---|---|
| The Space Opera Network | Purchased from Salesbot 9.99+TX. |
| Rayman | Purchased from Salesbot 9.99+TX. |
| Bravados | Purchased from Salesbot 9.99+TX. |
| Giant Flamin' Stooge | Purchased from Salesbot 9.99+TX. |
| The Kraken | Purchased from Salesbot 9.99+TX. |
| The Phantom | Found in the Main Studio Map behind a locked gate. Read the guide below for detailed instructions. ▼The Phantom Memory Guide▼ |
| Plungerhands Mcmurdy | Found at the Western Set by using the scan ability to make a bridge. Read the guide below for detailed instructions. ▼Plungerhands Mcmurdy Memory Guide▼ |
| The Careless Shepherdess | Found at the Medieval Set near the green button. Read the guide below for detailed instructions. ▼The Careless Shepherdess Memory Guide▼ |
| Captain Opera-Beard | Found by going through the leftmost cannon. It's behind a cracked blue wall. Read the guide below for detailed instructions. ▼Captain Opera-Beard Memory Guide▼ |
| Morning Galaxy Magazine | Found at the Main TV Studio area behind the cracked wall. Read the guide below for detailed instructions. ▼Morning Galaxy Magazine Memory Guide▼ |
| S.O.N. Movie-of-the-Week | Found behind a locked gate at the Backing Studio Area. Read the guide below for detailed instructions. ▼S.O.N. Movie-of-the-Week Memory Guide▼ |
| Spark Road Trip | Received as a reward after clearing the Unlikely Team-Up Battle Quest. |
| The Phantom 2 | Received as a reward after clearing the Operatic Showdown Battle Quest. |
| The Golden Tickets | Received as a reward after clearing the All Hands Ahoy! Battle Quest. |
How to Get DLC 3 Memories
How to Get The Phantom Memory
| Walkthrough | |
|---|---|
| 1 | 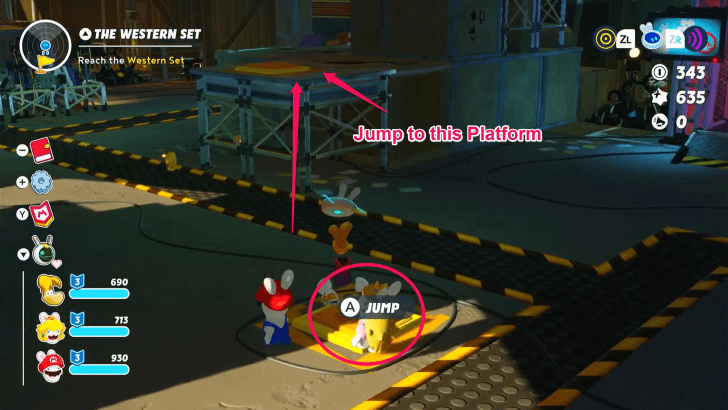 Head to the Main TV Studio Map. On the left side there will be a jump pad. Use it to jump on the platform with the jump pad too. |
| 2 |  Use that jump pad to get to the next platform. The orange cube will be right there. Use Rayman’s charged punch to get it. |
| 3 |  Jump off the platforms and place the cube in the right spot, it should be in front of The Pirate Set. An area will open up and there will be a cracked wall to the right. Break it and the memory should be there. |
How to Get Plungerhands Mcmurdy Memory
| Walkthrough | |
|---|---|
| 1 | 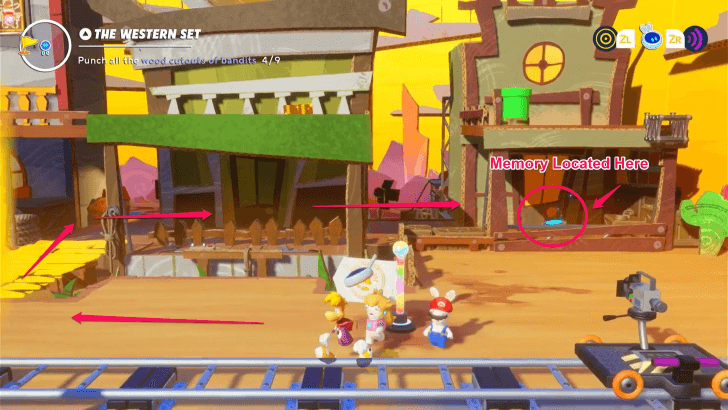 At the Western Set near the teleport flag, use the scan ability beside the green building to reveal a bridge. Walk across the bridge then to the right to get the memory. |
How to Get The Careless Shepherdess Memory
| Walkthrough | |
|---|---|
| 1 | 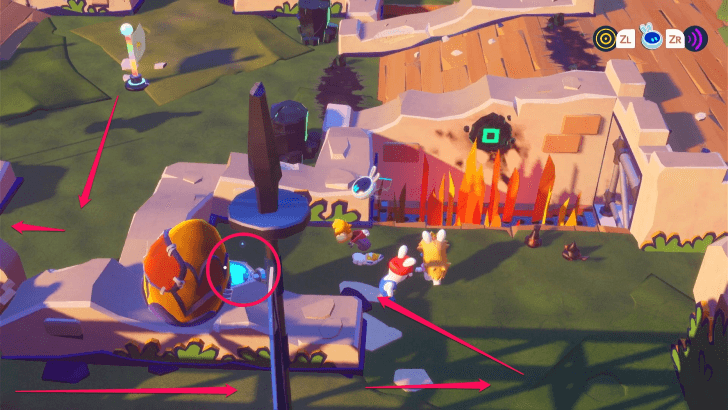 From the Medieval Set teleport flag enter the area on the right and go through the mini maze. The memory should be right near the square green button on the wall you have to press for the main quest, “The Medieval Set.” |
How to Get Captain Opera-Beard Memory
| Walkthrough | |
|---|---|
| 1 | 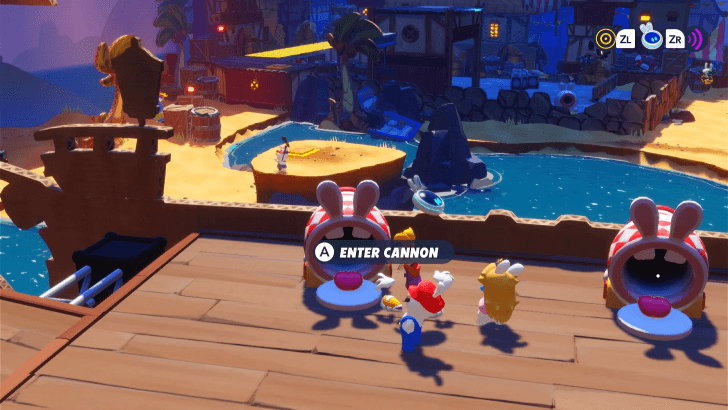 From the Pirate Set Flag, take the leftmost cannon. You should end up at the beach next to a jump pad. |
| 2 | 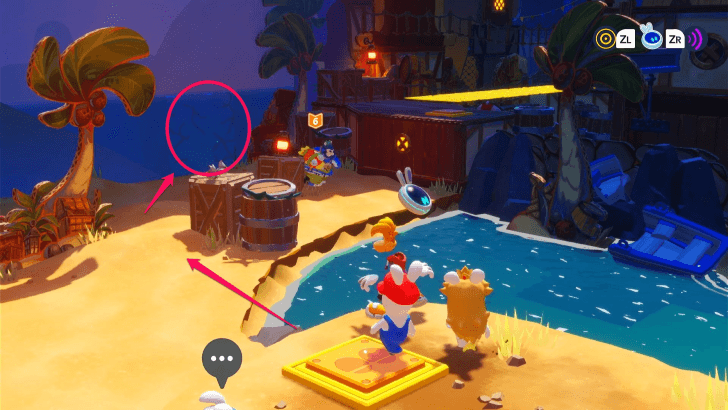 There should be a cracked area on the blue wall at the end. Break it with the sonic powers and you’ll find the memory. |
How to Get Morning Galaxy Magazine Memory
| Walkthrough | |
|---|---|
| 1 | 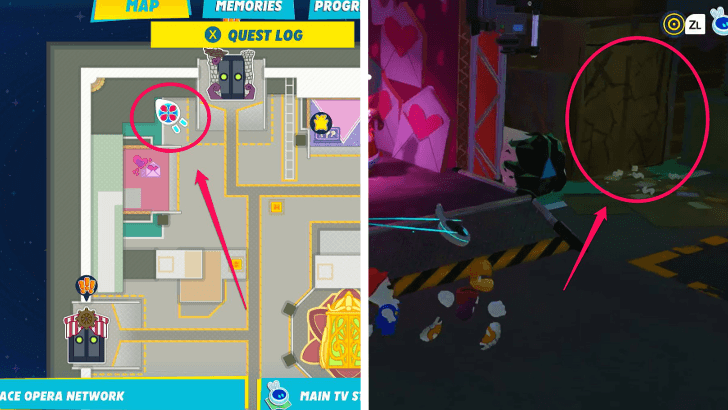 At the Main TV Studio Area, head to the northwest corner to the set with a lot of hearts and envelopes. The memory should be behind a cracked wall next to this set. |
How to Get S.O.N. Movie of the Week Memory
| Walkthrough | |
|---|---|
| 1 | 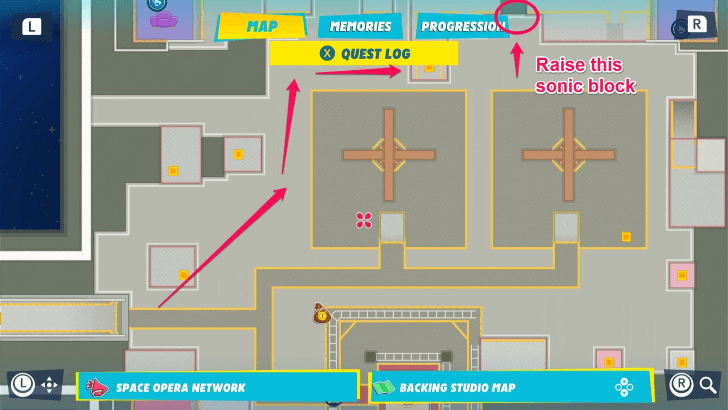 Head to the Backing Studio Area and to the northeastern area, under a prop alien face, raise the sonic block on the floor. |
| 2 | 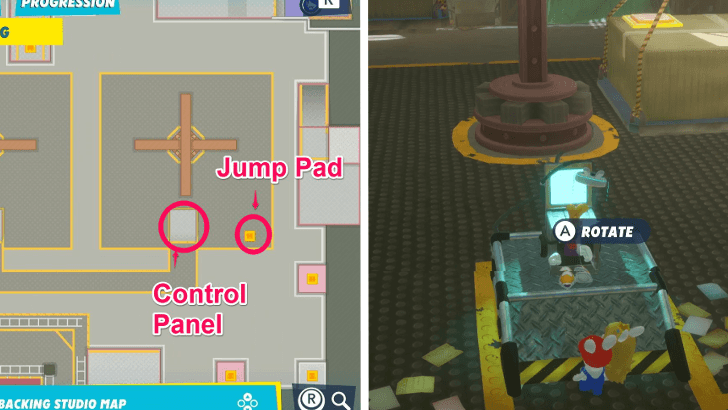 Next to the jump pad in the southeast area, there will be a control panel. Use it to rotate the bars to be vertical then head to the jump pad on the floor |
| 3 | 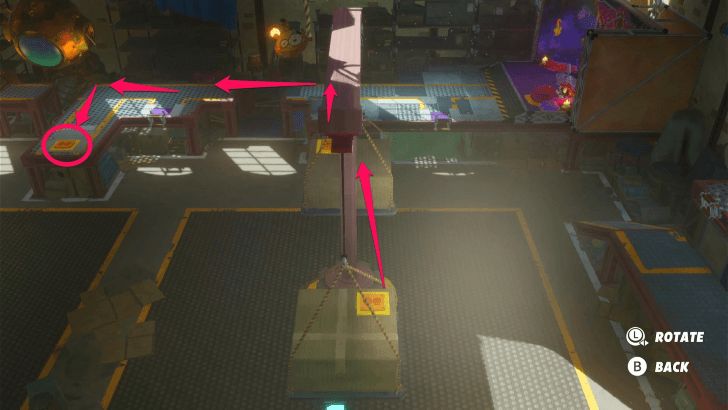 Use the jump pad to jump on the boxes then to the area in the north. Head in the direction of the block you raised and you’ll see another jump pad. Remember to lower any ladders you see on the way in case you glide to the wrong area and have to start over. |
| 4 | 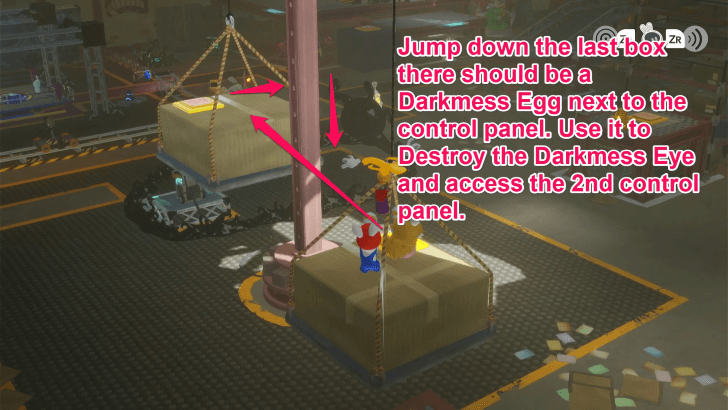 Use this jump pad to jump across the boxes and head to the center of the area blocked off by the Darkmess Eye. There should be a Darkmess Egg here. Use it to destroy the Darkmess eye to access the next control panel. |
| 5 | 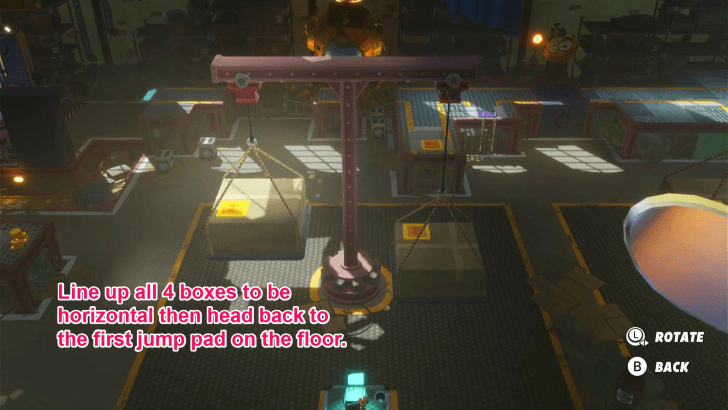 Use both control panels to line up the boxes horizontally. Make sure that the jump pads for each are on the farther end of the box (left side). After doing this head back to the jump pad on the floor you first used. |
| 6 | 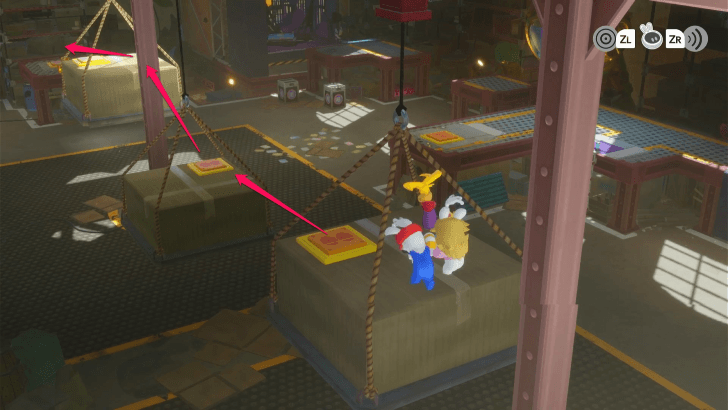 Jump across all 4 of the jump pads to the other side. This side should have a stack of gold coins on the platform next to another jump pad. |
| 7 | 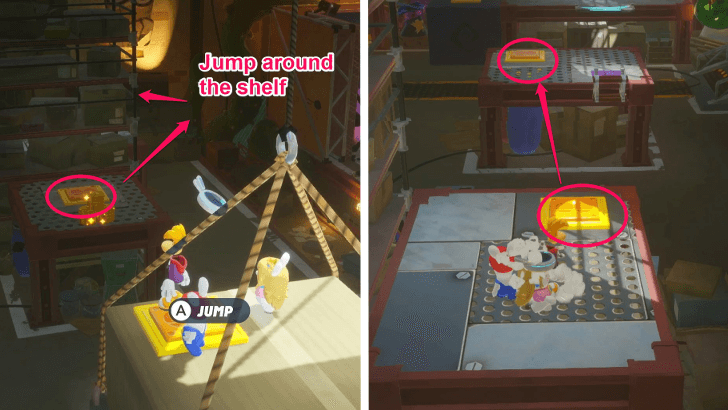 Use the jump pad to jump around the stack of boxes to another platform with a jump pad. On one side of this jump pad there should be another platform with a jump pad but this time it has a ladder. Head to this platform. |
| 8 | 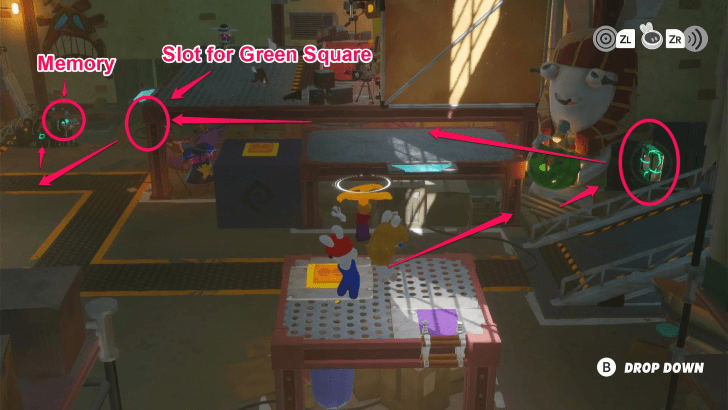 Use this last jump pad to grab the green square in the air located nearby. Use Rayman’s Charged punch to retrieve it. Place the green square in the proper slot (it’s next to the large magician’s hat). This will open the gate containing the memory. |
Related Guides
| DLC Guides | |
|---|---|
| The Last Spark Hunter | Rayman in the Phantom Show |
Comment
Author
Rayman in the Phantom Show All Memory Locations Guide
improvement survey
03/2026
improving Game8's site?

Your answers will help us to improve our website.
Note: Please be sure not to enter any kind of personal information into your response.

We hope you continue to make use of Game8.
Rankings
- We could not find the message board you were looking for.
Gaming News
Popular Games

Genshin Impact Walkthrough & Guides Wiki

Resident Evil Requiem (RE9) Walkthrough & Guides Wiki

Honkai: Star Rail Walkthrough & Guides Wiki

Monster Hunter Wilds Walkthrough & Guides Wiki

Umamusume: Pretty Derby Walkthrough & Guides Wiki

Pokemon TCG Pocket (PTCGP) Strategies & Guides Wiki

Arknights: Endfield Walkthrough & Guides Wiki

Wuthering Waves Walkthrough & Guides Wiki

Zenless Zone Zero Walkthrough & Guides Wiki

Digimon Story: Time Stranger Walkthrough & Guides Wiki
Recommended Games

Fire Emblem Heroes (FEH) Walkthrough & Guides Wiki

Yu-Gi-Oh! Master Duel Walkthrough & Guides Wiki

Super Smash Bros. Ultimate Walkthrough & Guides Wiki

Diablo 4: Vessel of Hatred Walkthrough & Guides Wiki

Pokemon Brilliant Diamond and Shining Pearl (BDSP) Walkthrough & Guides Wiki

Elden Ring Shadow of the Erdtree Walkthrough & Guides Wiki

Monster Hunter World Walkthrough & Guides Wiki

The Legend of Zelda: Tears of the Kingdom Walkthrough & Guides Wiki

Persona 3 Reload Walkthrough & Guides Wiki

Cyberpunk 2077: Ultimate Edition Walkthrough & Guides Wiki
All rights reserved
MARIO + RABBIDS SPARKS OF HOPE © 2022 Ubisoft Entertainment. All Rights Reserved. Rabbids, Sparks of Hope, Ubisoft and the Ubisoft logo are registered or unregistered trademarks of Ubisoft Entertainment in the U.S. and/or other countries. Nintendo properties are licensed to Ubisoft Entertainment by Nintendo. SUPER MARIO characters © Nintendo. Trademarks are property of their respective owners. Nintendo Switch is a trademark of Nintendo.
The copyrights of videos of games used in our content and other intellectual property rights belong to the provider of the game.
The contents we provide on this site were created personally by members of the Game8 editorial department.
We refuse the right to reuse or repost content taken without our permission such as data or images to other sites.


