
This survey will take about 1 minute.
Your answers will help us to improve our website.
Mario + Rabbids Sparks of Hope
Bury the Hatchet Quest Guide and Walkthrough

Bury the Hatchet is a Side Quest in Mario + Rabbids Sparks of Hope (Mario Rabbids 2). Read on for a walkthrough of the quest, including rewards, location, and how to complete it.
List of Contents
Bury the Hatchet Walkthrough
Quest Objectives
| Objectives |
|---|
|
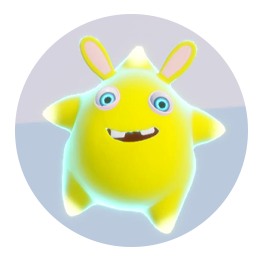
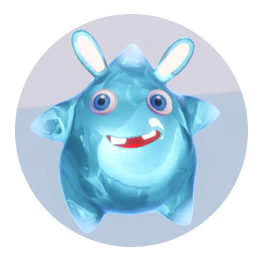
1. Join up with Vampastra in Paletteville.
2. Investigate the "Pumpkin House" ...the other one. 3. Track down "the Songbird". 4. Track down "the Fork". 5. Find the Magic Whetstone. 6. Bring the Magic Whetstone to "the Fork". 7. Expose the culprit, Hinky! 8. Break into Hinky's house! (You have probable cause.) 9. Wipe out the Puddle to recover the Axe. |
Bury the Hatchet Quest Location
| Steps to find the Bury the Hatchet Side Quest | |
|---|---|
| 1 |  Head to the path south of the spaceship. Turn right to the path. |
| 2 | 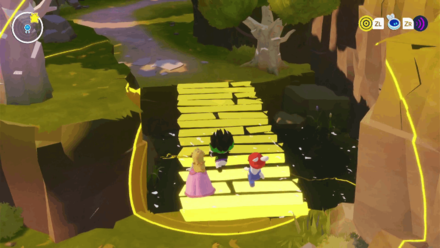 Use Beep-0's Scan to create a bridge leading to the next area. |
| 3 |  Follow the road and turn left towards the Rabbid lumberjack. Approach him to start the side quest. |
Quest Walkthrough
| Steps to proceed through Bury the Hatchet | |
|---|---|
| 1 |  Join up with Vampastra in Paletteville Head to the town area and climb up the house on the hill to find Vampastra. Approach the Spark to trigger a cutscene. |
| 2 |  Investigate the "Pumpkin House" Head inside the house on the left of the Paletteville Flag. Talk to the Rabbid inside to trigger a cutscene. |
| 3 |  Track down "the Songbird" Head to the center of the town and enter the middlemost house. Interact with the book on the table inside the house. |
| 4 | 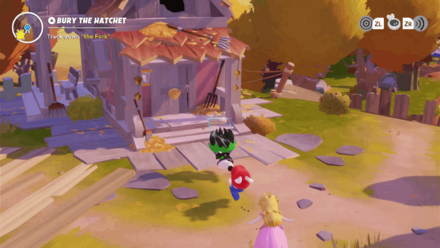 Track down "the Fork" Head to the rightmost house in the town. Interact with the book on the table to find clues on "the Fork's" location. |
| 5 | 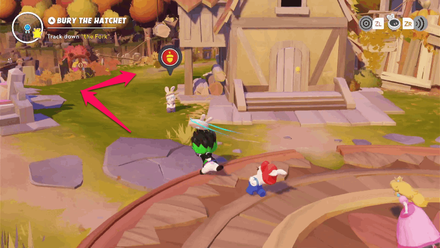 Track down "the Fork" Find the Rabbid with the sun hat next to the leftmost house and head down the path behind him. |
| 6 |  Track down "the Fork" Look for the Rabbid with the red hat and pitchfork and talk to him to progress the side quest. |
| 7 | 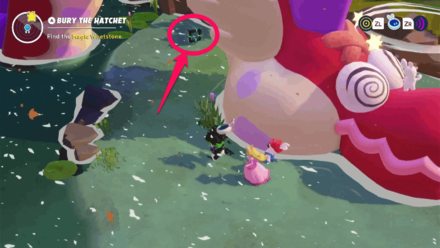 Find the Magic Whetstone Go to the shallow waters and head left of the giant sea monster to find the key to open the Darkmess gate that's blocking the path. |
| 8 |  Find the Magic Whetstone Follow Vampastra until you find the Wildclaw blocking the path. Use Beep-0's Scan ability towards the floating trail of coins to uncover an alternate path to avoid the Wildclaw. |
| 9 |  Find the Magic Whetstone Follow the road up the hill and turn left to find Vampastra waiting for you. Use Beep-0's Scan ability on the right side of the Spark to uncover the Magic Whetstone. |
| 10 | 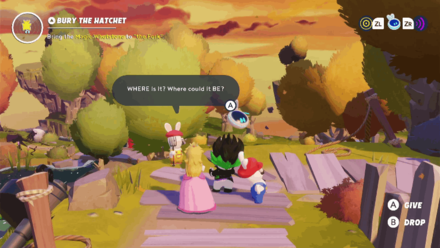 Bring the Magic Whetstone to "the Fork" Head back to "the Fork" and give him the Magic Whetstone. He will tell you the location of the culprit. |
| 11 |  Expose the culprit, Hinky! Head back to the house on the hill. Interact with the locked door and select "The Dryad" on the dialogue option. |
| 12 |  Wipe out the Puddle to recover the Axe. Interact with the Darkmess Puddle to start the battle quest, The Stolen Axe. |
The Stolen Axe Battle Quest Tips and Strategies
| Steps to proceed through The Stolen Axe | |
|---|---|
| 1 |  This battle quest requires you to go around different areas to reach the axe. We recommend equipping Heroes with Frostbite and Shock Sparks such as Cryobolide, Electroid, and Electrodash. You can also use Aquanox to knock back opponents out of bounds to inflict extra damage. |
| 2 | 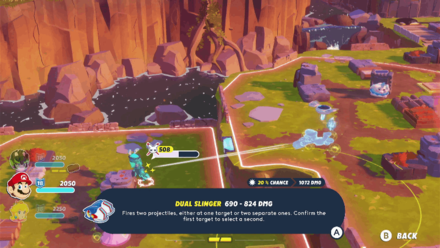 Eliminate the Ghostly Walkers, Stooges, and Depleters in each area before moving on to the next. You can ignore the Squashettes as they have short movement range and respawns periodically. |
| 3 | 
Take out all the Darkmess Eyes in each area to enable the jumping pads. |
| 4 | 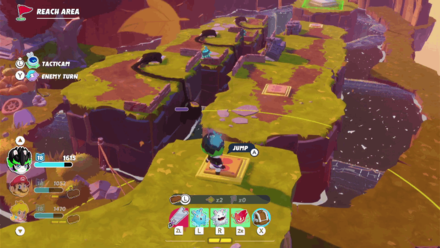
At the last area, you can ignore the Darkmess Eyes and use the jumping pads on the right side to each the area quicker. You'll need to defeat the Squashette in the area first and use a Hero with a wide movement range. |
Best Team Comps for Bury the Hatchet
Mario
| Hero | Sparks | Role |
|---|---|---|
 Mario Mario
|
 Electroid Electroid
|
Have the Stomp, Stomp & Glide, Jump Stomp, and Extra Stomp skills unlocked in order for Mario to move around between the jumping pads and damage the enemies at the same time. Note that the Ghostly Walkers can attack Mario if he uses a Jump Shot against them, but they cannot counterattack when using a Dash or Stomp. |
 Cryobolide Cryobolide
|
Edge
| Hero | Sparks | Role |
|---|---|---|
 Edge Edge
|
 Aquanox Aquanox
|
Make sure to unlock Extra Dash and Dash Increments Movement to increase Edge's movement range. Use her to inflict extra damage to opponents using a Splash-powered Flying Blade or move them out of cover using Pyrostar. |
 Pyrostar Pyrostar
|
Peach
| Hero | Sparks | Role |
|---|---|---|
 Peach Peach
|
 Ethering Ethering
|
Have Peach activate Team Barrier whenever you move to a different area. Put Skill Prims on Glide Boost and Movement Range to help her Team Jump the other two Heroes. Since this team comp does not have a healer, you can stock up some Super Mushroom Bags in case any of the Heroes have low health and no Team Barrier. |
 Pyrogeddon Pyrogeddon
|
Bury the Hatchet Overview and Rewards
| Bury the Hatchet | |
|---|---|
| Rewards |
・65 Coins ・170 Star Bits |
| Location | Palette Prime |
How to Unlock Bury the Hatchet
Complete Off-Color Main Story Quest
Bury the Hatchet unlocks after completing the main story quest, Off-Color in Palette Prime.
Off-Color Quest Guide and Walkthrough
Mario + Rabbids Sparks of Hope Related Guides
List of All Palette Prime Side Quests
Comment
1  Anonymous over 3 years
I am at the part of the quest where it suggests I check out the OTHER pumpkin houes and I have no idea what it is talking about.
Author
Bury the Hatchet Quest Guide and Walkthrough
Please participate in our site
improvement survey
03/2026
improvement survey
03/2026
Would you assist in
improving Game8's site?
improving Game8's site?

×
We are listening to our users' valuable opinions and discussing how to act on them.
The information collected through this survey will be used for the purpose of improving our services. In addition, the information will only be disclosed a part of a statistic in a format that will not allow identification of personal information.
Begin Survey
Not Now
×
Please rate each item regarding Game8.co's Advertisements.
Amount of Ads
Very Dissatisfied
Somewhat Dissatisfied
Fine
Somewhat Satisfied
Highly Satisfied
Placement of Ads
Timing of Ad Display
Ad Loading Speed
Safeness of Ads
Content of Ads
×
Please rate each item regarding Game8.co's Quality of Articles.
Amount of information
Very Dissatisfied
Somewhat Dissatisfied
Fine
Somewhat Satisfied
Highly Satisfied
Frequency of updates
Speed of new information
Accuracy of articles
Understandibility of articles
Readability of sentences
×
Please rate each item regarding Game8.co's Usability of the Site.
Ease of finding information
Very Dissatisfied
Somewhat Dissatisfied
Fine
Somewhat Satisfied
Highly Satisfied
Loading Speed
Use of Color
Font Size
Visibility of Images
Easy to Understand Layout
×
Please rate each item regarding Game8.co's Message Boards, Comments.
Ease of Writing
Very Dissatisfied
Somewhat Dissatisfied
Fine
Somewhat Satisfied
Highly Satisfied
Readability
Ease in Finding Information
Comment Quality
Comment Quantity
Admin Response
×
Please rate each item regarding Game8.co's Site's new design.
Please rate our site's new design
Very Dissatisfied
Somewhat Dissatisfied
Fine
Somewhat Satisfied
Highly Satisfied
Do you think that the website's design change makes the site easier to use?
Has the new design made it easier for you to find information on the site?
Has the new design improved the overall visual appeal of the site?
How would you rate your overall satisfaction with the new design of the site?
×
How likely are you to recommend Game8 to someone you know?
Very Unlikely
0
1
2
3
4
5
6
7
8
9
10
Very Likely
If you have other opinions regarding potential improvement to the website, please share them with us. We would appreciate your honest opinion.
Note: This is a free response section, so you can proceed without entering anything.
Note: Please be sure not to enter any kind of personal information into your response.
Note: Please be sure not to enter any kind of personal information into your response.
×
Thank You
×
Thank you for participating in our survey! Your answers will help us to improve the quality of our website and services.
We hope you continue to make use of Game8.
We hope you continue to make use of Game8.
Close
Rankings
- We could not find the message board you were looking for.
Gaming News


![Monster Hunter Stories 3 Review [First Impressions] | Simply Rejuvenating](https://img.game8.co/4438641/2a31b7702bd70e78ec8efd24661dacda.jpeg/thumb)
Popular Games

Genshin Impact Walkthrough & Guides Wiki
Honkai: Star Rail Walkthrough & Guides Wiki
Umamusume: Pretty Derby Walkthrough & Guides Wiki
Pokemon Pokopia Walkthrough & Guides Wiki
Resident Evil Requiem (RE9) Walkthrough & Guides Wiki
Monster Hunter Wilds Walkthrough & Guides Wiki
Wuthering Waves Walkthrough & Guides Wiki
Arknights: Endfield Walkthrough & Guides Wiki
Pokemon FireRed and LeafGreen (FRLG) Walkthrough & Guides Wiki
Pokemon TCG Pocket (PTCGP) Strategies & Guides Wiki


Recommended Games
Diablo 4: Vessel of Hatred Walkthrough & Guides Wiki
Cyberpunk 2077: Ultimate Edition Walkthrough & Guides Wiki
Fire Emblem Heroes (FEH) Walkthrough & Guides Wiki
Yu-Gi-Oh! Master Duel Walkthrough & Guides Wiki
Super Smash Bros. Ultimate Walkthrough & Guides Wiki
Pokemon Brilliant Diamond and Shining Pearl (BDSP) Walkthrough & Guides Wiki
Elden Ring Shadow of the Erdtree Walkthrough & Guides Wiki
Monster Hunter World Walkthrough & Guides Wiki
The Legend of Zelda: Tears of the Kingdom Walkthrough & Guides Wiki
Persona 3 Reload Walkthrough & Guides Wiki


All rights reserved
MARIO + RABBIDS SPARKS OF HOPE © 2022 Ubisoft Entertainment. All Rights Reserved. Rabbids, Sparks of Hope, Ubisoft and the Ubisoft logo are registered or unregistered trademarks of Ubisoft Entertainment in the U.S. and/or other countries. Nintendo properties are licensed to Ubisoft Entertainment by Nintendo. SUPER MARIO characters © Nintendo. Trademarks are property of their respective owners. Nintendo Switch is a trademark of Nintendo.
The copyrights of videos of games used in our content and other intellectual property rights belong to the provider of the game.
The contents we provide on this site were created personally by members of the Game8 editorial department.
We refuse the right to reuse or repost content taken without our permission such as data or images to other sites.
If you are referring to the step after talking to the Rabbid named "Hinky", then following the step '2' found in the 'Quest Walkthrough' section of our guide should put you on the right track.