Barrendale Mesa Secret Zone Quest Guide and Walkthrough
Barrendale Mesa Secret Zone is a Side Quest in Mario + Rabbids Sparks of Hope (Mario Rabbids 2). Read on for a walkthrough of the quest, including rewards, location, and how to complete it.
List of Contents
Barrendale Mesa Secret Zone Walkthrough
Quest Objectives
| Objectives |
|---|
|
1. Unlock the Secret Zone with the Barren Key.
2. Reach the Spark. |
Quest Walkthrough
| Steps to proceed through Barrendale Mesa Secret Zone | |
|---|---|
| 1 | 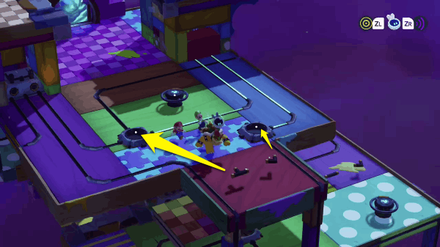 Pick up the tubes and place it on the floor panels as shown in the image above. |
| 2 | 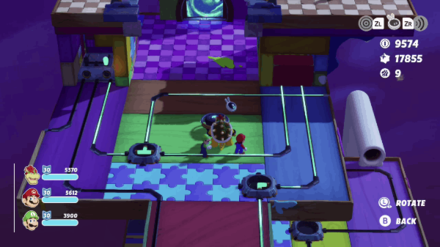 Rotate the mechanism in the middle in clockwise position two times to light up the pipes on the floor. |
| 3 | 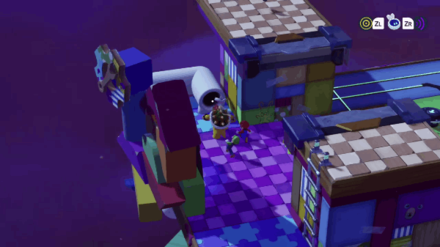 Enter the white pipe on the left of the entrance. |
| 4 | 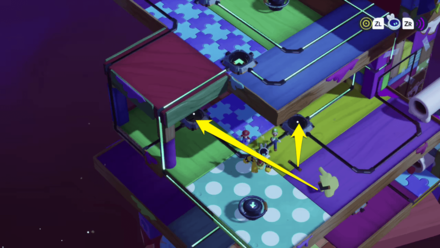 Pick up the tubes and place it on the floor panels as shown in the image above. |
| 5 |  Rotate the mechanism in the following order: counter-clockwise → counter-clockwise → clockwise → clockwise → clockwise. Enter the pipe to proceed to the next area. |
| 6 | 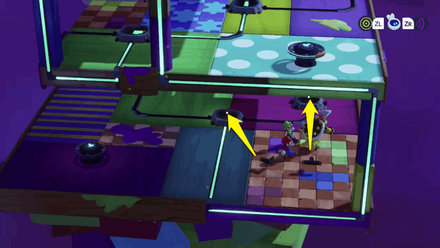 Pick up the tubes and place it on the floor panels as shown in the image above. Rotate the mechanism in clockwise position |
| 7 | 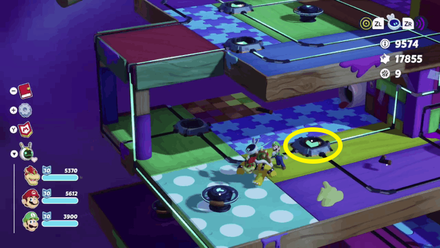 Head to the second floor of the area and place the L-shaped pipe on the middle floor panel. |
| 8 |  Rotate the mechanism to move the L-shaped pipe. |
| 9 | 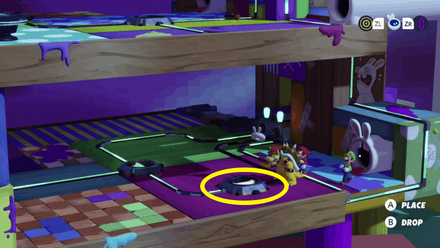 Take the two-way pipe and head to the lowest floor. Place the two-way pipe on the nearest floor panel. A cutscene should play showing a new bridge leading to a white Rabbid-like pipe. |
| 10 | 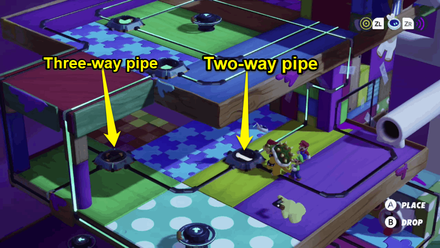 Take the three-way pipe and two-way pipe from the lowest floor and bring them to the middle floor. Rotate the mechanism so that the light appears and creates a bridge leading to the Spark. |
| 11 | 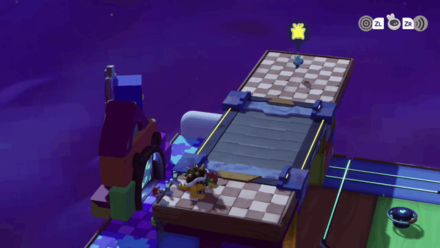 Climb up the ladder to reach the Spark and complete the secret zone. |
Barrendale Mesa Secret Zone Overview and Rewards
First Attempt
| Barrendale Mesa Secret Zone | |
|---|---|
| Rewards |
・No Coins Rewarded ・No Star Bits Rewarded |
| Location | Barrendale Mesa |
Second Attempt
| Barrendale Mesa Secret Zone |
|---|
 Gleaming Discruptor Gleaming Discruptor
|
Re-entering the Terra Flora Secret Zone will allow you to earn a unique weapon if you complete the challenge within the time limit. Although you can retry any Secret Zone as many times as you like, you will only receive Weapon Skins for the second attempt. Any attempt after the second will only reward you with coins.
List of All Weapon Skins and How to Get
How to Unlock Barrendale Mesa Secret Zone
Complete Momma's Payback Main Quest
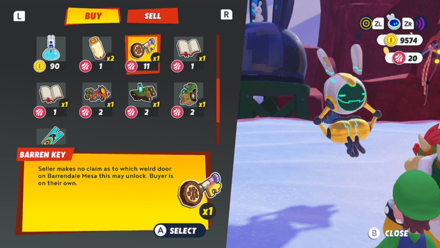
The Barrendale Mesa Secret Zone side quest appears on the map once you complete the Momma's Payback main story quest.
However, you need to purchase the Barren Key from Salesbot 9.99+TX for 11 Planet Coins to unlock the door to the Secret Zone.
Mario + Rabbids Sparks of Hope Related Guides
Comment
replace the 2 way pipe with the *1* way pipe, sorry!
Author
Barrendale Mesa Secret Zone Quest Guide and Walkthrough
improvement survey
03/2026
improving Game8's site?

Your answers will help us to improve our website.
Note: Please be sure not to enter any kind of personal information into your response.

We hope you continue to make use of Game8.
Rankings
- We could not find the message board you were looking for.
Gaming News
Popular Games

Genshin Impact Walkthrough & Guides Wiki

Honkai: Star Rail Walkthrough & Guides Wiki

Umamusume: Pretty Derby Walkthrough & Guides Wiki

Pokemon Pokopia Walkthrough & Guides Wiki

Resident Evil Requiem (RE9) Walkthrough & Guides Wiki

Monster Hunter Wilds Walkthrough & Guides Wiki

Wuthering Waves Walkthrough & Guides Wiki

Arknights: Endfield Walkthrough & Guides Wiki

Pokemon FireRed and LeafGreen (FRLG) Walkthrough & Guides Wiki

Pokemon TCG Pocket (PTCGP) Strategies & Guides Wiki
Recommended Games

Diablo 4: Vessel of Hatred Walkthrough & Guides Wiki

Cyberpunk 2077: Ultimate Edition Walkthrough & Guides Wiki

Fire Emblem Heroes (FEH) Walkthrough & Guides Wiki

Yu-Gi-Oh! Master Duel Walkthrough & Guides Wiki

Super Smash Bros. Ultimate Walkthrough & Guides Wiki

Pokemon Brilliant Diamond and Shining Pearl (BDSP) Walkthrough & Guides Wiki

Elden Ring Shadow of the Erdtree Walkthrough & Guides Wiki

Monster Hunter World Walkthrough & Guides Wiki

The Legend of Zelda: Tears of the Kingdom Walkthrough & Guides Wiki

Persona 3 Reload Walkthrough & Guides Wiki
All rights reserved
MARIO + RABBIDS SPARKS OF HOPE © 2022 Ubisoft Entertainment. All Rights Reserved. Rabbids, Sparks of Hope, Ubisoft and the Ubisoft logo are registered or unregistered trademarks of Ubisoft Entertainment in the U.S. and/or other countries. Nintendo properties are licensed to Ubisoft Entertainment by Nintendo. SUPER MARIO characters © Nintendo. Trademarks are property of their respective owners. Nintendo Switch is a trademark of Nintendo.
The copyrights of videos of games used in our content and other intellectual property rights belong to the provider of the game.
The contents we provide on this site were created personally by members of the Game8 editorial department.
We refuse the right to reuse or repost content taken without our permission such as data or images to other sites.


![Monster Hunter Stories 3 Review [First Impressions] | Simply Rejuvenating](https://img.game8.co/4438641/2a31b7702bd70e78ec8efd24661dacda.jpeg/thumb)


It's much easier this way: 1) TOP floor put T on left side, L on right, rotate 2x to the left. 2) MIDDLE floor put L on right, rotate to glow, bring I down to BOTTOM. 3) Put I on right, T on left, rotate to get bridge. 4) Take the L across bridge then up to last slot. 5) Back on BOTTOM, bring T up to MIDDLE and insert on left. Back to BOTTOM, bring I to MIDDLE and put on right slot. Rotate to light upstairs now RUN to top!