Uncork the Volcano Quest Guide and Walkthrough

Uncork the Volcano is a Main Story Quest in Mario + Rabbids Sparks of Hope (Mario Rabbids 2). Read on for a walkthrough of the quest, including rewards, location, and how to complete it.
List of Contents
Uncork the Volcano Walkthrough
Quest Objectives
| Objectives |
|---|
|
1. Enter Mt. Spout.
2. Scale Mt. Spout from within. 3. Cleanse the Puddle inside Mt. Spout. 4. Reach the top of Mt. Spout 5. Triumph over the Darkmess Tentacle! |
Quest Walkthrough
| Step-by-Step Guide | |
|---|---|
| 1 |
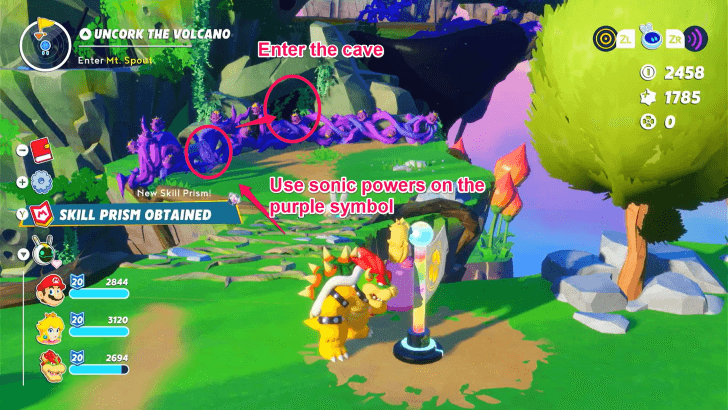 Destroy the purple vines with Beep-0’s sonic powers and enter the cave ahead. |
| 2 |
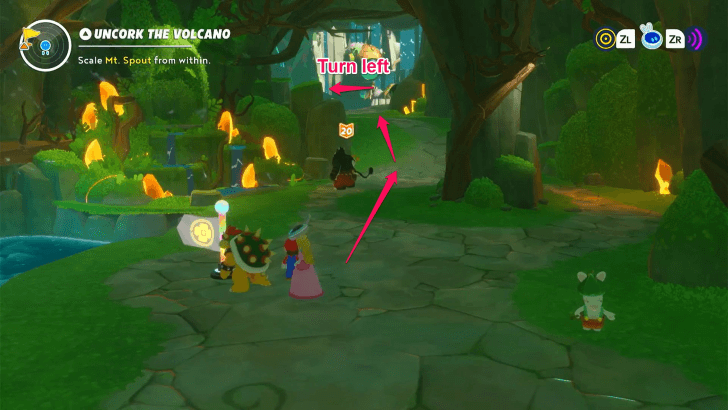 Once inside the cave, go straight ahead, past the teleport point. Once the path diverges into two, head to the left where there will be a trail of coins and a sonic block. |
| 3 |
Destroying the sonic block and scanning the yellow symbol will point you to a nearby ledge. Use Beep-0’s scanning ability to reveal the ladder and climb up it. |
| 4 |
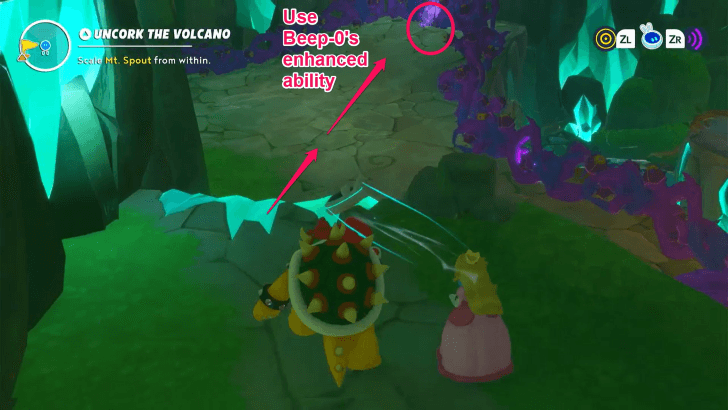 Slide down the other end with the crystal ramp and destroy the purple vines by heading to the purple symbol and pressing the enhanced sonic ability repeatedly. |
| 5 |
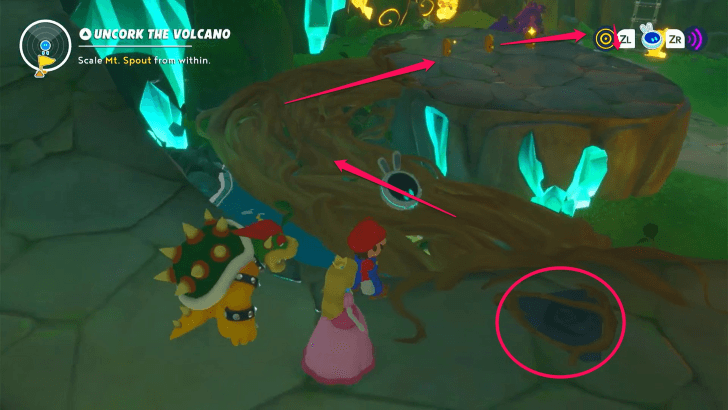 Activate the vine bridge by using the switch on the nearby ledge. Walk across the bridge and climb down the ladder. |
| 6 |
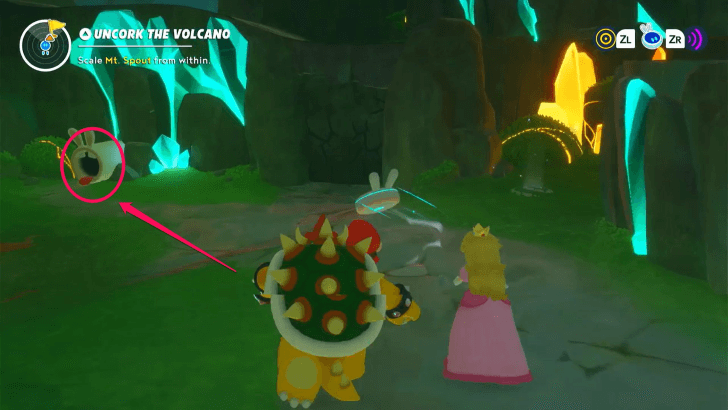 Once down there, turn to the right and you will see a pipe. Enter the pipe. |
| 7 |
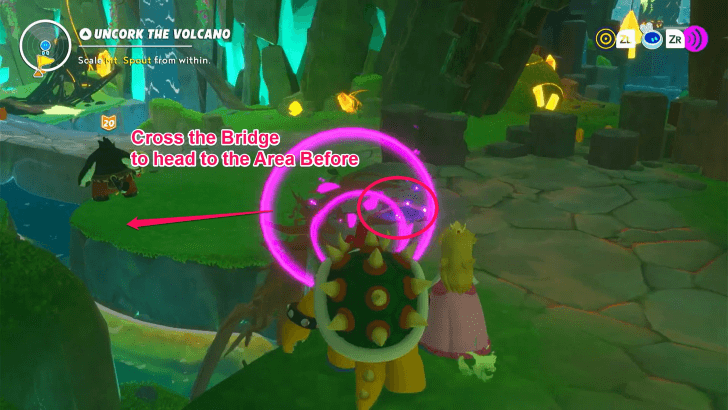 Once you exit the pipe there will be a nearby purple symbol. Use the enhanced ability to make another vine bridge grow. Cross this bridge to get back to the earlier area. |
| 8 |
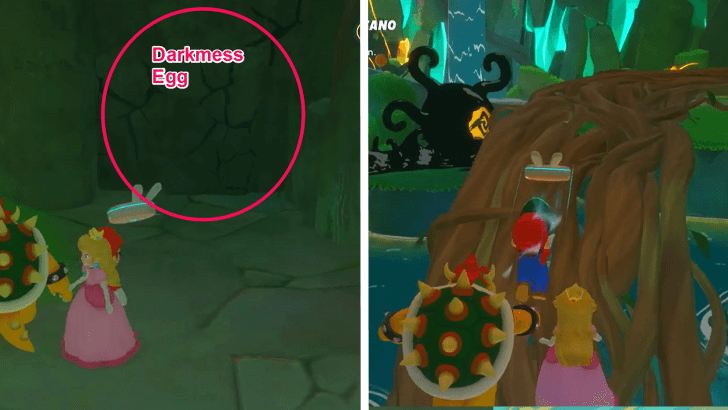 You will see a cracked wall near the pipe you previously entered. Break it with the sonic ability and get the Darkmess Egg from inside. Throw the Darkmess Egg from the vine bridge you just made to break the Darkmess Eye. This will clear the path ahead. |
| 9 |
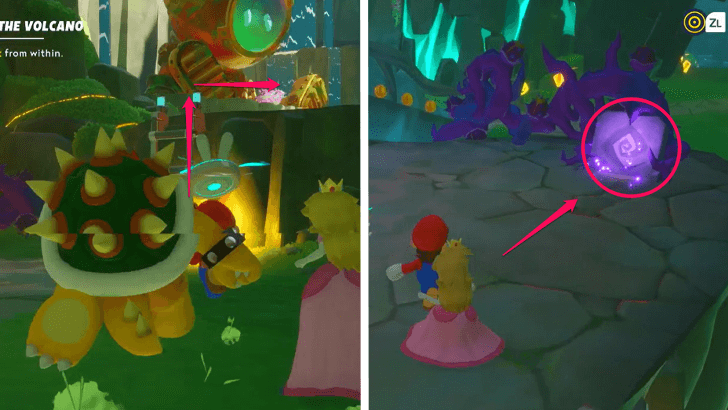 Climb the nearby ladder and clear the Purple Vines once again using the sonic abilities on the purple symbol. |
| 10 |
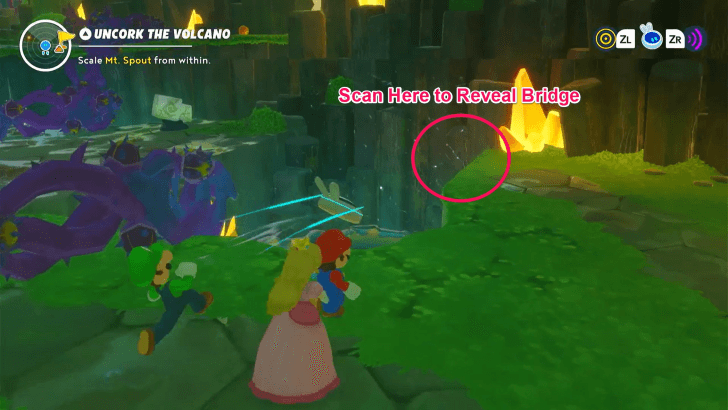 Head down the path until you reach another set of purple vines blocking your way. To the right of these vines, use Beep-0’s scan ability to reveal a bridge and walk across it. |
| 11 |
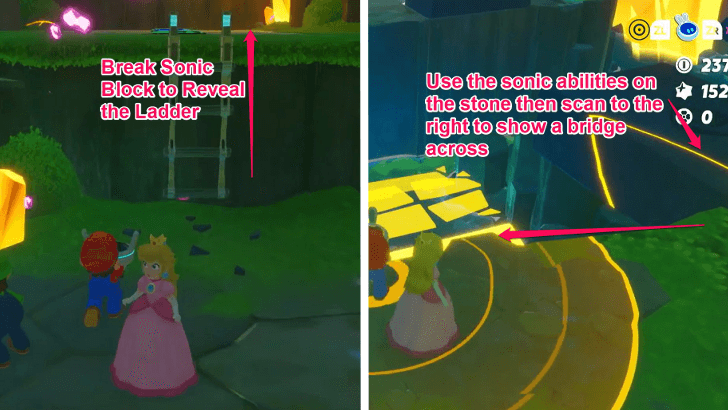 Break another sonic block to reveal a ladder. Climb up it. To the left of two floor switches, there will be a large stone. Use the sonic abilities on the stone however do not walk across it as it is incomplete. To the left of this stone use the scanning ability to reveal a bridge. Walk across this bridge. |
| 12 |
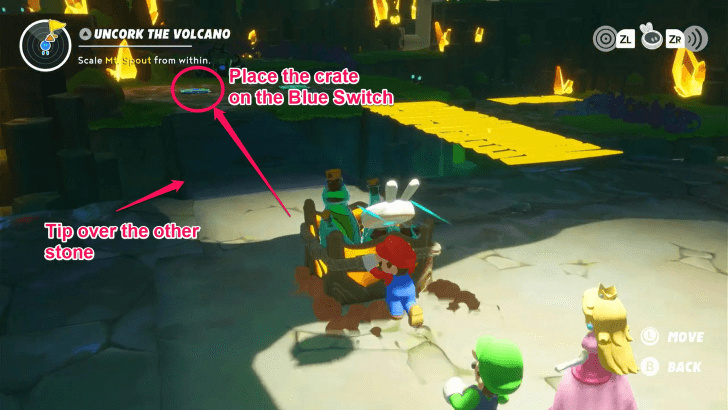 Tip the other stone on the other side and move the crate of bottles across the stone bridge. Put it on the switch with the blue circle. |
| 13 |
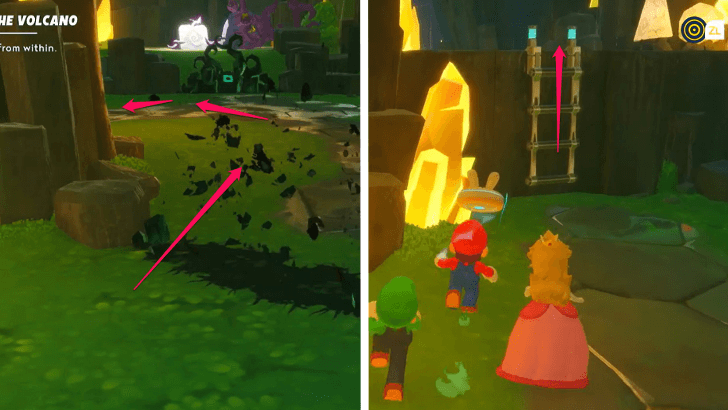 Head to the path that just cleared up and make a U-turn until you see a ladder. Climb it. |
| 14 |
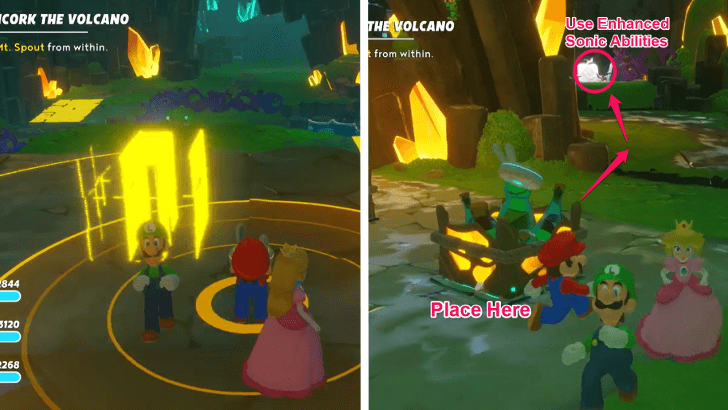 Use Beep-0’s scanning ability near the center to reveal another crate. Push it down and onto the switch with the green square. Continue heading down the path that opened up and clear the vines using the sonic abilities on the symbol on the rock. |
| 15 |
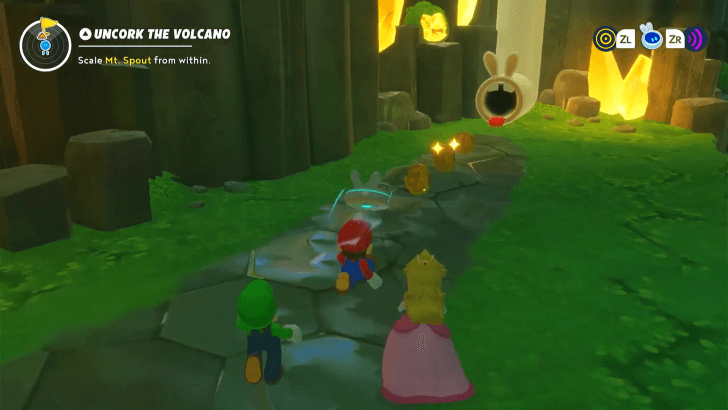 Turn around and head to the path to the left. Enter the pipe on the other end. |
| 16 |
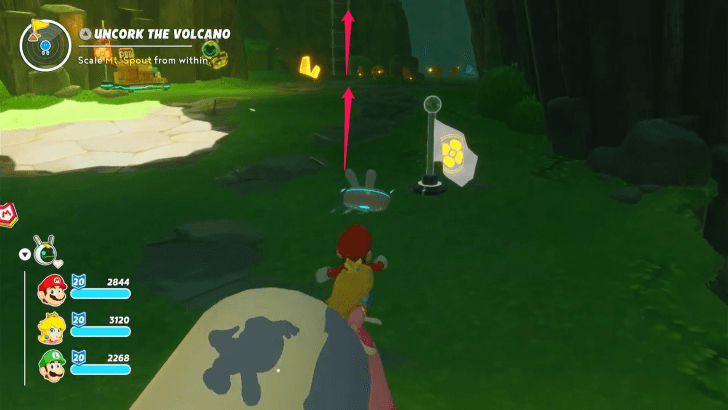 Climb up the ladder at the other end. |
| 17 |
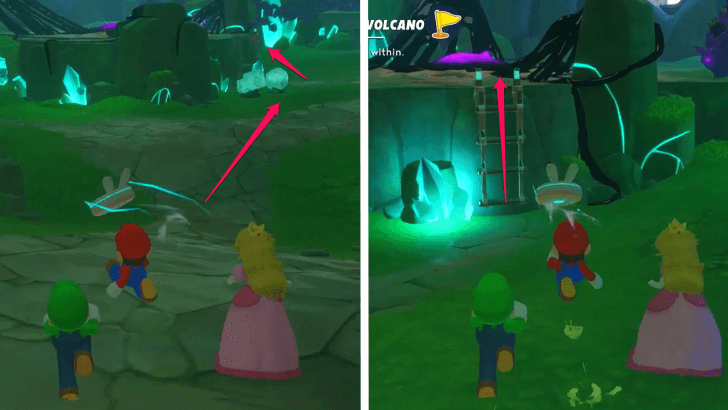 Head straight to the ledge on the other side. There will be another ladder you can climb to reach the next challenge for the quest, Metalheads. |
| 18 |
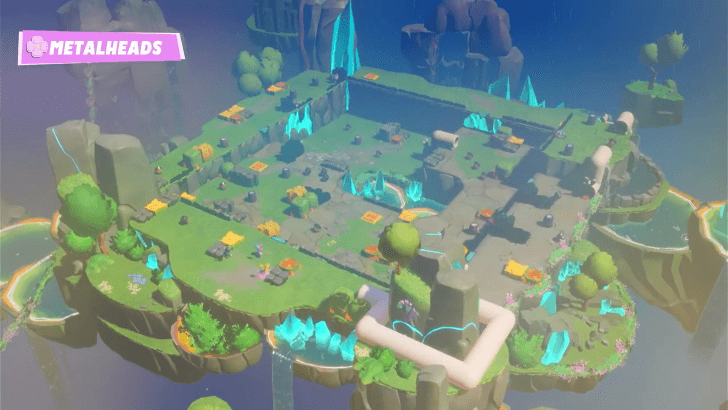 Metalheads (Battle Quest) Unlike regular Goombas, Armored Goombas require to be dashed on and thrown out of bounds. Alternatively, use the splash and gust barrels found throughout the map to knock enemies out of the field once you've used up your dashes. Note: Lure Armored Goombas to barrels using Glitter's Gather 'Round ability to speed things up![/mid] |
| 19 |
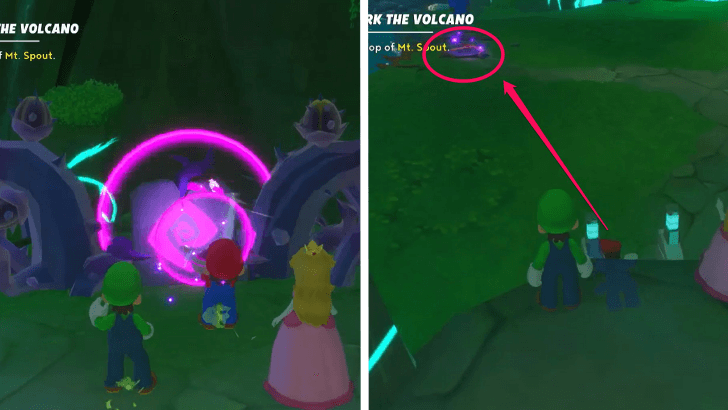 After beating the challenge, use the enhanced sonic ability to clear the purple vines. Head back down the ladder and use the ability on the purple symbol on the floor to create the vine bridge. Once made, walk across it. |
| 20 |
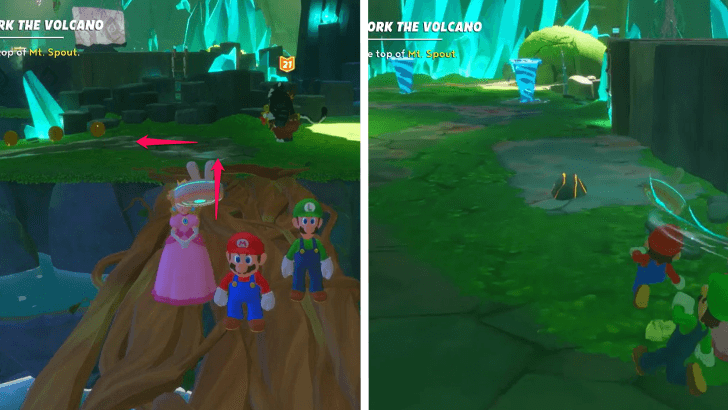 Following the path on the left with the trail of coins, you will come across geysers and objects you can use to block them. The goal is to plug up all geysers with the objects to clear the path ahead. Note that you cannot bring the objects up by ladder. |
| 21 |
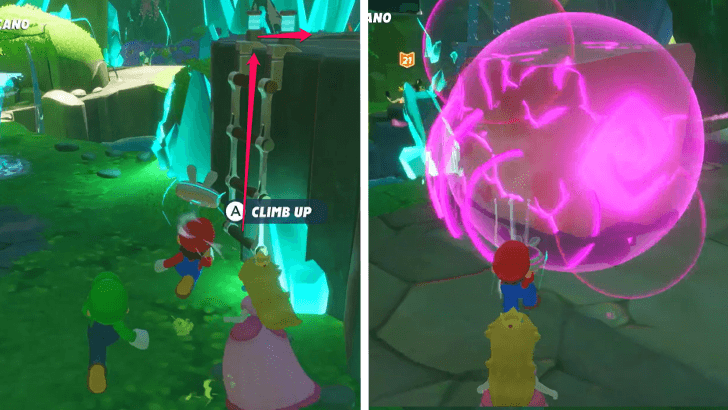 For the first geyser, climb the ladder to your immediate right and break the sonic block. This will reveal a geyser. |
| 22 |
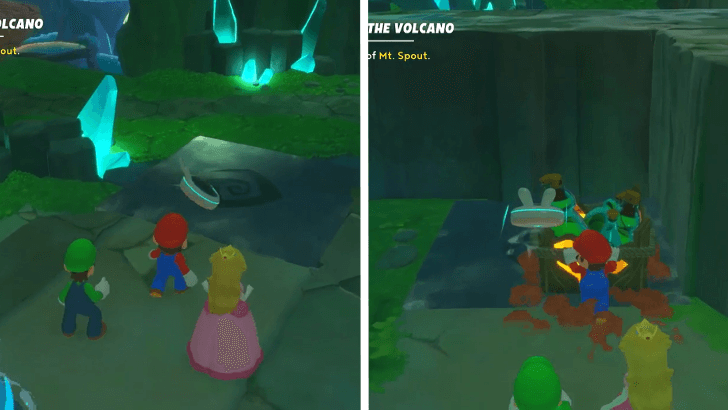 Use the sonic powers on the nearby block to lower it and place the crate on the other side on top of it. |
| 23 |
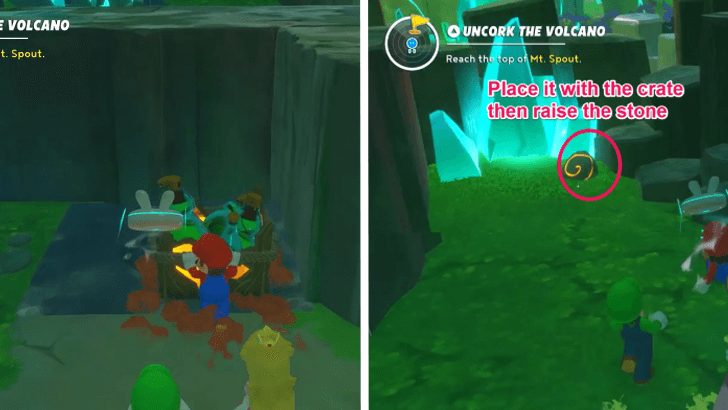 Near where you found the crate, there will also be a stone. Pick it up and place it with the crate. Raise the block with the sonic powers. |
| 24 |
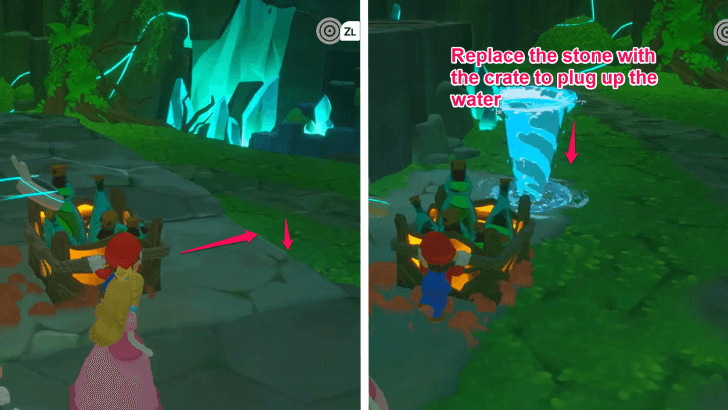 Drop the crate off the edge where the geyser on the lower level should be. Move the stone plugging up this geyser and replace it with the crate. Set the stone aside on the ground nearby. You will use it later. |
| 25 |
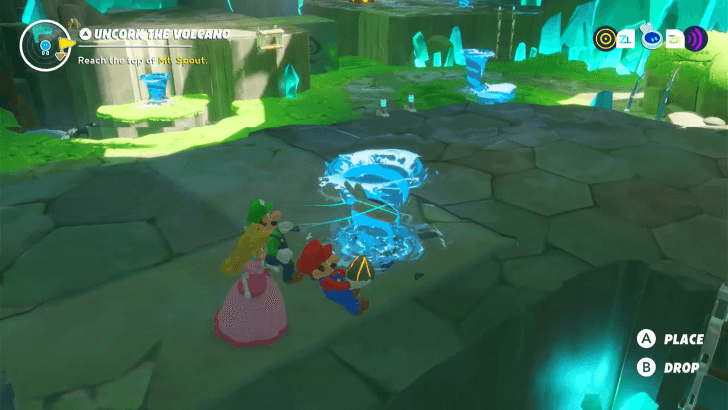 Use the stone you found on the other side to plug up the geyser on top of the ledge. |
| 26 |
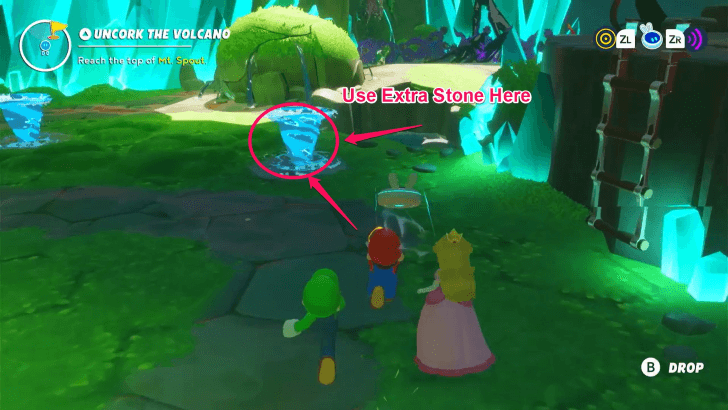 With the extra stone you replaced with the crate, use it to plug up the geyser near the giant mossy rock. |
| 27 |
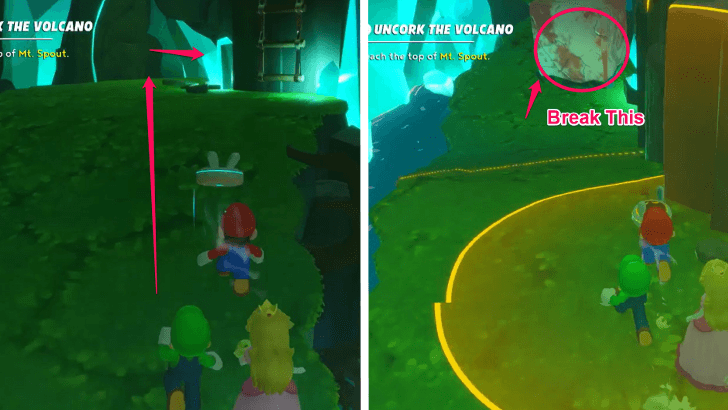 Opposite of the area you just completed, head up the grassy ramp, past a ladder and to the right. You should see a sonic block on the other end. Break it and you will find another stone you can use on a geyser. |
| 28 |
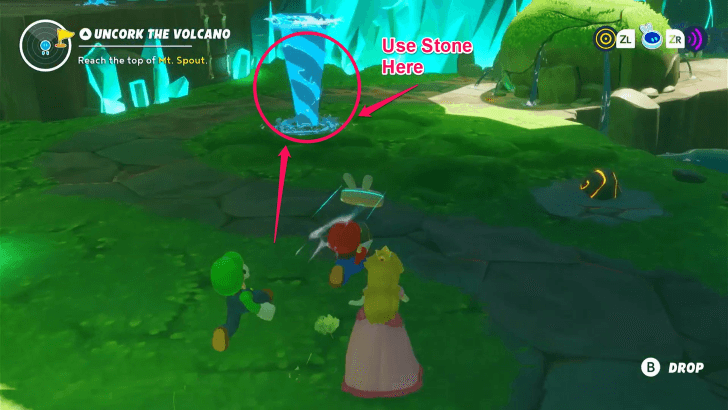 Bring it to the area near the giant mossy rock and place it on top of the other geyser. |
| 29 |
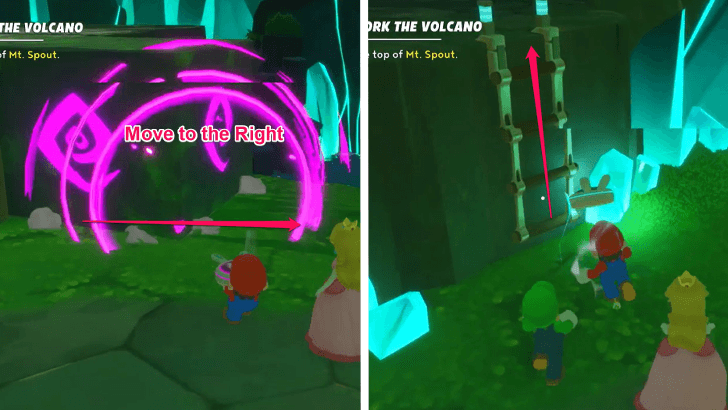 To the left of where you placed this stone there should be a moveable sonic block and a ladder leading up a different ledge. Move the sonic block to the right then climb up the ladder. |
| 30 |
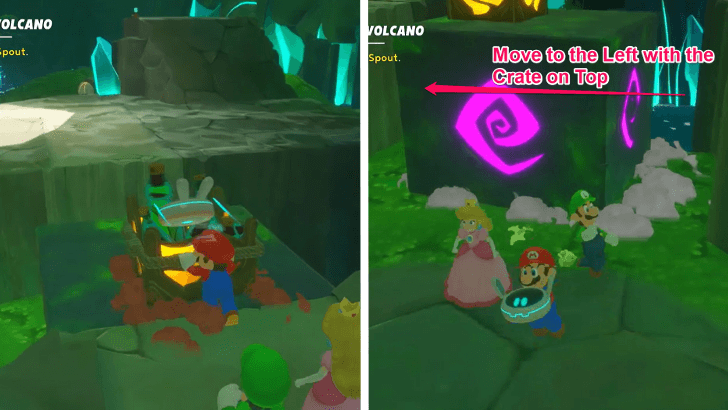 There should be another geyser and crate on top. Move the crate on top of the sonic block and move it to the left. |
| 31 |
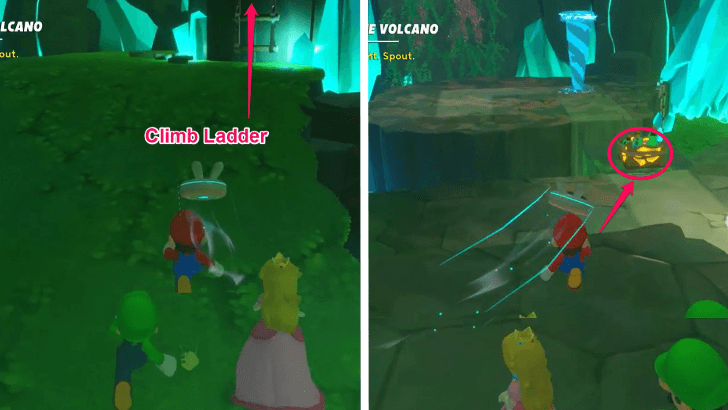 Head to the grassy ramp from before and climb the ladder you walked past. Head down the ramp towards the crate of bottles you just moved. |
| 32 |
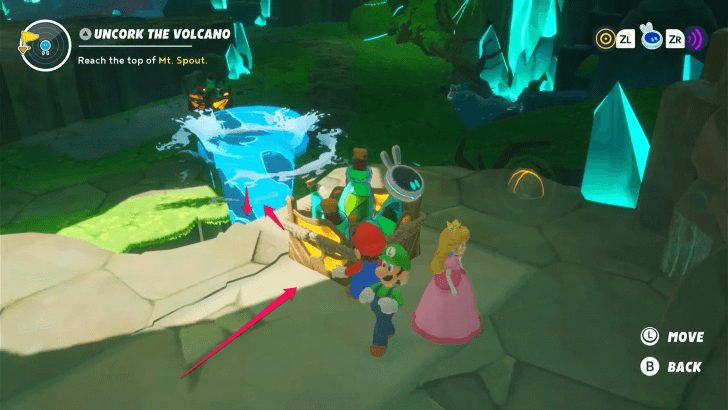 Push the crate onto the geyser below. |
| 33 |
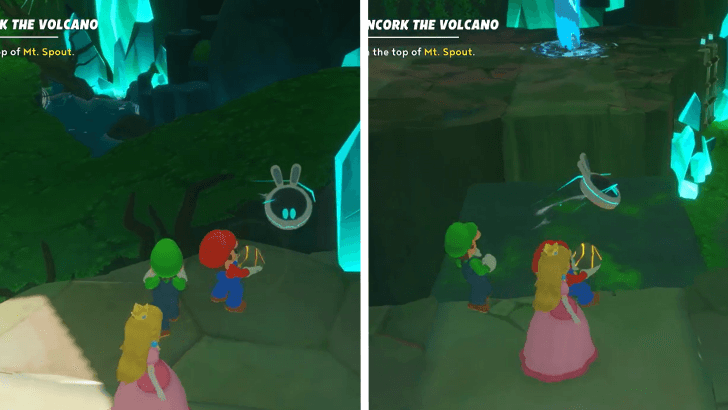 Right next to where you pushed the crate off the ledge there should be another stone. Pick it up and place it on the sonic block. |
| 34 |
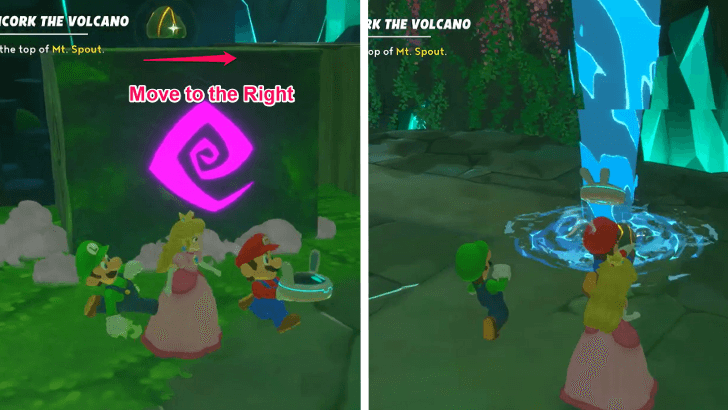 Move the sonic block to the right and place the stone on top of the last geyser on the other side. This will clear the large mossy rock blocking the path ahead. |
| 35 |
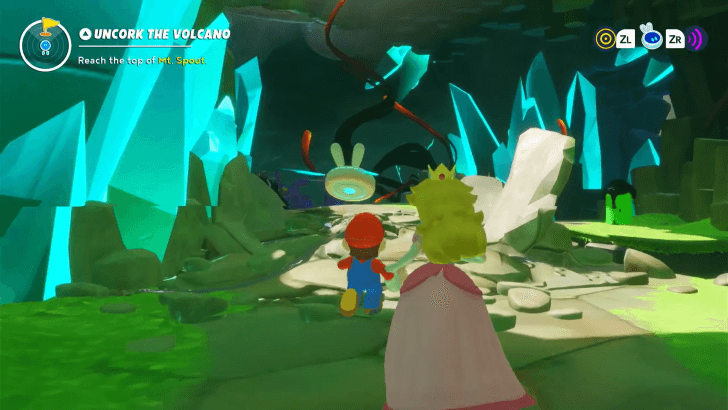 Continue down the path that cleared up and the next challenge, Spout Forth, will be ahead. |
| 36 |
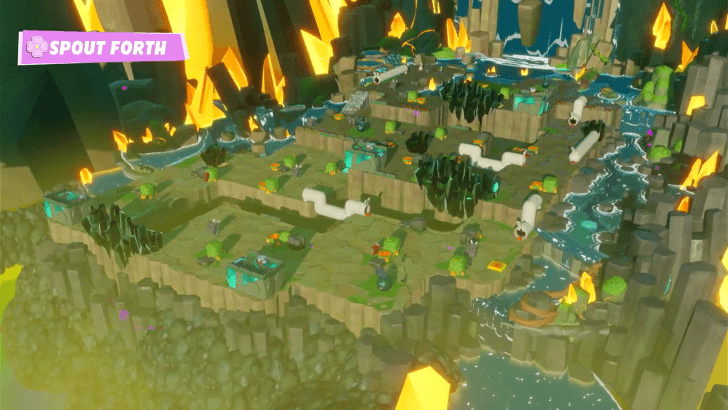 Spout Forth (Battle Quest) Destroy the Darkmess blocking the dam by using the explosives spread out from their respective sources. Be on the lookout for Squashettes as their attacks can mess with your Heroes' positioning and can drop any carried explosives. Note: Two explosives respawn from its source every turn when they are used or destroyed. If the Darkmess blockade is too far, you can have your Hero put down the explosive and have another with movement range bring it closer to the blockade.[/mid] |
Uncork the Volcano Battle Quests and Rewards
| Battle Quest | Overview |
|---|---|
| Metalheads |
Objectives: Defeat 17 Armored Goombas.
Rewards: ・75 Coins ・160 Star Bits |
| Spout Forth |
Objectives: Destroy Darkmess Dam.
Rewards: ・
・175 Coins ・390 Star Bits |
How to Unlock Uncork the Volcano
Complete Stay on Track Quest

Uncork the Volcano is unlocked after completing the Main Quest Stay on Track.
Previous and Next Guides
| ◀ Previous Quest | Next Quest ▶ | Stay on Track | It's an Ill Wind that Blows |
|---|
Mario + Rabbids Sparks of Hope Related Guides
List of Story Walkthrough Quests
Comment
There is a bug in Step 7, where the crate can get stuck mid air, and not block the spouting water. If the autosave happened past this stage, then the game is stuck
Author
Uncork the Volcano Quest Guide and Walkthrough
improvement survey
03/2026
improving Game8's site?

Your answers will help us to improve our website.
Note: Please be sure not to enter any kind of personal information into your response.

We hope you continue to make use of Game8.
Rankings
- We could not find the message board you were looking for.
Gaming News
Popular Games

Genshin Impact Walkthrough & Guides Wiki

Honkai: Star Rail Walkthrough & Guides Wiki

Umamusume: Pretty Derby Walkthrough & Guides Wiki

Pokemon Pokopia Walkthrough & Guides Wiki

Resident Evil Requiem (RE9) Walkthrough & Guides Wiki

Monster Hunter Wilds Walkthrough & Guides Wiki

Wuthering Waves Walkthrough & Guides Wiki

Arknights: Endfield Walkthrough & Guides Wiki

Pokemon FireRed and LeafGreen (FRLG) Walkthrough & Guides Wiki

Pokemon TCG Pocket (PTCGP) Strategies & Guides Wiki
Recommended Games

Diablo 4: Vessel of Hatred Walkthrough & Guides Wiki

Cyberpunk 2077: Ultimate Edition Walkthrough & Guides Wiki

Fire Emblem Heroes (FEH) Walkthrough & Guides Wiki

Yu-Gi-Oh! Master Duel Walkthrough & Guides Wiki

Super Smash Bros. Ultimate Walkthrough & Guides Wiki

Pokemon Brilliant Diamond and Shining Pearl (BDSP) Walkthrough & Guides Wiki

Elden Ring Shadow of the Erdtree Walkthrough & Guides Wiki

Monster Hunter World Walkthrough & Guides Wiki

The Legend of Zelda: Tears of the Kingdom Walkthrough & Guides Wiki

Persona 3 Reload Walkthrough & Guides Wiki
All rights reserved
MARIO + RABBIDS SPARKS OF HOPE © 2022 Ubisoft Entertainment. All Rights Reserved. Rabbids, Sparks of Hope, Ubisoft and the Ubisoft logo are registered or unregistered trademarks of Ubisoft Entertainment in the U.S. and/or other countries. Nintendo properties are licensed to Ubisoft Entertainment by Nintendo. SUPER MARIO characters © Nintendo. Trademarks are property of their respective owners. Nintendo Switch is a trademark of Nintendo.
The copyrights of videos of games used in our content and other intellectual property rights belong to the provider of the game.
The contents we provide on this site were created personally by members of the Game8 editorial department.
We refuse the right to reuse or repost content taken without our permission such as data or images to other sites.


![Monster Hunter Stories 3 Review [First Impressions] | Simply Rejuvenating](https://img.game8.co/4438641/2a31b7702bd70e78ec8efd24661dacda.jpeg/thumb)


Thank you for bringing this to our attention. We will be sure to add this information to not only this guide, but any other appropriate guides as well.