
This survey will take about 1 minute.
Your answers will help us to improve our website.
Last of Us 2
Chapter 2: Seattle Day 1 - Downtown Walkthrough
Welcome to Game8's Last of Us Part 2 guide. Feel free to get started by checking out one of our popular guides from the list below!
See our guides for getting 100% of the trophies!
The Jury is out! Read our full spoiler-free review here!
This is a walkthrough for Chapter 2: Seattle Day 1 - Downtown in The Last of Us Part 2 (TLOU2). For a list of objectives in this section, items, collectible locations, enemy strategy and other tips & tricks, read on!
| Previous Section | Next Section |
|---|---|
| The Gate | Eastbrook Elementary |
List of Contents
Seattle Day 1 - Downtown Walkthrough
| 1 | Continue moving towards the Serevena Hotel. |
|---|---|
| 2 | Find the generator by following the Yellow Power Line. |
| 3 | Based on the artifact that you pick up, the gas is available at the Courtroom Garage or the Dome. |
| 4 | Enter the open gate with the Fuel Distribution sign on it. |
| 5 | Move forward until you reach the locked gate, then squeeze through it to enter. |
| 6 | You will encounter 2 Runners on the area. Deal with them, then go over the wooden wall to proceed. |
| 7 | On this area, You will encounter 2 Clickers and 2 Runners. You can go Prone to silently get past them. |
| 8 | Head up through the scaffholdings to get inside the Dome. |
| 9 | After spotting the gas from the other side of the metal bars, squeeze through the broken metal wall and use the trolley as boost to get the Gas Container. |
| 10 | Head to the Courtroom Garage. |
| 11 | Use the trolley again to boost yourself up to the other side of the courtroom. |
| 12 | Dina will find a rope. Swing yourself to jump to the other side. |
| 13 | Exit through the broken window and go to the Courtoom Garage. The Courthouse will have a big US flag on the outside, so it will be easy to find. |
| 14 | Head to the right side of the courthouse and climb up the ladder. |
| 15 | Open the window to get inside. |
| 16 | You will encounter 2 Clickers and 3 Runners right after you get inside. |
| 17 | At the end of the hallway, open the double door with the help of Dina. |
| 18 | Head downstairs and you wil find a locked room. Smash the windows to get in and open the Safe. |
| 19 | Use the rope at the elevator to go down. |
| 20 | After opening the elevator you will encounter 5 Runners and 2 Clickers. |
| 21 | Fill up your Gas Container. |
| 22 | Use the chain to open up the garage doors. |
| 23 | Go back to the Fedra gate and turn on the generator. |
| 24 | Input the code 5-3-4-5 to open the gate. |
| 25 | Move forward the Serevana Hotel. |
| 26 | You will spot an infected. Hop on the fence to get inside. |
| 27 | Inside the lobby you will encounter 5 Runners. |
| 28 | Head upstairs and check one of the rooms until you encounter a tortured person, where a cutscene will trigger. |
| 29 | Exit the hotel and go to your horse. |
| 30 | Go to Gate East 1 and turn on the generator. Dina will input the code to open the gate. |
| 31 | Continue moving forward up to the bridge and another cutscence will trigger. |
Seattle Day 1 - Downtown Tips and Strategy
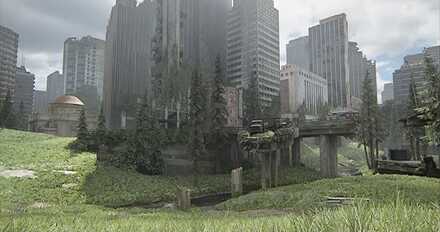
Seattle Map

You can visit some of the places that Ellie marked as ? on her map. There may be a lot of supplies inside those buildings, so be aure and check them out while in the area.
Swinging with the Rope

This is the first experience that you will have swinging on a Rope. You have to build up momentum to successfully cross the other side by pressing the jump putton when you reach the peak of momentum.
Safe in the Courthouse
 Enlarge
This safe can be found inside the courthouse before hopping down the elevator shaft. Break the window near end of the hall and hop into the room on the other side to find a safe. The code to the safe is written on the board in the same room.
Inside you will find some scavenged parts and ammo.
 Enlarge
| Safe Combination |
|---|
| 860722 |
Seattle Day 1 - Downtown Safe Locations
Bank Vault Code

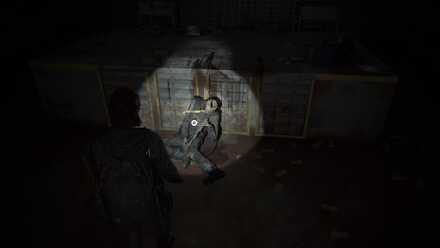
After entering town, the Bank is ahead and slightly to the left. Inside the bank, there will be two Clickers and several Runners. The Vault is in a room behind the counter. The combination is on the table in front of the vault.

Here you will be able to get the Pump Shotgun.
Courthouse Safe Code
This safe can be found inside the courthouse before hopping down the elevator shaft. Break the window near end of the hall and hop into the room on the other side to find a safe. The code to the safe is written on the board in the same room.
Inside you will find some scavenged parts and ammo.
Enlarge| Safe Combination |
|---|
| 860722 |
West Gate 2 Safe Code

The West Gate is located across from the music store. Writing that reads 'Use gate code' is on the wall next to the safe. You should already have the note with all of the gate codes.
| Safe Combination |
|---|
| 0451 |
Seattle Day 1 - Downtown Collectibles
Artifacts
 FEDRA Census Document FEDRA Census Document |
|
| Chapter | Seattle Day 1 - Downtown |
|---|---|
| Location | This artifact is in a drawer inside a guard house to your left right after you spot the Serevena Hotel with Dina. |
 Cache Hunter Note Cache Hunter Note |
|
| Chapter | Seattle Day 1 - Downtown |
|---|---|
| Location | This artifact is located inside the small pouch at a small broken building straight ahead after you enter downtown. |
 Bank Heist Plans Bank Heist Plans |
|
| Chapter | Seattle Day 1 - Downtown |
|---|---|
| Location | This artifact is located inside the small pouch in the room with the Vault Door of the Westlake Bank. |
 Bank Robber Letter Bank Robber Letter |
|
| Chapter | Seattle Day 1 - Downtown |
|---|---|
| Location | This artifact is located on the main table inside the Vault Room of the Westlake Bank. |
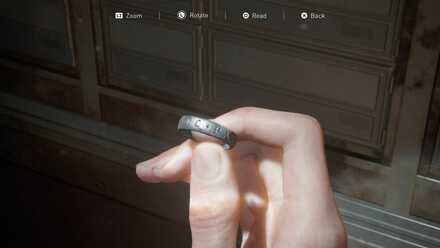 Antique Ring Antique Ring |
|
| Chapter | Seattle Day 1 - Downtown |
|---|---|
| Location | This artifact is located in the drawer at the corner of the Vault Room of the Westlake Bank. |
 Letter from Isaac Letter from Isaac |
|
| Chapter | Seattle Day 1 - Downtown |
|---|---|
| Location | This artifact is located inside the small pouch near the burnt tank. |
 Street Drawing Street Drawing |
|
| Chapter | Seattle Day 1 - Downtown |
|---|---|
| Location | This artifact is located inside a drawer on top of a security checkpoint on 5th Ave. You can easily get to the security checkpoint if you exit the Valiant Music Shop from the second floor. |
 WLF Community Supply Chest Note WLF Community Supply Chest Note |
|
| Chapter | Seattle Day 1 - Downtown |
|---|---|
| Location | This artifact is located inside the small pouch up the stairs and beside some crates east of Valiant Music Shop but on the same block. |
 WLF Safe House Supply Note WLF Safe House Supply Note |
|
| Chapter | Seattle Day 1 - Downtown |
|---|---|
| Location | This artifact is on the counter inside Ruston Coffee at the corner of 5th Ave and Spring St. |
 Pet Store Key Pet Store Key |
|
| Chapter | Seattle Day 1 - Downtown |
|---|---|
| Location | This artifact is on a baby changing table in the restroom at Ruston Coffee. |
 Join WLF Note Join WLF Note |
|
| Chapter | Seattle Day 1 - Downtown |
|---|---|
| Location | This artifact is on a printer inside the Barko's Pet Shop. |
 Note to Informant Note to Informant |
|
| Chapter | Seattle Day 1 - Downtown |
|---|---|
| Location | This artifact is inside the frontmost truck of the convoy between 6th Ave and 7th Ave. |
 Plea to a Friend Letter Plea to a Friend Letter |
|
| Chapter | Seattle Day 1 - Downtown |
|---|---|
| Location | This artifact is on a corpse at the first floor of the Courthouse after the area with Clickers and Runners. |
 Lt. Torres' Final Memorandum Lt. Torres' Final Memorandum |
|
| Chapter | Seattle Day 1 - Downtown |
|---|---|
| Location | This artifact can be picked up from a corpse after you get the machete of its body in the Bailiff's Office at the Courthouse. |
 List of Known WLF Agitators List of Known WLF Agitators |
|
| Chapter | Seattle Day 1 - Downtown |
|---|---|
| Location | This artifact can be found in the bottom of file cabinet in the Bailiff's Office at the Courthouse. |
 Emergency Protocols Memo Emergency Protocols Memo |
|
| Chapter | Seattle Day 1 - Downtown |
|---|---|
| Location | This artifact is on a table beside a TV on the upper floor of the Dome opposite to where entered. |
 Rabbi Saunders' Letter Rabbi Saunders' Letter |
|
| Chapter | Seattle Day 1 - Downtown |
|---|---|
| Location | This artifact is inside a drawer of the desk in the Rabbi's Office after you swing from a cable at the Dome. |
 WLF Recruiter Journal WLF Recruiter Journal |
|
| Chapter | Seattle Day 1 - Downtown |
|---|---|
| Location | This artifact is inside a drawer across the two beds on the second floor of the Serevena Hotel. |
Journal Entries
 Shimmer Shimmer |
|
| Chapter | Seattle Day 1 - Downtown |
|---|---|
| Location | This journal entry can be gained by interacting with view from the security checkpoint right after you pickup the Street Drawing artifact. |
 Rabbi Saunders' Letter Rabbi Saunders' Letter |
|
| Chapter | Seattle Day 1 - Downtown |
|---|---|
| Location | This journal entry can be gained automatically after you get the artifact Rabbi Saunders' Letter from the desk in the Rabbi's Office. |
Trading Cards
 Doctor Uckmann Doctor Uckmann |
|
| Chapter | Seattle Day 1 - Downtown |
|---|---|
| Location | This trading card is inside a drawer on the third floor of a broken building north of Westlake Bank. |
 Das Wort Das Wort |
|
| Chapter | Seattle Day 1 - Downtown |
|---|---|
| Location | This trading card is inside a drawer behind the counter with the cash register at the Valiant Music Shop. |
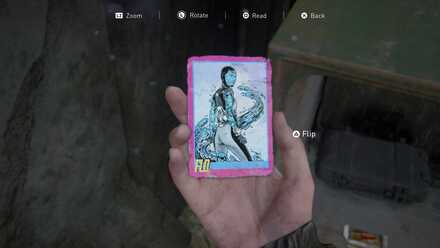 Flo Flo |
|
| Chapter | Seattle Day 1 - Downtown |
|---|---|
| Location | This trading card is inside a safe at the end of Madison ST behind West Gate 2. |
 Big Blue Big Blue |
|
| Chapter | Seattle Day 1 - Downtown |
|---|---|
| Location | This trading card is inside a drawer behind the counter of Ruston's Coffee. |
 Know It All Know It All |
|
| Chapter | Seattle Day 1 - Downtown |
|---|---|
| Location | This trading card is inside a nightstand between two beds at the second floor of the Serevena Hotel. |
Last of Us 2 Related Links
| Previous Section | Next Section |
|---|---|
| The Gate | Eastbrook Elementary |
| Chapter 1 | Jackson |
|---|---|
| Chapter 2 | Seattle Day 1 |
| Chapter 3 | Seattle Day 2 |
| Chapter 4 | Seattle Day 3 |
| Chapter 5 | The Park |
| Chapter 6 | Seattle Day 1 |
| Chapter 7 | Seattle Day 2 |
| Chapter 8 | Seattle Day 3 |
| Chapter 9 | The Farm |
| Chapter 10 | Santa Barbara |
| Chapter 11 | The Farm |
Author

Chapter 2: Seattle Day 1 - Downtown Walkthrough
Please participate in our site
improvement survey
03/2026
improvement survey
03/2026
Would you assist in
improving Game8's site?
improving Game8's site?

×
We are listening to our users' valuable opinions and discussing how to act on them.
The information collected through this survey will be used for the purpose of improving our services. In addition, the information will only be disclosed a part of a statistic in a format that will not allow identification of personal information.
Begin Survey
Not Now
×
Please rate each item regarding Game8.co's Advertisements.
Amount of Ads
Very Dissatisfied
Somewhat Dissatisfied
Fine
Somewhat Satisfied
Highly Satisfied
Placement of Ads
Timing of Ad Display
Ad Loading Speed
Safeness of Ads
Content of Ads
×
Please rate each item regarding Game8.co's Quality of Articles.
Amount of information
Very Dissatisfied
Somewhat Dissatisfied
Fine
Somewhat Satisfied
Highly Satisfied
Frequency of updates
Speed of new information
Accuracy of articles
Understandibility of articles
Readability of sentences
×
Please rate each item regarding Game8.co's Usability of the Site.
Ease of finding information
Very Dissatisfied
Somewhat Dissatisfied
Fine
Somewhat Satisfied
Highly Satisfied
Loading Speed
Use of Color
Font Size
Visibility of Images
Easy to Understand Layout
×
Please rate each item regarding Game8.co's Message Boards, Comments.
Ease of Writing
Very Dissatisfied
Somewhat Dissatisfied
Fine
Somewhat Satisfied
Highly Satisfied
Readability
Ease in Finding Information
Comment Quality
Comment Quantity
Admin Response
×
Please rate each item regarding Game8.co's Site's new design.
Please rate our site's new design
Very Dissatisfied
Somewhat Dissatisfied
Fine
Somewhat Satisfied
Highly Satisfied
Do you think that the website's design change makes the site easier to use?
Has the new design made it easier for you to find information on the site?
Has the new design improved the overall visual appeal of the site?
How would you rate your overall satisfaction with the new design of the site?
×
How likely are you to recommend Game8 to someone you know?
Very Unlikely
0
1
2
3
4
5
6
7
8
9
10
Very Likely
If you have other opinions regarding potential improvement to the website, please share them with us. We would appreciate your honest opinion.
Note: This is a free response section, so you can proceed without entering anything.
Note: Please be sure not to enter any kind of personal information into your response.
Note: Please be sure not to enter any kind of personal information into your response.
×
Thank You
×
Thank you for participating in our survey! Your answers will help us to improve the quality of our website and services.
We hope you continue to make use of Game8.
We hope you continue to make use of Game8.
Close
Rankings
- We could not find the message board you were looking for.
Gaming News


![Everwind Review [Early Access] | The Shaky First Step to A Very Long Journey](https://img.game8.co/4440226/ab079b1153298a042633dd1ef51e878e.png/thumb)

![Monster Hunter Stories 3 Review [First Impressions] | Simply Rejuvenating](https://img.game8.co/4438641/2a31b7702bd70e78ec8efd24661dacda.jpeg/thumb)
Popular Games

Genshin Impact Walkthrough & Guides Wiki
Honkai: Star Rail Walkthrough & Guides Wiki
Umamusume: Pretty Derby Walkthrough & Guides Wiki
Pokemon Pokopia Walkthrough & Guides Wiki
Resident Evil Requiem (RE9) Walkthrough & Guides Wiki
Monster Hunter Wilds Walkthrough & Guides Wiki
Wuthering Waves Walkthrough & Guides Wiki
Arknights: Endfield Walkthrough & Guides Wiki
Pokemon FireRed and LeafGreen (FRLG) Walkthrough & Guides Wiki
Pokemon TCG Pocket (PTCGP) Strategies & Guides Wiki


Recommended Games
Diablo 4: Vessel of Hatred Walkthrough & Guides Wiki
Fire Emblem Heroes (FEH) Walkthrough & Guides Wiki
Yu-Gi-Oh! Master Duel Walkthrough & Guides Wiki
Super Smash Bros. Ultimate Walkthrough & Guides Wiki
Pokemon Brilliant Diamond and Shining Pearl (BDSP) Walkthrough & Guides Wiki
Elden Ring Shadow of the Erdtree Walkthrough & Guides Wiki
Monster Hunter World Walkthrough & Guides Wiki
The Legend of Zelda: Tears of the Kingdom Walkthrough & Guides Wiki
Persona 3 Reload Walkthrough & Guides Wiki
Cyberpunk 2077: Ultimate Edition Walkthrough & Guides Wiki


All rights reserved
© 2020 Sony Interactive Entertainment LLC. Created and developed by Naughty Dog LLC
The copyrights of videos of games used in our content and other intellectual property rights belong to the provider of the game.
The contents we provide on this site were created personally by members of the Game8 editorial department.
We refuse the right to reuse or repost content taken without our permission such as data or images to other sites.